
Instruction Manual
Page 2
... not expose to high temperature above 60°C (140°F) such as hammering, dropping or stepping on the bottom. Record the serial number in fire. DSC-TX100/TX100V Serial No Model No. Observe the following cautions. • Do not disassemble. • Do not crush and do not expose the battery pack to... and serial numbers are located on it. • Do not short circuit and do not expose the unit to these numbers whenever you call your Sony dealer regarding this product. Model No.
... not expose to high temperature above 60°C (140°F) such as hammering, dropping or stepping on the bottom. Record the serial number in fire. DSC-TX100/TX100V Serial No Model No. Observe the following cautions. • Do not disassemble. • Do not crush and do not expose the battery pack to... and serial numbers are located on it. • Do not short circuit and do not expose the unit to these numbers whenever you call your Sony dealer regarding this product. Model No.

Instruction Manual
Page 3
...this camera only, and should not be used with the same or equivalent type recommended by Sony. • Dispose of the FCC Rules. If some trouble occurs while using a genuine Sony battery charger or a device that may call toll free 1-800-822-8837, or visit...(mains lead), if supplied, is an internationally recognized safety organization. For more information regarding recycling of rechargeable batteries, call : Sony Customer Information Center 1-800-222-SONY (7669). For Customers in the U.S.A. This Class B digital apparatus complies with Part 15 of used rechargeable batteries to the ...
...this camera only, and should not be used with the same or equivalent type recommended by Sony. • Dispose of the FCC Rules. If some trouble occurs while using a genuine Sony battery charger or a device that may call toll free 1-800-822-8837, or visit...(mains lead), if supplied, is an internationally recognized safety organization. For more information regarding recycling of rechargeable batteries, call : Sony Customer Information Center 1-800-222-SONY (7669). For Customers in the U.S.A. This Class B digital apparatus complies with Part 15 of used rechargeable batteries to the ...
Instruction Manual
Page 4
... Information Declaration of FCC Rules. Connect the equipment into an outlet on , the user is subject to Subpart B of Part 15 of Conformity Trade Name: SONY Model No.: DSC-TX100V Responsible Party: Sony Electronics Inc.
... Information Declaration of FCC Rules. Connect the equipment into an outlet on , the user is subject to Subpart B of Part 15 of Conformity Trade Name: SONY Model No.: DSC-TX100V Responsible Party: Sony Electronics Inc.

Instruction Manual
Page 5
...has been tested and found compliant with separate collection systems) This symbol on the product or on its packaging indicates that this DSC-TX100V Digital Still Camera is in compliance with the essential requirements and other European countries with the limits set out in the EMC ... consequences for the customers in the countries applying EU Directives The manufacturer of the Directive 1999/5/EC. For Customers in Europe Hereby, Sony Corporation, declares that this product shall not be treated as household waste. Instead it shall be handed over to discontinue midway (fail...
...has been tested and found compliant with separate collection systems) This symbol on the product or on its packaging indicates that this DSC-TX100V Digital Still Camera is in compliance with the essential requirements and other European countries with the limits set out in the EMC ... consequences for the customers in the countries applying EU Directives The manufacturer of the Directive 1999/5/EC. For Customers in Europe Hereby, Sony Corporation, declares that this product shall not be treated as household waste. Instead it shall be handed over to discontinue midway (fail...

Instruction Manual
Page 6
... for safety, performance or data integrity reasons require a permanent connection with an incorporated battery, this battery should lose the fuse cover, please contact your nearest Sony service station. If you will help prevent potentially negative consequences for the recycling of electrical and electronic equipment. For all other European countries with separate...
... for safety, performance or data integrity reasons require a permanent connection with an incorporated battery, this battery should lose the fuse cover, please contact your nearest Sony service station. If you will help prevent potentially negative consequences for the recycling of electrical and electronic equipment. For all other European countries with separate...
Instruction Manual
Page 7
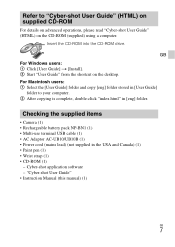
Refer to your computer. 2 After copying is complete, double-click "index.html" in [eng] folder. Checking the supplied items • Camera (1) • Rechargeable battery pack NP-BN1 (1) • Multi-use terminal USB cable (1) • AC Adaptor AC-UB10/UB10B (1) • Power cord (mains lead) (not supplied in [User Guide] folder to "Cyber-shot User Guide" (HTML) on supplied CD-ROM For details on advanced operations, please read "Cyber-shot User Guide" (HTML) on the desktop. GB For Windows users: 1 Click [User Guide] t [Install]. 2 Start "User Guide" from the shortcut on the CD-...
Refer to your computer. 2 After copying is complete, double-click "index.html" in [eng] folder. Checking the supplied items • Camera (1) • Rechargeable battery pack NP-BN1 (1) • Multi-use terminal USB cable (1) • AC Adaptor AC-UB10/UB10B (1) • Power cord (mains lead) (not supplied in [User Guide] folder to "Cyber-shot User Guide" (HTML) on supplied CD-ROM For details on advanced operations, please read "Cyber-shot User Guide" (HTML) on the desktop. GB For Windows users: 1 Click [User Guide] t [Install]. 2 Start "User Guide" from the shortcut on the CD-...
Instruction Manual
Page 8
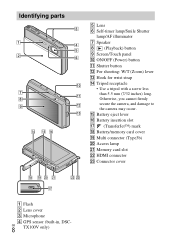
..., and damage to the camera may occur. GB 8 TX100V only) O Battery eject lever P Battery insertion slot Q (TransferJet™) mark R Battery/memory card cover S Multi connector (Type3b) T Access lamp U Memory card slot V HDMI connector W Connector cover A Flash B Lens cover C Microphone D GPS sensor (built-in, DSC- Identifying parts E Lens F Self-timer lamp/Smile Shutter...
..., and damage to the camera may occur. GB 8 TX100V only) O Battery eject lever P Battery insertion slot Q (TransferJet™) mark R Battery/memory card cover S Multi connector (Type3b) T Access lamp U Memory card slot V HDMI connector W Connector cover A Flash B Lens cover C Microphone D GPS sensor (built-in, DSC- Identifying parts E Lens F Self-timer lamp/Smile Shutter...

Instruction Manual
Page 9
Inserting the battery pack Eject lever GB 1 Open the cover. 2 Insert the battery pack. • While pressing the battery eject lever, insert the battery pack as illustrated. Make sure that the battery eject lever locks after insertion. Charging the battery pack For customers in the USA, Canada Power cord (Mains lead) For customers in countries/regions other than the USA and Canada Power/Charge lamp Lit: Charging Off: Charging finished GB 9
Inserting the battery pack Eject lever GB 1 Open the cover. 2 Insert the battery pack. • While pressing the battery eject lever, insert the battery pack as illustrated. Make sure that the battery eject lever locks after insertion. Charging the battery pack For customers in the USA, Canada Power cord (Mains lead) For customers in countries/regions other than the USA and Canada Power/Charge lamp Lit: Charging Off: Charging finished GB 9
Instruction Manual
Page 10
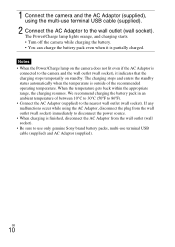
... the power source. • When charging is finished, disconnect the AC Adaptor from the wall outlet (wall socket). • Be sure to use only genuine Sony brand battery packs, multi-use terminal USB cable (supplied). 2 Connect the AC Adaptor to the camera and the wall outlet (wall socket), it is connected...
... the power source. • When charging is finished, disconnect the AC Adaptor from the wall outlet (wall socket). • Be sure to use only genuine Sony brand battery packs, multi-use terminal USB cable (supplied). 2 Connect the AC Adaptor to the camera and the wall outlet (wall socket), it is connected...
Instruction Manual
Page 11
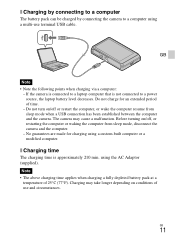
GB Note • Note the following points when charging via a computer: - Do not charge for charging using a multi-use and circumstances. The camera may take longer depending on conditions of use terminal USB cable. No guarantees are made for an extended period of 25°C (77°F). Before turning on /off , or restarting the computer or waking the computer from sleep mode when a USB connection has been established between the computer and the camera. Charging may cause a malfunction. If the camera is connected to a laptop computer that is approximately 210 min. Do not turn ...
GB Note • Note the following points when charging via a computer: - Do not charge for charging using a multi-use and circumstances. The camera may take longer depending on conditions of use terminal USB cable. No guarantees are made for an extended period of 25°C (77°F). Before turning on /off , or restarting the computer or waking the computer from sleep mode when a USB connection has been established between the computer and the camera. Charging may cause a malfunction. If the camera is connected to a laptop computer that is approximately 210 min. Do not turn ...
Instruction Manual
Page 12
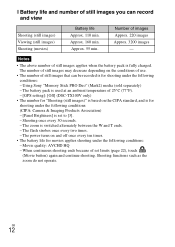
Approx. 55 min. Notes • The above number of images Approx. 220 images Approx. 3200 images - Using Sony "Memory Stick PRO Duo" (Mark2) media (sold separately) - Movie quality: AVCHD HQ - The number of still images that can record and view Shooting (still ... not operate. Shooting once every 30 seconds. - The battery pack is used at an ambient temperature of 25°C (77°F). - [GPS setting]: [Off] (DSC-TX100V only) • The number for "Shooting (still images)" is based on the conditions of use. • The number of still images may decrease depending on...
Approx. 55 min. Notes • The above number of images Approx. 220 images Approx. 3200 images - Using Sony "Memory Stick PRO Duo" (Mark2) media (sold separately) - Movie quality: AVCHD HQ - The number of still images that can record and view Shooting (still ... not operate. Shooting once every 30 seconds. - The battery pack is used at an ambient temperature of 25°C (77°F). - [GPS setting]: [Off] (DSC-TX100V only) • The number for "Shooting (still images)" is based on the conditions of use. • The number of still images may decrease depending on...
Instruction Manual
Page 13
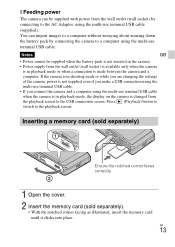
If the camera is in the camera. • Power supply from the playback screen to the playback screen. x Feeding power The camera can import images to a computer without worrying about wearing down the battery pack by connecting to the AC Adaptor, using the multi-use terminal USB cable (supplied). You can be supplied when the battery pack is made between the camera and a computer. Press (Playback) button to switch to the USB connection screen. Notes GB • Power cannot be supplied with power from the wall outlet (wall socket) by connecting the camera to a computer using ...
If the camera is in the camera. • Power supply from the playback screen to the playback screen. x Feeding power The camera can import images to a computer without worrying about wearing down the battery pack by connecting to the AC Adaptor, using the multi-use terminal USB cable (supplied). You can be supplied when the battery pack is made between the camera and a computer. Press (Playback) button to switch to the USB connection screen. Notes GB • Power cannot be supplied with power from the wall outlet (wall socket) by connecting the camera to a computer using ...
Instruction Manual
Page 14
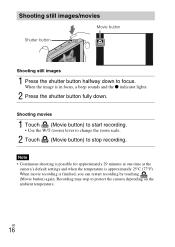
Battery pack: Slide the battery eject lever. x To remove the memory card/battery pack Memory card: Push the memory card in once. GB 14 This may damage the camera. Be sure not to as SD card. x Memory cards that you can use Memory card For still images Memory Stick PRO Duo a A Memory Stick PRO-HG Duo a Memory Stick Duo a SD memory card a B SDHC memory card a SDXC memory card a For movies a (Mark2 only) a - Note • Never remove the memory card/battery pack when the access lamp (page 8) is lit. a (Class 4 or faster) a (Class 4 or faster) a (Class 4 or ...
Battery pack: Slide the battery eject lever. x To remove the memory card/battery pack Memory card: Push the memory card in once. GB 14 This may damage the camera. Be sure not to as SD card. x Memory cards that you can use Memory card For still images Memory Stick PRO Duo a A Memory Stick PRO-HG Duo a Memory Stick Duo a SD memory card a B SDHC memory card a SDXC memory card a For movies a (Mark2 only) a - Note • Never remove the memory card/battery pack when the access lamp (page 8) is lit. a (Class 4 or faster) a (Class 4 or faster) a (Class 4 or ...

Instruction Manual
Page 15
... [NEXT]. • Midnight is indicated as 12:00 AM, and noon as 12:00 PM. 5 Touch [OK]. 6 Select the desired display color and [GPS setting] (DSC-TX100V), following the instructions on the screen, then touch [OK]. • The battery pack will run out quickly if you set [GPS setting] to [On...
... [NEXT]. • Midnight is indicated as 12:00 AM, and noon as 12:00 PM. 5 Touch [OK]. 6 Select the desired display color and [GPS setting] (DSC-TX100V), following the instructions on the screen, then touch [OK]. • The battery pack will run out quickly if you set [GPS setting] to [On...
Instruction Manual
Page 16
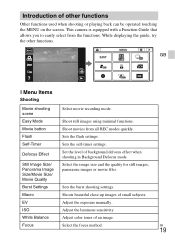
Shooting still images/movies Movie button Shutter button Shooting still images 1 Press the shutter button halfway down . When movie recording is approximately 25°C (77°F). Recording may stop recording. When the image is in focus, a beep sounds and the z indicator lights. 2 Press the shutter button fully down to protect the camera depending on the ambient temperature. GB 16 Note • Continuous shooting is possible for approximately 29 minutes at one time at the camera's default settings and when the temperature is finished, you can restart recording by touching (Movie...
Shooting still images/movies Movie button Shutter button Shooting still images 1 Press the shutter button halfway down . When movie recording is approximately 25°C (77°F). Recording may stop recording. When the image is in focus, a beep sounds and the z indicator lights. 2 Press the shutter button fully down to protect the camera depending on the ambient temperature. GB 16 Note • Continuous shooting is possible for approximately 29 minutes at one time at the camera's default settings and when the temperature is finished, you can restart recording by touching (Movie...

Instruction Manual
Page 17
x Returning to shooting images Touch . • You can also return to shooting mode by pressing the shutter button halfway down. x Selecting next/previous image Touch (Next)/ (Previous) on this camera, the registration screen for the data file appears. x Deleting an image 1 Touch (Delete) t [This Image]. Viewing images GB (Playback) 1 Press the (Playback) button. • When images on a memory card recorded with other cameras are played back on the screen. • To play back movies, touch (Playback) in the center of the screen. • To zoom in, touch the image being played back. ...
x Returning to shooting images Touch . • You can also return to shooting mode by pressing the shutter button halfway down. x Selecting next/previous image Touch (Next)/ (Previous) on this camera, the registration screen for the data file appears. x Deleting an image 1 Touch (Delete) t [This Image]. Viewing images GB (Playback) 1 Press the (Playback) button. • When images on a memory card recorded with other cameras are played back on the screen. • To play back movies, touch (Playback) in the center of the screen. • To zoom in, touch the image being played back. ...

Instruction Manual
Page 18
History: Display the last 10 items displayed in shooting/viewing mode. GB 18 Objective guide: Search functions according to your needs. In-Camera Guide This camera contains an internal function guide. Keyword: Search functions by key words. Icon guide: Search the function and meaning of the screen while viewing. 2 Select a search method from [In-Camera Guide]. This allows you to search the camera's functions according to your needs. 1 Touch (In-Camera Guide). • The mark will appear on the bottom right of displayed icons. Troubleshooting: Search common problems and ...
History: Display the last 10 items displayed in shooting/viewing mode. GB 18 Objective guide: Search functions according to your needs. In-Camera Guide This camera contains an internal function guide. Keyword: Search functions by key words. Icon guide: Search the function and meaning of the screen while viewing. 2 Select a search method from [In-Camera Guide]. This allows you to search the camera's functions according to your needs. 1 Touch (In-Camera Guide). • The mark will appear on the bottom right of displayed icons. Troubleshooting: Search common problems and ...
Instruction Manual
Page 19
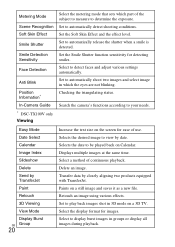
EV Adjust the exposure manually. White Balance Adjust color tones of background defocus effect when shooting in Background Defocus mode. Flash Sets the flash settings. Focus Select the focus method. Defocus Effect Set the level of an image. GB 19 Movie button Shoot movies from the functions. Burst Settings Sets the burst shooting settings. Macro Shoots beautiful close-up images of small subjects. Easy Mode Shoot still images using minimal functions. Self-Timer Sets the self-timer settings. Introduction of other functions. This camera is equipped ...
EV Adjust the exposure manually. White Balance Adjust color tones of background defocus effect when shooting in Background Defocus mode. Flash Sets the flash settings. Focus Select the focus method. Defocus Effect Set the level of an image. GB 19 Movie button Shoot movies from the functions. Burst Settings Sets the burst shooting settings. Macro Shoots beautiful close-up images of small subjects. Easy Mode Shoot still images using minimal functions. Self-Timer Sets the self-timer settings. Introduction of other functions. This camera is equipped ...
Instruction Manual
Page 20
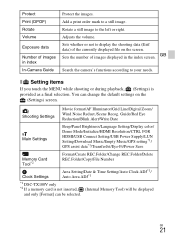
Metering Mode Scene Recognition Soft Skin Effect Smile Shutter Smile Detection Sensitivity Face Detection Anti Blink Position Information* In-Camera Guide * DSC-TX100V only Viewing Select the metering mode that sets which the eyes are not blinking. Delete an image. Set to play back images shot in groups ...
Metering Mode Scene Recognition Soft Skin Effect Smile Shutter Smile Detection Sensitivity Face Detection Anti Blink Position Information* In-Camera Guide * DSC-TX100V only Viewing Select the metering mode that sets which the eyes are not blinking. Delete an image. Set to play back images shot in groups ...
Instruction Manual
Page 21
.../Create REC.Folder/Change REC.Folder/Delete REC.Folder/Copy/File Number Clock Settings Area Setting/Date & Time Setting/Auto Clock ADJ*1/ Auto Area ADJ*1 *1 DSC-TX100V only *2 If a memory card is provided as a final selection. Shooting Settings Movie format/AF Illuminator/Grid Line/Digital Zoom/ Wind Noise Reduct./Scene Recog. Rotate...
.../Create REC.Folder/Change REC.Folder/Delete REC.Folder/Copy/File Number Clock Settings Area Setting/Date & Time Setting/Auto Clock ADJ*1/ Auto Area ADJ*1 *1 DSC-TX100V only *2 If a memory card is provided as a final selection. Shooting Settings Movie format/AF Illuminator/Grid Line/Digital Zoom/ Wind Noise Reduct./Scene Recog. Rotate...
