Instruction Manual
Page 11
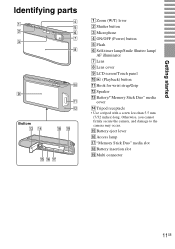
...parts Bottom A Zoom (W/T) lever B Shutter button C Microphone D ON/OFF (Power) button E Flash F Self-timer lamp/Smile Shutter lamp/ AF illuminator G Lens H Lens cover I LCD screen/Touch panel J (Playback) button K Hook for wrist strap/Grip L Speaker M Battery/"Memory Stick Duo" media cover N Tripod receptacle ...• Use a tripod with a screw less than 5.5 mm (7/32 inches) long. Otherwise, you cannot firmly secure the camera, and damage to the camera may occur. O Battery eject lever P Access lamp Q "Memory Stick Duo" media slot R Battery insertion slot S Multi connector 11GB
...parts Bottom A Zoom (W/T) lever B Shutter button C Microphone D ON/OFF (Power) button E Flash F Self-timer lamp/Smile Shutter lamp/ AF illuminator G Lens H Lens cover I LCD screen/Touch panel J (Playback) button K Hook for wrist strap/Grip L Speaker M Battery/"Memory Stick Duo" media cover N Tripod receptacle ...• Use a tripod with a screw less than 5.5 mm (7/32 inches) long. Otherwise, you cannot firmly secure the camera, and damage to the camera may occur. O Battery eject lever P Access lamp Q "Memory Stick Duo" media slot R Battery insertion slot S Multi connector 11GB

Instruction Manual
Page 14
With the terminal side facing the lens, insert the "Memory Stick Duo" media until the battery eject lever is locked. 4 Close the cover. • Closing the cover with the battery inserted incorrectly may damage the camera. Check the direction of the battery, make sure the polarity marks are facing the LCD screen, and...
With the terminal side facing the lens, insert the "Memory Stick Duo" media until the battery eject lever is locked. 4 Close the cover. • Closing the cover with the battery inserted incorrectly may damage the camera. Check the direction of the battery, make sure the polarity marks are facing the LCD screen, and...
Instruction Manual
Page 16
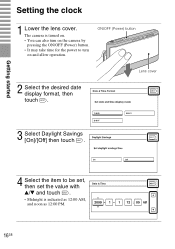
Lens cover 3 Select Daylight Savings [On]/[Off] then touch . 4 Select the item to turn on the camera by pressing the ON/OFF (Power) button. • It may take time for the power to be set, then set the value with v/V and touch . • Midnight is turned on. • You can also turn on and allow operation. Getting started Setting the clock 1 Lower the lens cover. The camera is indicated as 12:00 AM, and noon as 12:00 PM. 16GB ON/OFF (Power) button 2 Select the desired date display format, then touch .
Lens cover 3 Select Daylight Savings [On]/[Off] then touch . 4 Select the item to turn on the camera by pressing the ON/OFF (Power) button. • It may take time for the power to be set, then set the value with v/V and touch . • Midnight is turned on. • You can also turn on and allow operation. Getting started Setting the clock 1 Lower the lens cover. The camera is indicated as 12:00 AM, and noon as 12:00 PM. 16GB ON/OFF (Power) button 2 Select the desired date display format, then touch .

Instruction Manual
Page 18
Shooting/viewing images Shooting images 1 Lower the lens cover. Zoom (W/T) lever Lens cover Shooting/viewing images 3 Press the shutter button halfway down . The camera is approximately 1 cm (13/32 inches) (W)/50 cm (19 3/4 inches) (T) (from the lens). 4 Press the shutter button fully down to return. When the...shoot movies, set (REC Mode) to (Movie Mode) (page 33). 2 Hold the camera steady as illustrated. • Slide the zoom (W/T) lever to the T side to indicate that SteadyShot is shot. 18GB Shutter button SteadyShot mark AE/AF lock The image is working. is displayed to ...
Shooting/viewing images Shooting images 1 Lower the lens cover. Zoom (W/T) lever Lens cover Shooting/viewing images 3 Press the shutter button halfway down . The camera is approximately 1 cm (13/32 inches) (W)/50 cm (19 3/4 inches) (T) (from the lens). 4 Press the shutter button fully down to return. When the...shoot movies, set (REC Mode) to (Movie Mode) (page 33). 2 Hold the camera steady as illustrated. • Slide the zoom (W/T) lever to the T side to indicate that SteadyShot is shot. 18GB Shutter button SteadyShot mark AE/AF lock The image is working. is displayed to ...

Instruction Manual
Page 19
... down. Shooting/viewing images Viewing images 1 Press the (Playback) button. • When images on a "Memory Stick Duo" media recorded with other cameras cannot be played back, touch t (View Mode) t [Folder View] to shooting mode by pressing the ON/OFF (Power) button. 19GB x ...Returning to shooting images Touch . • You can also turn off the camera Close the lens cover. • You can also return to view the images. (Playback) button x Selecting next/previous image Touch (Next)/ (Previous) on the...
... down. Shooting/viewing images Viewing images 1 Press the (Playback) button. • When images on a "Memory Stick Duo" media recorded with other cameras cannot be played back, touch t (View Mode) t [Folder View] to shooting mode by pressing the ON/OFF (Power) button. 19GB x ...Returning to shooting images Touch . • You can also turn off the camera Close the lens cover. • You can also return to view the images. (Playback) button x Selecting next/previous image Touch (Next)/ (Previous) on the...

Instruction Manual
Page 57
... some cases this malfunction cannot be sure to chemical products such as you can still use the camera, but the date and time will be indicated. On the internal rechargeable backup battery This camera has an internal rechargeable battery for only short periods, it becomes completely discharged. ...strong magnetic place • In sandy or dusty places Be careful not to a warm location, moisture may condense inside the lens, you do not use the camera at all for a long time. Charging method of the internal rechargeable backup battery Insert charged battery pack in contact with ...
... some cases this malfunction cannot be sure to chemical products such as you can still use the camera, but the date and time will be indicated. On the internal rechargeable backup battery This camera has an internal rechargeable battery for only short periods, it becomes completely discharged. ...strong magnetic place • In sandy or dusty places Be careful not to a warm location, moisture may condense inside the lens, you do not use the camera at all for a long time. Charging method of the internal rechargeable backup battery Insert charged battery pack in contact with ...

Instruction Manual
Page 58
...Speed USB (USB 2.0 compliant) [LCD screen] LCD panel: Wide (16:9), 7.5 cm (3.0 type) TFT drive Total number of camera: Approx. 10.2 Megapixels Lens: Carl Zeiss Vario-Tessar 4× zoom lens f = 6.18 - 24.7 mm (35 - 140 mm (35 mm film equivalent)) F3.5 (W) - F4.6 (T) When ...modes) White balance: Automatic, Daylight, Cloudy, Fluorescent 1/2/3, Incandescent, Flash, One push Underwater White Balance: Auto, Underwater 1/2, One push Recording system: Still images: JPEG (DCF Ver. 2.0, Exif Ver. 2.21, MPF Baseline) compliant, DPOF compatible Movies: MPEG-4 Visual Recording media: Internal Memory (...
...Speed USB (USB 2.0 compliant) [LCD screen] LCD panel: Wide (16:9), 7.5 cm (3.0 type) TFT drive Total number of camera: Approx. 10.2 Megapixels Lens: Carl Zeiss Vario-Tessar 4× zoom lens f = 6.18 - 24.7 mm (35 - 140 mm (35 mm film equivalent)) F3.5 (W) - F4.6 (T) When ...modes) White balance: Automatic, Daylight, Cloudy, Fluorescent 1/2/3, Incandescent, Flash, One push Underwater White Balance: Auto, Underwater 1/2, One push Recording system: Still images: JPEG (DCF Ver. 2.0, Exif Ver. 2.21, MPF Baseline) compliant, DPOF compatible Movies: MPEG-4 Visual Recording media: Internal Memory (...

Cyber-shot® Handbook
Page 3
...long time, use a "Memory Stick" media with excellent contrast. When using this camera. 3GB Carl Zeiss lens The camera is equipped with a Carl Zeiss lens which is not a malfunction. • Be careful not to bump the lens, and be used as is to evaporate. Black, white, red, blue or green.... Notes on the LCD screen. These dots are not actual images shot using a "Memory Stick Duo" media with the quality standards of reproducing sharp images with the camera. The screen may condense inside the lens, you do not affect the recording. This moisture condensation may trail ...
...long time, use a "Memory Stick" media with excellent contrast. When using this camera. 3GB Carl Zeiss lens The camera is equipped with a Carl Zeiss lens which is not a malfunction. • Be careful not to bump the lens, and be used as is to evaporate. Black, white, red, blue or green.... Notes on the LCD screen. These dots are not actual images shot using a "Memory Stick Duo" media with the quality standards of reproducing sharp images with the camera. The screen may condense inside the lens, you do not affect the recording. This moisture condensation may trail ...

Cyber-shot® Handbook
Page 10
... Smile Shutter - - - - - - - - - - Shooting Direction - - - - - - Balance - - - Table of contents MENU/Settings Search MENU items (Shooting) You can easily select the various shooting functions from . 1 Lower the lens cover to switch to shooting mode. 2 Touch to display the MENU screen. indicate the - EV ISO - - - - - Metering Mode - - DRO Anti Blink - - - - - - - - - - - - 10GB Continued r
... Smile Shutter - - - - - - - - - - Shooting Direction - - - - - - Balance - - - Table of contents MENU/Settings Search MENU items (Shooting) You can easily select the various shooting functions from . 1 Lower the lens cover to switch to shooting mode. 2 Touch to display the MENU screen. indicate the - EV ISO - - - - - Metering Mode - - DRO Anti Blink - - - - - - - - - - - - 10GB Continued r

Cyber-shot® Handbook
Page 15
...the paint pen. Bottom * Using the paint pen The paint pen is already attached to the wrist strap. Index 15GB Do not carry the camera by being dropped. Table of contents Operation Search MENU/Settings Search Names of parts A Zoom (W/T) lever (31, 33) B Shutter button C... Microphone D ON/OFF (Power) button E Flash F Self-timer lamp/Smile Shutter lamp/ AF illuminator G Lens H Lens cover I LCD screen/Touch panel J (Playback) button (32) K Hook for wrist strap*/Grip L Speaker M Battery/"Memory Stick Duo" media cover N Tripod receptacle O...
...the paint pen. Bottom * Using the paint pen The paint pen is already attached to the wrist strap. Index 15GB Do not carry the camera by being dropped. Table of contents Operation Search MENU/Settings Search Names of parts A Zoom (W/T) lever (31, 33) B Shutter button C... Microphone D ON/OFF (Power) button E Flash F Self-timer lamp/Smile Shutter lamp/ AF illuminator G Lens H Lens cover I LCD screen/Touch panel J (Playback) button (32) K Hook for wrist strap*/Grip L Speaker M Battery/"Memory Stick Duo" media cover N Tripod receptacle O...

Cyber-shot® Handbook
Page 21
...with the setting adjusted automatically. Table of contents Operation Search REC Mode You can select various settings using the flash when composing burst shots taken in high-speed. Allows you to shoot with reduced blur in low light scenes without using the menu. Allows you to ...shoot a panoramic image after composing images. Also you can select the shooting mode based on condition and objective. 1 Lower the lens cover to switch to shooting mode. 2 Touch (REC Mode) t desired mode (Intelligent Auto Adjustment) (Sweep Panorama) (Movie Mode) (Program Auto) (...
...with the setting adjusted automatically. Table of contents Operation Search REC Mode You can select various settings using the flash when composing burst shots taken in high-speed. Allows you to shoot with reduced blur in low light scenes without using the menu. Allows you to ...shoot a panoramic image after composing images. Also you can select the shooting mode based on condition and objective. 1 Lower the lens cover to switch to shooting mode. 2 Touch (REC Mode) t desired mode (Intelligent Auto Adjustment) (Sweep Panorama) (Movie Mode) (Program Auto) (...

Cyber-shot® Handbook
Page 22
.... For details, see page 59. Either recompose the shot or change the focus setting (page 56). • Focusing may be difficult in Intelligent Auto Adjustment mode. Index 22GB This function lets the camera automatically recognize the shooting conditions and shoot the image. ...There is approximately 8 cm (3 1/4 inches) (1 cm (13/32 inches) in the Close focus mode when you to shoot still images with the setting adjusted automatically. 1 Lower the lens cover to switch to shooting mode. 2 (REC Mode) t Adjustment) (Intelligent Auto 3 Press the shutter button fully down. Table...
.... For details, see page 59. Either recompose the shot or change the focus setting (page 56). • Focusing may be difficult in Intelligent Auto Adjustment mode. Index 22GB This function lets the camera automatically recognize the shooting conditions and shoot the image. ...There is approximately 8 cm (3 1/4 inches) (1 cm (13/32 inches) in the Close focus mode when you to shoot still images with the setting adjusted automatically. 1 Lower the lens cover to switch to shooting mode. 2 (REC Mode) t Adjustment) (Intelligent Auto 3 Press the shutter button fully down. Table...

Cyber-shot® Handbook
Page 23
... press the shutter button fully down. Objects are moving - Objects are too close to the camera - Table of contents Sweep Panorama Allows you to create a panoramic image from composed images. 1 Lower the lens cover to switch to shooting mode. 2 (REC Mode) t (Sweep Panorama) Operation Search ...MENU/Settings Search Index 3 Hold the camera at the position where you cannot pan the camera across the entire subject within the given time, a ...
... press the shutter button fully down. Objects are moving - Objects are too close to the camera - Table of contents Sweep Panorama Allows you to create a panoramic image from composed images. 1 Lower the lens cover to switch to shooting mode. 2 (REC Mode) t (Sweep Panorama) Operation Search ...MENU/Settings Search Index 3 Hold the camera at the position where you cannot pan the camera across the entire subject within the given time, a ...

Cyber-shot® Handbook
Page 25
Operation Search MENU/Settings Search Index 25GB Table of contents Movie Mode Allows you to record movies with audio. 1 Lower the lens cover to switch to shooting mode. 2 (REC Mode) t (Movie Mode) 3 Press the shutter button fully down. 4 To stop shooting, press the shutter button fully down again.
Operation Search MENU/Settings Search Index 25GB Table of contents Movie Mode Allows you to record movies with audio. 1 Lower the lens cover to switch to shooting mode. 2 (REC Mode) t (Movie Mode) 3 Press the shutter button fully down. 4 To stop shooting, press the shutter button fully down again.

Cyber-shot® Handbook
Page 26
Table of contents Program Auto Allows you can select various settings using the menu. 1 Lower the lens cover to switch to shoot with the exposure adjusted automatically (both the shutter speed and the aperture value). Operation Search MENU/Settings Search Index 26GB Also you to shooting mode. 2 (REC Mode) t (Program Auto) 3 Press the shutter button fully down.
Table of contents Program Auto Allows you can select various settings using the menu. 1 Lower the lens cover to switch to shoot with the exposure adjusted automatically (both the shutter speed and the aperture value). Operation Search MENU/Settings Search Index 26GB Also you to shooting mode. 2 (REC Mode) t (Program Auto) 3 Press the shutter button fully down.

Cyber-shot® Handbook
Page 27
... or water falls • Smile Shutter cannot be used. • When using the flash to reduce the subject blur. 1 Lower the lens cover to switch to the camera - Table of shots are taken, and image processing is applied to (High Sensitivity). In such cases, set Scene Selection to reduce subject blur and noise...
... or water falls • Smile Shutter cannot be used. • When using the flash to reduce the subject blur. 1 Lower the lens cover to switch to the camera - Table of shots are taken, and image processing is applied to (High Sensitivity). In such cases, set Scene Selection to reduce subject blur and noise...

Cyber-shot® Handbook
Page 28
...change such as waves or water falls • Smile Shutter cannot be used. • When using a tripod. 1 Lower the lens cover to switch to the camera - Image with little contrast such as fluorescent lighting, block noise may occur. In these cases, set Scene Selection to reduce subject ...blur and noise. Table of shots are taken, and image processing is not effectively reduced in the following situations: - Image with ...
...change such as waves or water falls • Smile Shutter cannot be used. • When using a tripod. 1 Lower the lens cover to switch to the camera - Image with little contrast such as fluorescent lighting, block noise may occur. In these cases, set Scene Selection to reduce subject ...blur and noise. Table of shots are taken, and image processing is not effectively reduced in the following situations: - Image with ...

Cyber-shot® Handbook
Page 29
... appears white. Table of contents Operation Search MENU/Settings Search Scene Selection Allows you to shoot with preset settings according to the scene. 1 Lower the lens cover to switch to shooting mode. 2 (REC Mode) t desired mode (Scene Selection) t (High Sensitivity) Allows you to shoot images without losing the dark atmosphere of...
... appears white. Table of contents Operation Search MENU/Settings Search Scene Selection Allows you to shoot with preset settings according to the scene. 1 Lower the lens cover to switch to shooting mode. 2 (REC Mode) t desired mode (Scene Selection) t (High Sensitivity) Allows you to shoot images without losing the dark atmosphere of...

Cyber-shot® Handbook
Page 31
MENU/Settings Search Index 31GB Move the zoom (W/T) lever to the T side to zoom in and move to the W side to the W side when shooting in Sweep Panorama mode. Table of contents Operation Search Zoom You can enlarge images up to 4×. 1 Lower the lens cover to switch to shooting mode. 2 Move the zoom (W/T) lever. T side W side Notes • The camera zooms slowly while shooting a movie. • Zoom is locked to zoom out. • When the zoom scale exceeds 4×, see page 90. The camera's optical zoom function can enlarge the image when shooting.
MENU/Settings Search Index 31GB Move the zoom (W/T) lever to the T side to zoom in and move to the W side to the W side when shooting in Sweep Panorama mode. Table of contents Operation Search Zoom You can enlarge images up to 4×. 1 Lower the lens cover to switch to shooting mode. 2 Move the zoom (W/T) lever. T side W side Notes • The camera zooms slowly while shooting a movie. • Zoom is locked to zoom out. • When the zoom scale exceeds 4×, see page 90. The camera's optical zoom function can enlarge the image when shooting.

Cyber-shot® Handbook
Page 37
... the minimum necessary functions. This function lets the camera automatically recognize the shooting conditions and shoot the image...Scene Recognition operates in Easy Mode (Shooting) Smile Shutter: Touch (Smile). For details, see . 1 Lower the lens cover to switch to shooting mode. 2 t (Easy Mode) t [OK] Notes • The battery charge is... recognized. Table of contents Operation Search MENU/Settings Search Easy Mode Allows you shoot still images using a tripod), (Backlight), (Backlight Portrait), (Landscape), (Macro), (Close Focus) or (Portrait), and...
... the minimum necessary functions. This function lets the camera automatically recognize the shooting conditions and shoot the image...Scene Recognition operates in Easy Mode (Shooting) Smile Shutter: Touch (Smile). For details, see . 1 Lower the lens cover to switch to shooting mode. 2 t (Easy Mode) t [OK] Notes • The battery charge is... recognized. Table of contents Operation Search MENU/Settings Search Easy Mode Allows you shoot still images using a tripod), (Backlight), (Backlight Portrait), (Landscape), (Macro), (Close Focus) or (Portrait), and...


