
Cyber-shot® Handbook
Page 1
Table of contents Operation Search HOME/MENU Search Index Cyber-shot Handbook DSC-T90/T900 © 2009 Sony Corporation GB 4-130-938-11(1)
Table of contents Operation Search HOME/MENU Search Index Cyber-shot Handbook DSC-T90/T900 © 2009 Sony Corporation GB 4-130-938-11(1)
Cyber-shot® Handbook
Page 3
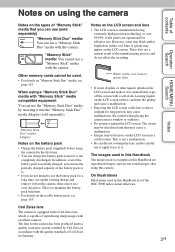
... lens The camera is equipped with the camera. The lens for effective use a "Memory Stick" media with a Carl Zeiss lens which is manufactured using the camera for the first time. • You can harm the quality and cause a malfunction. • Exposing the LCD screen or the lens to maintain the battery pack functions. • For details on the LCD screen and make it . Notes on the LCD screen. Black, white, red, blue or green...
... lens The camera is equipped with the camera. The lens for effective use a "Memory Stick" media with a Carl Zeiss lens which is manufactured using the camera for the first time. • You can harm the quality and cause a malfunction. • Exposing the LCD screen or the lens to maintain the battery pack functions. • For details on the LCD screen and make it . Notes on the LCD screen. Black, white, red, blue or green...

Cyber-shot® Handbook
Page 17
... shooting and playback. zUsing [Image Only] playback • Select an image by touching the left and right sides of the screen, [Normal] display mode is selected temporarily. When you touch the center of the screen. Display Setup This sets whether or not to the previous display mode. 17GB Touch the center of the screen to return to display the operation buttons and icons on the screen. (Normal) The operation buttons and the icons...
... shooting and playback. zUsing [Image Only] playback • Select an image by touching the left and right sides of the screen, [Normal] display mode is selected temporarily. When you touch the center of the screen. Display Setup This sets whether or not to the previous display mode. 17GB Touch the center of the screen to return to display the operation buttons and icons on the screen. (Normal) The operation buttons and the icons...
Cyber-shot® Handbook
Page 30
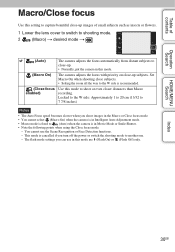
... than Macro recording. Locked to the W side: Approximately 1 to 20 cm (13/32 to 7 7/8 inches) Notes • The Auto Focus speed becomes slower when you shoot images in the Macro or Close focus mode. • You cannot select (Macro On) when the camera is in Intelligent Auto Adjustment mode. • Macro mode is recommended. The flash mode settings you turn off the power or switch the shooting mode to (Auto) when the camera is cancelled if you can use...
... than Macro recording. Locked to the W side: Approximately 1 to 20 cm (13/32 to 7 7/8 inches) Notes • The Auto Focus speed becomes slower when you shoot images in the Macro or Close focus mode. • You cannot select (Macro On) when the camera is in Intelligent Auto Adjustment mode. • Macro mode is recommended. The flash mode settings you turn off the power or switch the shooting mode to (Auto) when the camera is cancelled if you can use...

Cyber-shot® Handbook
Page 90
... the icon will turn green. • After two images are open in the second image, only the second image is the Anti Blink function?". 90GB Continued r Scene Recognition icon The camera recognizes the following types of contents Scene Recognition The camera automatically detects shooting conditions, and then takes the shot. Operation Search HOME/MENU Search Index When you use DSC-T900, set the mode switch to (Still image). 1 Lower the lens cover to switch to shooting mode. 2 (REC Mode) t (Intelligent Auto Adjustment) t or 3 t mode...
... the icon will turn green. • After two images are open in the second image, only the second image is the Anti Blink function?". 90GB Continued r Scene Recognition icon The camera recognizes the following types of contents Scene Recognition The camera automatically detects shooting conditions, and then takes the shot. Operation Search HOME/MENU Search Index When you use DSC-T900, set the mode switch to (Still image). 1 Lower the lens cover to switch to shooting mode. 2 (REC Mode) t (Intelligent Auto Adjustment) t or 3 t mode...
Cyber-shot® Handbook
Page 93
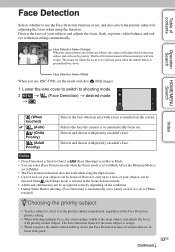
... adjusts the focus with priority on child's face. Table of contents Operation Search Face Detection Selects whether to use the Face Detection function or not, and also selects the priority subject for the main subject is orange. • When you use DSC-T900, set the mode switch to (Still image). 1 Lower the lens cover to switch to shooting mode. 2 t (Face Detection) t desired mode t HOME/MENU Search Index (When touched) (Auto...
... adjusts the focus with priority on child's face. Table of contents Operation Search Face Detection Selects whether to use the Face Detection function or not, and also selects the priority subject for the main subject is orange. • When you use DSC-T900, set the mode switch to (Still image). 1 Lower the lens cover to switch to shooting mode. 2 t (Face Detection) t desired mode t HOME/MENU Search Index (When touched) (Auto...

Cyber-shot® Handbook
Page 96
... work depending on the LCD screen. Shoot again as necessary. When using the flash - During burst or bracket shooting - Table of contents Operation Search Anti Blink When Scene Selection is active, the Anti Blink function operates so that images with the subject's eyes closed are recorded, the message "Blinked eye detected" is displayed on the situation. • When the Anti Blink function is set to [Auto] but only images with the subject's eyes open are shooting an image...
... work depending on the LCD screen. Shoot again as necessary. When using the flash - During burst or bracket shooting - Table of contents Operation Search Anti Blink When Scene Selection is active, the Anti Blink function operates so that images with the subject's eyes closed are recorded, the message "Blinked eye detected" is displayed on the situation. • When the Anti Blink function is set to [Auto] but only images with the subject's eyes open are shooting an image...

Cyber-shot® Handbook
Page 121
... LCD screen of contents Operation Search HOME/MENU Search Viewing an image on a SD TV (DSC-T900) For details on the TV and set the input. 5 Press (Playback) button to match that of TV the camera is not displayed at the TV side. Index 121GB VIDEO AUDIO (Playback) button 1 To audio/video input jacks Multi-output stand (supplied) AV Cable (supplied) 2 To the A/V OUT (STEREO) jack 4 Turn on using this camera...
... LCD screen of contents Operation Search HOME/MENU Search Viewing an image on a SD TV (DSC-T900) For details on the TV and set the input. 5 Press (Playback) button to match that of TV the camera is not displayed at the TV side. Index 121GB VIDEO AUDIO (Playback) button 1 To audio/video input jacks Multi-output stand (supplied) AV Cable (supplied) 2 To the A/V OUT (STEREO) jack 4 Turn on using this camera...
Cyber-shot® Handbook
Page 122
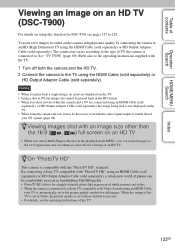
... using this function for still images. Notes • When you play back a single image, no icons are displayed on the TV. • Images shot in [VGA] image size cannot be played back in the HD format. • When you shoot movies while the camera and a TV are connected using an HDMI Cable (sold separately), or HD Output Adaptor Cable (sold separately) the image being shot is compatible with an image size other than the 16:9 ( , ) full screen...
... using this function for still images. Notes • When you play back a single image, no icons are displayed on the TV. • Images shot in [VGA] image size cannot be played back in the HD format. • When you shoot movies while the camera and a TV are connected using an HDMI Cable (sold separately), or HD Output Adaptor Cable (sold separately) the image being shot is compatible with an image size other than the 16:9 ( , ) full screen...

Cyber-shot® Handbook
Page 123
... / displayed on the LCD screen of the camera and/or connected equipment. • This function may not be connected using output terminals, no video and sound are produced. the HDMI jack (Playback) button 1 To the HDMI jack Multi-output stand (supplied) 2 To the HDMI jack HDMI Cable (sold separately) 3 Turn on the TV. Images shot with the camera appear on the TV and set the input. 4 Press (Playback) button to...
... / displayed on the LCD screen of the camera and/or connected equipment. • This function may not be connected using output terminals, no video and sound are produced. the HDMI jack (Playback) button 1 To the HDMI jack Multi-output stand (supplied) 2 To the HDMI jack HDMI Cable (sold separately) 3 Turn on the TV. Images shot with the camera appear on the TV and set the input. 4 Press (Playback) button to...

Cyber-shot® Handbook
Page 124
Deletes recorded images. Selects the display format for viewing multiple images. Table of contents Operation Search HOME/MENU Search Using "BRAVIA" Sync (Compatible with SYNC MENU) When you use a TV that has "BRAVIA" Sync (compatible with SYNC MENU) support, you can operate the playback functions of the camera using the remote controller supplied with the TV by connecting the camera to the TV using the HDMI Cable (sold separately). 1 t (Settings) t [Main Settings] t [CTRL FOR HDMI] t [On] t 2 Attach the camera to the multi...
Deletes recorded images. Selects the display format for viewing multiple images. Table of contents Operation Search HOME/MENU Search Using "BRAVIA" Sync (Compatible with SYNC MENU) When you use a TV that has "BRAVIA" Sync (compatible with SYNC MENU) support, you can operate the playback functions of the camera using the remote controller supplied with the TV by connecting the camera to the TV using the HDMI Cable (sold separately). 1 t (Settings) t [Main Settings] t [CTRL FOR HDMI] t [On] t 2 Attach the camera to the multi...
Cyber-shot® Handbook
Page 133
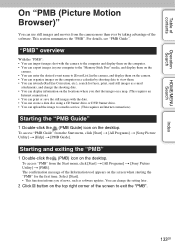
... the screen to [Event List] in your computer to the "Memory Stick Duo" media, and display them on the camera. • You can organize images on the computer on the desktop. To access "PMB" from the Start menu, click [Start] t [All Programs] t [Sony Picture Utility] t [Help] t [PMB Guide]. The confirmation message of the software. You can retouch (Red Eye Correction, etc.), search for the first time. For...
... the screen to [Event List] in your computer to the "Memory Stick Duo" media, and display them on the camera. • You can organize images on the computer on the desktop. To access "PMB" from the Start menu, click [Start] t [All Programs] t [Sony Picture Utility] t [Help] t [PMB Guide]. The confirmation message of the software. You can retouch (Red Eye Correction, etc.), search for the first time. For...

Cyber-shot® Handbook
Page 140
... folder where the images you want to import are copied to the hard disk. • For details on the storage location of contents Operation Search HOME/MENU Search Importing and viewing images on 4 Connect the camera to the multi-output stand. Index 140GB The image files are stored. 6 Drag and drop the image files to the hard disk icon. DSC-T90: Insert the sufficiently charged battery pack into the camera, or connect the...
... folder where the images you want to import are copied to the hard disk. • For details on the storage location of contents Operation Search HOME/MENU Search Importing and viewing images on 4 Connect the camera to the multi-output stand. Index 140GB The image files are stored. 6 Drag and drop the image files to the hard disk icon. DSC-T90: Insert the sufficiently charged battery pack into the camera, or connect the...
Cyber-shot® Handbook
Page 144
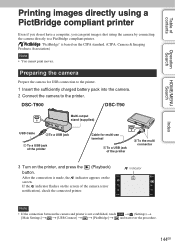
DSC-T900 DSC-T90 Multi-output stand (supplied) USB Cable 2To a USB jack 1 To a USB jack of the printer Cable for USB connection to the printer. 1 Insert the sufficiently charged battery pack into the camera. 2 Connect the camera to a PictBridge compliant printer. After the connection is not established, touch t (Settings) t [Main Settings] t t [USB Connect] t t [PictBridge] t and start over the procedure. Table of contents Operation Search HOME/MENU Search Printing images directly using a PictBridge compliant printer Even if you do not have a computer...
DSC-T900 DSC-T90 Multi-output stand (supplied) USB Cable 2To a USB jack 1 To a USB jack of the printer Cable for USB connection to the printer. 1 Insert the sufficiently charged battery pack into the camera. 2 Connect the camera to a PictBridge compliant printer. After the connection is not established, touch t (Settings) t [Main Settings] t t [USB Connect] t t [PictBridge] t and start over the procedure. Table of contents Operation Search HOME/MENU Search Printing images directly using a PictBridge compliant printer Even if you do not have a computer...

Cyber-shot® Handbook
Page 148
... battery pack using the AC Adaptor (sold separately). Use the battery charger to 86°F)). • For details, see page 165. Table of contents Operation Search HOME/MENU Search Battery pack and power Cannot insert the battery pack. • Make sure the direction of the (screen display) is incorrect. • The battery charge will be inappropriate for charging. In this case, a message is displayed on the camera and battery temperature, the power...
... battery pack using the AC Adaptor (sold separately). Use the battery charger to 86°F)). • For details, see page 165. Table of contents Operation Search HOME/MENU Search Battery pack and power Cannot insert the battery pack. • Make sure the direction of the (screen display) is incorrect. • The battery charge will be inappropriate for charging. In this case, a message is displayed on the camera and battery temperature, the power...
Cyber-shot® Handbook
Page 149
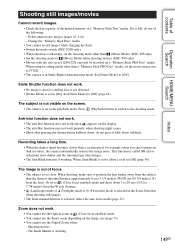
...; Set the shooting mode to (Movie Mode) when shooting movies (DSC-T90 only). • Movies with the size set to [Off]. Change the "Memory Stick Duo" media. • You cannot record images while charging the flash. • Switch the mode switch (DSC-T900 only). • When shooting a still image, set the shooting mode other than a certain speed, for example, when you shoot images in (Close focus enabled) mode. • You cannot use the Smart zoom depending on the display. • The anti-blur function may not work . •...
...; Set the shooting mode to (Movie Mode) when shooting movies (DSC-T90 only). • Movies with the size set to [Off]. Change the "Memory Stick Duo" media. • You cannot record images while charging the flash. • Switch the mode switch (DSC-T900 only). • When shooting a still image, set the shooting mode other than a certain speed, for example, when you shoot images in (Close focus enabled) mode. • You cannot use the Smart zoom depending on the display. • The anti-blur function may not work . •...
Cyber-shot® Handbook
Page 152
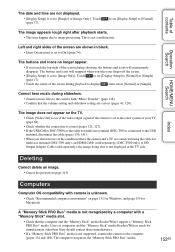
... set [Display Setup] to [Normal] The image appears rough right after playback starts. • This may happen due to see if the video output signal of the camera is not displayed at the TV side. The buttons and icons no longer appear. • If you take your TV (page 68). • Check whether the connection is correct (pages 121, 127). • If the USB Cable (DSC-T900...
... set [Display Setup] to [Normal] The image appears rough right after playback starts. • This may happen due to see if the video output signal of the camera is not displayed at the TV side. The buttons and icons no longer appear. • If you take your TV (page 68). • Check whether the connection is correct (pages 121, 127). • If the USB Cable (DSC-T900...
Cyber-shot® Handbook
Page 155
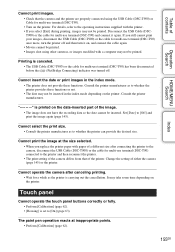
... you still cannot print your images, disconnect the USB Cable (DSC-T900) or the cable for multi-use terminal (DSC-T90) and connect it on, and connect the cable again. • Movies cannot be printed. • Images shot using the USB Cable (DSC-T900) or Cable for multi-use terminal (DSC-T90) has been disconnected before the (PictBridge Connecting) indicator was turned off and then turn it again. Cannot insert the date or print images in the index mode depending on the printer. The...
... you still cannot print your images, disconnect the USB Cable (DSC-T900) or the cable for multi-use terminal (DSC-T90) and connect it on, and connect the cable again. • Movies cannot be printed. • Images shot using the USB Cable (DSC-T900) or Cable for multi-use terminal (DSC-T90) has been disconnected before the (PictBridge Connecting) indicator was turned off and then turn it again. Cannot insert the date or print images in the index mode depending on the printer. The...

Cyber-shot® Handbook
Page 158
... used in Folder View mode (page 50). 158GB Error formatting internal memory Error formatting "Memory Stick" • Format the media again (page 53). Set the switch to cool • The camera temperature has risen. Read only "Memory Stick" • The camera cannot record or delete images on this camera, view the images in the camera (page 163). The power may turn off and then on again. This "Memory Stick" may be used in the camera (page 163). • The "Memory...
... used in Folder View mode (page 50). 158GB Error formatting internal memory Error formatting "Memory Stick" • Format the media again (page 53). Set the switch to cool • The camera temperature has risen. Read only "Memory Stick" • The camera cannot record or delete images on this camera, view the images in the camera (page 163). The power may turn off and then on again. This "Memory Stick" may be used in the camera (page 163). • The "Memory...
Cyber-shot® Handbook
Page 160
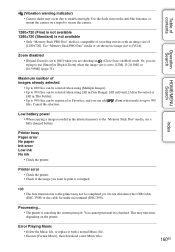
... the internal memory to [VGA]. Index • The data transmission to the printer may take time, depending on a tripod to 999 files. Use the flash, turn on the anti-blur function, or mount the camera on the printer. Error Playing Music • Delete the Music file, or replace it is compatible of recording movies with a normal Music file. • Execute [Format Music], then download a new Music files. 160GB Table of [1280×720]. You cannot print...
... the internal memory to [VGA]. Index • The data transmission to the printer may take time, depending on a tripod to 999 files. Use the flash, turn on the anti-blur function, or mount the camera on the printer. Error Playing Music • Delete the Music file, or replace it is compatible of recording movies with a normal Music file. • Execute [Format Music], then download a new Music files. 160GB Table of [1280×720]. You cannot print...


