Instruction Manual
Page 2
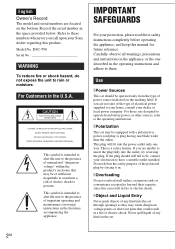
... outlets, extension cords or convenience receptacles beyond their capacity, since this product. IMPORTANT SAFEGUARDS For your Sony dealer regarding this can result in fire or electric shock. [ Object and Liquid Entry Never push objects of important operating and maintenance (servicing) instructions in the U.S.A. Model No. This symbol is intended to alert the user to persons. Use [ Power Sources This set . 2GB This...
... outlets, extension cords or convenience receptacles beyond their capacity, since this product. IMPORTANT SAFEGUARDS For your Sony dealer regarding this can result in fire or electric shock. [ Object and Liquid Entry Never push objects of important operating and maintenance (servicing) instructions in the U.S.A. Model No. This symbol is intended to alert the user to persons. Use [ Power Sources This set . 2GB This...
Instruction Manual
Page 3
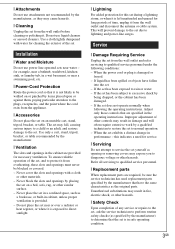
... protection for this indicates a need for service. [ Servicing Do not attempt to service the set exhibits a distinct change in the cabinet are specified in a wet basement, or near a swimming pool, etc. [ Power-Cord Protection Route the power cord so that are provided for long periods of the set. Adjust only those controls that it . for cleaning the exterior of time, unplug it from overheating, these slots and openings...
... protection for this indicates a need for service. [ Servicing Do not attempt to service the set exhibits a distinct change in the cabinet are specified in a wet basement, or near a swimming pool, etc. [ Power-Cord Protection Route the power cord so that are provided for long periods of the set. Adjust only those controls that it . for cleaning the exterior of time, unplug it from overheating, these slots and openings...
Instruction Manual
Page 5
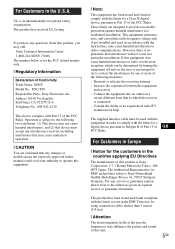
... to Part 15 of Conformity Trade Name: SONY Model No.: DSC-T90 Responsible Party: Sony Electronics Inc. UL is for a Class B digital device, pursuant to correct the interference by turning the equipment off and on a circuit different from that interference will not occur in the EMC Directive for using connection cables shorter than 3 meters (9.8 feet). [ Attention The electromagnetic fields at the specific frequencies...
... to Part 15 of Conformity Trade Name: SONY Model No.: DSC-T90 Responsible Party: Sony Electronics Inc. UL is for a Class B digital device, pursuant to correct the interference by turning the equipment off and on a circuit different from that interference will not occur in the EMC Directive for using connection cables shorter than 3 meters (9.8 feet). [ Attention The electromagnetic fields at the specific frequencies...
Instruction Manual
Page 7
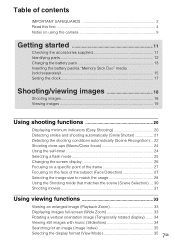
... 11 Identifying parts 12 Charging the battery pack 13 Inserting the battery pack/a "Memory Stick Duo" media (sold separately 15 Setting the clock 17 Shooting/viewing images 18 Shooting images 18 Viewing images 19 Using shooting functions 20 Displaying minimum indicators (Easy Shooting 20 Detecting smiles and shooting automatically (Smile Shutter 21 Detecting the shooting conditions automatically (Scene Recognition)... 22 Shooting close-ups (Macro/Close focus 24 Using the self-timer 24 Selecting a flash mode 25 Changing the screen display 26 Focusing on a specific point of...
... 11 Identifying parts 12 Charging the battery pack 13 Inserting the battery pack/a "Memory Stick Duo" media (sold separately 15 Setting the clock 17 Shooting/viewing images 18 Shooting images 18 Viewing images 19 Using shooting functions 20 Displaying minimum indicators (Easy Shooting 20 Detecting smiles and shooting automatically (Smile Shutter 21 Detecting the shooting conditions automatically (Scene Recognition)... 22 Shooting close-ups (Macro/Close focus 24 Using the self-timer 24 Selecting a flash mode 25 Changing the screen display 26 Focusing on a specific point of...
Instruction Manual
Page 8
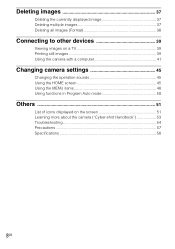
Deleting images 37 Deleting the currently displayed image 37 Deleting multiple images 37 Deleting all images (Format 38 Connecting to other devices 39 Viewing images on a TV 39 Printing still images 39 Using the camera with a computer 41 Changing camera settings 45 Changing the operation sounds 45 Using the HOME screen 45 Using the MENU items 48 Using functions in Program Auto mode 50 Others 51 List of icons displayed on the screen 51 Learning more about the camera ("Cyber-shot Handbook 53 Troubleshooting 54 Precautions 57 Specifications 58 8GB
Deleting images 37 Deleting the currently displayed image 37 Deleting multiple images 37 Deleting all images (Format 38 Connecting to other devices 39 Viewing images on a TV 39 Printing still images 39 Using the camera with a computer 41 Changing camera settings 45 Changing the operation sounds 45 Using the HOME screen 45 Using the MENU items 48 Using functions in Program Auto mode 50 Others 51 List of icons displayed on the screen 51 Learning more about the camera ("Cyber-shot Handbook 53 Troubleshooting 54 Precautions 57 Specifications 58 8GB
Instruction Manual
Page 9
... power, part of the camera. • Do not use , but it before the power turns off or you may turn off automatically to record movies or the power may be damaged. • Clean the flash surface before operating the camera. • Avoid exposing the camera to automatically create a management file. A message will play back images. • Using the camera in insufficient light emission. Please use Sony genuine accessories If you use . Otherwise, the internal memory data or "Memory...
... power, part of the camera. • Do not use , but it before the power turns off or you may turn off automatically to record movies or the power may be damaged. • Clean the flash surface before operating the camera. • Avoid exposing the camera to automatically create a management file. A message will play back images. • Using the camera in insufficient light emission. Please use Sony genuine accessories If you use . Otherwise, the internal memory data or "Memory...
Instruction Manual
Page 14
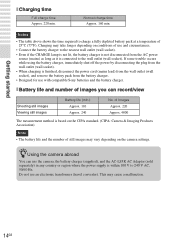
... is finished, disconnect the power cord (mains lead) from the wall outlet (wall socket), and remove the battery pack from the wall outlet (wall socket). • When charging is connected to the wall outlet (wall socket). Charging may take longer depending on the camera settings. Getting started x Charging time Full charge time Approx. 220 min. zUsing the camera abroad You can record/view Shooting still images Viewing still images Battery life (min.) Approx...
... is finished, disconnect the power cord (mains lead) from the wall outlet (wall socket), and remove the battery pack from the wall outlet (wall socket). • When charging is connected to the wall outlet (wall socket). Charging may take longer depending on the camera settings. Getting started x Charging time Full charge time Approx. 220 min. zUsing the camera abroad You can record/view Shooting still images Viewing still images Battery life (min.) Approx...
Instruction Manual
Page 16
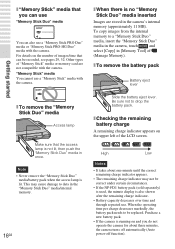
..., the camera turns off automatically (Auto power-off function). Note • Never remove the "Memory Stick Duo" media/battery pack when the access lamp is no "Memory Stick Duo" media inserted Images are not compatible with the camera. Purchase a new battery pack. • If the camera is running on the number of "Memory Stick" media or memory card are stored in once. To copy images from the internal memory to data in [Memory Tool...
..., the camera turns off automatically (Auto power-off function). Note • Never remove the "Memory Stick Duo" media/battery pack when the access lamp is no "Memory Stick Duo" media inserted Images are not compatible with the camera. Purchase a new battery pack. • If the camera is running on the number of "Memory Stick" media or memory card are stored in once. To copy images from the internal memory to data in [Memory Tool...
Instruction Manual
Page 23
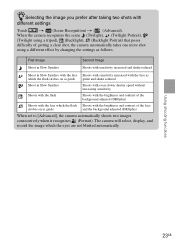
... of getting a clear shot, the camera automatically takes one more shot using a different effect by changing the settings as guide and the background adjusted (DROplus) When set to [Advanced], the camera automatically shoots two images consecutively when it recognizes (Portrait). Using shooting functions 23GB The camera will select, display, and record the image which the flash Shoots with different settings Touch t (Scene Recognition) t (Advanced). zSelecting the image you prefer after taking two shots with the brightness...
... of getting a clear shot, the camera automatically takes one more shot using a different effect by changing the settings as guide and the background adjusted (DROplus) When set to [Advanced], the camera automatically shoots two images consecutively when it recognizes (Portrait). Using shooting functions 23GB The camera will select, display, and record the image which the flash Shoots with different settings Touch t (Scene Recognition) t (Advanced). zSelecting the image you prefer after taking two shots with the brightness...

Instruction Manual
Page 24
... using the self-timer. (Self-Timer 10sec): Shooting starts after a two-second delay. The self-timer lamp flashes and a beep sounds until the shutter operates. 24GB Set Macro On when shooting close subjects. (Close focus enabled): Use this setting if you want to include yourself in the image. To cancel, touch . (Self-Timer 2sec): Shooting starts after a 10-second delay. Use this mode to close-up. This is to prevent blurring due to (Auto) when the camera is...
... using the self-timer. (Self-Timer 10sec): Shooting starts after a two-second delay. The self-timer lamp flashes and a beep sounds until the shutter operates. 24GB Set Macro On when shooting close subjects. (Close focus enabled): Use this setting if you want to include yourself in the image. To cancel, touch . (Self-Timer 2sec): Shooting starts after a 10-second delay. Use this mode to close-up. This is to prevent blurring due to (Auto) when the camera is...

Instruction Manual
Page 40
..." software installed on a PC (page 42), you want to print. 4 Touch the desired setting item, then [OK]. Copy the images to a "Memory Stick Duo" media, then take the "Memory Stick Duo" media to copy: Touch t t [OK]. However, note that images be duplicated depending on an image. use terminal, touch t (Settings) t [Main Settings] t t [USB Connect] t t [PictBridge] t , and start over the procedure from the camera. t (Manage Memory) t [Memory Tool] t t [Copy] For details, consult your photo printing service...
..." software installed on a PC (page 42), you want to print. 4 Touch the desired setting item, then [OK]. Copy the images to a "Memory Stick Duo" media, then take the "Memory Stick Duo" media to copy: Touch t t [OK]. However, note that images be duplicated depending on an image. use terminal, touch t (Settings) t [Main Settings] t t [USB Connect] t t [PictBridge] t , and start over the procedure from the camera. t (Manage Memory) t [Memory Tool] t t [Copy] For details, consult your photo printing service...
Instruction Manual
Page 42
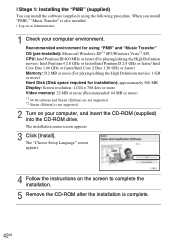
... installation menu screen appears. 3 Click [Install]. The "Choose Setup Language" screen appears. 4 Follow the instructions on the screen to complete the installation. 5 Remove the CD-ROM after the installation is not supported. 2 Turn on as Administrator. 1 Check your computer, and insert the CD-ROM (supplied) into the CD-ROM drive. x Stage 1: Installing the "PMB" (supplied) You can install the software (supplied) using "PMB" and "Music Transfer" OS (pre-installed): Microsoft Windows...
... installation menu screen appears. 3 Click [Install]. The "Choose Setup Language" screen appears. 4 Follow the instructions on the screen to complete the installation. 5 Remove the CD-ROM after the installation is not supported. 2 Turn on as Administrator. 1 Check your computer, and insert the CD-ROM (supplied) into the CD-ROM drive. x Stage 1: Installing the "PMB" (supplied) You can install the software (supplied) using "PMB" and "Music Transfer" OS (pre-installed): Microsoft Windows...

Instruction Manual
Page 45
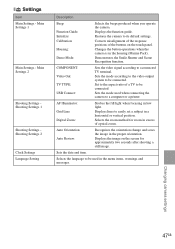
... to lower the volume, select [Low]. Only the items that are available for each mode are organized for convenience into broad categories for selection, such as shooting, viewing and printing images. Shutter: Turns on the shutter sound when you operate the camera. 1 Touch t (Settings) t [Main Settings] t t [Beep] t t desired mode t . Off: Turns off the beep/shutter sound. Changing camera settings x Shooting Item Shooting Description Records still images or movies. 45GB Changing camera settings Changing the operation sounds You can set the sound produced when you...
... to lower the volume, select [Low]. Only the items that are available for each mode are organized for convenience into broad categories for selection, such as shooting, viewing and printing images. Shutter: Turns on the shutter sound when you operate the camera. 1 Touch t (Settings) t [Main Settings] t t [Beep] t t desired mode t . Off: Turns off the beep/shutter sound. Changing camera settings x Shooting Item Shooting Description Records still images or movies. 45GB Changing camera settings Changing the operation sounds You can set the sound produced when you...
Instruction Manual
Page 46
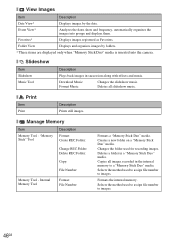
...Folder View Displays and organizes images by the date. Deletes a folder in succession along with effects and music. x Slideshow Item Slideshow Music Tool Description Plays back images in a "Memory Stick Duo" media. "Memory Stick" Tool Description Format: Create REC.Folder: Change REC.Folder: Delete REC.Folder: Copy: File Number: Memory Tool - Copies all slideshow music. Deletes all images recorded in the internal memory to a "Memory Stick Duo" media. Selects the method used to assign file number to images. x Print Item Print Description Prints still images...
...Folder View Displays and organizes images by the date. Deletes a folder in succession along with effects and music. x Slideshow Item Slideshow Music Tool Description Plays back images in a "Memory Stick Duo" media. "Memory Stick" Tool Description Format: Create REC.Folder: Change REC.Folder: Delete REC.Folder: Copy: File Number: Memory Tool - Copies all slideshow music. Deletes all images recorded in the internal memory to a "Memory Stick Duo" media. Selects the method used to assign file number to images. x Print Item Print Description Prints still images...
Instruction Manual
Page 47
... messages. Sets the mode used in a horizontal or vertical position. Auto Orientation: Auto Review: Recognizes the orientation change and saves the image in the housing (Marine Pack). Selects the language to be connected. Main Settings 1 Main Settings - Corrects misalignment of the response positions of optical zoom. Displays the image on the touch panel. Sets the date and time. AF Illuminator: Grid Line: Digital Zoom: Strobes the fill light when focusing in excess of the buttons...
... messages. Sets the mode used in a horizontal or vertical position. Auto Orientation: Auto Review: Recognizes the orientation change and saves the image in the housing (Marine Pack). Selects the language to be connected. Main Settings 1 Main Settings - Corrects misalignment of the response positions of optical zoom. Displays the image on the touch panel. Sets the date and time. AF Illuminator: Grid Line: Digital Zoom: Strobes the fill light when focusing in excess of the buttons...
Instruction Manual
Page 49
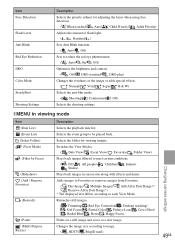
... image. Switches the View Modes. ( Date View/ Event View/ Favorites/ Folder View) Plays back images filtered to usage. ( HDTV/ Blog/E-mail) Changing camera settings 49GB Changes the image size according to meet certain conditions. ( Off/ All people/ Smiles) Children/ Infants/ Plays back images in succession along with effects and music. Selects the folder for adjusting the focus when using face detection. ( When touched/ Auto/ Child Priority/ Adult Priority) Adjusts the amount of flash light. ( / Standard/ ) Sets Anti Blink function. ( Auto/ Off) Sets...
... image. Switches the View Modes. ( Date View/ Event View/ Favorites/ Folder View) Plays back images filtered to usage. ( HDTV/ Blog/E-mail) Changing camera settings 49GB Changes the image size according to meet certain conditions. ( Off/ All people/ Smiles) Children/ Infants/ Plays back images in succession along with effects and music. Selects the folder for adjusting the focus when using face detection. ( When touched/ Auto/ Child Priority/ Adult Priority) Adjusts the amount of flash light. ( / Standard/ ) Sets Anti Blink function. ( Auto/ Off) Sets...

Instruction Manual
Page 50
...) Adjusts the exposure. (-2.0EV to (Program Auto). Using functions in Program Auto mode You can change the Focus, Metering Mode, ISO, and EV settings when [REC Mode] is set to +2.0EV) Rotates a still image. Prevents accidental erasure. ( This Image/ Multiple Images/ Set All in Date Range*/ Remove All in Date Range*) * The displayed text differs according to each View Mode. Item (Delete) (Protect) (Print) (Rotate) (Volume Settings) Description Deletes images. ( This Image/ Multiple Images/ All in Date Range*) * The displayed text differs according to each View Mode. Prints images using...
...) Adjusts the exposure. (-2.0EV to (Program Auto). Using functions in Program Auto mode You can change the Focus, Metering Mode, ISO, and EV settings when [REC Mode] is set to +2.0EV) Rotates a still image. Prevents accidental erasure. ( This Image/ Multiple Images/ Set All in Date Range*/ Remove All in Date Range*) * The displayed text differs according to each View Mode. Item (Delete) (Protect) (Print) (Rotate) (Volume Settings) Description Deletes images. ( This Image/ Multiple Images/ All in Date Range*) * The displayed text differs according to each View Mode. Prints images using...
Instruction Manual
Page 52
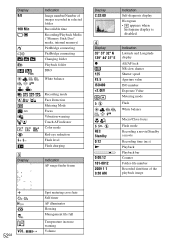
... a movie Recording time (m:s) Playback Playback bar Counter Folder-file number Recorded date/time of images recorded in selected folder Recordable time Recording/Playback Media ("Memory Stick Duo" media, internal memory) PictBridge connecting PictBridge connecting Changing folder Playback folder DRO White balance Recording mode Face Detection Metering Mode Focus Vibration warning Touch AF indicator Color mode Red-eye reduction Flash level Flash charging Indication AF range finder frame Display C:32:00 D Display 35° 37' 32" N 139° 44' 31" E z 125 F3.5 ISO400 +2.0EV Indication Self...
... a movie Recording time (m:s) Playback Playback bar Counter Folder-file number Recorded date/time of images recorded in selected folder Recordable time Recording/Playback Media ("Memory Stick Duo" media, internal memory) PictBridge connecting PictBridge connecting Changing folder Playback folder DRO White balance Recording mode Face Detection Metering Mode Focus Vibration warning Touch AF indicator Color mode Red-eye reduction Flash level Flash charging Indication AF range finder frame Display C:32:00 D Display 35° 37' 32" N 139° 44' 31" E z 125 F3.5 ISO400 +2.0EV Indication Self...
Instruction Manual
Page 54
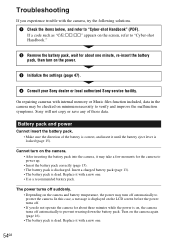
... the battery pack. • Make sure the direction of those data. If a code such as "C/E:ss:ss" appears on the screen, refer to prevent wearing down the battery pack. Troubleshooting If you do not operate the camera for about one . 54GB Replace it until the battery eject lever is dead. The power turns off automatically to "Cyber-shot Handbook" (PDF). On repairing cameras with internal memory or Music files function included, data in the camera may turn...
... the battery pack. • Make sure the direction of those data. If a code such as "C/E:ss:ss" appears on the screen, refer to prevent wearing down the battery pack. Troubleshooting If you do not operate the camera for about one . 54GB Replace it until the battery eject lever is dead. The power turns off automatically to "Cyber-shot Handbook" (PDF). On repairing cameras with internal memory or Music files function included, data in the camera may turn...
Instruction Manual
Page 55
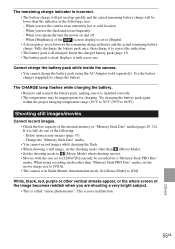
... the (screen display) is in Smile Shutter demonstration mode. Delete unnecessary images (page 37). - When you use the camera in the following : - This is installed correctly. • The temperature may be lower than (Movie Mode). • Set the shooting mode to [Bright]. • A discrepancy arose between the remaining charge indicator and the actual remaining battery charge. The remaining charge indicator is called "smear phenomenon". Use the battery charger (supplied) to 86°F)). White, black, red, purple...
... the (screen display) is in Smile Shutter demonstration mode. Delete unnecessary images (page 37). - When you use the camera in the following : - This is installed correctly. • The temperature may be lower than (Movie Mode). • Set the shooting mode to [Bright]. • A discrepancy arose between the remaining charge indicator and the actual remaining battery charge. The remaining charge indicator is called "smear phenomenon". Use the battery charger (supplied) to 86°F)). White, black, red, purple...


