
Instruction Manual
Page 8
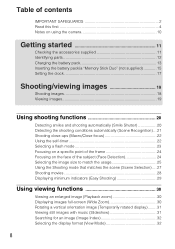
... (Scene Selection) .... 27 Shooting movies 28 Displaying minimum indicators (Easy Shooting 29 Using viewing functions 30 Viewing an enlarged image (Playback zoom 30 Displaying images full-screen (Wide Zoom 30 Rotating a vertical orientation image (Temporarily rotated display)........ 31 Viewing still images with music (Slideshow 31 Searching for an image (Image Index 32...
... (Scene Selection) .... 27 Shooting movies 28 Displaying minimum indicators (Easy Shooting 29 Using viewing functions 30 Viewing an enlarged image (Playback zoom 30 Displaying images full-screen (Wide Zoom 30 Rotating a vertical orientation image (Temporarily rotated display)........ 31 Viewing still images with music (Slideshow 31 Searching for an image (Image Index 32...
Instruction Manual
Page 9
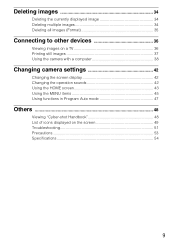
Deleting images 34 Deleting the currently displayed image 34 Deleting multiple images 34 Deleting all images (Format 35 Connecting to other devices 36 Viewing images on a TV 36 Printing still images 37 Using the camera with a computer 38 Changing camera settings 42 Changing the screen display 42 Changing the operation sounds 42 Using the HOME screen 43 Using the MENU items 45 Using functions in Program Auto mode 47 Others 48 Viewing "Cyber-shot Handbook 48 List of icons displayed on the screen 49 Troubleshooting 51 Precautions 53 Specifications 54 9
Deleting images 34 Deleting the currently displayed image 34 Deleting multiple images 34 Deleting all images (Format 35 Connecting to other devices 36 Viewing images on a TV 36 Printing still images 37 Using the camera with a computer 38 Changing camera settings 42 Changing the screen display 42 Changing the operation sounds 42 Using the HOME screen 43 Using the MENU items 45 Using functions in Program Auto mode 47 Others 48 Viewing "Cyber-shot Handbook 48 List of icons displayed on the screen 49 Troubleshooting 51 Precautions 53 Specifications 54 9

Instruction Manual
Page 10
...of the pixels are operational for Camera File system) universal standard established by JEITA (Japan Electronics and Information Technology Industries Association). • Sony does not guarantee that the camera will play back images recorded or edited with other equipment, or that generates strong radio waves or emits... location that other materials may be repaired. • Do not aim the camera at the sun or other liquids splash on the LCD screen and make a backup copy to the flash surface, resulting in sandy or dusty locations may cause dirt on the flash surface to become ...
...of the pixels are operational for Camera File system) universal standard established by JEITA (Japan Electronics and Information Technology Industries Association). • Sony does not guarantee that the camera will play back images recorded or edited with other equipment, or that generates strong radio waves or emits... location that other materials may be repaired. • Do not aim the camera at the sun or other liquids splash on the LCD screen and make a backup copy to the flash surface, resulting in sandy or dusty locations may cause dirt on the flash surface to become ...

Instruction Manual
Page 12
... Identifying parts Bottom A Zoom (W/T) lever B Shutter button C Microphone D POWER button/POWER lamp E Flash F Self-timer lamp/Smile Shutter lamp/ AF illuminator G Lens H Lens cover I LCD screen/Touch panel J (Playback) button K Hook for wrist strap/Grip L Speaker M Battery/"Memory Stick Duo" cover N Tripod receptacle • Use a tripod with a screw less than 5.5 mm...
... Identifying parts Bottom A Zoom (W/T) lever B Shutter button C Microphone D POWER button/POWER lamp E Flash F Self-timer lamp/Smile Shutter lamp/ AF illuminator G Lens H Lens cover I LCD screen/Touch panel J (Playback) button K Hook for wrist strap/Grip L Speaker M Battery/"Memory Stick Duo" cover N Tripod receptacle • Use a tripod with a screw less than 5.5 mm...
Instruction Manual
Page 16
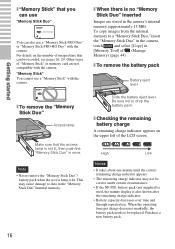
... Stick Duo"/internal memory. For details on the upper left of "Memory Stick" or memory card are stored in once. Other types of the LCD screen. "Memory Stick" You cannot use a "Memory Stick PRO Duo" or "Memory Stick PRO-HG Duo" with the camera. To copy images from the internal memory...
... Stick Duo"/internal memory. For details on the upper left of "Memory Stick" or memory card are stored in once. Other types of the LCD screen. "Memory Stick" You cannot use a "Memory Stick PRO Duo" or "Memory Stick PRO-HG Duo" with the camera. To copy images from the internal memory...

Instruction Manual
Page 19
... down. The last image shot is displayed. • When images on the "Memory Stick Duo" recorded with other cameras cannot be played back on the screen.
... down. The last image shot is displayed. • When images on the "Memory Stick Duo" recorded with other cameras cannot be played back on the screen.
Instruction Manual
Page 24
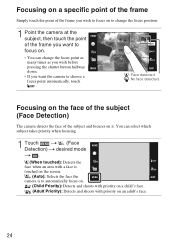
... which subject takes priority when focusing. 1 Touch t (Face Detection) t desired mode t . (When touched): Detects the face when an area with a face is touched on the screen. (Auto): Selects the face the camera is to choose a focus point automatically, touch . : Face detected. : No face detected.
... which subject takes priority when focusing. 1 Touch t (Face Detection) t desired mode t . (When touched): Detects the face when an area with a face is touched on the screen. (Auto): Selects the face the camera is to choose a focus point automatically, touch . : Face detected. : No face detected.

Instruction Manual
Page 25
... view your images. 1 t (Image Size) t desired size t . Using shooting functions Image size 10M (3648×2736) Usage guidelines For prints up to A3+ size LCD screen 5M (2592×1944) For prints up to A4 size 3M (2048×1536) VGA (640×480) For prints up to match the usage...; When you print images shot with 16:9 aspect ratio, both edges may be reproduced when the image is recorded when you will fill the entire screen. The larger the image size, the more images can be recorded. Selecting the image size to L/L2 size For e-mail attachments Images are displayed in...
... view your images. 1 t (Image Size) t desired size t . Using shooting functions Image size 10M (3648×2736) Usage guidelines For prints up to A3+ size LCD screen 5M (2592×1944) For prints up to A4 size 3M (2048×1536) VGA (640×480) For prints up to match the usage...; When you print images shot with 16:9 aspect ratio, both edges may be reproduced when the image is recorded when you will fill the entire screen. The larger the image size, the more images can be recorded. Selecting the image size to L/L2 size For e-mail attachments Images are displayed in...

Instruction Manual
Page 30
... the center. again to enlarge. The image is set to [Image Only], touch the center of the whole image Displaying images full-screen (Wide Zoom) 1 Press the (Playback) button to enlarge. 2 Adjust the zoom scale and position. The zoom scale increases each time you ...touch the screen. / / / : Adjusts the position. : Changes the zoom scale. : Turns / / / on/off. : Cancels playback zoom. Using viewing functions Viewing an enlarged image (Playback zoom...
... the center. again to enlarge. The image is set to [Image Only], touch the center of the whole image Displaying images full-screen (Wide Zoom) 1 Press the (Playback) button to enlarge. 2 Adjust the zoom scale and position. The zoom scale increases each time you ...touch the screen. / / / : Adjusts the position. : Changes the zoom scale. : Turns / / / on/off. : Cancels playback zoom. Using viewing functions Viewing an enlarged image (Playback zoom...
Instruction Manual
Page 31
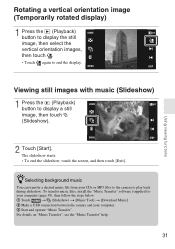
The slideshow starts. • To end the slideshow, touch the screen, and then touch [Exit]. To transfer music files, install the "Music Transfer" software (supplied) to your computer (page 39), then follow the steps below. 1 Touch t (...
The slideshow starts. • To end the slideshow, touch the screen, and then touch [Exit]. To transfer music files, install the "Music Transfer" software (supplied) to your computer (page 39), then follow the steps below. 1 Touch t (...

Instruction Manual
Page 32
... (Playback) button to display an image, then touch (Image Index). • If you touch , you can set the number of images displayed in the index screen to 12 or 20 images. 2 Touch the / buttons to turn the pages. • To return to display an image, then touch (Image Index) t (View Mode...): Displays and organizes images by folders. 32 Searching for viewing multiple images when using "Memory Stick Duo". 1 Press the (Playback) button to the single-image screen, touch the thumbnail image.
... (Playback) button to display an image, then touch (Image Index). • If you touch , you can set the number of images displayed in the index screen to 12 or 20 images. 2 Touch the / buttons to turn the pages. • To return to display an image, then touch (Image Index) t (View Mode...): Displays and organizes images by folders. 32 Searching for viewing multiple images when using "Memory Stick Duo". 1 Press the (Playback) button to the single-image screen, touch the thumbnail image.

Instruction Manual
Page 34
... images. 2 Repeat step 1. 3 Touch t [OK]. The mark is displayed in [Folder View] when using , when selecting images. You can switch between single-image and index screen using the internal memory. (All in This 34 Deleting images Deleting the currently displayed image 1 Touch (Delete) t [OK] (page 19).
... images. 2 Repeat step 1. 3 Touch t [OK]. The mark is displayed in [Folder View] when using , when selecting images. You can switch between single-image and index screen using the internal memory. (All in This 34 Deleting images Deleting the currently displayed image 1 Touch (Delete) t [OK] (page 19).

Instruction Manual
Page 36
... camera by connecting the camera to an HD (High Definition) TV with the HD Output Adaptor Cable (not supplied) or Cyber-shot station (not supplied). • Set [COMPONENT] to [SD] when viewing movies. 36 Set [COMPONENT] to [HD(1080i)] in [Main Settings 2] by selecting (Settings) on the HOME screen. • You cannot view movies output...
... camera by connecting the camera to an HD (High Definition) TV with the HD Output Adaptor Cable (not supplied) or Cyber-shot station (not supplied). • Set [COMPONENT] to [SD] when viewing movies. 36 Set [COMPONENT] to [HD(1080i)] in [Main Settings 2] by selecting (Settings) on the HOME screen. • You cannot view movies output...
Instruction Manual
Page 39
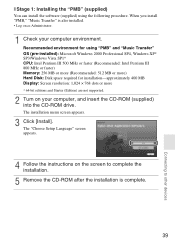
.... 2 Turn on as Administrator. 1 Check your computer, and insert the CD-ROM (supplied) into the CD-ROM drive. The installation menu screen appears. 3 Click [Install]. When you install "PMB," "Music Transfer" is complete. 39 Connecting to complete the installation. 5 Remove the CD...-ROM after the installation is also installed. • Log on your computer environment. The "Choose Setup Language" screen appears. 4 Follow the instructions on the screen to other devices x Stage 1: Installing the "PMB" (supplied) You can install the software (supplied) using "PMB" and...
.... 2 Turn on as Administrator. 1 Check your computer, and insert the CD-ROM (supplied) into the CD-ROM drive. The installation menu screen appears. 3 Click [Install]. When you install "PMB," "Music Transfer" is complete. 39 Connecting to complete the installation. 5 Remove the CD...-ROM after the installation is also installed. • Log on your computer environment. The "Choose Setup Language" screen appears. 4 Follow the instructions on the screen to other devices x Stage 1: Installing the "PMB" (supplied) You can install the software (supplied) using "PMB" and...

Instruction Manual
Page 40
... data may corrupt the data. • When using a battery with little remaining charge, you can start menu: Click [Start] t [All Programs] t [Sony Picture Utility] t [Help] t [PMB Guide]. appears on the desktop. • To access the "PMB Guide" from the camera while the camera is recommended.... 3 Click the [Import] button. x Stage 2: Importing images to your computer. Do not operate the computer while the indicator is displayed on the screen during the communication session. Using the AC Adaptor (not supplied) and the USB / A/V / DC IN cable for multi-use terminal 2 To the ...
... data may corrupt the data. • When using a battery with little remaining charge, you can start menu: Click [Start] t [All Programs] t [Sony Picture Utility] t [Help] t [PMB Guide]. appears on the desktop. • To access the "PMB Guide" from the camera while the camera is recommended.... 3 Click the [Import] button. x Stage 2: Importing images to your computer. Do not operate the computer while the indicator is displayed on the screen during the communication session. Using the AC Adaptor (not supplied) and the USB / A/V / DC IN cable for multi-use terminal 2 To the ...
Instruction Manual
Page 42
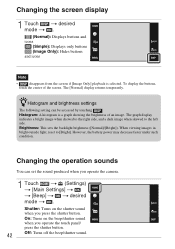
... reset to the left side. Shutter: Turns on the beep/shutter sound when you press the shutter button. Changing camera settings Changing the screen display 1 Touch t desired mode t . (Normal): Displays buttons and icons (Simple): Displays only buttons (Image Only): Hides buttons and icons... Note • disappears from the screen if [Image Only] playback is a graph showing the brightness of the screen. The [Normal] display returns temporarily. On: Turns on the shutter sound when you operate the touch...
... reset to the left side. Shutter: Turns on the beep/shutter sound when you press the shutter button. Changing camera settings Changing the screen display 1 Touch t desired mode t . (Normal): Displays buttons and icons (Simple): Displays only buttons (Image Only): Hides buttons and icons... Note • disappears from the screen if [Image Only] playback is a graph showing the brightness of the screen. The [Normal] display returns temporarily. On: Turns on the shutter sound when you operate the touch...
Instruction Manual
Page 43
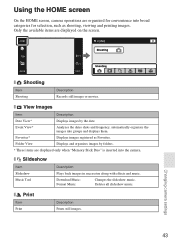
... are organized for convenience into broad categories for selection, such as Favorites. Folder View Displays and organizes images by the date. Using the HOME screen On the HOME screen, camera operations are displayed only when "Memory Stick Duo" is inserted into the camera. Event View* Analyzes the dates shots and frequency, automatically... 43 x Slideshow Item Slideshow Music Tool Description Plays back images in succession along with effects and music. Only the available items are displayed on the screen. Deletes all slideshow music.
... are organized for convenience into broad categories for selection, such as Favorites. Folder View Displays and organizes images by the date. Using the HOME screen On the HOME screen, camera operations are displayed only when "Memory Stick Duo" is inserted into the camera. Event View* Analyzes the dates shots and frequency, automatically... 43 x Slideshow Item Slideshow Music Tool Description Plays back images in succession along with effects and music. Only the available items are displayed on the screen. Deletes all slideshow music.
Instruction Manual
Page 44
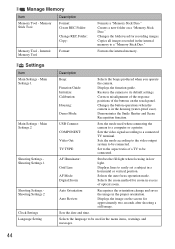
...: Initialize: Calibration: Housing: Demo Mode: Selects the beeps produced when you operate the camera. Corrects misalignment of the response positions of the buttons on the screen for approximately two seconds after shooting a still image. Selects the language to be used in a horizontal or vertical position. Copies all images recorded in the...
...: Initialize: Calibration: Housing: Demo Mode: Selects the beeps produced when you operate the camera. Corrects misalignment of the response positions of the buttons on the screen for approximately two seconds after shooting a still image. Selects the language to be used in a horizontal or vertical position. Copies all images recorded in the...
Instruction Manual
Page 45
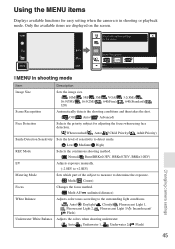
...) Underwater White Balance Adjusts the colors when shooting underwater. ( Auto/ Underwater 1, Underwater 2/ Flash) Changing camera settings 45 Only the available items are displayed on the screen.
...) Underwater White Balance Adjusts the colors when shooting underwater. ( Auto/ Underwater 1, Underwater 2/ Flash) Changing camera settings 45 Only the available items are displayed on the screen.
Instruction Manual
Page 49
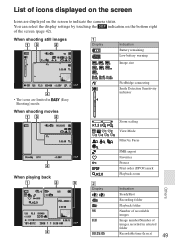
... Sensitivity indicator B Display 96 8/8 00:25:05 Zoom scaling View Mode Filter by touching the indication on the bottom right of icons displayed on the screen Icons are displayed on the screen to indicate the camera status. List of the...
... Sensitivity indicator B Display 96 8/8 00:25:05 Zoom scaling View Mode Filter by touching the indication on the bottom right of icons displayed on the screen Icons are displayed on the screen to indicate the camera status. List of the...


