

Instruction Manual
Page 12
... the camera, and damage to the camera may occur. O Battery eject lever P Access lamp Q "Memory Stick Duo" slot R Battery insertion slot S Multi connector 12 Getting started Identifying parts Bottom A Zoom (W/T) lever B Shutter button C Microphone D POWER button/POWER lamp E Flash F Self-timer lamp/Smile Shutter lamp/ AF illuminator G Lens H Lens cover I LCD screen/Touch panel...
... the camera, and damage to the camera may occur. O Battery eject lever P Access lamp Q "Memory Stick Duo" slot R Battery insertion slot S Multi connector 12 Getting started Identifying parts Bottom A Zoom (W/T) lever B Shutter button C Microphone D POWER button/POWER lamp E Flash F Self-timer lamp/Smile Shutter lamp/ AF illuminator G Lens H Lens cover I LCD screen/Touch panel...
Instruction Manual
Page 16
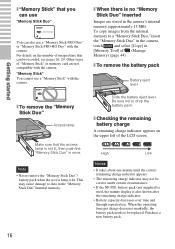
... use a "Memory Stick PRO Duo" or "Memory Stick PRO-HG Duo" with the camera. x Checking the remaining battery charge A remaining charge indicator appears on the number of the LCD screen. When the operating time per charge decreases markedly, the battery pack needs to drop the ...charge indicator appears. • The remaining charge indicator may cause damage to a "Memory Stick Duo," insert the "Memory Stick Duo" in the camera, touch and select [Copy] in the "Memory Stick Duo"/internal memory. Slide the battery eject lever. "Memory Stick" You cannot use "Memory Stick...
... use a "Memory Stick PRO Duo" or "Memory Stick PRO-HG Duo" with the camera. x Checking the remaining battery charge A remaining charge indicator appears on the number of the LCD screen. When the operating time per charge decreases markedly, the battery pack needs to drop the ...charge indicator appears. • The remaining charge indicator may cause damage to a "Memory Stick Duo," insert the "Memory Stick Duo" in the camera, touch and select [Copy] in the "Memory Stick Duo"/internal memory. Slide the battery eject lever. "Memory Stick" You cannot use "Memory Stick...

Instruction Manual
Page 19
... Selecting next/previous image Touch (Next)/ (Previous) on this camera, view the images in [Folder View] (page 32). x Turning off the camera Close the lens cover. • You can also turn off the camera by pressing the POWER button. 19 The last image shot is displayed. •... When images on the "Memory Stick Duo" recorded with other cameras cannot be played back on the screen...
... Selecting next/previous image Touch (Next)/ (Previous) on this camera, view the images in [Folder View] (page 32). x Turning off the camera Close the lens cover. • You can also turn off the camera by pressing the POWER button. 19 The last image shot is displayed. •... When images on the "Memory Stick Duo" recorded with other cameras cannot be played back on the screen...
Instruction Manual
Page 24
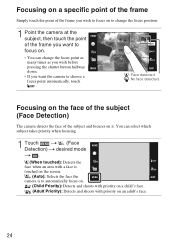
... want to focus on. • You can select which subject takes priority when focusing. 1 Touch t (Face Detection) t desired mode t . (When touched): Detects the face when an area with a face is touched on the screen. (Auto): Selects the face the camera is to automatically focus on. (Child Priority): Detects and shoots with priority on a child's face...
... want to focus on. • You can select which subject takes priority when focusing. 1 Touch t (Face Detection) t desired mode t . (When touched): Detects the face when an area with a face is touched on the screen. (Auto): Selects the face the camera is to automatically focus on. (Child Priority): Detects and shoots with priority on a child's face...

Instruction Manual
Page 30
...Press the (Playback) button to end the wide 30 When is enlarged at the center. Shows the displayed area of the screen, then touch the area you touched at twice the size, with the area you want to enlarge. Using viewing functions Viewing an enlarged image (Playback zoom) ...1 Press the (Playback) button to display an image, then touch the area you touch the screen. / / / : Adjusts the position. : Changes the zoom scale. : Turns / / / on/off. : Cancels playback zoom. The zoom...
...Press the (Playback) button to end the wide 30 When is enlarged at the center. Shows the displayed area of the screen, then touch the area you touched at twice the size, with the area you want to enlarge. Using viewing functions Viewing an enlarged image (Playback zoom) ...1 Press the (Playback) button to display an image, then touch the area you touch the screen. / / / : Adjusts the position. : Changes the zoom scale. : Turns / / / on/off. : Cancels playback zoom. The zoom...
Instruction Manual
Page 31
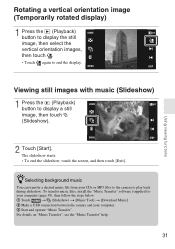
... touch the screen, and then touch [Exit]. zSelecting background music You can transfer a desired music file from your computer. 3 Start and operate "Music Transfer". To transfer music files, install the "Music Transfer" software (supplied) to your computer (page 39), then follow the steps below. 1 Touch ...t (Slideshow) t [Music Tool] t [Download Music]. 2 Make a USB connection between the camera and your CDs or MP3 files to the camera to play back during slideshow. Viewing still images with music (Slideshow) 1 Press the (Playback...
... touch the screen, and then touch [Exit]. zSelecting background music You can transfer a desired music file from your computer. 3 Start and operate "Music Transfer". To transfer music files, install the "Music Transfer" software (supplied) to your computer (page 39), then follow the steps below. 1 Touch ...t (Slideshow) t [Music Tool] t [Download Music]. 2 Make a USB connection between the camera and your CDs or MP3 files to the camera to play back during slideshow. Viewing still images with music (Slideshow) 1 Press the (Playback...

Instruction Manual
Page 32
...display format (View Mode) Allows you can set the number of images displayed in the index screen to 12 or 20 images. 2 Touch the / buttons to turn the pages. • To return to display an image, then touch (Image Index) t (View Mode) t desired mode. (Date View): Displays images by... the date. (Event View): Analyzes the dates shots and frequency, automatically organizes the images into groups and displays them. (Favorites): Displays images...
...display format (View Mode) Allows you can set the number of images displayed in the index screen to 12 or 20 images. 2 Touch the / buttons to turn the pages. • To return to display an image, then touch (Image Index) t (View Mode) t desired mode. (Date View): Displays images by... the date. (Event View): Analyzes the dates shots and frequency, automatically organizes the images into groups and displays them. (Favorites): Displays images...

Instruction Manual
Page 34
... Index) t (Delete). 2 Select images for deletion. 1 Touch / to turn the pages, then touch the images you want to the selected images. 2 Repeat step 1. 3 Touch t [OK]. Deleting images Deleting the currently displayed image 1 Touch (Delete) t [OK] (page 19). You can switch between single-image and index screen using the internal memory. (All in [Folder View] when...
... Index) t (Delete). 2 Select images for deletion. 1 Touch / to turn the pages, then touch the images you want to the selected images. 2 Repeat step 1. 3 Touch t [OK]. Deleting images Deleting the currently displayed image 1 Touch (Delete) t [OK] (page 19). You can switch between single-image and index screen using the internal memory. (All in [Folder View] when...
Instruction Manual
Page 42
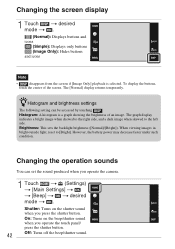
Changing camera settings Changing the screen display 1 Touch t desired mode t . (Normal): Displays buttons and icons (Simple): Displays only buttons (Image Only): Hides buttons and icons Note • disappears from the screen if [Image Only] playback is a graph showing the brightness of the screen. zHistogram and brightness settings The following setting can set the sound produced when...
Changing camera settings Changing the screen display 1 Touch t desired mode t . (Normal): Displays buttons and icons (Simple): Displays only buttons (Image Only): Hides buttons and icons Note • disappears from the screen if [Image Only] playback is a graph showing the brightness of the screen. zHistogram and brightness settings The following setting can set the sound produced when...
Instruction Manual
Page 44
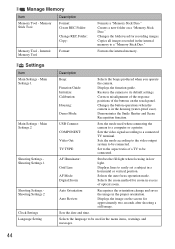
...used for approximately two seconds after shooting a still image. Demonstrates the Smile Shutter and Scene ...Line: AF Mode: Digital Zoom: Strobes the fill light when focusing in the proper orientation. Selects the language to be used when connecting the camera to a computer or... used in a horizontal or vertical position. Displays the image on the screen for recording images. Copies all images recorded in the internal memory to ... camera to a connected TV terminal. Sets the mode according to the video output system to be connected. Creates a new folder on the touch panel...
...used for approximately two seconds after shooting a still image. Demonstrates the Smile Shutter and Scene ...Line: AF Mode: Digital Zoom: Strobes the fill light when focusing in the proper orientation. Selects the language to be used when connecting the camera to a computer or... used in a horizontal or vertical position. Displays the image on the screen for recording images. Copies all images recorded in the internal memory to ... camera to a connected TV terminal. Sets the mode according to the video output system to be connected. Creates a new folder on the touch panel...
Instruction Manual
Page 45
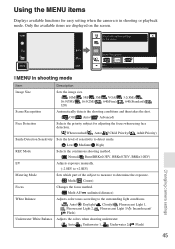
...detects the shooting conditions and then takes the shot. ( Off/ Auto/ Advanced) Face Detection Selects the priority subject for easy setting when the camera is in shooting or playback mode. Only the available items are displayed on the screen. Using the MENU items Displays available functions for... adjusting the focus when using face detection. ( When touched/ Auto/ Child Priority/ Adult Priority) ...
...detects the shooting conditions and then takes the shot. ( Off/ Auto/ Advanced) Face Detection Selects the priority subject for easy setting when the camera is in shooting or playback mode. Only the available items are displayed on the screen. Using the MENU items Displays available functions for... adjusting the focus when using face detection. ( When touched/ Auto/ Child Priority/ Adult Priority) ...
Instruction Manual
Page 49
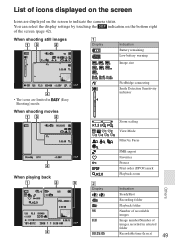
When shooting still images A Display Indication Battery remaining Low battery warning Image size • The icons are displayed on the bottom right of images recorded in selected folder Recordable time (h:m:s) 49 List of icons displayed on the screen Icons are limited in Shooting) mode. ...PictBridge connecting Smile Detection Sensitivity indicator B Display 96 8/8 00:25:05 Zoom scaling View Mode Filter by touching the indication on the screen to indicate the camera status. You can select the display settings by Faces PMB export Favorites Protect Print order (DPOF) mark ...
When shooting still images A Display Indication Battery remaining Low battery warning Image size • The icons are displayed on the bottom right of images recorded in selected folder Recordable time (h:m:s) 49 List of icons displayed on the screen Icons are limited in Shooting) mode. ...PictBridge connecting Smile Detection Sensitivity indicator B Display 96 8/8 00:25:05 Zoom scaling View Mode Filter by touching the indication on the screen to indicate the camera status. You can select the display settings by Faces PMB export Favorites Protect Print order (DPOF) mark ...

Instruction Manual
Page 53
... On moisture condensation If the camera is brought directly from a cold to a warm location, moisture may condense inside the lens, you can still use the camera, but the date and time ...On cleaning Cleaning the LCD screen Wipe the screen surface with a dry cloth. Do not expose the camera to remove fingerprints, dust, etc. On operating temperatures Your camera is designed for maintaining ... or near a heater The camera body may become discolored or deformed, and this malfunction cannot be repaired. Do not touch the camera with the power off the camera and wait about one month ...
... On moisture condensation If the camera is brought directly from a cold to a warm location, moisture may condense inside the lens, you can still use the camera, but the date and time ...On cleaning Cleaning the LCD screen Wipe the screen surface with a dry cloth. Do not expose the camera to remove fingerprints, dust, etc. On operating temperatures Your camera is designed for maintaining ... or near a heater The camera body may become discolored or deformed, and this malfunction cannot be repaired. Do not touch the camera with the power off the camera and wait about one month ...

Cyber-shot® Handbook
Page 2
... in this handbook In this handbook Click on the screen in the camera's default setting. Marks and notations used in a listing of HOME/MENU items. Search for information by operation. Search for information by arrows (t).You should touch the items on a button at upper right to jump... to the corresponding page. Indicates information that is useful to the correct operation of the camera. Marks are shown as they appear in the order indicated. ...
... in this handbook In this handbook Click on the screen in the camera's default setting. Marks and notations used in a listing of HOME/MENU items. Search for information by operation. Search for information by arrows (t).You should touch the items on a button at upper right to jump... to the corresponding page. Indicates information that is useful to the correct operation of the camera. Marks are shown as they appear in the order indicated. ...

Cyber-shot® Handbook
Page 4
... of contents Notes on using the camera How to use this handbook 2 Notes on using the camera 3 Operation Search 7 HOME/MENU Search 9 Using the touch panel 14 Changing the DISP (screen display) setting 15 Album/Photo Library Function (DSC-T700 only)··· 17 Using the internal memory (DSC-T77 only 18 Shooting Auto Adjustment 19...
... of contents Notes on using the camera How to use this handbook 2 Notes on using the camera 3 Operation Search 7 HOME/MENU Search 9 Using the touch panel 14 Changing the DISP (screen display) setting 15 Album/Photo Library Function (DSC-T700 only)··· 17 Using the internal memory (DSC-T77 only 18 Shooting Auto Adjustment 19...

Cyber-shot® Handbook
Page 8
...EV 34, 86 Changing focus position Using the touch panel 14 Face Detection 82 Deleting images Delete 41, 112 Format 53 Displaying enlarged images Playback zoom 36 Trimming 108 Displaying full-screen images DISP (Screen Display 15 Wide Zoom 16, 42 Temporarily ...DSC-T700 only 45 Retouch 108 Paint 110 Multi-Purpose Resize 111 Playing back a series of Slideshow 38 images in order Initializing settings Initialize 59 Printing images Print 141 Viewing on TVs Viewing images on a TV 119 Information about optional accessories "Cyber-shot Step-up Guide 140 Cyber-shot...
...EV 34, 86 Changing focus position Using the touch panel 14 Face Detection 82 Deleting images Delete 41, 112 Format 53 Displaying enlarged images Playback zoom 36 Trimming 108 Displaying full-screen images DISP (Screen Display 15 Wide Zoom 16, 42 Temporarily ...DSC-T700 only 45 Retouch 108 Paint 110 Multi-Purpose Resize 111 Playing back a series of Slideshow 38 images in order Initializing settings Initialize 59 Printing images Print 141 Viewing on TVs Viewing images on a TV 119 Information about optional accessories "Cyber-shot Step-up Guide 140 Cyber-shot...

Cyber-shot® Handbook
Page 9
... as shooting, viewing and printing images. 1 Touch to display the HOME screen. Shooting Items Shooting View Images 1 (DSC-T700) View Images (DSC-T77) Items Date View* Event View* Favorites* Folder View * These items are organized for convenience into the camera (DSC-T77 only). View Images 2 (DSC-T700) Slideshow (DSC-T77) Items Slideshow Music Tool Scrapbook (DSC-T700 only) Download Music Format Music...
... as shooting, viewing and printing images. 1 Touch to display the HOME screen. Shooting Items Shooting View Images 1 (DSC-T700) View Images (DSC-T77) Items Date View* Event View* Favorites* Folder View * These items are organized for convenience into the camera (DSC-T77 only). View Images 2 (DSC-T700) Slideshow (DSC-T77) Items Slideshow Music Tool Scrapbook (DSC-T700 only) Download Music Format Music...

Cyber-shot® Handbook
Page 11
...Red Eye Reduction - - Color Mode - - - that appears in shooting mode are displayed on an item under "Menu items" to jump to display the Menu screen. 3 Touch the menu item t desired mode t . DRO - - - - Flash - - - - White Balance - - REC Mode Menu items Scene Selection Image Size...1 Lower the lens cover to switch to shooting mode. 2 Touch to the corresponding page. Face Detection - - EV - - Flash Level - - - - Anti Blink - - - - Click on the screen. 11GB Shooting Settings - SteadyShot - - appears when the desired ...
...Red Eye Reduction - - Color Mode - - - that appears in shooting mode are displayed on an item under "Menu items" to jump to display the Menu screen. 3 Touch the menu item t desired mode t . DRO - - - - Flash - - - - White Balance - - REC Mode Menu items Scene Selection Image Size...1 Lower the lens cover to switch to shooting mode. 2 Touch to the corresponding page. Face Detection - - EV - - Flash Level - - - - Anti Blink - - - - Click on the screen. 11GB Shooting Settings - SteadyShot - - appears when the desired ...

Cyber-shot® Handbook
Page 12
...under "Menu items" to jump to display the Menu screen. 3 Touch the menu item t desired mode t . Click on the screen that it is available and - Favorites - - - - Notes • The DPOF setting is already selected. DSC-T700 View Mode Memory Stick Duo / Internal Memory Menu ... (Protect) DPOF (Print) (Rotate) (Volume Settings) Date View - - Event View - - that appears in view mode are displayed on the screen. appears when the desired item is unavailable when using the internal memory. • Only the available items are displayed for easy setting. 1 Press the ...
...under "Menu items" to jump to display the Menu screen. 3 Touch the menu item t desired mode t . Click on the screen that it is available and - Favorites - - - - Notes • The DPOF setting is already selected. DSC-T700 View Mode Memory Stick Duo / Internal Memory Menu ... (Protect) DPOF (Print) (Rotate) (Volume Settings) Date View - - Event View - - that appears in view mode are displayed on the screen. appears when the desired item is unavailable when using the internal memory. • Only the available items are displayed for easy setting. 1 Press the ...

Marketing Specifications (Brown Model)
Page 1
...shots. Face Detection can even distinguish between children and adults, so you can also select subject priority (Adult or Child Priority or touch subject on the pictures you expect from five sophisticated colors to reflect your images and still... The combination of their memorable moments. Choose from a Sony® digital camera. DSC-T77/T The ultra-slim Sony® Cyber-shot® DSC-T77 digital camera features a 3.0"1 widescreen LCD touch-screen display, Optical SteadyShot™ image stabilization to compensate for camera shake, and Smile Shutter™ technology, which helps ...
...shots. Face Detection can even distinguish between children and adults, so you can also select subject priority (Adult or Child Priority or touch subject on the pictures you expect from five sophisticated colors to reflect your images and still... The combination of their memorable moments. Choose from a Sony® digital camera. DSC-T77/T The ultra-slim Sony® Cyber-shot® DSC-T77 digital camera features a 3.0"1 widescreen LCD touch-screen display, Optical SteadyShot™ image stabilization to compensate for camera shake, and Smile Shutter™ technology, which helps ...


