Instruction Manual
Page 3
... the set has been exposed to the plugs, receptacles, and the point where the cord exits from the wall outlet and disconnect the antenna or cable system. Never block the slots and openings by a qualified technician to restore the set , and to qualified service personnel. [ Replacement parts When replacement parts are...
... the set has been exposed to the plugs, receptacles, and the point where the cord exits from the wall outlet and disconnect the antenna or cable system. Never block the slots and openings by a qualified technician to restore the set , and to qualified service personnel. [ Replacement parts When replacement parts are...
Instruction Manual
Page 5
...of the following measures: - These limits are designed to provide reasonable protection against harmful interference in the EMC Directive for using connection cables shorter than 3 meters (9.8 feet). [ Attention The electromagnetic fields at the specific frequencies may cause harmful interference to radio communications.... or an experienced radio/TV technician for help. This equipment generates, uses, and can be used in accordance with the limits for a digital device pursuant to Subpart B of Part 15 of FCC Rules. Reorient or relocate the receiving antenna. - [ Note: This equipment has...
...of the following measures: - These limits are designed to provide reasonable protection against harmful interference in the EMC Directive for using connection cables shorter than 3 meters (9.8 feet). [ Attention The electromagnetic fields at the specific frequencies may cause harmful interference to radio communications.... or an experienced radio/TV technician for help. This equipment generates, uses, and can be used in accordance with the limits for a digital device pursuant to Subpart B of Part 15 of FCC Rules. Reorient or relocate the receiving antenna. - [ Note: This equipment has...
Instruction Manual
Page 11
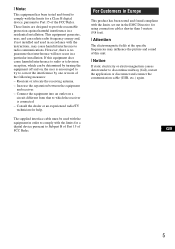
... The paint pen is used when operating the touch panel. It attaches to prevent the camera from damage by holding the paint pen. Cyber-shot application software - "Cyber-shot Step-up Guide" • Instruction Manual (this manual) (1) • Power cord ...(mains lead) (1) (not supplied in the USA and Canada) x Using the wrist strap Attach the strap and place your hand through the loop to the wrist strap. • USB, A/V cable for multi-use terminal (1) Note • Do not carry the camera...
... The paint pen is used when operating the touch panel. It attaches to prevent the camera from damage by holding the paint pen. Cyber-shot application software - "Cyber-shot Step-up Guide" • Instruction Manual (this manual) (1) • Power cord ...(mains lead) (1) (not supplied in the USA and Canada) x Using the wrist strap Attach the strap and place your hand through the loop to the wrist strap. • USB, A/V cable for multi-use terminal (1) Note • Do not carry the camera...

Instruction Manual
Page 36
... TV with the HD Output Adaptor Cable (not supplied) or Cyber-shot station (not supplied). • Set [COMPONENT] to [SD] when viewing movies. 36 Set [COMPONENT] to [HD(1080i)] in [Main Settings 2] by selecting (Settings) on the camera by connecting the camera to an HD (High Definition) TV with the cable for multi-use terminal (supplied...
... TV with the HD Output Adaptor Cable (not supplied) or Cyber-shot station (not supplied). • Set [COMPONENT] to [SD] when viewing movies. 36 Set [COMPONENT] to [HD(1080i)] in [Main Settings 2] by selecting (Settings) on the camera by connecting the camera to an HD (High Definition) TV with the cable for multi-use terminal (supplied...
Instruction Manual
Page 37
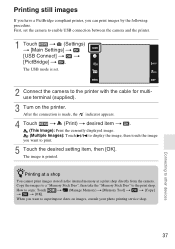
...set the camera to enable USB connection between the camera and the printer. 1 Touch t (Settings) t [Main Settings] t [USB Connect] t t [PictBridge] t . t (Manage Memory) t [Memory Tool] t t [Copy] When you want to print. 5 Touch the desired setting item, then [OK]. Connecting to copy: Touch t t [OK]. Printing still images If ... shop. Copy the images to a "Memory Stick Duo", then take the "Memory Stick Duo" to the printer with the cable for multiuse terminal (supplied). 3 Turn on images, consult your photo printing service shop. The USB mode is printed. zPrinting ...
...set the camera to enable USB connection between the camera and the printer. 1 Touch t (Settings) t [Main Settings] t [USB Connect] t t [PictBridge] t . t (Manage Memory) t [Memory Tool] t t [Copy] When you want to print. 5 Touch the desired setting item, then [OK]. Connecting to copy: Touch t t [OK]. Printing still images If ... shop. Copy the images to a "Memory Stick Duo", then take the "Memory Stick Duo" to the printer with the cable for multiuse terminal (supplied). 3 Turn on images, consult your photo printing service shop. The USB mode is printed. zPrinting ...

Instruction Manual
Page 40
... is displayed on the desktop. • To access the "PMB Guide" from the camera while the camera is recommended. 40 Using the AC Adaptor (not supplied) and the USB / A/V / DC IN cable for multi-use terminal 2 To the multi connector • is displayed. appears on... the screen of the camera. 1 To a USB jack Cable for multi-use terminal from the start using a battery with little remaining charge, you can start menu: Click [Start] t [All Programs] t [Sony Picture Utility] t [Help] t [PMB Guide]. When the indicator ...
... is displayed on the desktop. • To access the "PMB Guide" from the camera while the camera is recommended. 40 Using the AC Adaptor (not supplied) and the USB / A/V / DC IN cable for multi-use terminal 2 To the multi connector • is displayed. appears on... the screen of the camera. 1 To a USB jack Cable for multi-use terminal from the start using a battery with little remaining charge, you can start menu: Click [Start] t [All Programs] t [Sony Picture Utility] t [Help] t [PMB Guide]. When the indicator ...

Accessories Brochure
Page 2
... the HVL-ML20M Marine Light to feel powerless again when you've got an extra Sony® InfoLITHIUM® battery pack. Multi-use terminal cable (sold separately). Keep your gear dry at depths up on your new Cyber-shot camera from watery mishaps with its retractable plug can weaken the rubber gasket on extra O-rings...
... the HVL-ML20M Marine Light to feel powerless again when you've got an extra Sony® InfoLITHIUM® battery pack. Multi-use terminal cable (sold separately). Keep your gear dry at depths up on your new Cyber-shot camera from watery mishaps with its retractable plug can weaken the rubber gasket on extra O-rings...
Accessories Brochure
Page 3
...with arm strap and bicycle mounting bracket. *You need to install Picture Motion Browser supplied with your Cyber-shot® camera to change or termination without notice. Cyber-shot Station® Dock/HD Cable/GPS Unit/ Light/Tripods Put on your PC* to others. Designed for use in razor-sharp ...of every video and photo you take a lot of lighting level. HD Output Adaptor Cable VMC-MHC1 $39.99 Connects your Cyber-shot camera to remember where and when you 've got help with the Sony® Ring Light. Internet connection required. Carrying case included. The new integrated AV/...
...with arm strap and bicycle mounting bracket. *You need to install Picture Motion Browser supplied with your Cyber-shot® camera to change or termination without notice. Cyber-shot Station® Dock/HD Cable/GPS Unit/ Light/Tripods Put on your PC* to others. Designed for use in razor-sharp ...of every video and photo you take a lot of lighting level. HD Output Adaptor Cable VMC-MHC1 $39.99 Connects your Cyber-shot camera to remember where and when you 've got help with the Sony® Ring Light. Internet connection required. Carrying case included. The new integrated AV/...

Cyber-shot® Handbook
Page 18
...computer. However you can be performed on a "Memory Stick Duo" to the internal memory. • By making a USB connection between the camera and a computer with a cable for multi-use terminal, you cannot export data on the "Memory Stick Duo". When a "Memory Stick Duo" is no "Memory Stick ...import image data on images in [Copy] (page 56). Table of contents Operation Search HOME/MENU Search Using the internal memory (DSC-T77 only) The camera has approximately 15 MB of your computer Perform the procedure on pages 132 to 135 without error using this internal memory. Note &#...
...computer. However you can be performed on a "Memory Stick Duo" to the internal memory. • By making a USB connection between the camera and a computer with a cable for multi-use terminal, you cannot export data on the "Memory Stick Duo". When a "Memory Stick Duo" is no "Memory Stick ...import image data on images in [Copy] (page 56). Table of contents Operation Search HOME/MENU Search Using the internal memory (DSC-T77 only) The camera has approximately 15 MB of your computer Perform the procedure on pages 132 to 135 without error using this internal memory. Note &#...

Cyber-shot® Handbook
Page 63
... Search Index 63GB Table of contents Operation Search USB Connect Selects the USB mode when connecting the camera to a PictBridge compliant printer (page 142). Connects the camera to a computer or a PictBridge compliant printer using the cable for multi-use terminal. 1 t (Settings) t [Main Settings] t t [USB Connect] t t desired mode t Auto PictBridge PTP/MTP Mass Storage...
... Search Index 63GB Table of contents Operation Search USB Connect Selects the USB mode when connecting the camera to a PictBridge compliant printer (page 142). Connects the camera to a computer or a PictBridge compliant printer using the cable for multi-use terminal. 1 t (Settings) t [Main Settings] t t [USB Connect] t t desired mode t Auto PictBridge PTP/MTP Mass Storage...
Cyber-shot® Handbook
Page 73
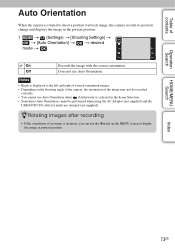
...; If the orientation of an image is incorrect, you can use terminal (not supplied). Table of contents Operation Search Auto Orientation When the camera is selected in the Scene Selection. • Sometimes Auto Orientation cannot be performed when using the AC Adaptor (not supplied) and the USB.../AV/DC IN cable for multi-use the [Rotate] on the shooting angle of the camera, the orientation of the image may not be recorded correctly. • You cannot use Auto Orientation when (Underwater...
...; If the orientation of an image is incorrect, you can use terminal (not supplied). Table of contents Operation Search Auto Orientation When the camera is selected in the Scene Selection. • Sometimes Auto Orientation cannot be performed when using the AC Adaptor (not supplied) and the USB.../AV/DC IN cable for multi-use the [Rotate] on the shooting angle of the camera, the orientation of the image may not be recorded correctly. • You cannot use Auto Orientation when (Underwater...

Cyber-shot® Handbook
Page 119
Refer also to the operating instructions supplied with the camera appear on the TV. Images shot with the TV. Notes • If your TV has stereo input jacks, connect the audio plug (black) of the cable for multi-use terminal to the left audio jack. • Icons and other indicators do not ...appear on the camera. Index 119GB The connection varies according ...
Refer also to the operating instructions supplied with the camera appear on the TV. Images shot with the TV. Notes • If your TV has stereo input jacks, connect the audio plug (black) of the cable for multi-use terminal to the left audio jack. • Icons and other indicators do not ...appear on the camera. Index 119GB The connection varies according ...

Cyber-shot® Handbook
Page 120
... r Touch / to [HD(1080i)] (page 65). • Images shot in [HD(1080i)] signal format. Turn off both the camera and the TV before connecting the camera to the TV. 1 Connect the camera to an HD (High Definition) TV with the camera appear on an HD (High Definition) TV • With [Multi-Purpose...To audio/video input jacks Green/Blue/Red White/Red (Playback) button HD Output Adaptor Cable (not supplied) 2 To the multi connector 2 Turn on the TV and set to [SD] (DSC-T700 only). • When using the camera abroad, it may be played back in HD format. • You cannot view ...
... r Touch / to [HD(1080i)] (page 65). • Images shot in [HD(1080i)] signal format. Turn off both the camera and the TV before connecting the camera to the TV. 1 Connect the camera to an HD (High Definition) TV with the camera appear on an HD (High Definition) TV • With [Multi-Purpose...To audio/video input jacks Green/Blue/Red White/Red (Playback) button HD Output Adaptor Cable (not supplied) 2 To the multi connector 2 Turn on the TV and set to [SD] (DSC-T700 only). • When using the camera abroad, it may be played back in HD format. • You cannot view ...

Cyber-shot® Handbook
Page 121
...the country or region where the camera is used. NTSC system Bahama Islands, Bolivia, Canada, Central America, Chile, Colombia, Ecuador, Jamaica, Japan, Korea, Mexico, Peru, Surinam, Taiwan, the Philippines, the U.S.A., Venezuela, etc. By connecting Sony's PhotoTV HD-compatible devices using an HD Output Adaptor Cable (not supplied), whole new ...and colors. • The settings are also required to be made on a TV screen, you want to the operating instruction of the digital still camera. For details, refer to view images on the TV. The color system of the TV must match that of the TV.
...the country or region where the camera is used. NTSC system Bahama Islands, Bolivia, Canada, Central America, Chile, Colombia, Ecuador, Jamaica, Japan, Korea, Mexico, Peru, Surinam, Taiwan, the Philippines, the U.S.A., Venezuela, etc. By connecting Sony's PhotoTV HD-compatible devices using an HD Output Adaptor Cable (not supplied), whole new ...and colors. • The settings are also required to be made on a TV screen, you want to the operating instruction of the digital still camera. For details, refer to view images on the TV. The color system of the TV must match that of the TV.

Cyber-shot® Handbook
Page 126
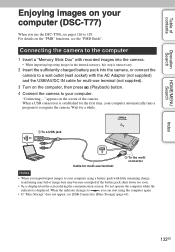
...(page 63). When a USB connection is established for multi-use the DSC-T77, see the "PMB Guide". When importing/exporting images on the "Memory Stick Duo", insert the "Memory Stick Duo" into the camera, or connect the camera to a wall outlet (wall socket) with little remaining charge, transferring ...battery pack with the AC Adaptor (not supplied) and the USB/AV/DC IN cable for the first time, your computer. Connecting the camera to the computer 1 Insert the sufficiently charged battery pack into the camera. 2 Turn on your computer using the computer again. • If "Mass ...
...(page 63). When a USB connection is established for multi-use the DSC-T77, see the "PMB Guide". When importing/exporting images on the "Memory Stick Duo", insert the "Memory Stick Duo" into the camera, or connect the camera to a wall outlet (wall socket) with little remaining charge, transferring ...battery pack with the AC Adaptor (not supplied) and the USB/AV/DC IN cable for the first time, your computer. Connecting the camera to the computer 1 Insert the sufficiently charged battery pack into the camera. 2 Turn on your computer using the computer again. • If "Mass ...

Cyber-shot® Handbook
Page 128
...]. 3 Confirm the device on the LCD screen. Notes • You cannot play back exported images on this camera, files containing images which were shot using other cameras. • When printing images at a shop, export the images to the internal memory. Image exporting starts. ...If the AutoPlay Wizard appears, close it. 2 Double-click (PMB) on a computer or images which were processed on the desktop to 3 below before: • Disconnecting the cable...
...]. 3 Confirm the device on the LCD screen. Notes • You cannot play back exported images on this camera, files containing images which were shot using other cameras. • When printing images at a shop, export the images to the internal memory. Image exporting starts. ...If the AutoPlay Wizard appears, close it. 2 Double-click (PMB) on a computer or images which were processed on the desktop to 3 below before: • Disconnecting the cable...
Cyber-shot® Handbook
Page 132
... 63). Do not operate the computer while the indicator is displayed on your computer (DSC-T77) When you can start using a battery pack with the AC Adaptor (not supplied) and the USB/AV/DC IN cable for the first time, your computer automatically runs a program to a wall outlet (...the internal memory, this step is established for multi-use the DSC-T700, see the "PMB Guide". Connecting the camera to the computer 1 Insert a "Memory Stick Duo" with recorded images into the camera, or connect the camera to recognize the camera. When the indicator changes to , you use terminal (not ...
... 63). Do not operate the computer while the indicator is displayed on your computer (DSC-T77) When you can start using a battery pack with the AC Adaptor (not supplied) and the USB/AV/DC IN cable for the first time, your computer automatically runs a program to a wall outlet (...the internal memory, this step is established for multi-use the DSC-T700, see the "PMB Guide". Connecting the camera to the computer 1 Insert a "Memory Stick Duo" with recorded images into the camera, or connect the camera to recognize the camera. When the indicator changes to , you use terminal (not ...

Cyber-shot® Handbook
Page 134
...". 3 Select the still images to be exported on the main screen. 4 Click on the top of contents Operation Search HOME/MENU Search Exporting images to the camera When an image file...that image again on the camera by exporting the image file to 3 below before: • Disconnecting the cable for playing back, on this camera, the mark is displayed on...camera, files containing images which were processed on the confirmation window, then click [OK]. For details, see the "PMB Guide". 1 Make a USB connection between the camera and a computer. The Export Image screen appears. 5 Select [Cyber-shot...
...". 3 Select the still images to be exported on the main screen. 4 Click on the top of contents Operation Search HOME/MENU Search Exporting images to the camera When an image file...that image again on the camera by exporting the image file to 3 below before: • Disconnecting the cable for playing back, on this camera, the mark is displayed on...camera, files containing images which were processed on the confirmation window, then click [OK]. For details, see the "PMB Guide". 1 Make a USB connection between the camera and a computer. The Export Image screen appears. 5 Select [Cyber-shot...

Cyber-shot® Handbook
Page 138
...file names, see pages 129, 135. 4 View images on a computer 1 Prepare the camera and a Macintosh computer. 2 Connect the camera to your computer with the cable for multi-use terminal. 1 To a USB jack Cable for multi-use terminal 2 To the multi connector 3 Copy image files to the Macintosh ... the newly recognized icon t [DCIM] t the folder where the images you perform the procedures listed below, or the camera is disconnected from the computer. • Disconnecting the cable for multi-use terminal. • Removing a "Memory Stick Duo". • Inserting a "Memory Stick Duo" into the...
...file names, see pages 129, 135. 4 View images on a computer 1 Prepare the camera and a Macintosh computer. 2 Connect the camera to your computer with the cable for multi-use terminal. 1 To a USB jack Cable for multi-use terminal 2 To the multi connector 3 Copy image files to the Macintosh ... the newly recognized icon t [DCIM] t the folder where the images you perform the procedures listed below, or the camera is disconnected from the computer. • Disconnecting the cable for multi-use terminal. • Removing a "Memory Stick Duo". • Inserting a "Memory Stick Duo" into the...
Cyber-shot® Handbook
Page 142
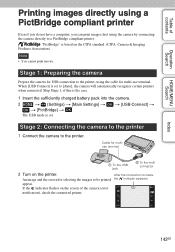
... a PictBridge compliant printer Even if you do not have a computer, you can print images shot using the cable for selecting the images to the printer. Skip Stage 1, if this is the case. 1 Insert the sufficiently charged battery pack into the camera. 2 t (Settings) t [Main Settings] t t [PictBridge] t The USB mode is set . Stage 1: Preparing the...
... a PictBridge compliant printer Even if you do not have a computer, you can print images shot using the cable for selecting the images to the printer. Skip Stage 1, if this is the case. 1 Insert the sufficiently charged battery pack into the camera. 2 t (Settings) t [Main Settings] t t [PictBridge] t The USB mode is set . Stage 1: Preparing the...


