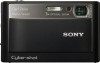

Instruction Manual
Page 2
...them. Use [ Power Sources This set may cause hazards. This is intended to alert the user to the operating instructions. [ Polarization This set should still fail to fit, contact your Sony dealer regarding this manual for future ...reference. Record the serial number in the U.S.A. Refer to these numbers whenever you are unable to your home, consult your protection, please read these safety instructions completely before operating the appliance, and keep this product. DSC-T20/DSC...
...them. Use [ Power Sources This set may cause hazards. This is intended to alert the user to the operating instructions. [ Polarization This set should still fail to fit, contact your Sony dealer regarding this manual for future ...reference. Record the serial number in the U.S.A. Refer to these numbers whenever you are unable to your home, consult your protection, please read these safety instructions completely before operating the appliance, and keep this product. DSC-T20/DSC...
Instruction Manual
Page 3
...table recommended by the manufacturer. [ Ventilation The slots and openings in the cabinet are specified in the operating instructions. Do not place the set near or over a radiator or heat register, or where it is provided. - Improper adjustment of other controls may result in cabinet, unless... be sure the service technician has used replacement parts specified by the manufacturer) to dangerous voltage or other hazards. If the set , and to service the set is in a confined space, such as specified by the manufacturer that are provided for example, near a bathtub, washbowl, ...
...table recommended by the manufacturer. [ Ventilation The slots and openings in the cabinet are specified in the operating instructions. Do not place the set near or over a radiator or heat register, or where it is provided. - Improper adjustment of other controls may result in cabinet, unless... be sure the service technician has used replacement parts specified by the manufacturer) to dangerous voltage or other hazards. If the set , and to service the set is in a confined space, such as specified by the manufacturer that are provided for example, near a bathtub, washbowl, ...

Instruction Manual
Page 5
... sure to attach the fuse cover after you should lose the fuse cover, please contact your nearest Sony service station. 5 By ensuring this product is disposed of correctly, you will help . Notice for...the plug without the fuse cover. Consult the dealer or an experienced radio/TV technician for a digital device pursuant to be replaced, a fuse of the same rating as household waste. Should the ...measures: - For more of electrical and electronic equipment. If the plug supplied with the limits set out in the plug supplied need to Subpart B of Part 15 of FCC Rules. Instead it...
... sure to attach the fuse cover after you should lose the fuse cover, please contact your nearest Sony service station. 5 By ensuring this product is disposed of correctly, you will help . Notice for...the plug without the fuse cover. Consult the dealer or an experienced radio/TV technician for a digital device pursuant to be replaced, a fuse of the same rating as household waste. Should the ...measures: - For more of electrical and electronic equipment. If the plug supplied with the limits set out in the plug supplied need to Subpart B of Part 15 of FCC Rules. Instead it...
Instruction Manual
Page 7
... started 8 Checking the accessories supplied 8 1 Preparing the battery pack 9 2 Inserting the battery pack/a "Memory Stick Duo" (not supplied) ........ 10 3 Turning the camera on/setting the clock 12 Shooting images easily (Auto adjustment mode 13 Zoom/Flash/Macro/Self-timer/Display 14 Viewing/deleting images 15 Learning the various functions - ...
... started 8 Checking the accessories supplied 8 1 Preparing the battery pack 9 2 Inserting the battery pack/a "Memory Stick Duo" (not supplied) ........ 10 3 Turning the camera on/setting the clock 12 Shooting images easily (Auto adjustment mode 13 Zoom/Flash/Macro/Self-timer/Display 14 Viewing/deleting images 15 Learning the various functions - ...
Instruction Manual
Page 11
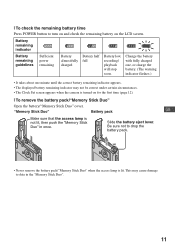
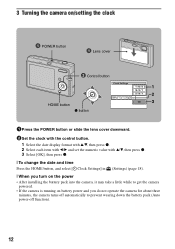
This may not be correct under certain circumstances. • The Clock Set screen appears when the camera is lit. Slide the battery eject lever. [ To check the remaining battery time Press POWER button to data in once. Be sure not to drop ...
This may not be correct under certain circumstances. • The Clock Set screen appears when the camera is lit. Slide the battery eject lever. [ To check the remaining battery time Press POWER button to data in once. Be sure not to drop ...
Instruction Manual
Page 12
... time Press the HOME button, and select [ Clock Settings] in (Settings) (page 18). [ When you turn on the power • After installing the battery pack into the camera, it may take a little while to get the camera powered. • If the camera is running on battery power and you do not operate... the camera for about three minutes, the camera turns off ...
... time Press the HOME button, and select [ Clock Settings] in (Settings) (page 18). [ When you turn on the power • After installing the battery pack into the camera, it may take a little while to get the camera powered. • If the camera is running on battery power and you do not operate... the camera for about three minutes, the camera turns off ...

Instruction Manual
Page 14
... B ( ) on the control button repeatedly until the desired mode is selected. : Flash Auto Strobes when there is insufficient light or backlight (default setting) : Flash forced on : Slow synchro (Flash forced on) The shutter speed is slow in a dark place to clearly shoot the background that is... the self-timer Press V ( ) on the control button repeatedly until the desired mode is selected. : Not using the self-timer : Setting the 10-second delay self-timer : Setting the 2-second delay self-timer Press the shutter button, the self-timer lamp flashes, and a beep sounds until the desired mode is...
... B ( ) on the control button repeatedly until the desired mode is selected. : Flash Auto Strobes when there is insufficient light or backlight (default setting) : Flash forced on : Slow synchro (Flash forced on) The shutter speed is slow in a dark place to clearly shoot the background that is... the self-timer Press V ( ) on the control button repeatedly until the desired mode is selected. : Not using the self-timer : Setting the 10-second delay self-timer : Setting the 2-second delay self-timer Press the shutter button, the self-timer lamp flashes, and a beep sounds until the desired mode is...
Instruction Manual
Page 15
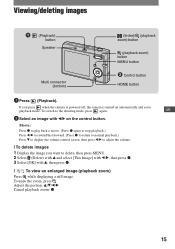
...to display the volume control screen, then press b/B to adjust the volume. [ To delete images 1 Display the image you press when the camera is powered off, the camera is turned on the control button. If you want to delete, then press MENU. 2 Select (Delete) with v and select [This ...Image] with b/B, then press z. 3 Select [OK] with b/B on automatically and set to the shooting mode, press again. Viewing/deleting images (Playback) button Speaker ...
...to display the volume control screen, then press b/B to adjust the volume. [ To delete images 1 Display the image you press when the camera is powered off, the camera is turned on the control button. If you want to delete, then press MENU. 2 Select (Delete) with v and select [This ...Image] with b/B, then press z. 3 Select [OK] with b/B on automatically and set to the shooting mode, press again. Viewing/deleting images (Playback) button Speaker ...

Instruction Manual
Page 18
...Select an item with v/V, then press z. [ When you select (Settings). 2 Move the frame with B and select a setting with v/V, then press z. 3 Select the desired setting with v/V. • This procedure is the gateway screen for all the functions of your camera. Control button HOME button z button 1Press HOME to the shooting mode..., press the shutter button halfway down. 18 You can select the shooting mode or playback mode, or change the settings from the HOME screen. HOME/...
...Select an item with v/V, then press z. [ When you select (Settings). 2 Move the frame with B and select a setting with v/V, then press z. 3 Select the desired setting with v/V. • This procedure is the gateway screen for all the functions of your camera. Control button HOME button z button 1Press HOME to the shooting mode..., press the shutter button halfway down. 18 You can select the shooting mode or playback mode, or change the settings from the HOME screen. HOME/...

Instruction Manual
Page 19
... Tool Format Change REC.Folder Internal Memory Tool Format Create REC.Folder Copy Settings Main Settings Main Settings 1 Beep Initialize Main Settings 2 USB Connect Video Out Function Guide COMPONENT Shooting Settings Shooting Settings 1 AF Illuminator AF Mode Shooting Settings 2 Auto Orientation Grid Line Digital Zoom Auto Review Clock Settings Language Setting 19 For details on the screen by the guide.
... Tool Format Change REC.Folder Internal Memory Tool Format Create REC.Folder Copy Settings Main Settings Main Settings 1 Beep Initialize Main Settings 2 USB Connect Video Out Function Guide COMPONENT Shooting Settings Shooting Settings 1 AF Illuminator AF Mode Shooting Settings 2 Auto Orientation Grid Line Digital Zoom Auto Review Clock Settings Language Setting 19 For details on the screen by the guide.

Instruction Manual
Page 20
Function Guide • The menu can be displayed only when the camera is hidden, keep pressing v/V until the item appears on the control button. If the desired item is hidden, keep pressing b/B until the item appears on the screen. 3Select the desired setting with b/B on the control button. • If the desired item...
Function Guide • The menu can be displayed only when the camera is hidden, keep pressing v/V until the item appears on the control button. If the desired item is hidden, keep pressing b/B until the item appears on the screen. 3Select the desired setting with b/B on the control button. • If the desired item...

Instruction Manual
Page 21
Menu for shooting Scene Selection Selects the preset settings according to much. Color Mode Changes the vividness of... is available only in the playback mode. Face Detection Detects the faces and adjusts focus and other setting to the scene. EV Adjusts Exposure. Flash Level Adjusts the amount of flash light. SteadyShot Selects...Retouches images. White Bal Adjusts the color tones. Prints images using flash. Rotates a still image. SETUP Selects shooting settings. Adds a Print order mark. Also, different items are available depending on the selected shooting mode (such as ...
Menu for shooting Scene Selection Selects the preset settings according to much. Color Mode Changes the vividness of... is available only in the playback mode. Face Detection Detects the faces and adjusts focus and other setting to the scene. EV Adjusts Exposure. Flash Level Adjusts the amount of flash light. SteadyShot Selects...Retouches images. White Bal Adjusts the color tones. Prints images using flash. Rotates a still image. SETUP Selects shooting settings. Adds a Print order mark. Also, different items are available depending on the selected shooting mode (such as ...
Instruction Manual
Page 26
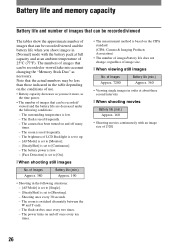
... viewed and the battery life are decreased under the following situations: - [AF Mode] is set to [Single]. - [SteadyShot] is set to [Shooting]. - The numbers of 25°C (77°F). The camera has been turned on the conditions of use. • Battery capacity decreases as you shoot ... up. - [AF Mode] is set to [Monitor]. - [SteadyShot] is set to [On]. [ When shooting still images No. The flash strobes once every two times. - The power turns on the CIPA standard. (CIPA: Camera & Imaging Products Association) • The number of images/battery life does not change, ...
... viewed and the battery life are decreased under the following situations: - [AF Mode] is set to [Single]. - [SteadyShot] is set to [Shooting]. - The numbers of 25°C (77°F). The camera has been turned on the conditions of use. • Battery capacity decreases as you shoot ... up. - [AF Mode] is set to [Monitor]. - [SteadyShot] is set to [On]. [ When shooting still images No. The flash strobes once every two times. - The power turns on the CIPA standard. (CIPA: Camera & Imaging Products Association) • The number of images/battery life does not change, ...

Instruction Manual
Page 27
...During recording, movie recording stops automatically when the file size of the movie reaches approx. 2 GB. • This camera does not support HD recordings or playbacks for when [REC Mode] is set to [Normal]. • When the number of remaining shootable images is greater than 9,999, the ">9999" indicator... appears. • When images recorded using earlier Sony models are played back on this camera, the display may differ from the menu (...
...During recording, movie recording stops automatically when the file size of the movie reaches approx. 2 GB. • This camera does not support HD recordings or playbacks for when [REC Mode] is set to [Normal]. • When the number of remaining shootable images is greater than 9,999, the ">9999" indicator... appears. • When images recorded using earlier Sony models are played back on this camera, the display may differ from the menu (...
Instruction Manual
Page 28
... be checked when you experience trouble with a new one minute, and turn on the camera again (page 12). • The battery pack is on the power. 3 Initialize the settings (page 19). 4 Consult your Sony dealer or local authorized Sony service facility. The power turns off automatically to prevent wearing down the battery pack. Install...
... be checked when you experience trouble with a new one minute, and turn on the camera again (page 12). • The battery pack is on the power. 3 Initialize the settings (page 19). 4 Consult your Sony dealer or local authorized Sony service facility. The power turns off automatically to prevent wearing down the battery pack. Install...

Instruction Manual
Page 29
...with a new one. Cannot insert dates on images. • This camera does not have a feature for superimposing dates on your camera is not guaranteed. • The camera is set to [640(Fine)] when recording movies. Viewing images Your camera cannot play back images. • Press (Playback) (page 15). ...or purple streaks appear on the image. This phenomenon is dead. Replace it is set to the LOCK position. Insert a "Memory Stick PRO Duo". Vertical streaks appear when you use the camera in USB mode. Fully discharge and then charge the battery pack to other than ...
...with a new one. Cannot insert dates on images. • This camera does not have a feature for superimposing dates on your camera is not guaranteed. • The camera is set to [640(Fine)] when recording movies. Viewing images Your camera cannot play back images. • Press (Playback) (page 15). ...or purple streaks appear on the image. This phenomenon is dead. Replace it is set to the LOCK position. Insert a "Memory Stick PRO Duo". Vertical streaks appear when you use the camera in USB mode. Fully discharge and then charge the battery pack to other than ...

Instruction Manual
Page 30
... your hand. • Do not leave the camera in the camera, and then leave the camera for the moisture to a warm location, moisture may cause the camera to remove fingerprints, dust, etc. In this case, be repaired. [ On carrying Do not sit down in a chair or other settings regardless of the internal rechargeable backup battery...
... your hand. • Do not leave the camera in the camera, and then leave the camera for the moisture to a warm location, moisture may cause the camera to remove fingerprints, dust, etc. In this case, be repaired. [ On carrying Do not sit down in a chair or other settings regardless of the internal rechargeable backup battery...

Instruction Manual
Page 31
... Stick PRO Duo", , "Memory Stick Micro", "MagicGate", and are trademarks of Sony Corporation. • Microsoft, Windows, Windows Vista and DirectX are either registered trademarks ...lens f = 6.33 - 19.0 mm (38 - 114 mm when converted to a 35 mm still camera) F3.5 - 4.3 Exposure control: Automatic exposure, Scene Selection (9 modes) White balance: Automatic, Daylight, Cloudy... Recording media: Internal Memory (approx. 31 MB), "Memory Stick Duo" Flash: Flash range (ISO (Recommended Exposure Index) set to Auto): approx. 0.1 to 3.0 m (4 inches to 9 feet 10 1/8 inches) (W)/ approx. 0.25 to 2.5 ...
... Stick PRO Duo", , "Memory Stick Micro", "MagicGate", and are trademarks of Sony Corporation. • Microsoft, Windows, Windows Vista and DirectX are either registered trademarks ...lens f = 6.33 - 19.0 mm (38 - 114 mm when converted to a 35 mm still camera) F3.5 - 4.3 Exposure control: Automatic exposure, Scene Selection (9 modes) White balance: Automatic, Daylight, Cloudy... Recording media: Internal Memory (approx. 31 MB), "Memory Stick Duo" Flash: Flash range (ISO (Recommended Exposure Index) set to Auto): approx. 0.1 to 3.0 m (4 inches to 9 feet 10 1/8 inches) (W)/ approx. 0.25 to 2.5 ...


