Instruction Manual
Page 5
...contents Notes on the screen 16 Changing the settings - Menu/Setup 18 Menu items 20 Setup items 21 Enjoying your camera 6 Getting started 7 Checking the accessories supplied 7 1 Inserting the batteries/"Memory Stick Duo" media (sold separately) ...8 2 Turning the camera on/setting the ...clock 10 Shooting images easily 11 Shooting mode/Zoom/Flash/Macro/Self-timer/Display/Image size ........ 12 Viewing/deleting images 14 Indicators on using your computer 22 Supported Operating Systems for USB connection and application software (supplied 22 Viewing "Cyber-shot...
...contents Notes on the screen 16 Changing the settings - Menu/Setup 18 Menu items 20 Setup items 21 Enjoying your camera 6 Getting started 7 Checking the accessories supplied 7 1 Inserting the batteries/"Memory Stick Duo" media (sold separately) ...8 2 Turning the camera on/setting the ...clock 10 Shooting images easily 11 Shooting mode/Zoom/Flash/Macro/Self-timer/Display/Image size ........ 12 Viewing/deleting images 14 Indicators on using your computer 22 Supported Operating Systems for USB connection and application software (supplied 22 Viewing "Cyber-shot...
Instruction Manual
Page 6
... compensation for damaged content or recording failure Sony cannot compensate for effective use the camera near a location that the camera is working correctly. • The camera is neither dust-proof, nor splashproof, nor water-proof. Otherwise, the camera may cause malfunctions. • If moisture... condensation occurs, remove it before operating the camera. • Avoid exposing the camera to record images. If water enters inside the camera, a malfunction may cause dirt on the LCD screen and lens • The LCD screen is...
... compensation for damaged content or recording failure Sony cannot compensate for effective use the camera near a location that the camera is working correctly. • The camera is neither dust-proof, nor splashproof, nor water-proof. Otherwise, the camera may cause malfunctions. • If moisture... condensation occurs, remove it before operating the camera. • Avoid exposing the camera to record images. If water enters inside the camera, a malfunction may cause dirt on the LCD screen and lens • The LCD screen is...
Instruction Manual
Page 8
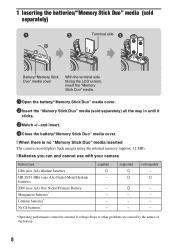
... nature of the battery. 8 and insert. 4Close the battery/"Memory Stick Duo" media cover. [ When there is no "Memory Stick Duo" media inserted The camera records/plays back images using the internal memory (approx. 12 MB). [ Batteries you can and cannot use with your... batteries/"Memory Stick Duo" media (sold separately) ɟ 2 1 Terminal side ɠ Battery/"Memory Stick Duo" media cover With the terminal side facing the LCD screen, insert the "Memory Stick Duo" media. 1Open the battery/"Memory Stick Duo" media cover. 2Insert the "Memory Stick Duo" media (sold separately) all the way...
... nature of the battery. 8 and insert. 4Close the battery/"Memory Stick Duo" media cover. [ When there is no "Memory Stick Duo" media inserted The camera records/plays back images using the internal memory (approx. 12 MB). [ Batteries you can and cannot use with your... batteries/"Memory Stick Duo" media (sold separately) ɟ 2 1 Terminal side ɠ Battery/"Memory Stick Duo" media cover With the terminal side facing the LCD screen, insert the "Memory Stick Duo" media. 1Open the battery/"Memory Stick Duo" media cover. 2Insert the "Memory Stick Duo" media (sold separately) all the way...
Instruction Manual
Page 9
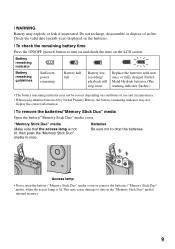
... not lit, then push the "Memory Stick Duo" media in once. This may cause damage to turn on and check the time on the LCD screen. Replace the batteries with new ones, or fully charged NickelMetal Hydride batteries.(The warning indicator flashes.) • The battery remaining indicator may not be correct...
... not lit, then push the "Memory Stick Duo" media in once. This may cause damage to turn on and check the time on the LCD screen. Replace the batteries with new ones, or fully charged NickelMetal Hydride batteries.(The warning indicator flashes.) • The battery remaining indicator may not be correct...
Instruction Manual
Page 10
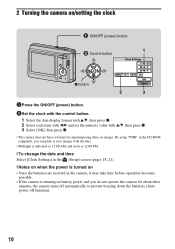
... time Select [Clock Settings] in the (Setup) screen (pages 18, 21). [ Notes on when the power is turned on • Once the batteries are inserted in the camera, it may take time before operation becomes possible. • If the camera is running on battery power and you do not ... with v/V, then press z. 2 Select each item with b/B and set the numeric value with v/V, then press z. 3 Select [OK], then press z. • The camera does not have a feature for about three minutes, the camera turns off automatically to prevent wearing down the batteries (Auto power-off function). 10 2 Turning the...
... time Select [Clock Settings] in the (Setup) screen (pages 18, 21). [ Notes on when the power is turned on • Once the batteries are inserted in the camera, it may take time before operation becomes possible. • If the camera is running on battery power and you do not ... with v/V, then press z. 2 Select each item with b/B and set the numeric value with v/V, then press z. 3 Select [OK], then press z. • The camera does not have a feature for about three minutes, the camera turns off automatically to prevent wearing down the batteries (Auto power-off function). 10 2 Turning the...
Instruction Manual
Page 13
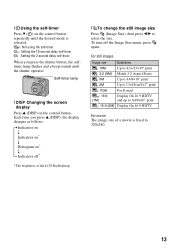
...:9 HDTV and up [ To change the still image size Press (Image Size), then press b/B to 320×240. 13 Self-timer lamp [ DISP Changing the screen display Press v (DISP) on the control button. To turn off * * The brightness of the LCD Backlight up to A4/8×10" print : 16:9 (2M) Display...
...:9 HDTV and up [ To change the still image size Press (Image Size), then press b/B to 320×240. 13 Self-timer lamp [ DISP Changing the screen display Press v (DISP) on the control button. To turn off * * The brightness of the LCD Backlight up to A4/8×10" print : 16:9 (2M) Display...
Instruction Manual
Page 14
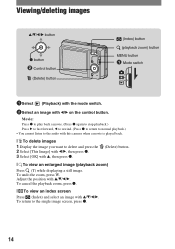
To cancel the playback zoom, press z. [ To view an index screen Press (Index) and select an image with v/V/b/B. To return to delete and press the 2 Select [This Image] with b/B, then press z. 3 Select [OK] with v, then press z. (... ɟ Control button (Delete) button (Index) button (playback zoom) button MENU button Mode switch 1Select (Playback) with the mode switch. 2Select an image with this camera when a movie is played back. [ To delete images 1 Display the image you want to the single image...
To cancel the playback zoom, press z. [ To view an index screen Press (Index) and select an image with v/V/b/B. To return to delete and press the 2 Select [This Image] with b/B, then press z. 3 Select [OK] with v, then press z. (... ɟ Control button (Delete) button (Index) button (playback zoom) button MENU button Mode switch 1Select (Playback) with the mode switch. 2Select an image with this camera when a movie is played back. [ To delete images 1 Display the image you want to the single image...

Instruction Manual
Page 15
To cancel a selection, select an image you want to delete with v, then press z. • To delete all the images of a folder, select [All In This Folder] in the checkbox of the image. The mark is displayed, press the (Delete) button and select [Multiple Images] with b/B on the control button, then press z. 2 Select the image you have selected for deletion, then press z again. 3 Press the MENU button. 4 Select [OK] with v/V/b/B, then press z. [ To delete images in index mode 1 While an index screen is checked in step 1, then press z. 15
To cancel a selection, select an image you want to delete with v, then press z. • To delete all the images of a folder, select [All In This Folder] in the checkbox of the image. The mark is displayed, press the (Delete) button and select [Multiple Images] with b/B on the control button, then press z. 2 Select the image you have selected for deletion, then press z again. 3 Press the MENU button. 4 Select [OK] with v/V/b/B, then press z. [ To delete images in index mode 1 While an index screen is checked in step 1, then press z. 15
Instruction Manual
Page 16
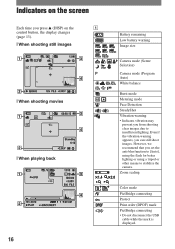
... warning appears, you from shooting clear images due to stabilize the camera. Zoom scaling Color mode PictBridge connecting Protect Print order (DPOF) mark PictBridge connecting • Do not disconnect the USB cable while the mark is displayed. Indicators on the screen Each time you press v (DISP) on the A control button, the display...
... warning appears, you from shooting clear images due to stabilize the camera. Zoom scaling Color mode PictBridge connecting Protect Print order (DPOF) mark PictBridge connecting • Do not disconnect the USB cable while the mark is displayed. Indicators on the screen Each time you press v (DISP) on the A control button, the display...
Instruction Manual
Page 18
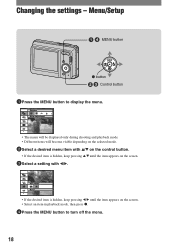
... button. • If the desired item is hidden, keep pressing v/V until the item appears on the screen. 3Select a setting with b/B. • If the desired item is hidden, keep pressing b/B until the item appears on the screen. • Select an item in playback mode, then press z. 4Press the MENU button to turn off...
... button. • If the desired item is hidden, keep pressing v/V until the item appears on the screen. 3Select a setting with b/B. • If the desired item is hidden, keep pressing b/B until the item appears on the screen. • Select an item in playback mode, then press z. 4Press the MENU button to turn off...
Instruction Manual
Page 20
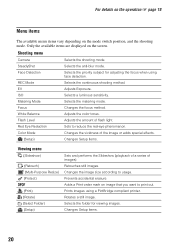
... using face detection. Changes Setup items. 20 For details on the operation 1 page 18 Menu items The available menu items vary depending on the screen. Shooting menu Camera Selects the shooting mode. Focus White Balance Flash Level Changes the focus method. Selects the metering mode. Retouches still images. EV ISO Metering Mode...
... using face detection. Changes Setup items. 20 For details on the operation 1 page 18 Menu items The available menu items vary depending on the screen. Shooting menu Camera Selects the shooting mode. Focus White Balance Flash Level Changes the focus method. Selects the metering mode. Retouches still images. EV ISO Metering Mode...
Instruction Manual
Page 21
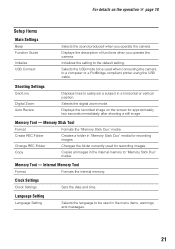
...used for recording images. Language Setting Language Setting Selects the language to "Memory Stick Duo" media. Shooting Settings Grid Line Digital Zoom Auto Review Displays lines to a computer or a PictBridge compliant printer using the USB cable. Clock Settings Clock Settings Sets... Function Guide Initialize USB Connect Selects the sound produced when you operate the camera. Memory Stick Tool Format Formats the "Memory Stick Duo" media. For details on the screen for approximately two seconds immediately after shooting a still image. Displays the description...
...used for recording images. Language Setting Language Setting Selects the language to "Memory Stick Duo" media. Shooting Settings Grid Line Digital Zoom Auto Review Displays lines to a computer or a PictBridge compliant printer using the USB cable. Clock Settings Clock Settings Sets... Function Guide Initialize USB Connect Selects the sound produced when you operate the camera. Memory Stick Tool Format Formats the "Memory Stick Duo" media. For details on the screen for approximately two seconds immediately after shooting a still image. Displays the description...
Instruction Manual
Page 23
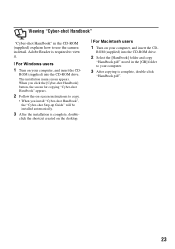
When you click the [Cyber-shot Handbook] button, the screen for copying "Cyber-shot Handbook" appears. 2 Follow the on-screen instructions to use the camera in detail. ROM (supplied) into the CD-ROM drive. 2 Select the [Handbook] folder and copy "Handbook.pdf" stored in the [GB] folder to view it. [ ...
When you click the [Cyber-shot Handbook] button, the screen for copying "Cyber-shot Handbook" appears. 2 Follow the on-screen instructions to use the camera in detail. ROM (supplied) into the CD-ROM drive. 2 Select the [Handbook] folder and copy "Handbook.pdf" stored in the [GB] folder to view it. [ ...
Instruction Manual
Page 28
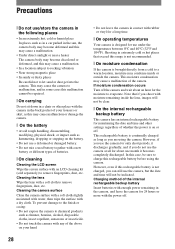
... chemical products such as thinner, benzine, alcohol, disposable cloths, insect repellent, sunscreen or insecticide. • Do not touch the camera with any of batteries. [ On cleaning Cleaning the LCD screen Wipe the screen surface with a dry cloth. However, even if this rechargeable battery is designed for maintaining the date and time and other...
... chemical products such as thinner, benzine, alcohol, disposable cloths, insect repellent, sunscreen or insecticide. • Do not touch the camera with any of batteries. [ On cleaning Cleaning the LCD screen Wipe the screen surface with a dry cloth. However, even if this rechargeable battery is designed for maintaining the date and time and other...
Instruction Manual
Page 29
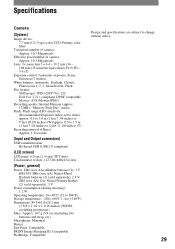
...] Image device: 7.7 mm (1/2.3 type) color CCD, Primary color filter Total pixel number of camera: Approx. 10.3 Megapixels Effective pixel number of camera: Approx. 10.1 Megapixels Lens: 3× zoom lens f = 6.4 - 19.2 mm (36 - 108 mm (35 mm film equivalent)) F2.9 (W) - ... inches to 4 feet 11 1/8 inches) (T) Recording interval of Burst: Approx. 1.0 seconds [Input and Output connectors] USB communication: Hi-Speed USB (USB 2.0 compliant) [LCD screen] LCD panel: 6.0 cm (2.4 type) TFT drive Total number of dots: 112 320 (480×234) dots [Power, general] Power: LR6 (size AA) Alkaline batteries ...
...] Image device: 7.7 mm (1/2.3 type) color CCD, Primary color filter Total pixel number of camera: Approx. 10.3 Megapixels Effective pixel number of camera: Approx. 10.1 Megapixels Lens: 3× zoom lens f = 6.4 - 19.2 mm (36 - 108 mm (35 mm film equivalent)) F2.9 (W) - ... inches to 4 feet 11 1/8 inches) (T) Recording interval of Burst: Approx. 1.0 seconds [Input and Output connectors] USB communication: Hi-Speed USB (USB 2.0 compliant) [LCD screen] LCD panel: 6.0 cm (2.4 type) TFT drive Total number of dots: 112 320 (480×234) dots [Power, general] Power: LR6 (size AA) Alkaline batteries ...


