Instruction Manual
Page 1
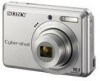
Digital Still Camera Instruction Manual GB DSC-S930 For details on advanced operations, please read this manual thoroughly, and retain it for future reference. © 2009 Sony Corporation 4-126-520-11(1) Operating Instructions Before operating the unit, please read "Cybershot Handbook" (PDF) and "Cyber-shot Step-up Guide" on the CD-ROM (supplied) using a computer.
Digital Still Camera Instruction Manual GB DSC-S930 For details on advanced operations, please read this manual thoroughly, and retain it for future reference. © 2009 Sony Corporation 4-126-520-11(1) Operating Instructions Before operating the unit, please read "Cybershot Handbook" (PDF) and "Cyber-shot Step-up Guide" on the CD-ROM (supplied) using a computer.
Instruction Manual
Page 2
....gov/hazardouswaste/perchlorate Perchlorate Material: Lithium battery contains perchlorate. 2 Model No. Address: 16530 Via Esprillo, San Diego, CA 92127U.S.A. Owner's Record The model and serial numbers are designed to correct the interference by turning the equipment off and on, the user is subject to the following measures: - Record the serial number in the U.S.A. DSC-S930 Serial No WARNING To reduce fire or...
....gov/hazardouswaste/perchlorate Perchlorate Material: Lithium battery contains perchlorate. 2 Model No. Address: 16530 Via Esprillo, San Diego, CA 92127U.S.A. Owner's Record The model and serial numbers are designed to correct the interference by turning the equipment off and on, the user is subject to the following measures: - Record the serial number in the U.S.A. DSC-S930 Serial No WARNING To reduce fire or...
Instruction Manual
Page 3
... household waste disposal service or the shop where you will help prevent potential negative consequences for the environment and human health, which could otherwise be handed over to the applicable collection point for using connection cables shorter than 3 meters (9.8 feet). [ Attention The electromagnetic fields at the specific frequencies may influence the picture and sound of this product shall...
... household waste disposal service or the shop where you will help prevent potential negative consequences for the environment and human health, which could otherwise be handed over to the applicable collection point for using connection cables shorter than 3 meters (9.8 feet). [ Attention The electromagnetic fields at the specific frequencies may influence the picture and sound of this product shall...
Instruction Manual
Page 5
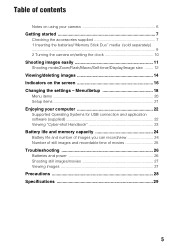
... Supported Operating Systems for USB connection and application software (supplied 22 Viewing "Cyber-shot Handbook 23 Battery life and memory capacity 24 Battery life and number of images you can record/view 24 Number of still images and recordable time of contents Notes on using your camera 6 Getting started 7 Checking the accessories supplied 7 1 Inserting the batteries/"Memory Stick Duo" media (sold separately) ...8 2 Turning the camera on/setting the clock 10 Shooting images easily 11 Shooting mode/Zoom/Flash/Macro/Self-timer/Display/Image size ........ 12 Viewing/deleting images...
... Supported Operating Systems for USB connection and application software (supplied 22 Viewing "Cyber-shot Handbook 23 Battery life and memory capacity 24 Battery life and number of images you can record/view 24 Number of still images and recordable time of contents Notes on using your camera 6 Getting started 7 Checking the accessories supplied 7 1 Inserting the batteries/"Memory Stick Duo" media (sold separately) ...8 2 Turning the camera on/setting the clock 10 Shooting images easily 11 Shooting mode/Zoom/Flash/Macro/Self-timer/Display/Image size ........ 12 Viewing/deleting images...
Instruction Manual
Page 6
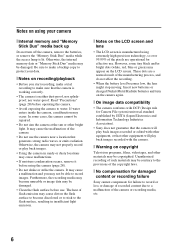
... play back images recorded or edited with other equipment, or that the camera is working correctly. • The camera is neither dust-proof, nor splashproof, nor water-proof. In some tiny black and/or bright dots (white, red, blue or green) may be contrary to become unusable or image data may appear on the LCD screen and lens • The LCD screen is lit. These dots are operational...
... play back images recorded or edited with other equipment, or that the camera is working correctly. • The camera is neither dust-proof, nor splashproof, nor water-proof. In some tiny black and/or bright dots (white, red, blue or green) may be contrary to become unusable or image data may appear on the LCD screen and lens • The LCD screen is lit. These dots are operational...
Instruction Manual
Page 9
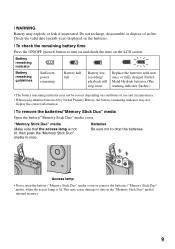
... valid date (month-year) displayed on the batteries. [ To check the remaining battery time Press the ON/OFF (power) button to drop the batteries. [ WARNING Battery may cause damage to data in the "Memory Stick Duo" media/ internal memory. 9 This may explode or leak if mistreated. Battery remaining indicator Battery remaining guidelines Sufficient power remaining Battery half full Battery low, recording/ playback will stop soon. Replace the batteries with new ones, or fully charged...
... valid date (month-year) displayed on the batteries. [ To check the remaining battery time Press the ON/OFF (power) button to drop the batteries. [ WARNING Battery may cause damage to data in the "Memory Stick Duo" media/ internal memory. 9 This may explode or leak if mistreated. Battery remaining indicator Battery remaining guidelines Sufficient power remaining Battery half full Battery low, recording/ playback will stop soon. Replace the batteries with new ones, or fully charged...
Instruction Manual
Page 10
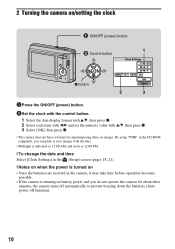
... date and time Select [Clock Settings] in the (Setup) screen (pages 18, 21). [ Notes on when the power is running on images. By using "PMB" in the camera, it may take time before operation becomes possible. • If the camera is turned on • Once the batteries are inserted in the CD-ROM (supplied), you do not operate the camera for superimposing dates on battery power and you can print or save images...
... date and time Select [Clock Settings] in the (Setup) screen (pages 18, 21). [ Notes on when the power is running on images. By using "PMB" in the camera, it may take time before operation becomes possible. • If the camera is turned on • Once the batteries are inserted in the CD-ROM (supplied), you do not operate the camera for superimposing dates on battery power and you can print or save images...
Instruction Manual
Page 12
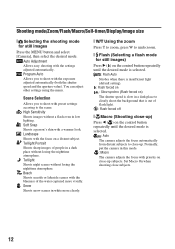
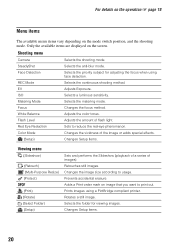
Shooting mode/Zoom/Flash/Macro/Self-timer/Display/Image size [ Selecting the shooting mode for still images) Press B ( ) on the control button repeatedly until the desired mode is selected. : Flash Auto Strobes when there is insufficient light (default setting). : Flash forced on : Slow synchro (Flash forced on the control button repeatedly until the desired mode is out of the water captured more vividly. Scene Selection Allows you to the scene. Twilight Shoots night scenes without losing the nighttime...
Shooting mode/Zoom/Flash/Macro/Self-timer/Display/Image size [ Selecting the shooting mode for still images) Press B ( ) on the control button repeatedly until the desired mode is selected. : Flash Auto Strobes when there is insufficient light (default setting). : Flash forced on : Slow synchro (Flash forced on the control button repeatedly until the desired mode is out of the water captured more vividly. Scene Selection Allows you to the scene. Twilight Shoots night scenes without losing the nighttime...
Instruction Manual
Page 13
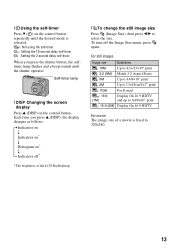
... screen display Press v (DISP) on * r Indicators off the Image Size menu, press again. To turn off * * The brightness of the LCD Backlight up to A4/8×10" print : 16:9 (2M) Display On 16:9 HDTV For movie The image size of a movie is selected. : Not using the self-timer : Setting the 10-second delay self-timer : Setting the 2-second delay self-timer When you press v (DISP), the display changes as follows: Indicators on r Indicators on* r Histogram on the control button. [ Using...
... screen display Press v (DISP) on * r Indicators off the Image Size menu, press again. To turn off * * The brightness of the LCD Backlight up to A4/8×10" print : 16:9 (2M) Display On 16:9 HDTV For movie The image size of a movie is selected. : Not using the self-timer : Setting the 10-second delay self-timer : Setting the 2-second delay self-timer When you press v (DISP), the display changes as follows: Indicators on r Indicators on* r Histogram on the control button. [ Using...
Instruction Manual
Page 16
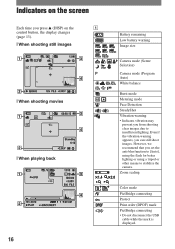
... set the anti-blur function to [Auto], using the flash for better lighting or using a tripod or other means to insufficient lighting. Even if the vibration warning appears, you can still shoot images. Zoom scaling Color mode PictBridge connecting Protect Print order (DPOF) mark PictBridge connecting • Do not disconnect the USB cable while the mark is displayed. Indicators on the screen Each time you press v (DISP) on the A control button, the display changes (page 13). [ When shooting...
... set the anti-blur function to [Auto], using the flash for better lighting or using a tripod or other means to insufficient lighting. Even if the vibration warning appears, you can still shoot images. Zoom scaling Color mode PictBridge connecting Protect Print order (DPOF) mark PictBridge connecting • Do not disconnect the USB cable while the mark is displayed. Indicators on the screen Each time you press v (DISP) on the A control button, the display changes (page 13). [ When shooting...
Instruction Manual
Page 17
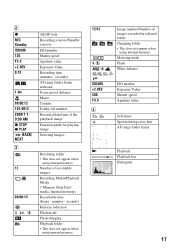
... 2009 1 1 9:30 AM z STOP z PLAY BACK/ NEXT C 12 00:00:15 101 AE/AF lock Recording a movie/Standby a movie ISO number Shutter speed Aperture value Exposure Value Recording time (minutes : seconds) AF range finder frame indicator Focus preset distance Macro Counter Folder-file number Recorded date/time of images recorded in selected folder Changing folder • This does not appear when using internal memory. Metering mode Flash White balance ISO number Exposure Value Shutter speed Aperture value Self-timer Spot metering cross hair AF range finder frame Playback Playback bar Histogram 17
... 2009 1 1 9:30 AM z STOP z PLAY BACK/ NEXT C 12 00:00:15 101 AE/AF lock Recording a movie/Standby a movie ISO number Shutter speed Aperture value Exposure Value Recording time (minutes : seconds) AF range finder frame indicator Focus preset distance Macro Counter Folder-file number Recorded date/time of images recorded in selected folder Changing folder • This does not appear when using internal memory. Metering mode Flash White balance ISO number Exposure Value Shutter speed Aperture value Self-timer Spot metering cross hair AF range finder frame Playback Playback bar Histogram 17
Instruction Manual
Page 20
... Changes the vividness of flash light. Retouches still images. Selects the folder for adjusting the focus when using a PictBridge compliant printer. Changes Setup items. 20 Selects the continuous shooting method. Selects the metering mode. Adjusts the amount of the image or adds special effects. Prints images using face detection. Rotates a still image. Changes the image size according to reduce the red-eye phenomenon. Selects a luminous sensitivity. Red Eye Reduction Color Mode (Setup) Sets to usage. Focus White Balance Flash Level Changes the focus...
... Changes the vividness of flash light. Retouches still images. Selects the folder for adjusting the focus when using a PictBridge compliant printer. Changes Setup items. 20 Selects the continuous shooting method. Selects the metering mode. Adjusts the amount of the image or adds special effects. Prints images using face detection. Rotates a still image. Changes the image size according to reduce the red-eye phenomenon. Selects a luminous sensitivity. Red Eye Reduction Color Mode (Setup) Sets to usage. Focus White Balance Flash Level Changes the focus...
Instruction Manual
Page 21
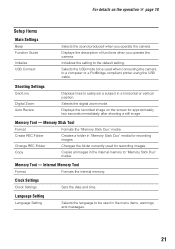
... Digital Zoom Auto Review Displays lines to easily set a subject in the internal memory to a computer or a PictBridge compliant printer using the USB cable. Clock Settings Clock Settings Sets the date and time. Displays the description of functions when you operate the camera. Displays the recorded image on the operation 1 page 18 Setup items Main Settings Beep Function Guide Initialize USB Connect Selects the sound produced when you operate the camera. Memory Stick Tool Format Formats the "Memory Stick Duo" media. Internal Memory Tool Format Formats the internal memory...
... Digital Zoom Auto Review Displays lines to easily set a subject in the internal memory to a computer or a PictBridge compliant printer using the USB cable. Clock Settings Clock Settings Sets the date and time. Displays the description of functions when you operate the camera. Displays the recorded image on the operation 1 page 18 Setup items Main Settings Beep Function Guide Initialize USB Connect Selects the sound produced when you operate the camera. Memory Stick Tool Format Formats the "Memory Stick Duo" media. Internal Memory Tool Format Formats the internal memory...
Instruction Manual
Page 22
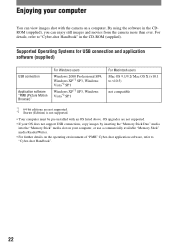
..., refer to "Cyber-shot Handbook". 22 OS upgrades are not supported. *2 Starter (Edition) is not supported. • Your computer must be pre-installed with the camera on a computer. Supported Operating Systems for USB connection and application software (supplied) USB connection Application software "PMB (Picture Motion Browser)" For Windows users Windows 2000 Professional SP4, Windows XP*1 SP3, Windows Vista*2 SP1 Windows XP*1 SP3, Windows Vista*2 SP1 For Macintosh users Mac OS 9.1/9.2/ Mac OS X (v10.1 to v10.5) not compatible *1 64...
..., refer to "Cyber-shot Handbook". 22 OS upgrades are not supported. *2 Starter (Edition) is not supported. • Your computer must be pre-installed with the camera on a computer. Supported Operating Systems for USB connection and application software (supplied) USB connection Application software "PMB (Picture Motion Browser)" For Windows users Windows 2000 Professional SP4, Windows XP*1 SP3, Windows Vista*2 SP1 Windows XP*1 SP3, Windows Vista*2 SP1 For Macintosh users Mac OS 9.1/9.2/ Mac OS X (v10.1 to v10.5) not compatible *1 64...
Instruction Manual
Page 23
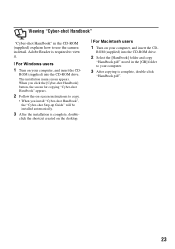
... desktop. [ For Macintosh users 1 Turn on -screen instructions to copy. • When you click the [Cyber-shot Handbook] button, the screen for copying "Cyber-shot Handbook" appears. 2 Follow the on your computer, and insert the CD- When you install "Cyber-shot Handbook", the "Cyber-shot Step-up Guide" will be installed automatically. 3 After the installation is complete, double-click "Handbook.pdf". 23 ROM (supplied) into the CD-ROM drive. 2 Select the [Handbook] folder and copy "Handbook.pdf" stored in detail...
... desktop. [ For Macintosh users 1 Turn on -screen instructions to copy. • When you click the [Cyber-shot Handbook] button, the screen for copying "Cyber-shot Handbook" appears. 2 Follow the on your computer, and insert the CD- When you install "Cyber-shot Handbook", the "Cyber-shot Step-up Guide" will be installed automatically. 3 After the installation is complete, double-click "Handbook.pdf". 23 ROM (supplied) into the CD-ROM drive. 2 Select the [Handbook] folder and copy "Handbook.pdf" stored in detail...
Instruction Manual
Page 24
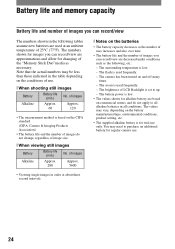
... not change, regardless of image size. [ When viewing still images Battery Battery life (min.) No. The flash is used frequently. - The values may be less than those indicated in the table depending on the CIPA standard. (CIPA: Camera & Imaging Products Association) • The battery life and the number of images do not apply to up. - The brightness of LCD Backlight is for regular camera use . [ When shooting still images Battery Battery life...
... not change, regardless of image size. [ When viewing still images Battery Battery life (min.) No. The flash is used frequently. - The values may be less than those indicated in the table depending on the CIPA standard. (CIPA: Camera & Imaging Products Association) • The battery life and the number of images do not apply to up. - The brightness of LCD Backlight is for regular camera use . [ When shooting still images Battery Battery life...
Instruction Manual
Page 26
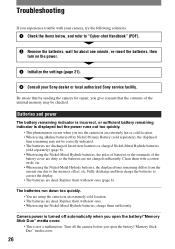
... to the memory effect, etc. Troubleshooting If you open the battery/"Memory Stick Duo" media cover. • This is not a malfunction. The batteries run down too quickly. • You are dead. Be aware that by sending the camera for about one due to "Cyber-shot Handbook" (PDF). 2 Remove the batteries, wait for repair, you open the battery/"Memory Stick Duo" media cover. 26 Camera power is turned off the camera before you...
... to the memory effect, etc. Troubleshooting If you open the battery/"Memory Stick Duo" media cover. • This is not a malfunction. The batteries run down too quickly. • You are dead. Be aware that by sending the camera for about one due to "Cyber-shot Handbook" (PDF). 2 Remove the batteries, wait for repair, you open the battery/"Memory Stick Duo" media cover. 26 Camera power is turned off the camera before you...
Instruction Manual
Page 27
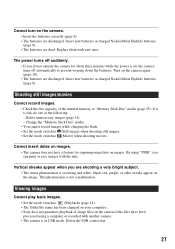
.... Delete unnecessary images (page 14). - Viewing images Cannot play back images. • Set the mode switch to (Playback) (page 14). • The folder/file name has been changed on your computer. • Sony does not guarantee playback of image files on the camera if the files have a feature for about three minutes while the power is full, do one of the internal memory or "Memory Stick Duo" media (page 25). Delete the USB connection. 27 Cannot turn...
.... Delete unnecessary images (page 14). - Viewing images Cannot play back images. • Set the mode switch to (Playback) (page 14). • The folder/file name has been changed on your computer. • Sony does not guarantee playback of image files on the camera if the files have a feature for about three minutes while the power is full, do one of the internal memory or "Memory Stick Duo" media (page 25). Delete the USB connection. 27 Cannot turn...
Instruction Manual
Page 28
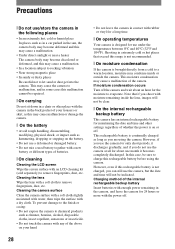
... any of the internal rechargeable backup battery Insert batteries with the power off. This rechargeable battery is continually charged as long as you can still use the camera, but the date and time will not be repaired. [ On carrying Do not sit down in a chair or other settings regardless of whether the power is designed for the moisture to remove fingerprints, dust, etc. Charging method of...
... any of the internal rechargeable backup battery Insert batteries with the power off. This rechargeable battery is continually charged as long as you can still use the camera, but the date and time will not be repaired. [ On carrying Do not sit down in a chair or other settings regardless of whether the power is designed for the moisture to remove fingerprints, dust, etc. Charging method of...
Instruction Manual
Page 29
... 10.3 Megapixels Effective pixel number of camera: Approx. 10.1 Megapixels Lens: 3× zoom lens f = 6.4 - 19.2 mm (36 - 108 mm (35 mm film equivalent)) F2.9 (W) - 5.4 (T) Exposure control: Automatic exposure, Scene Selection (7 modes) White balance: Automatic, Daylight, Cloudy, Fluorescent 1, 2, 3, Incandescent, Flash File format: Still images: JPEG (DCF Ver. 2.0, Exif Ver. 2.21 ) compliant, DPOF compatible Movies: AVI (Motion JPEG) Recording media: Internal Memory (approx. 12 MB), "Memory Stick Duo" media Flash: Flash range (ISO sensitivity (Recommended Exposure Index) set to Auto): approx...
... 10.3 Megapixels Effective pixel number of camera: Approx. 10.1 Megapixels Lens: 3× zoom lens f = 6.4 - 19.2 mm (36 - 108 mm (35 mm film equivalent)) F2.9 (W) - 5.4 (T) Exposure control: Automatic exposure, Scene Selection (7 modes) White balance: Automatic, Daylight, Cloudy, Fluorescent 1, 2, 3, Incandescent, Flash File format: Still images: JPEG (DCF Ver. 2.0, Exif Ver. 2.21 ) compliant, DPOF compatible Movies: AVI (Motion JPEG) Recording media: Internal Memory (approx. 12 MB), "Memory Stick Duo" media Flash: Flash range (ISO sensitivity (Recommended Exposure Index) set to Auto): approx...


