Operating Instructions
Page 14
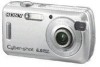
Identifying parts See the pages in parentheses for details of operation. 1 5 2 6 7 3 4 A POWER button/lamp (t step 2 in "Read This First") B Shutter button (t step 5 in "Read This First") C Flash (t step 5 in "Read This First") D Self-timer lamp (t step 5 in "Read This First") A AE/AF lock lamp/self-timer ...
Identifying parts See the pages in parentheses for details of operation. 1 5 2 6 7 3 4 A POWER button/lamp (t step 2 in "Read This First") B Shutter button (t step 5 in "Read This First") C Flash (t step 5 in "Read This First") D Self-timer lamp (t step 5 in "Read This First") A AE/AF lock lamp/self-timer ...
Operating Instructions
Page 26
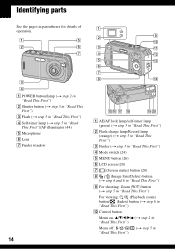
To display an item that are available depending on the power and set to display the menu. 3 Select the desired menu item with v/V. Using the menu Using menu items v/V/b/B button z button Mode switch MENU button Control button 1 Turn on the position of the location where menu items usually appear....items that is not displayed, an v/V mark appears on the edges of the mode switch and the settings. (Camera) menu 2 Press MENU to . 4 Select the setting with b/B on the control button. • If the desired item is invisible, keep pressing b/B until the item appears on the screen. ...
To display an item that are available depending on the power and set to display the menu. 3 Select the desired menu item with v/V. Using the menu Using menu items v/V/b/B button z button Mode switch MENU button Control button 1 Turn on the position of the location where menu items usually appear....items that is not displayed, an v/V mark appears on the edges of the mode switch and the settings. (Camera) menu 2 Press MENU to . 4 Select the setting with b/B on the control button. • If the desired item is invisible, keep pressing b/B until the item appears on the screen. ...
Operating Instructions
Page 42
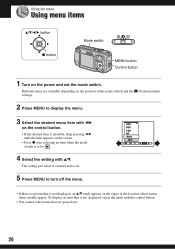
...appear, select the previous setting again. • This setting is maintained even when the power is turned off the (Setup) screen, press MENU. If it appears, then press z on the control button. To turn off . 42 The frame of the selected item turns yellow. 5 Press... the menu from the (Setup) screen, press b on the control button to select the item you want to set. v/V/b/B button Mode switch z button MENU button Control button 1 Turn on the power. 2 Press MENU to display the menu. 3 After pressing B on the control button, go to the press B again. (Setup) setting, then 4 Press...
...appear, select the previous setting again. • This setting is maintained even when the power is turned off the (Setup) screen, press MENU. If it appears, then press z on the control button. To turn off . 42 The frame of the selected item turns yellow. 5 Press... the menu from the (Setup) screen, press b on the control button to select the item you want to set. v/V/b/B button Mode switch z button MENU button Control button 1 Turn on the power. 2 Press MENU to display the menu. 3 After pressing B on the control button, go to the press B again. (Setup) setting, then 4 Press...
Operating Instructions
Page 49
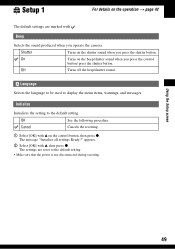
... the default setting. • Make sure that the power is not disconnected during resetting. On Turns on the beep/shutter sound when you operate the camera. OK See the following procedure. appears. 2 Select [OK] with v on the shutter sound when you press the shutter button. Language Selects the language to be used to...
... the default setting. • Make sure that the power is not disconnected during resetting. On Turns on the beep/shutter sound when you operate the camera. OK See the following procedure. appears. 2 Select [OK] with v on the shutter sound when you press the shutter button. Language Selects the language to be used to...

Operating Instructions
Page 69
... is set . 69 When connecting the camera to a printer that can print a set of either the same images (1) or different images (2). 1 2 MENU button Control Button • It is recommended to use ... (not supplied) to prevent the power from turning off partway through printing. 1 Press MENU to display the menu. 2 Press B on the control button to select (Setup). •... computer, you can print images shot using your camera by connecting the camera directly to a PictBridge compliant printer. • "PictBridge" is based on the CIPA standard. (CIPA: Camera & Imaging Products Association) In...
... is set . 69 When connecting the camera to a printer that can print a set of either the same images (1) or different images (2). 1 2 MENU button Control Button • It is recommended to use ... (not supplied) to prevent the power from turning off partway through printing. 1 Press MENU to display the menu. 2 Press B on the control button to select (Setup). •... computer, you can print images shot using your camera by connecting the camera directly to a PictBridge compliant printer. • "PictBridge" is based on the CIPA standard. (CIPA: Camera & Imaging Products Association) In...


