Operating Instructions
Page 1
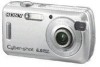
Owner's Record The model and serial numbers are located on 100% recycled paper using VOC (Volatile Organic Compound)-free vegetable oil based ink. Record the serial number in China Digital Still Camera User's Guide/ Troubleshooting DSC-S600 "Read This First" (separate volume) Explains the set-up and basic operations for future reference. DSC-S600 Serial No © 2006 Sony Corporation Enjoying the camera Using the menu Using the Setup screen Using your camera. Printed on the bottom. Additional information on this...
Owner's Record The model and serial numbers are located on 100% recycled paper using VOC (Volatile Organic Compound)-free vegetable oil based ink. Record the serial number in China Digital Still Camera User's Guide/ Troubleshooting DSC-S600 "Read This First" (separate volume) Explains the set-up and basic operations for future reference. DSC-S600 Serial No © 2006 Sony Corporation Enjoying the camera Using the menu Using the Setup screen Using your camera. Printed on the bottom. Additional information on this...

Operating Instructions
Page 3
... by turning the equipment off and on its packaging indicates that interference will help to discontinue midway (fail), restart the application or disconnect and connect the communication cable (USB, etc.) again. Reorient or relocate the receiving antenna. - Consult the dealer or an experienced radio/TV technician for using connection cables shorter than 3 meters (9.8 feet). Attention The electromagnetic fields at the specific...
... by turning the equipment off and on its packaging indicates that interference will help to discontinue midway (fail), restart the application or disconnect and connect the communication cable (USB, etc.) again. Reorient or relocate the receiving antenna. - Consult the dealer or an experienced radio/TV technician for using connection cables shorter than 3 meters (9.8 feet). Attention The electromagnetic fields at the specific...
Operating Instructions
Page 4
... "Precautions" (page 94) before operating the camera. • Before you record one-time events, make a trial recording to back up • If you can use . When using a "Memory Stick Duo" with "Memory Stick" compatible equipment You can use the camera near a location that the camera is lit, the data in the internal memory or "Memory Stick Duo" may cause dirt on the flash surface to become discolored or to...
... "Precautions" (page 94) before operating the camera. • Before you record one-time events, make a trial recording to back up • If you can use . When using a "Memory Stick Duo" with "Memory Stick" compatible equipment You can use the camera near a location that the camera is lit, the data in the internal memory or "Memory Stick Duo" may cause dirt on the flash surface to become discolored or to...
Operating Instructions
Page 6
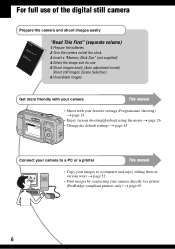
..." (separate volume) 1 Prepare the batteries 2 Turn the camera on/set the clock 3 Insert a "Memory Stick Duo" (not supplied) 4 Select the image size for use 5 Shoot images easily (Auto adjustment mode) Shoot still images (Scene Selection) 6 View/delete images Get more friendly with your camera This manual • Shoot with your favorite settings (Program auto shooting) t page 24 • Enjoy various shooting/playback using the menu t page 26 • Change the default settings t page 42 1 2 Connect your camera to a PC or a printer This manual • Copy your images to...
..." (separate volume) 1 Prepare the batteries 2 Turn the camera on/set the clock 3 Insert a "Memory Stick Duo" (not supplied) 4 Select the image size for use 5 Shoot images easily (Auto adjustment mode) Shoot still images (Scene Selection) 6 View/delete images Get more friendly with your camera This manual • Shoot with your favorite settings (Program auto shooting) t page 24 • Enjoy various shooting/playback using the menu t page 26 • Change the default settings t page 42 1 2 Connect your camera to a PC or a printer This manual • Copy your images to...
Operating Instructions
Page 8
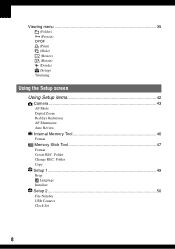
Folder Change REC. Folder Copy Setup 1 49 1 Beep Language Initialize Setup 2 50 2 File Number USB Connect Clock Set 8 Viewing menu 35 (Folder) - (Protect) DPOF (Print) (Slide) (Resize) (Rotate) (Divide) (Setup) Trimming Using the Setup screen Using Setup items 42 Camera 43 AF Mode Digital Zoom Red Eye Reduction AF Illuminator Auto Review Internal Memory Tool 46 Format Memory Stick Tool 47 Format Create REC.
Folder Change REC. Folder Copy Setup 1 49 1 Beep Language Initialize Setup 2 50 2 File Number USB Connect Clock Set 8 Viewing menu 35 (Folder) - (Protect) DPOF (Print) (Slide) (Resize) (Rotate) (Divide) (Setup) Trimming Using the Setup screen Using Setup items 42 Camera 43 AF Mode Digital Zoom Red Eye Reduction AF Illuminator Auto Review Internal Memory Tool 46 Format Memory Stick Tool 47 Format Create REC.
Operating Instructions
Page 12
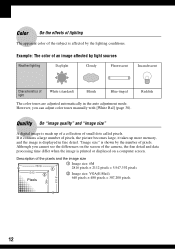
... more memory, and the image is affected by the lighting conditions. Description of small dots called pixels. "Image size" is printed or displayed on the screen of pixels. Although you can adjust color tones manually with [White Bal] (page 30). However, you cannot see the differences on a computer screen. Example: The color of an image affected by the number of the camera, the fine detail and data processing time...
... more memory, and the image is affected by the lighting conditions. Description of small dots called pixels. "Image size" is printed or displayed on the screen of pixels. Although you can adjust color tones manually with [White Bal] (page 30). However, you cannot see the differences on a computer screen. Example: The color of an image affected by the number of the camera, the fine detail and data processing time...
Operating Instructions
Page 50
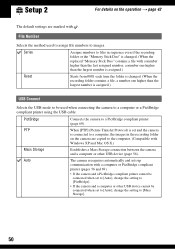
... printer using the USB cable. PictBridge Connects the camera to [Mass Storage]. 50 PTP When [PTP] (Picture Transfer Protocol) is set and the camera is connected to a computer, the images in sequence even if the recording folder or the "Memory Stick Duo" is changed. (When the replaced "Memory Stick Duo" contains a file with a number higher than the last assigned number, a number one higher than the largest number is assigned.) Reset Starts from 0001 each time the folder...
... printer using the USB cable. PictBridge Connects the camera to [Mass Storage]. 50 PTP When [PTP] (Picture Transfer Protocol) is set and the camera is connected to a computer, the images in sequence even if the recording folder or the "Memory Stick Duo" is changed. (When the replaced "Memory Stick Duo" contains a file with a number higher than the last assigned number, a number one higher than the largest number is assigned.) Reset Starts from 0001 each time the folder...

Operating Instructions
Page 54
... software is installed, the USB driver is complete. • If it does not appear, double-click (My Computer) t (CYBERSHOTSOFT). 2 Click [Install]. The "Choose Setup Language" screen appears. 3 Select the desired language, then click [Next]. Read the agreement carefully. If you accept the terms of the agreement, click the radio button next to complete the installation. The installation menu screen appears. 4 Follow the instructions on the screen. 5 Remove...
... software is installed, the USB driver is complete. • If it does not appear, double-click (My Computer) t (CYBERSHOTSOFT). 2 Click [Install]. The "Choose Setup Language" screen appears. 3 Select the desired language, then click [Next]. Read the agreement carefully. If you accept the terms of the agreement, click the radio button next to complete the installation. The installation menu screen appears. 4 Follow the instructions on the screen. 5 Remove...

Operating Instructions
Page 55
... using batteries, copying may fail or image data may become corrupted if the batteries shut down too soon. 3 Set the mode switch to your computer using Windows 2000/Me, install the supplied software before proceeding. POWER Using your computer This section describes the process using a Windows computer as follows. You can copy images from the camera and insert it in this step is unnecessary. • The screen displays shown in the Memory Stick...
... using batteries, copying may fail or image data may become corrupted if the batteries shut down too soon. 3 Set the mode switch to your computer using Windows 2000/Me, install the supplied software before proceeding. POWER Using your computer This section describes the process using a Windows computer as follows. You can copy images from the camera and insert it in this step is unnecessary. • The screen displays shown in the Memory Stick...
Operating Instructions
Page 60
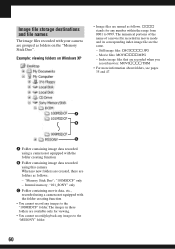
... of a movie file recorded in these folders are folders as follows: - Still image files: DSC0ssss.JPG - Movie files: MOV0ssss.MPG - "101MSDCF" only - Internal memory; Index image files that are grouped as follows. Image file storage destinations and file names The image files recorded with your camera are recorded when you record movies: MOV0ssss.THM • For more information about folders, see pages 35 and 47. ssss stands for viewing. • You cannot record/playback any number within the...
... of a movie file recorded in these folders are folders as follows: - Still image files: DSC0ssss.JPG - Movie files: MOV0ssss.MPG - "101MSDCF" only - Internal memory; Index image files that are grouped as follows. Image file storage destinations and file names The image files recorded with your camera are recorded when you record movies: MOV0ssss.THM • For more information about folders, see pages 35 and 47. ssss stands for viewing. • You cannot record/playback any number within the...
Operating Instructions
Page 61
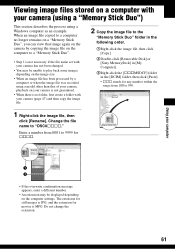
... camera, playback on your camera is not guaranteed. • When there is no folder, first create a folder with your camera has not been changed. • You may be unable to play back some images depending on the image size. • When an image file has been processed by copying the image file on the computer to a "Memory Stick Duo". • Step 1 is not necessary if the file name set...
... camera, playback on your camera is not guaranteed. • When there is no folder, first create a folder with your camera has not been changed. • You may be unable to play back some images depending on the image size. • When an image file has been processed by copying the image file on the computer to a "Memory Stick Duo". • Step 1 is not necessary if the file name set...
Operating Instructions
Page 62
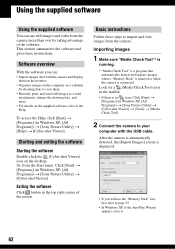
..., print, and send still images as e-mail attachments, change the shooting date, and more. • For details on the supplied software, refer to your computer with the camera and display them on the monitor. • Organize images on the computer on the desktop. Exiting the software Click button in Windows XP, [All Programs]) t [Sony Picture Utility] t [Help] t [Cyber-shot Viewer]. After the camera is automatically detected, the [Import Images] screen is connected. Starting...
..., print, and send still images as e-mail attachments, change the shooting date, and more. • For details on the supplied software, refer to your computer with the camera and display them on the monitor. • Organize images on the computer on the desktop. Exiting the software Click button in Windows XP, [All Programs]) t [Sony Picture Utility] t [Help] t [Cyber-shot Viewer]. After the camera is automatically detected, the [Import Images] screen is connected. Starting...
Operating Instructions
Page 66
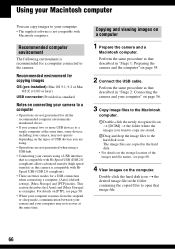
... is compatible with Hi-Speed USB (USB 2.0 compliant) allows advanced transfer (high speed transfer) as examples. Using your Macintosh computer You can copy images to your computer. • The supplied software is not compatible with HiSpeed USB (USB 2.0 compliant). • There are three modes for a USB connection when connecting a computer, [Auto] (default setting), [Mass Storage] and [PTP] modes. Recommended computer environment The following environment is recommended for a computer connected to the camera. Copying and viewing images on...
... is compatible with Hi-Speed USB (USB 2.0 compliant) allows advanced transfer (high speed transfer) as examples. Using your Macintosh computer You can copy images to your computer. • The supplied software is not compatible with HiSpeed USB (USB 2.0 compliant). • There are three modes for a USB connection when connecting a computer, [Auto] (default setting), [Mass Storage] and [PTP] modes. Recommended computer environment The following environment is recommended for a computer connected to the camera. Copying and viewing images on...

Operating Instructions
Page 69
... single-image mode You can print several images at a reduced size on the screen of images that is recognized when [USB Connect] is set . 69 Stage 1: Preparing the camera Prepare the camera to connect it to a printer that can be printed as an index image differ depending on the printer. • You cannot print movies. • If the indicator flashes on a printing sheet. Printing still images The USB mode is recommended to use batteries with the USB cable. Printing images directly using a PictBridge compliant printer...
... single-image mode You can print several images at a reduced size on the screen of images that is recognized when [USB Connect] is set . 69 Stage 1: Preparing the camera Prepare the camera to connect it to a printer that can be printed as an index image differ depending on the printer. • You cannot print movies. • If the indicator flashes on a printing sheet. Printing still images The USB mode is recommended to use batteries with the USB cable. Printing images directly using a PictBridge compliant printer...
Operating Instructions
Page 77
..."). - Set the image size to other position than [640(Fine)]. - The image is out of the following : - Precision digital zoom does not function. • Set [Digital Zoom] to the LOCK position. Recording takes a long time. • The NR slow shutter function is too close. Zoom does not work. • You cannot change the zoom scale when shooting movies. If they are using the "Memory Stick Duo" with the write-protect switch, and the switch is turned on. • Turn on...
..."). - Set the image size to other position than [640(Fine)]. - The image is out of the following : - Precision digital zoom does not function. • Set [Digital Zoom] to the LOCK position. Recording takes a long time. • The NR slow shutter function is too close. Zoom does not work. • You cannot change the zoom scale when shooting movies. If they are using the "Memory Stick Duo" with the write-protect switch, and the switch is turned on. • Turn on...
Operating Instructions
Page 79
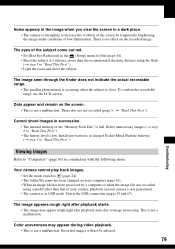
... camera cannot play back images. • Set the mode switch to (page 24). • The folder/file name has been changed on your computer (page 61). • When an image file has been processed by temporarily brightening the image under conditions of low illumination. To confirm the recordable range, use the LCD screen. Install new batteries or charged Nickel-Metal Hydride batteries (t step 1 in "Read This First"). The eyes of your camera, playback...
... camera cannot play back images. • Set the mode switch to (page 24). • The folder/file name has been changed on your computer (page 61). • When an image file has been processed by temporarily brightening the image under conditions of low illumination. To confirm the recordable range, use the LCD screen. Install new batteries or charged Nickel-Metal Hydride batteries (t step 1 in "Read This First"). The eyes of your camera, playback...
Operating Instructions
Page 81
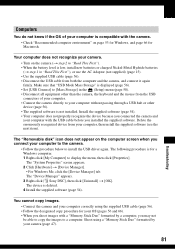
... the USB cable before you installed the supplied software. The "Removable disk" icon does not appear on page 53 for Windows, and page 66 for a Windows computer. 1 Right-click [My Computer] to install the USB driver again. You cannot copy images. • Connect the camera and your computer correctly using a "Memory Stick Duo" formatted by a computer, you connect your computer with the camera. • Check "Recommended computer environment" on the computer screen...
... the USB cable before you installed the supplied software. The "Removable disk" icon does not appear on page 53 for Windows, and page 66 for a Windows computer. 1 Right-click [My Computer] to install the USB driver again. You cannot copy images. • Connect the camera and your computer correctly using a "Memory Stick Duo" formatted by a computer, you connect your computer with the camera. • Check "Recommended computer environment" on the computer screen...
Operating Instructions
Page 85
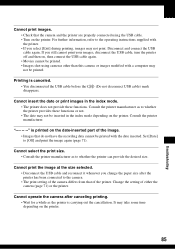
... USB cable again. • Movies cannot be printed. • Images shot using the USB cable. • Turn on the printer. Set [Date] to the camera. • The print setting of the camera differs from that of either the camera (page 71) or the printer. Change the setting of the printer. Disconnect and connect the USB cable again. Cannot print the image at the size selected. • Disconnect the USB cable and reconnect it whenever you select [Exit] during printing, images may take some time...
... USB cable again. • Movies cannot be printed. • Images shot using the USB cable. • Turn on the printer. Set [Date] to the camera. • The print setting of the camera differs from that of either the camera (page 71) or the printer. Change the setting of the printer. Disconnect and connect the USB cable again. Cannot print the image at the size selected. • Disconnect the USB cable and reconnect it whenever you select [Exit] during printing, images may take some time...
Operating Instructions
Page 87
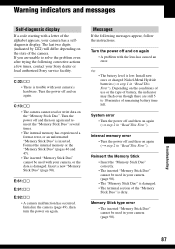
..."). Warning indicators and messages Self-diagnosis display If a code starting with a letter of the alphabet appears, your Sony dealer or local authorized Sony service facility. If you are still 5 to solve the problem even after trying the following messages appear, follow the instructions. C:13:ss • The camera cannot read or write data on again and reinsert the "Memory Stick Duo" several times. • The internal memory has experienced a format error...
..."). Warning indicators and messages Self-diagnosis display If a code starting with a letter of the alphabet appears, your Sony dealer or local authorized Sony service facility. If you are still 5 to solve the problem even after trying the following messages appear, follow the instructions. C:13:ss • The camera cannot read or write data on again and reinsert the "Memory Stick Duo" several times. • The internal memory has experienced a format error...
Operating Instructions
Page 97
Index mode printing 69 Index screen t step 6 in "Read This First" Indicator see "Viewing" Playback/Edit 24 Precautions 94 Precision digital zoom ..........43 Pressing halfway down .........10 t step 5 in "Read This First" Print 68 Index mode 69 Single-image mode........69 Print order mark 73 Printing at a shop 73 Printing directly 69 Program auto shooting..........24 Protect 36 PTP 50 Q Quick Review t step 5 in "Read This First" R REC Mode 31 Red Eye Reduction 44 Resize...
Index mode printing 69 Index screen t step 6 in "Read This First" Indicator see "Viewing" Playback/Edit 24 Precautions 94 Precision digital zoom ..........43 Pressing halfway down .........10 t step 5 in "Read This First" Print 68 Index mode 69 Single-image mode........69 Print order mark 73 Printing at a shop 73 Printing directly 69 Program auto shooting..........24 Protect 36 PTP 50 Q Quick Review t step 5 in "Read This First" R REC Mode 31 Red Eye Reduction 44 Resize...


