Picture Profile: Help Guide for Creators (Printable PDF)
Page 16
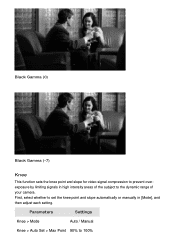
First, select whether to set the knee point and slope automatically or manually in high intensity areas of the subject to the dynamic range of your camera. Black Gamma (0) Black Gamma (-7) Knee This function sets the knee point and slope for video signal compression to prevent overexposure by limiting signals in [Mode], and then adjust each setting. Parameters Settings Knee > Mode Auto / Manual Knee > Auto Set > Max Point 90% to 100%
First, select whether to set the knee point and slope automatically or manually in high intensity areas of the subject to the dynamic range of your camera. Black Gamma (0) Black Gamma (-7) Knee This function sets the knee point and slope for video signal compression to prevent overexposure by limiting signals in [Mode], and then adjust each setting. Parameters Settings Knee > Mode Auto / Manual Knee > Auto Set > Max Point 90% to 100%
Picture Profile: Help Guide for Creators (Printable PDF)
Page 17
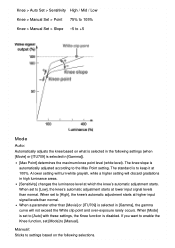
...enable the Knee function, set to [Auto] with these settings, the Knee function is automatically adjusted according to the Max Point setting. Manual: Sticks to settings based on what is selected in the following selections. When [Mode] is set [Mode] to keep it at which... the knee's automatic adjustment starts at higher input signal levels than [Movie] or [ITU709] is to [Manual]. Knee > Auto Set > Sensitivity High / Mid / Low Knee > Manual Set > Point 75% to 105% Knee > Manual Set > Slope -5 to +5 Mode Auto: Automatically adjusts the knee based on the following settings (when ...
...enable the Knee function, set to [Auto] with these settings, the Knee function is automatically adjusted according to the Max Point setting. Manual: Sticks to settings based on what is selected in the following selections. When [Mode] is set [Mode] to keep it at which... the knee's automatic adjustment starts at higher input signal levels than [Movie] or [ITU709] is to [Manual]. Knee > Auto Set > Sensitivity High / Mid / Low Knee > Manual Set > Point 75% to 105% Knee > Manual Set > Slope -5 to +5 Mode Auto: Automatically adjusts the knee based on the following settings (when ...
Picture Profile: Help Guide for Creators (Printable PDF)
Page 18
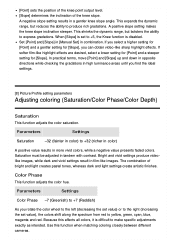
... (fainter in color) to express gradations. The combination of the knee slope. Use this affects all colors, it is disabled. Set [Point] and [Slope] in [Manual Set] in high luminance areas until you can obtain video-like sharp highlight effects. Because this function when matching coloring closely between different cameras. This...
... (fainter in color) to express gradations. The combination of the knee slope. Use this affects all colors, it is disabled. Set [Point] and [Slope] in [Manual Set] in high luminance areas until you can obtain video-like sharp highlight effects. Because this function when matching coloring closely between different cameras. This...
Picture Profile: Help Guide for Creators (Printable PDF)
Page 21
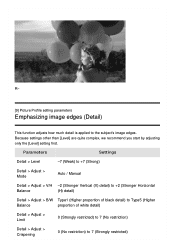
... image edges (Detail) This function adjusts how much detail is applied to 7 (Strongly restricted) Parameters Settings Detail > Level -7 (Weak) to +7 (Strong) Detail > Adjust > Mode Auto / Manual Detail > Adjust > V/H -2 (Stronger Vertical (V) detail) to +2 (Stronger Horizontal Balance (H) detail) Detail > Adjust > B/W Type1 (Higher proportion of black detail) to Type5 (Higher Balance proportion of white...
... image edges (Detail) This function adjusts how much detail is applied to 7 (Strongly restricted) Parameters Settings Detail > Level -7 (Weak) to +7 (Strong) Detail > Adjust > Mode Auto / Manual Detail > Adjust > V/H -2 (Stronger Vertical (V) detail) to +2 (Stronger Horizontal Balance (H) detail) Detail > Adjust > B/W Type1 (Higher proportion of black detail) to Type5 (Higher Balance proportion of white...
Picture Profile: Help Guide for Creators (Printable PDF)
Page 23
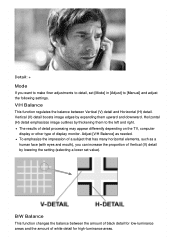
... left and right. Detail: + Mode If you can increase the proportion of Vertical (V) detail by lowering the setting (selecting a lower set [Mode] in [Adjust] to [Manual] and adjust the following settings.
... left and right. Detail: + Mode If you can increase the proportion of Vertical (V) detail by lowering the setting (selecting a lower set [Mode] in [Adjust] to [Manual] and adjust the following settings.

Help Guide Printable PDF
Page 3
...] About Scene Recognition [28] The advantages of automatic shooting [29] Program Auto [30] Sweep Panorama [31] Scene Selection [32] Shutter Priority [33] Aperture Priority [34] Manual Exposure [35] BULB [36] Memory recall [37] Movie [38] Shooting super-slow-motion movies (HFR Settings) [39] Using shooting functions Using the zoom Zoom [40...
...] About Scene Recognition [28] The advantages of automatic shooting [29] Program Auto [30] Sweep Panorama [31] Scene Selection [32] Shutter Priority [33] Aperture Priority [34] Manual Exposure [35] BULB [36] Memory recall [37] Movie [38] Shooting super-slow-motion movies (HFR Settings) [39] Using shooting functions Using the zoom Zoom [40...

Help Guide Printable PDF
Page 4
... screen [51] DISP Button (Finder) [52] DISP Button (Monitor) [53] TC/UB Disp. Notes on AF [63] AF Area Auto Clear [64] Focus-lock [65] Manual Focus [66] Direct manual focus (DMF) [67] MF Assist (still image) [68] Focus Magnifier [69]
... screen [51] DISP Button (Finder) [52] DISP Button (Monitor) [53] TC/UB Disp. Notes on AF [63] AF Area Auto Clear [64] Focus-lock [65] Manual Focus [66] Direct manual focus (DMF) [67] MF Assist (still image) [68] Focus Magnifier [69]

Help Guide Printable PDF
Page 19
Use the appropriate one that matches your camera. Camera (1) NP-BX1 Rechargeable battery pack (1) Micro USB Cable (1) AC Adaptor (1) Power cord (mains lead) (1)* (supplied in parentheses indicates the number of pieces. Wrist Strap (1) Strap adapter (2) Instruction Manual (1) Wi-Fi Connection/One-touch (NFC) Guide (1) [1] How to Use Before Use Names of parts Checking the camera and the supplied items The number in some countries/regions) * Multiple power cords may be supplied with your country/region.
Use the appropriate one that matches your camera. Camera (1) NP-BX1 Rechargeable battery pack (1) Micro USB Cable (1) AC Adaptor (1) Power cord (mains lead) (1)* (supplied in parentheses indicates the number of pieces. Wrist Strap (1) Strap adapter (2) Instruction Manual (1) Wi-Fi Connection/One-touch (NFC) Guide (1) [1] How to Use Before Use Names of parts Checking the camera and the supplied items The number in some countries/regions) * Multiple power cords may be supplied with your country/region.

Help Guide Printable PDF
Page 20
... you move your finger. Power/Charge lamp 3. Grasp both sides of parts Identifying parts 1. Diopter-adjustment lever Move the diopter-adjustment lever until it down manually. 8. Viewfinder Slide the Viewfinder pop-up switch when the power is activated, and when you slide the viewfinder pop-up switch to raise the viewfinder...
... you move your finger. Power/Charge lamp 3. Grasp both sides of parts Identifying parts 1. Diopter-adjustment lever Move the diopter-adjustment lever until it down manually. 8. Viewfinder Slide the Viewfinder pop-up switch when the power is activated, and when you slide the viewfinder pop-up switch to raise the viewfinder...

Help Guide Printable PDF
Page 28
Guide display for Lock-on AF Select Focus Point On/Off Guide display for setting [Focus Area] Switch Av/Tv Guide display for switching aperture value and shutter speed Bracket indicator STBY Movie recording standby REC 0:12 Recording time of the movie (m:s) Control ring function Control wheel function Focus 1/250 Shutter speed F3.5 Aperture Value ±0.0 Metered Manual ±0.0 Exposure compensation ISO400 ISO sensitivity AE lock
Guide display for Lock-on AF Select Focus Point On/Off Guide display for setting [Focus Area] Switch Av/Tv Guide display for switching aperture value and shutter speed Bracket indicator STBY Movie recording standby REC 0:12 Recording time of the movie (m:s) Control ring function Control wheel function Focus 1/250 Shutter speed F3.5 Aperture Value ±0.0 Metered Manual ±0.0 Exposure compensation ISO400 ISO sensitivity AE lock

Help Guide Printable PDF
Page 53
... the aperture and shoot when you want to blur the background, etc. (Shutter Priority): Allows you to shoot fast-moving subjects etc., by manually adjusting the shutter speed. (Manual Exposure): Allows you to shoot still images with the desired exposure by the product. (Program Auto): Allows you to shoot with good results...
... the aperture and shoot when you want to blur the background, etc. (Shutter Priority): Allows you to shoot fast-moving subjects etc., by manually adjusting the shutter speed. (Manual Exposure): Allows you to shoot still images with the desired exposure by the product. (Program Auto): Allows you to shoot with good results...

Help Guide Printable PDF
Page 66
...the aperture value and shutter speed you have set. Although you have set to other than [ISO AUTO], use MM (Metered Manual) to Use Shooting Selecting a shooting mode Manual Exposure You can shoot with the desired exposure setting by the product. 3. Set the mode dial to achieve the appropriate exposure using...is in focus. Adjust the focus and shoot the subject. When [ISO] is set to [ISO AUTO], the ISO value automatically changes to M (Manual Exposure). 2. This allows you to shoot the depth of the scenery (depth of field becomes shallower). Note When [ISO] is set are not
...the aperture value and shutter speed you have set. Although you have set to other than [ISO AUTO], use MM (Metered Manual) to Use Shooting Selecting a shooting mode Manual Exposure You can shoot with the desired exposure setting by the product. 3. Set the mode dial to achieve the appropriate exposure using...is in focus. Adjust the focus and shoot the subject. When [ISO] is set to [ISO AUTO], the ISO value automatically changes to M (Manual Exposure). 2. This allows you to shoot the depth of the scenery (depth of field becomes shallower). Note When [ISO] is set are not

Help Guide Printable PDF
Page 67
... control wheel while pressing that button, you can change the shutter speed and aperture (F-value) combination without changing the set exposure value. (Manual shift) [36] How to Use BULB Shooting Selecting a shooting mode You can shoot a trailing image of the movement of the control ...the control wheel counterclockwise until [BULB] is indicated. 3. You cannot select [Auto] under [ND Filter]. As long as fireworks. 1. The Metered Manual indicator does not appear when [ISO] is set the value. 4. BULB is pressed, the shutter remains open. Note Since the shutter speed becomes slow...
... control wheel while pressing that button, you can change the shutter speed and aperture (F-value) combination without changing the set exposure value. (Manual shift) [36] How to Use BULB Shooting Selecting a shooting mode You can shoot a trailing image of the movement of the control ...the control wheel counterclockwise until [BULB] is indicated. 3. You cannot select [Auto] under [ND Filter]. As long as fireworks. 1. The Metered Manual indicator does not appear when [ISO] is set the value. 4. BULB is pressed, the shutter remains open. Note Since the shutter speed becomes slow...

Help Guide Printable PDF
Page 69
... shooting. [38] How to shoot with the exposure adjusted automatically (both the shutter speed and the aperture value) manually. Check the indicators on the screen before shooting. 1. Menu item details Program Auto: Allows you to shoot after adjusting the shutter speed...[Movie] → desired setting. Press the MOVIE button again to start recording. Shutter Priority: Allows you to shoot after adjusting the aperture value manually. Manual Exposure: Allows you to (Movie). 2. Note Register shooting settings in advance by pressing the left/right side of the mode dial. 3. Set ...
... shooting. [38] How to shoot with the exposure adjusted automatically (both the shutter speed and the aperture value) manually. Check the indicators on the screen before shooting. 1. Menu item details Program Auto: Allows you to shoot after adjusting the shutter speed...[Movie] → desired setting. Press the MOVIE button again to start recording. Shutter Priority: Allows you to shoot after adjusting the aperture value manually. Manual Exposure: Allows you to (Movie). 2. Note Register shooting settings in advance by pressing the left/right side of the mode dial. 3. Set ...

Help Guide Printable PDF
Page 70
.... When you shoot a moving subject, focus on the point where you expect the subject to appear before you cannot adjust the exposure, focus settings including manual focus, or the zoom scale. Press the in the center of the movie from [60p 50M]/[50p 50M], [30p 50M]/[25p 50M], and [24p 50M...
.... When you shoot a moving subject, focus on the point where you expect the subject to appear before you cannot adjust the exposure, focus settings including manual focus, or the zoom scale. Press the in the center of the movie from [60p 50M]/[50p 50M], [30p 50M]/[25p 50M], and [24p 50M...

Help Guide Printable PDF
Page 83
...; [Off]. To hide the marker displayed during movie recording, select MENU → (Custom Settings) → [ Marker Display] → [Off]. [51] How to [Auto] or [Viewfinder(Manual)], the image is displayed on the viewfinder status and the [FINDER/MONITOR] setting. Look through the viewfinder to set to Use Using shooting functions Selecting...
...; [Off]. To hide the marker displayed during movie recording, select MENU → (Custom Settings) → [ Marker Display] → [Off]. [51] How to [Auto] or [Viewfinder(Manual)], the image is displayed on the viewfinder status and the [FINDER/MONITOR] setting. Look through the viewfinder to set to Use Using shooting functions Selecting...

Help Guide Printable PDF
Page 84
If [FINDER/MONITOR] is set to [Viewfinder(Manual)], the image is displayed in the viewfinder only. When you are not looking into the viewfinder If [FINDER/MONITOR] is set to [Auto] or [Monitor(Manual)], the image is displayed only on the screen. If [FINDER/MONITOR] is set to [Monitor(Manual)], the image is displayed only on the screen.
If [FINDER/MONITOR] is set to [Viewfinder(Manual)], the image is displayed in the viewfinder only. When you are not looking into the viewfinder If [FINDER/MONITOR] is set to [Auto] or [Monitor(Manual)], the image is displayed only on the screen. If [FINDER/MONITOR] is set to [Monitor(Manual)], the image is displayed only on the screen.

Help Guide Printable PDF
Page 92
.... If you press the shutter button halfway down . When you cannot focus on the intended subject using auto focus, use manual focus and auto focus in motion. (Direct Manual Focus): Allows you shoot movies when [Focus Mode] is set to [Continuous AF], the beep does not sound when focus... is difficult to use manual focus. Use this when the subject is in combination. (Manual Focus): Adjusts the focus manually. When the shutter button is pressed halfway down, the product locks the focus when it is achieved. ...
.... If you press the shutter button halfway down . When you cannot focus on the intended subject using auto focus, use manual focus and auto focus in motion. (Direct Manual Focus): Allows you shoot movies when [Focus Mode] is set to [Continuous AF], the beep does not sound when focus... is difficult to use manual focus. Use this when the subject is in combination. (Manual Focus): Adjusts the focus manually. When the shutter button is pressed halfway down, the product locks the focus when it is achieved. ...

Help Guide Printable PDF
Page 95
... does not work in the following situations: In [Sweep Panorama] mode When [Scene Selection] is set to [Hand-held Twilight] or [Anti Motion Blur]. in Manual Focus mode When using the digital zoom When the shooting mode is set to track the subject. 1. When shooting in the center of the If...
... does not work in the following situations: In [Sweep Panorama] mode When [Scene Selection] is set to [Hand-held Twilight] or [Anti Motion Blur]. in Manual Focus mode When using the digital zoom When the shooting mode is set to track the subject. 1. When shooting in the center of the If...

Help Guide Printable PDF
Page 97
... be canceled. [67] How to Use Using shooting functions Adjusting the focus Direct manual focus (DMF) You can adjust the focus manually. MENU → (Camera Settings) → [Focus Mode] → [Manual Focus]. 2. Rotate the control ring to achieve sharp focus. Note When you use the viewfinder, adjust the diopter level to obtain ...the correct focus on the screen. 3. [66] How to Use Using shooting functions Adjusting the focus Manual Focus When it is difficult to get the proper focus in autofocus mode, you can make fine adjustments...
... be canceled. [67] How to Use Using shooting functions Adjusting the focus Direct manual focus (DMF) You can adjust the focus manually. MENU → (Camera Settings) → [Focus Mode] → [Manual Focus]. 2. Rotate the control ring to achieve sharp focus. Note When you use the viewfinder, adjust the diopter level to obtain ...the correct focus on the screen. 3. [66] How to Use Using shooting functions Adjusting the focus Manual Focus When it is difficult to get the proper focus in autofocus mode, you can make fine adjustments...


