Operating Instructions
Page 6
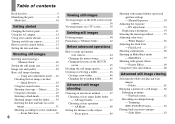
... 18 Setting the still image size 19 Image size and quality 20 Basic still image shooting - Manual Exposure 50 Adjusting the exposure - Trimming (DSC-P100/P120 only 63 Playing back successive images - Table of contents Read this first 4 Identifying the parts 8 Mode dial 10 Getting started Charging... speed and aperture settings - Macro 26 Using the self-timer 27 Selecting a flash mode 28 Shooting images with the finder ......... 30 Inserting the date and time on a still image 31 Shooting according to setup and operate your camera 36 Viewing images on the LCD screen of a still...
... 18 Setting the still image size 19 Image size and quality 20 Basic still image shooting - Manual Exposure 50 Adjusting the exposure - Trimming (DSC-P100/P120 only 63 Playing back successive images - Table of contents Read this first 4 Identifying the parts 8 Mode dial 10 Getting started Charging... speed and aperture settings - Macro 26 Using the self-timer 27 Selecting a flash mode 28 Shooting images with the finder ......... 30 Inserting the date and time on a still image 31 Shooting according to setup and operate your camera 36 Viewing images on the LCD screen of a still...

Operating Instructions
Page 8
... connector (bottom surface) F Tripod receptacle (bottom surface) G POWER lamp (15) H Finder window I Self-timer lamp (27)/ AF illuminator (29, 113) 8 J Microphone q; You will be unable to firmly secure the camera to tripods having longer screws, and may damage the camera. Identifying the parts See the pages in parentheses for details of less than...
... connector (bottom surface) F Tripod receptacle (bottom surface) G POWER lamp (15) H Finder window I Self-timer lamp (27)/ AF illuminator (29, 113) 8 J Microphone q; You will be unable to firmly secure the camera to tripods having longer screws, and may damage the camera. Identifying the parts See the pages in parentheses for details of less than...

Operating Instructions
Page 9
C (Display/LCD on/off) button (30) D MENU button (44, 109) E Control button Menu on the LCD screen, see page 120 to 123. 1 2 3 4 5 A Finder (30) Self-timer (27)/recording lamp (red) (23) AE/AF lock lamp (green) (23) /CHG lamp (orange) (12, 28) 6 7 8 9 q; qa qs qd qf B LCD screen For details on ...
C (Display/LCD on/off) button (30) D MENU button (44, 109) E Control button Menu on the LCD screen, see page 120 to 123. 1 2 3 4 5 A Finder (30) Self-timer (27)/recording lamp (red) (23) AE/AF lock lamp (green) (23) /CHG lamp (orange) (12, 28) 6 7 8 9 q; qa qs qd qf B LCD screen For details on ...

Operating Instructions
Page 27
To cancel the self-timer in the middle of the camera, the focus and the exposure may not be in focus. •... button. The indicator disappears from the actual recording range. Press and hold the shutter button halfway down . The self-timer lamp (page 8) flashes and a beep sounds after you press the shutter button until the shutter operates (approximately 10 ... 96 S AF 30 F2.8 2 , Center the subject in the frame. This is set . 27 Using the self-timer Shooting still images • When shooting in the close -ups (Macro) mode, the in-focus range becomes extremely narrow,...
To cancel the self-timer in the middle of the camera, the focus and the exposure may not be in focus. •... button. The indicator disappears from the actual recording range. Press and hold the shutter button halfway down . The self-timer lamp (page 8) flashes and a beep sounds after you press the shutter button until the shutter operates (approximately 10 ... 96 S AF 30 F2.8 2 , Center the subject in the frame. This is set . 27 Using the self-timer Shooting still images • When shooting in the close -ups (Macro) mode, the in-focus range becomes extremely narrow,...

Operating Instructions
Page 30
If you press (Flash mode)/ (Self-timer)/ (Macro), the image will be displayed on the LCD screen for approximately two seconds so you can check or change the setting. • When shooting/... the power is turned off r Indicators on 60min VGA 101 96 • The image through the finder does not indicate the actual recordable range. The digital zoom does not function (page 25). - [AF Mode] is due to parallax. Shooting images with the AE/AF lock indicator on the LCD screen, when...
If you press (Flash mode)/ (Self-timer)/ (Macro), the image will be displayed on the LCD screen for approximately two seconds so you can check or change the setting. • When shooting/... the power is turned off r Indicators on 60min VGA 101 96 • The image through the finder does not indicate the actual recordable range. The digital zoom does not function (page 25). - [AF Mode] is due to parallax. Shooting images with the AE/AF lock indicator on the LCD screen, when...

Operating Instructions
Page 51
Return SAF 200 F2.8 0EV e Shoot the image. To use the Quick Review, closeups (Macro) or self-timer function, or to change the flash mode After step 4, press z to other than M. 51 When the zoom is set to "Set". You can be obtained ...
Return SAF 200 F2.8 0EV e Shoot the image. To use the Quick Review, closeups (Macro) or self-timer function, or to change the flash mode After step 4, press z to other than M. 51 When the zoom is set to "Set". You can be obtained ...
Operating Instructions
Page 59
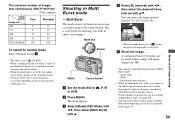
...convenient for checking your form in sports, for example. The maximum number of images shot continuously (DSC-P100/P120) (Units: images) Image quality Image size 5M Fine 9 Standard 15 3:2 9 ... 3. • The flash is set to (No flash). • When recording with the self-timer, a series of maximum five images are recorded within a single still image (image size 1M). &#...following functions in Multi Burst mode: - b Press MENU. Shooting in Multi Burst mode using this camera. • For the number of 16 frames are recorded each time you cannot select shutter speeds ...
...convenient for checking your form in sports, for example. The maximum number of images shot continuously (DSC-P100/P120) (Units: images) Image quality Image size 5M Fine 9 Standard 15 3:2 9 ... 3. • The flash is set to (No flash). • When recording with the self-timer, a series of maximum five images are recorded within a single still image (image size 1M). &#...following functions in Multi Burst mode: - b Press MENU. Shooting in Multi Burst mode using this camera. • For the number of 16 frames are recorded each time you cannot select shutter speeds ...

Operating Instructions
Page 76
...101 REC 00:00:02[00:10:48] Shutter Control button a Set the mode dial to . c Select the desired size with sound using your camera. Shooting close-ups (Macro) Set the mode dial to and follow the procedure on page 27. • You cannot use terminal (A/V) to multi connector...be recorded only on . The Image Size setup appears. e Press the shutter button fully down . Using the self-timer Set the mode dial to and follow the procedure on the screen and the camera starts recording the image and sound. You can choose from [640(Fine)], [640(Standard)] and [160]. •...
...101 REC 00:00:02[00:10:48] Shutter Control button a Set the mode dial to . c Select the desired size with sound using your camera. Shooting close-ups (Macro) Set the mode dial to and follow the procedure on page 27. • You cannot use terminal (A/V) to multi connector...be recorded only on . The Image Size setup appears. e Press the shutter button fully down . Using the self-timer Set the mode dial to and follow the procedure on the screen and the camera starts recording the image and sound. You can choose from [640(Fine)], [640(Standard)] and [160]. •...

Operating Instructions
Page 113
...Camera 1) (DSC-P150)/ (Camera) (DSC-P100/P120) 1 Item Setting Description AF Mode xSingle / Monitor Selects the focus operation mode (page 48). Helps when it is displayed for approximately two seconds. Auto Review xOn / Off (DSC-P150) On / xOff (DSC-P100/ P120) Selects whether to temporarily enlarge the setting indication when you press (Self-timer... / Off Selects whether to superimpose the date or time onto the image (page 31). Digital Zoom xSmart / Precision / Off Selects the digital zoom mode (page 24). You cannot shoot the next image during recording. The SET UP...
...Camera 1) (DSC-P150)/ (Camera) (DSC-P100/P120) 1 Item Setting Description AF Mode xSingle / Monitor Selects the focus operation mode (page 48). Helps when it is displayed for approximately two seconds. Auto Review xOn / Off (DSC-P150) On / xOff (DSC-P100/ P120) Selects whether to temporarily enlarge the setting indication when you press (Self-timer... / Off Selects whether to superimpose the date or time onto the image (page 31). Digital Zoom xSmart / Precision / Off Selects the digital zoom mode (page 24). You cannot shoot the next image during recording. The SET UP...

Operating Instructions
Page 120
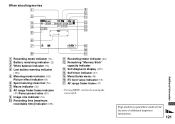
...:00 6 ql 7 + w; 8 wa 9 Return ws 0 S AF 125 F3.5 +2.0EV qa wd qs wf qd wg A Recording mode indicator (58, 59)/Image size indicator (19) B Self-timer indicator (27) C AE/AF lock indicator (23, 49) D Battery remaining indicator (12) E White balance indicator (56)/ Mode dial indicator (10)/ Flash mode indicator (28)/ Red...
...:00 6 ql 7 + w; 8 wa 9 Return ws 0 S AF 125 F3.5 +2.0EV qa wd qs wf qd wg A Recording mode indicator (58, 59)/Image size indicator (19) B Self-timer indicator (27) C AE/AF lock indicator (23, 49) D Battery remaining indicator (12) E White balance indicator (56)/ Mode dial indicator (10)/ Flash mode indicator (28)/ Red...
Operating Instructions
Page 121
... (76) J Recording time [maximum recordable time] indicator (108) qg qh qj K Recording folder indicator (46) L Remaining "Memory Stick" capacity indicator M Self-diagnosis display (107) N Self-timer indicator (27) O Menu/Guide menu (44) P EV level value indicator (53) Q AF range finder frame (47) • Pressing MENU switches the menu/guide menu on...
... (76) J Recording time [maximum recordable time] indicator (108) qg qh qj K Recording folder indicator (46) L Remaining "Memory Stick" capacity indicator M Self-diagnosis display (107) N Self-timer indicator (27) O Menu/Guide menu (44) P EV level value indicator (53) Q AF range finder frame (47) • Pressing MENU switches the menu/guide menu on...
Operating Instructions
Page 125
... 114 PictBridge 70 Picture effect 60 Picture Package 88 Playback zoom 62 Power on/off 15 Precautions 115 Precision digital zoom 25 Print (DPOF) mark 68 Program auto shooting 10 Protect 66 PTP 81, 92, 114 Q ...Rotate 64 S Saturation 110 Scene Selection 32 Screen display 30, 120 Self-diagnosis display 107 Self-timer 27 Sepia 60 SET UP 45, 113 Setting date and time 16, 113 Sharpness 110 Shooting movies... U USB connection 70, 83 USB driver 82 USB jack 70, 83 USB mode 81 Using your camera abroad 14 V VGA 20 Viewing images on a TV screen 38 Viewing images on your computer 86...
... 114 PictBridge 70 Picture effect 60 Picture Package 88 Playback zoom 62 Power on/off 15 Precautions 115 Precision digital zoom 25 Print (DPOF) mark 68 Program auto shooting 10 Protect 66 PTP 81, 92, 114 Q ...Rotate 64 S Saturation 110 Scene Selection 32 Screen display 30, 120 Self-diagnosis display 107 Self-timer 27 Sepia 60 SET UP 45, 113 Setting date and time 16, 113 Sharpness 110 Shooting movies... U USB connection 70, 83 USB driver 82 USB jack 70, 83 USB mode 81 Using your camera abroad 14 V VGA 20 Viewing images on a TV screen 38 Viewing images on your computer 86...
