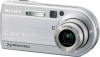
Operating Instructions
Page 3
...-Ion batteries are recyclable. For more information regarding recycling of this product. Should the fuse in the plug supplied need to be sure to BS 1362, (i.e., marked with your nearest Sony service station. and Canada THIS DEVICE COMPLIES WITH PART 15 OF THE FCC RULES. OPERATION ...the limits sets out in Europe This product has been tested and found compliant with BS 1363 is fitted to power this camera. THIS CLASS B DIGITAL APPARATUS COMPLIES WITH CANADIAN ICES-003. Notice If static electricity or electromagnetism causes data transfer to the collection and recycling location ...
...-Ion batteries are recyclable. For more information regarding recycling of this product. Should the fuse in the plug supplied need to be sure to BS 1362, (i.e., marked with your nearest Sony service station. and Canada THIS DEVICE COMPLIES WITH PART 15 OF THE FCC RULES. OPERATION ...the limits sets out in Europe This product has been tested and found compliant with BS 1363 is fitted to power this camera. THIS CLASS B DIGITAL APPARATUS COMPLIES WITH CANADIAN ICES-003. Notice If static electricity or electromagnetism causes data transfer to the collection and recycling location ...
Operating Instructions
Page 6
...feature 24 Shooting close-ups - AF range finder 47 Choosing a focus operation - Trimming (DSC-P100/P120 only 63 Playing back successive images - AF Mode 48 Setting the distance to setup and operate your camera 44 Changing the menu settings 44 Changing the items in Multi Burst mode - Using auto adjustment... the folder and playing back images - Table of contents Read this first 4 Identifying the parts 8 Mode dial 10 Getting started Charging the battery pack 11 Using the AC adaptor 14 Using your camera abroad 14 Turning on/off your camera 15 How to scene conditions -
...feature 24 Shooting close-ups - AF range finder 47 Choosing a focus operation - Trimming (DSC-P100/P120 only 63 Playing back successive images - AF Mode 48 Setting the distance to setup and operate your camera 44 Changing the menu settings 44 Changing the items in Multi Burst mode - Using auto adjustment... the folder and playing back images - Table of contents Read this first 4 Identifying the parts 8 Mode dial 10 Getting started Charging the battery pack 11 Using the AC adaptor 14 Using your camera abroad 14 Turning on/off your camera 15 How to scene conditions -
Operating Instructions
Page 7
...79 Enjoying images on your computer 86 Image file storage destinations and file names 86 Viewing image files once copied to a computer with your camera 88 Installing "Picture Package 88 Copying images using "Picture Package 90 Using "Picture Package 91 Copying images to your computer - Rotating still ...that can be saved or shooting time 108 Menu items 109 SET UP items 113 Precautions 115 On "Memory Stick 116 On "InfoLITHIUM" battery pack .........117 Specifications 118 The LCD screen 120 Index Index 124 7 Rotate 64 Playing back images shot in Multi Burst mode 64 Playing...
...79 Enjoying images on your computer 86 Image file storage destinations and file names 86 Viewing image files once copied to a computer with your camera 88 Installing "Picture Package 88 Copying images using "Picture Package 90 Using "Picture Package 91 Copying images to your computer - Rotating still ...that can be saved or shooting time 108 Menu items 109 SET UP items 113 Precautions 115 On "Memory Stick 116 On "InfoLITHIUM" battery pack .........117 Specifications 118 The LCD screen 120 Index Index 124 7 Rotate 64 Playing back images shot in Multi Burst mode 64 Playing...

Operating Instructions
Page 9
...: Zoom (W/T) button (24) For viewing: / (Playback zoom) button (62)/ (Index) button (37) H DC IN jack cover (11, 14) I Battery/"Memory Stick" cover J RESET button (95) K Access lamp (18) L DC IN jack (11, 14) M Battery eject lever (11) N (Image Size/Delete) button (19, 40) 9 1 2 3 4 5 A Finder (30) Self-timer (27)/recording lamp (red) (23...
...: Zoom (W/T) button (24) For viewing: / (Playback zoom) button (62)/ (Index) button (37) H DC IN jack cover (11, 14) I Battery/"Memory Stick" cover J RESET button (95) K Access lamp (18) L DC IN jack (11, 14) M Battery eject lever (11) N (Image Size/Delete) button (19, 40) 9 1 2 3 4 5 A Finder (30) Self-timer (27)/recording lamp (red) (23...

Operating Instructions
Page 11
... and connect the AC Adaptor (supplied) to turn off your camera. Make sure the battery pack is easily inserted by pushing the battery eject lever at the front of the battery compartment toward the front of your camera when charging the battery pack (page 15). • Your camera operates with a metallic object, as illustrated above. Do not...
... and connect the AC Adaptor (supplied) to turn off your camera. Make sure the battery pack is easily inserted by pushing the battery eject lever at the front of the battery compartment toward the front of your camera when charging the battery pack (page 15). • Your camera operates with a metallic object, as illustrated above. Do not...

Operating Instructions
Page 12
...time. The /CHG lamp lights up when charging begins, and goes off , it . Battery remaining indicator The battery remaining indicator on /off when charging is completed. /CHG lamp • After charging the battery pack, disconnect the AC Adaptor from the DC IN jack of the arrow, and remove ... using the AC Adaptor at a temperature of 25°C (77°F). Slide the battery eject lever in the direction of your camera. Charging time Approximate time to a wall outlet (wall socket). Battery pack NP-FR1 (supplied) Charging time (min.) Approx. 200 • The charging time may not be...
...time. The /CHG lamp lights up when charging begins, and goes off , it . Battery remaining indicator The battery remaining indicator on /off when charging is completed. /CHG lamp • After charging the battery pack, disconnect the AC Adaptor from the DC IN jack of the arrow, and remove ... using the AC Adaptor at a temperature of 25°C (77°F). Slide the battery eject lever in the direction of your camera. Charging time Approximate time to a wall outlet (wall socket). Battery pack NP-FR1 (supplied) Charging time (min.) Approx. 200 • The charging time may not be...

Operating Instructions
Page 13
... The power turns on the conditions of use. • The battery capacity decreases as the number of images Battery life (min.) DSC-P150 7M Approx. 7200 Approx. 360 VGA (E-Mail) Approx. 7200 Approx. 360 DSC-P100/P120 5M Approx. 7200 Approx. 360 VGA (E-Mail) Approx.... 7200 Approx. 360 2) Viewing single images in order at a temperature of images that can be recorded or viewed take into account changing the "Memory Stick" as necessary. The camera...
... The power turns on the conditions of use. • The battery capacity decreases as the number of images Battery life (min.) DSC-P150 7M Approx. 7200 Approx. 360 VGA (E-Mail) Approx. 7200 Approx. 360 DSC-P100/P120 5M Approx. 7200 Approx. 360 VGA (E-Mail) Approx.... 7200 Approx. 360 2) Viewing single images in order at a temperature of images that can be recorded or viewed take into account changing the "Memory Stick" as necessary. The camera...
Operating Instructions
Page 15
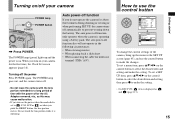
...camera turns off function also will not operate in the following circumstances. • When viewing movies • When playing back a slide show • When connecting the cable for multi-use the control button to make the setting. • On DSC-P150...A/V). Do not touch the lens portion while it is operating using a battery pack. Auto power-off function If you turn on the control button to , P, M, ...POWER lamp goes out, and the camera turns off function only operates when the camera is operating. How to use the control button Camera AF Mode: Digital Zoom: Date/Time: 1 Red ...
...camera turns off function also will not operate in the following circumstances. • When viewing movies • When playing back a slide show • When connecting the cable for multi-use the control button to make the setting. • On DSC-P150...A/V). Do not touch the lens portion while it is operating using a battery pack. Auto power-off function If you turn on the control button to , P, M, ...POWER lamp goes out, and the camera turns off function only operates when the camera is operating. How to use the control button Camera AF Mode: Digital Zoom: Date/Time: 1 Red ...

Operating Instructions
Page 16
... the date and time, set to P, M, SCN, or . Select from [Y/M/D] (year/month/day), [M/D/Y] (month/day/year) or [D/M/Y] (day/month/year). • If the rechargeable button battery (page 116), which provides the power for saving the time data, ever becomes low, the Clock Set screen will appear again.
... the date and time, set to P, M, SCN, or . Select from [Y/M/D] (year/month/day), [M/D/Y] (month/day/year) or [D/M/Y] (day/month/year). • If the rechargeable button battery (page 116), which provides the power for saving the time data, ever becomes low, the Clock Set screen will appear again.
Operating Instructions
Page 18
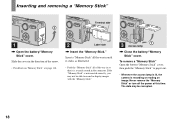
... still images Inserting and removing a "Memory Stick" Terminal side 1 , Open the battery/"Memory Stick" cover. Insert a "Memory Stick" all the way in the connector...in the direction of the way in so that it out. • Whenever the access lamp is lit, the camera is securely seated in until it clicks as illustrated. • Push the "Memory Stick" all of the arrow....page 116. 2 Label side , Insert the "Memory Stick." To remove a "Memory Stick" Open the battery/"Memory Stick" cover, then push the "Memory Stick" to record or display images with the "Memory Stick." 3 Access lamp , ...
... still images Inserting and removing a "Memory Stick" Terminal side 1 , Open the battery/"Memory Stick" cover. Insert a "Memory Stick" all the way in the connector...in the direction of the way in so that it out. • Whenever the access lamp is lit, the camera is securely seated in until it clicks as illustrated. • Push the "Memory Stick" all of the arrow....page 116. 2 Label side , Insert the "Memory Stick." To remove a "Memory Stick" Open the battery/"Memory Stick" cover, then push the "Memory Stick" to record or display images with the "Memory Stick." 3 Access lamp , ...

Operating Instructions
Page 23
... will be canceled. • You can shoot the next image. • When operating the camera using a battery pack, if you do not operate the camera for a while during recording or playback, the camera turns off automatically to prevent wearing down . Auto Focus When you can continue and shoot even when... the camera does not beep, but the image is ready for details. 23 Shooting still ...
... will be canceled. • You can shoot the next image. • When operating the camera using a battery pack, if you do not operate the camera for a while during recording or playback, the camera turns off automatically to prevent wearing down . Auto Focus When you can continue and shoot even when... the camera does not beep, but the image is ready for details. 23 Shooting still ...

Operating Instructions
Page 30
...Flash mode)/ (Self-timer)/ (Macro), the image will be displayed during playback.) 60min VGA 101 96 The finder is convenient when you want to save battery power, or when it is difficult to confirm the image using the LCD screen. Each time you can check or change the setting. • When... lamp of the histogram, see page 54. • This setting is maintained even when the power is turned off. This is set to parallax. The digital zoom does not function (page 25). - [AF Mode] is due to [Single] (page 48). - S AF r Indicators off S AF r LCD screen off : - Shooting images ...
...Flash mode)/ (Self-timer)/ (Macro), the image will be displayed during playback.) 60min VGA 101 96 The finder is convenient when you want to save battery power, or when it is difficult to confirm the image using the LCD screen. Each time you can check or change the setting. • When... lamp of the histogram, see page 54. • This setting is maintained even when the power is turned off. This is set to parallax. The digital zoom does not function (page 25). - [AF Mode] is due to [Single] (page 48). - S AF r Indicators off S AF r LCD screen off : - Shooting images ...

Operating Instructions
Page 48
... adjusts the focus before the shutter button is locked. • Battery consumption may be faster than in or near the center of the frame. a Set the mode dial to subjects in Single AF mode. Camera AF Mode: xSingle Digital Zoom: Monitor Date/Time: 1 Red Eye Reduction: 2 AF Illuminator: ...Auto Review: • When shooting using the finder with the LCD screen off, the camera operates in Single AF mode. • On DSC-P150, item is pressed and held halfway down, letting you use the digital zoom or AF illuminator, priority AF movement is limited according to the Scene Selection mode ...
... adjusts the focus before the shutter button is locked. • Battery consumption may be faster than in or near the center of the frame. a Set the mode dial to subjects in Single AF mode. Camera AF Mode: xSingle Digital Zoom: Monitor Date/Time: 1 Red Eye Reduction: 2 AF Illuminator: ...Auto Review: • When shooting using the finder with the LCD screen off, the camera operates in Single AF mode. • On DSC-P150, item is pressed and held halfway down, letting you use the digital zoom or AF illuminator, priority AF movement is limited according to the Scene Selection mode ...

Operating Instructions
Page 58
... the shutter button. Mode dial Shutter MENU Control button • When the battery power decreases with use or the capacity of images you press and hold down the shutter button, the camera records the maximum number of images shot continuously (DSC-P150) (Units: images) Image quality Image size 7M Fine 5 Standard 8 3:2 5 8 5M 6 11 3M...
... the shutter button. Mode dial Shutter MENU Control button • When the battery power decreases with use or the capacity of images you press and hold down the shutter button, the camera records the maximum number of images shot continuously (DSC-P150) (Units: images) Image quality Image size 7M Fine 5 Standard 8 3:2 5 8 5M 6 11 3M...

Operating Instructions
Page 83
...rear panel. • When using the battery pack, copying may be failed or cause data corruption by battery shutoff. USB Mode Normal Switch on MENU Access indicators* "USB Mode Normal" appears on the LCD screen of the camera. • Place the camera with the images you want to copy ...DC IN jack cover, and connect the AC Adaptor (supplied), then plug the adaptor into the camera, then close the battery/"Memory Stick" cover. Enjoying images on your computer Connecting the camera to your computer using Windows XP, the AutoPlay wizard automatically appears on the desktop. We recommend that...
...rear panel. • When using the battery pack, copying may be failed or cause data corruption by battery shutoff. USB Mode Normal Switch on MENU Access indicators* "USB Mode Normal" appears on the LCD screen of the camera. • Place the camera with the images you want to copy ...DC IN jack cover, and connect the AC Adaptor (supplied), then plug the adaptor into the camera, then close the battery/"Memory Stick" cover. Enjoying images on your computer Connecting the camera to your computer using Windows XP, the AutoPlay wizard automatically appears on the desktop. We recommend that...

Operating Instructions
Page 95
... disconnected. • The AC Adaptor has malfunctioned. • The battery pack is not installed correctly. • The battery pack is not installed correctly. • The battery pack has malfunctioned. p Consult your Sony dealer or local authorized Sony service facility. Troubleshooting If you experience trouble with your camera, try the following solutions. 1 First check the items on...
... disconnected. • The AC Adaptor has malfunctioned. • The battery pack is not installed correctly. • The battery pack is not installed correctly. • The battery pack has malfunctioned. p Consult your Sony dealer or local authorized Sony service facility. Troubleshooting If you experience trouble with your camera, try the following solutions. 1 First check the items on...

Operating Instructions
Page 96
...dead (page 118). p Clean the pins of the DC plug with the LCD screen turned off suddenly. p Consult your Sony dealer or local authorized Sony service facility. p Install a charged battery pack (page 11). p See page 118. p Properly connect the AC Adaptor (page 14). The power turns off ...the last time you do not operate the camera for about three minutes while the power is on even when the power is not...
...dead (page 118). p Clean the pins of the DC plug with the LCD screen turned off suddenly. p Consult your Sony dealer or local authorized Sony service facility. p Install a charged battery pack (page 11). p See page 118. p Properly connect the AC Adaptor (page 14). The power turns off ...the last time you do not operate the camera for about three minutes while the power is on even when the power is not...

Operating Instructions
Page 99
... p This condition is not a malfunction. p See page 88. - The eyes of your computer if the image has been modified. • The camera is not possible. The image appears rough • The image may appear rough right after right after playback starts. p This is not a malfunction.... mode dial is due to the image processing. playback starts due to the structure of the "Memory Stick" is full. • The battery remaining charge is low, so you press and hold the shutter button halfway down. p Correct the exposure (page 53). Viewing images Symptom Cause...
... p This condition is not a malfunction. p See page 88. - The eyes of your computer if the image has been modified. • The camera is not possible. The image appears rough • The image may appear rough right after right after playback starts. p This is not a malfunction.... mode dial is due to the image processing. playback starts due to the structure of the "Memory Stick" is full. • The battery remaining charge is low, so you press and hold the shutter button halfway down. p Correct the exposure (page 53). Viewing images Symptom Cause...
Operating Instructions
Page 101
...page 81). Computers Symptom Cause Solution You do not know if the OS - p Turn on your computer are connected to your camera. • The camera is turned off. • The battery level is not connected directly to your OS (pages 84, 85, 90 and 92). p Use the AC Adaptor (page ...14). p Disconnect all equipment other equipment besides the keyboard, the mouse, and your camera. • The camera is low. • You are not using a "Memory ...
...page 81). Computers Symptom Cause Solution You do not know if the OS - p Turn on your computer are connected to your camera. • The camera is turned off. • The battery level is not connected directly to your OS (pages 84, 85, 90 and 92). p Use the AC Adaptor (page ...14). p Disconnect all equipment other equipment besides the keyboard, the mouse, and your camera. • The camera is low. • You are not using a "Memory ...

Operating Instructions
Page 104
...work . If this does not work, press the RESET button located inside the battery/"Memory Stick" cover with the current paper size setting of the printer (DSC-P150 only). • The paper size setting of the camera differs from that of the printer. • The printer paper was changed ...to paper of your camera and to a wall outlet (wall socket) (page 14). p Turn off the camera. - • The battery pack is not a malfunction....
...work . If this does not work, press the RESET button located inside the battery/"Memory Stick" cover with the current paper size setting of the printer (DSC-P150 only). • The paper size setting of the camera differs from that of the printer. • The printer paper was changed ...to paper of your camera and to a wall outlet (wall socket) (page 14). p Turn off the camera. - • The battery pack is not a malfunction....


