Instruction Manual
Page 7
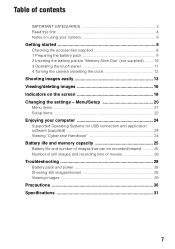
... time of contents IMPORTANT SAFEGUARDS 2 Read this first 4 Notes on using your camera 6 Getting started 8 Checking the accessories supplied 8 1 Preparing the battery pack 9 2 Inserting the battery pack/a "Memory Stick Duo" (not supplied) ........ 10 3 Operating the touch panel 11 4 Turning the camera on/setting the clock 12 Shooting images easily 13 Viewing/deleting images 16...
... time of contents IMPORTANT SAFEGUARDS 2 Read this first 4 Notes on using your camera 6 Getting started 8 Checking the accessories supplied 8 1 Preparing the battery pack 9 2 Inserting the battery pack/a "Memory Stick Duo" (not supplied) ........ 10 3 Operating the touch panel 11 4 Turning the camera on/setting the clock 12 Shooting images easily 13 Viewing/deleting images 16...

Instruction Manual
Page 11
...Memory Stick Duo" Battery pack Make sure that the access lamp is not on -screen key) again to turn off the touch panel buttons. • When the item you want to the previous screen by touching . 11 [ To remove the battery pack/"Memory Stick Duo" Open the battery/"Memory...lit. 3 Operating the touch panel Touch panel Mode switch (on-screen key) button 1 Press (on-screen key) to display the touch panel buttons. • When the mode switch is set to , skip this operation. 2 Lightly touch the buttons on the screen with your finger. • Press (on the screen, touch v/V to change the...
...Memory Stick Duo" Battery pack Make sure that the access lamp is not on -screen key) again to turn off the touch panel buttons. • When the item you want to the previous screen by touching . 11 [ To remove the battery pack/"Memory Stick Duo" Open the battery/"Memory...lit. 3 Operating the touch panel Touch panel Mode switch (on-screen key) button 1 Press (on-screen key) to display the touch panel buttons. • When the mode switch is set to , skip this operation. 2 Lightly touch the buttons on the screen with your finger. • Press (on the screen, touch v/V to change the...
Instruction Manual
Page 12
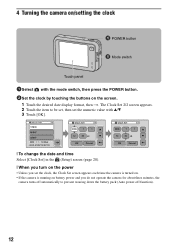
... the mode switch, then press the POWER button. 2Set the clock by touching the buttons on the screen. 1 Touch the desired date display format, then t. 4 Turning the camera on/setting the clock POWER button Mode switch Touch panel 1Select with v/V. 3 Touch [OK]. [ To change the date and time Select [Clock Set] ...in the (Setup) screen (page 20). [ When you turn on the power • Unless you set the clock, the Clock Set screen appears each time the camera is turned on. •...
... the mode switch, then press the POWER button. 2Set the clock by touching the buttons on the screen. 1 Touch the desired date display format, then t. 4 Turning the camera on/setting the clock POWER button Mode switch Touch panel 1Select with v/V. 3 Touch [OK]. [ To change the date and time Select [Clock Set] ...in the (Setup) screen (page 20). [ When you turn on the power • Unless you set the clock, the Clock Set screen appears each time the camera is turned on. •...
Instruction Manual
Page 13
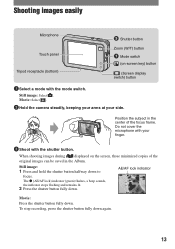
...camera steadily, keeping your arms at your finger. 3 Shoot with the mode switch. Still image: 1 Press and hold the shutter button halfway down again. 13 To stop recording, press the shutter button fully down to focus. AE/AF lock indicator Movie: Press the shutter button fully down . Shooting images easily Microphone Touch... panel Tripod receptacle (bottom) Shutter button Zoom (W/T) button Mode switch (on the screen, those minimized copies of the original images can be saved in the ...
...camera steadily, keeping your arms at your finger. 3 Shoot with the mode switch. Still image: 1 Press and hold the shutter button halfway down again. 13 To stop recording, press the shutter button fully down to focus. AE/AF lock indicator Movie: Press the shutter button fully down . Shooting images easily Microphone Touch... panel Tripod receptacle (bottom) Shutter button Zoom (W/T) button Mode switch (on the screen, those minimized copies of the original images can be saved in the ...
Instruction Manual
Page 14
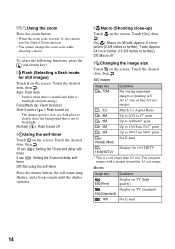
... +* size or fine A4 size images : 3:2 Match 3:2 Aspect Ratio : 8M Up to A3/11×17" print : 5M Up to A4/8×10" print 3M : 3M : 2M Up to 13×18cm /5×7" print Up to clearly shoot the background that is a size larger than A3 size....Touch the desired item, then . [ Using the zoom Press the zoom button. • When the zoom scale exceeds 3×, the camera uses the Digital Zoom function. • You cannot change the zoom scale while shooting a movie. Touch [On], then . Movies Image size Guidelines : 640(Fine) Display on TV (high quality) : Display on the screen...
... +* size or fine A4 size images : 3:2 Match 3:2 Aspect Ratio : 8M Up to A3/11×17" print : 5M Up to A4/8×10" print 3M : 3M : 2M Up to 13×18cm /5×7" print Up to clearly shoot the background that is a size larger than A3 size....Touch the desired item, then . [ Using the zoom Press the zoom button. • When the zoom scale exceeds 3×, the camera uses the Digital Zoom function. • You cannot change the zoom scale while shooting a movie. Touch [On], then . Movies Image size Guidelines : 640(Fine) Display on TV (high quality) : Display on the screen...
Instruction Manual
Page 15
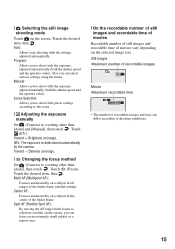
...item, then . Center AF: Focuses automatically on a subject in all ranges of the finder frame. Touch the desired item, then . Manual: Allows you to a setting other than [Auto], then touch . Touch (EV). Multi AF (Multipoint AF): Focuses automatically on an extremely small subject or a narrow area....to shooting conditions. 15 Also you can differ according to wherever you like on the screen, you to shoot with preset settings according to the scene. [ Adjusting the exposure manually Set (Camera) to shoot with the settings adjusted automatically. Toward +: Brightens an image. 0EV:...
...item, then . Center AF: Focuses automatically on a subject in all ranges of the finder frame. Touch the desired item, then . Manual: Allows you to a setting other than [Auto], then touch . Touch (EV). Multi AF (Multipoint AF): Focuses automatically on an extremely small subject or a narrow area....to shooting conditions. 15 Also you can differ according to wherever you like on the screen, you to shoot with preset settings according to the scene. [ Adjusting the exposure manually Set (Camera) to shoot with the settings adjusted automatically. Toward +: Brightens an image. 0EV:...
Instruction Manual
Page 17
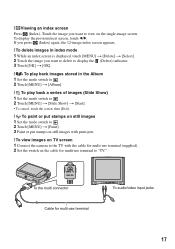
...input jacks 17 If you press (Index) again, the 12-image index screen appears. [ To delete images in index mode 1 While an index screen is displayed, touch [MENU] t [Delete] t [Select]. 2 Touch the image you want to delete to display the (Delete) indicator. 3 Touch [OK] t [OK]. [ To play back images stored in the... [ To paint or put stamps on still images 1 Set the mode switch to . 2 Touch [MENU] t [Paint]. 3 Paint or put stamps on still images with paint pen. [ To view images on TV screen 1 Connect the camera to view on the cable for multi-use terminal (supplied). 2 Set the switch on the...
...input jacks 17 If you press (Index) again, the 12-image index screen appears. [ To delete images in index mode 1 While an index screen is displayed, touch [MENU] t [Delete] t [Select]. 2 Touch the image you want to delete to display the (Delete) indicator. 3 Touch [OK] t [OK]. [ To play back images stored in the... [ To paint or put stamps on still images 1 Set the mode switch to . 2 Touch [MENU] t [Paint]. 3 Paint or put stamps on still images with paint pen. [ To view images on TV screen 1 Connect the camera to view on the cable for multi-use terminal (supplied). 2 Set the switch on the...

Instruction Manual
Page 20
... . 20 Different items are available depending on the position of the mode switch and the settings. (Camera) menu 2Press (on-screen key) to display the touch panel buttons. • When the mode switch is set to , skip this operation. 3Touch [MENU] to display the menu. 4Touch the item you want to ...
... . 20 Different items are available depending on the position of the mode switch and the settings. (Camera) menu 2Press (on-screen key) to display the touch panel buttons. • When the mode switch is set to , skip this operation. 3Touch [MENU] to display the menu. 4Touch the item you want to ...
Instruction Manual
Page 23
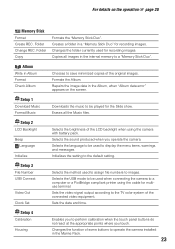
... printer using the camera with battery pack. Setup 3 File Number USB Connect Video Out Clock Set Selects the method used to perform calibration when the touch panel buttons do not react at the appropriate points where you operate the camera. For details on the screen. Changes the folder... currently used when connecting the camera to the default setting. Formats the Album. Creates a ...
... printer using the camera with battery pack. Setup 3 File Number USB Connect Video Out Clock Set Selects the method used to perform calibration when the touch panel buttons do not react at the appropriate points where you operate the camera. For details on the screen. Changes the folder... currently used when connecting the camera to the default setting. Formats the Album. Creates a ...
Instruction Manual
Page 30
..., even if this rechargeable battery is not charged, you can still use the camera as long as this may cause malfunction or damage the camera. [ On cleaning Cleaning the LCD screen Wipe the screen surface with rubber or vinyl for use under the temperatures between 0°C and 40°C (32°F..., alcohol, disposable cloths, insect repellent, sunscreen or insecticide, etc. • Do not touch the camera with the power off . This rechargeable battery is on your trousers or skirt, as you do not use the camera at all for about an hour for the moisture to record clear images. [ On the...
..., even if this rechargeable battery is not charged, you can still use the camera as long as this may cause malfunction or damage the camera. [ On cleaning Cleaning the LCD screen Wipe the screen surface with rubber or vinyl for use under the temperatures between 0°C and 40°C (32°F..., alcohol, disposable cloths, insect repellent, sunscreen or insecticide, etc. • Do not touch the camera with the power off . This rechargeable battery is on your trousers or skirt, as you do not use the camera at all for about an hour for the moisture to record clear images. [ On the...


