User Guide
Page 65
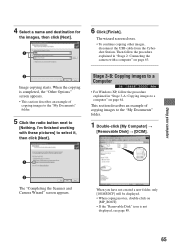
...radio button next to the "My Documents" folder. 1 Double-click [My Computer] t [Removable Disk] t [DCIM]. 1 2 The "Completing the Scanner and Camera Wizard" screen appears. Using your computer 4 Select a name and destination for the images, then click [Next]. 1 6 Click [Finish]. Then follow the procedure... explained in "Stage 2: Connecting the camera with these pictures] to a computer" on page 64. The wizard screen closes. • To continue copying other images, disconnect the USB ...
...radio button next to the "My Documents" folder. 1 Double-click [My Computer] t [Removable Disk] t [DCIM]. 1 2 The "Completing the Scanner and Camera Wizard" screen appears. Using your computer 4 Select a name and destination for the images, then click [Next]. 1 6 Click [Finish]. Then follow the procedure... explained in "Stage 2: Connecting the camera with these pictures] to a computer" on page 64. The wizard screen closes. • To continue copying other images, disconnect the USB ...
User Guide
Page 81
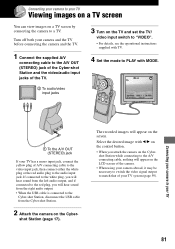
... if connected to the red plug, you attach the camera on the Cybershot Station while connecting to the A/V connecting cable, nothing will appear on the screen. Turn off... both your camera and the TV before connecting the camera and the TV. 1 Connect the supplied A/V connecting cable to ... a TV. PHOTO MODE MOVIE 101 8/9 VGA 101-0008 2005 1 1 10:30PM BACK/NEXT VOLUME Connecting your camera to your TV 1 To the A/V OUT (STEREO) jack If your TV has a mono input jack, connect ...
... if connected to the red plug, you attach the camera on the Cybershot Station while connecting to the A/V connecting cable, nothing will appear on the screen. Turn off... both your camera and the TV before connecting the camera and the TV. 1 Connect the supplied A/V connecting cable to ... a TV. PHOTO MODE MOVIE 101 8/9 VGA 101-0008 2005 1 1 10:30PM BACK/NEXT VOLUME Connecting your camera to your TV 1 To the A/V OUT (STEREO) jack If your TV has a mono input jack, connect ...


