User Guide
Page 5
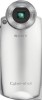
... on your finger when the lens cover opens and closes. Be careful when placing the camera near a location that may cause a malfunction. • Images may be some tiny black points and/or bright points (white, red, blue or green in insufficient light emission. Also, do not affect the recording... in a cold location. This is manufactured using the camera (page 100). • Do not shake or strike the camera. • Do not use . However, there...
... on your finger when the lens cover opens and closes. Be careful when placing the camera near a location that may cause a malfunction. • Images may be some tiny black points and/or bright points (white, red, blue or green in insufficient light emission. Also, do not affect the recording... in a cold location. This is manufactured using the camera (page 100). • Do not shake or strike the camera. • Do not use . However, there...
User Guide
Page 8
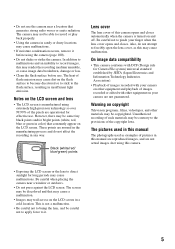
... that can be recorded/viewed 26 Using the buttons for better images 11 Focus - Table of contents Notes on using your camera 4 Enjoying the camera Basic techniques for recording/playback 27 Using Slide Show 28 Using Album 30 Using the menu Using menu items 32 Menu items ...33 Shooting menu 35 (Camera) (EV) 9 (Focus) WB (White Bal) ISO (P.Quality) Mode (REC Mode) BRK (Bracket Step) M (Interval) (Flash Level) PFX (P.Effect) (Saturation) (Contrast) (Sharpness) (Setup) 8 ...
... that can be recorded/viewed 26 Using the buttons for better images 11 Focus - Table of contents Notes on using your camera 4 Enjoying the camera Basic techniques for recording/playback 27 Using Slide Show 28 Using Album 30 Using the menu Using menu items 32 Menu items ...33 Shooting menu 35 (Camera) (EV) 9 (Focus) WB (White Bal) ISO (P.Quality) Mode (REC Mode) BRK (Bracket Step) M (Interval) (Flash Level) PFX (P.Effect) (Saturation) (Contrast) (Sharpness) (Setup) 8 ...
User Guide
Page 13
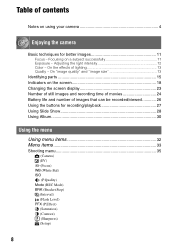
... On "image quality" and "image size" A digital image is made up more memory, and the image is displayed in the auto adjustment mode. Although you can adjust color tones manually with [White Bal] (page 40). "Image size" is shown by the lighting conditions. Enjoying the camera 1944 480 Color On the effects of...
... On "image quality" and "image size" A digital image is made up more memory, and the image is displayed in the auto adjustment mode. Although you can adjust color tones manually with [White Bal] (page 40). "Image size" is shown by the lighting conditions. Enjoying the camera 1944 480 Color On the effects of...
User Guide
Page 18
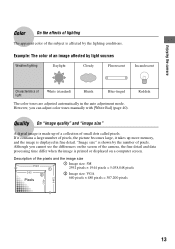
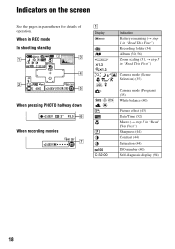
... Battery remaining (t step 1 in "Read This First") Recording folder (54) Album (30, 56) Zoom scaling (51, t step 5 in "Read This First") Camera mode (Scene Selection) (35) Camera mode (Program) (35) White balance (40) Picture effect (43) Date/Time (52) Macro (t step 5 in parentheses for details of operation. Indicators on the screen See the...
... Battery remaining (t step 1 in "Read This First") Recording folder (54) Album (30, 56) Zoom scaling (51, t step 5 in "Read This First") Camera mode (Scene Selection) (35) Camera mode (Program) (35) White balance (40) Picture effect (43) Date/Time (52) Macro (t step 5 in parentheses for details of operation. Indicators on the screen See the...

User Guide
Page 22
...; This does not appear when using Album. Protect (46) PictBridge connecting (76) Print order (DPOF) mark (79) Recording mode (41, t step 5 in "Read This First") White balance (40) Shutter speed Aperture value ISO number (40) Exposure Value (37) Menu/Guide menu (32) Indication Recorded date/time of the playback image (52...
...; This does not appear when using Album. Protect (46) PictBridge connecting (76) Print order (DPOF) mark (79) Recording mode (41, t step 5 in "Read This First") White balance (40) Shutter speed Aperture value ISO number (40) Exposure Value (37) Menu/Guide menu (32) Indication Recorded date/time of the playback image (52...
User Guide
Page 33
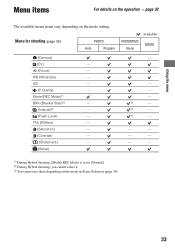
... Menu items For details on the operation t page 32 The available menu items vary depending on the mode in Scene Selection (page 36). 33 WB (White Bal) - Mode (REC Mode)1) BRK (Bracket Step)2) - PFX (P.Effect) - (Saturation) - (Contrast) - (Sharpness) - (Setup) - - - - 3) - 3) - 3) - - - - - - - 1) During Hybrid shooting, [Mode](REC ... on the mode setting. Menu for shooting (page 35) PHOTO Auto Program ( : available) PHOTO/MOVIE Scene MOVIE (Camera) (EV) - 9 (Focus) - M (Interval)2) - (Flash Level) - ISO - (P.Quality) -
... Menu items For details on the operation t page 32 The available menu items vary depending on the mode in Scene Selection (page 36). 33 WB (White Bal) - Mode (REC Mode)1) BRK (Bracket Step)2) - PFX (P.Effect) - (Saturation) - (Contrast) - (Sharpness) - (Setup) - - - - 3) - 3) - 3) - - - - - - - 1) During Hybrid shooting, [Mode](REC ... on the mode setting. Menu for shooting (page 35) PHOTO Auto Program ( : available) PHOTO/MOVIE Scene MOVIE (Camera) (EV) - 9 (Focus) - M (Interval)2) - (Flash Level) - ISO - (P.Quality) -
User Guide
Page 36
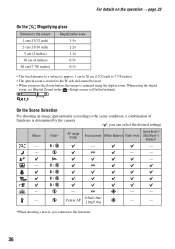
... a movie, you can select the desired setting) Macro Flash* AF range finder Speed Burst*/ Focus preset White Balance Flash level Multi Burst*/ Bracket* - / - - - - - SL - - / / / / - - - - - When using the digital zoom. For details on the operation t page 32 On the Magnifying glass Distance to the subject 1 cm...to the W side and cannot be used. • When you press the Zoom button, the image is enlarged using the digital zoom, set [Digital Zoom] in the (Setup) screen to [On] beforehand. 1.1 On the Scene Selection For shooting an image appropriately according to...
... a movie, you can select the desired setting) Macro Flash* AF range finder Speed Burst*/ Focus preset White Balance Flash level Multi Burst*/ Bracket* - / - - - - - SL - - / / / / - - - - - When using the digital zoom. For details on the operation t page 32 On the Magnifying glass Distance to the subject 1 cm...to the W side and cannot be used. • When you press the Zoom button, the image is enlarged using the digital zoom, set [Digital Zoom] in the (Setup) screen to [On] beforehand. 1.1 On the Scene Selection For shooting an image appropriately according to...
User Guide
Page 40
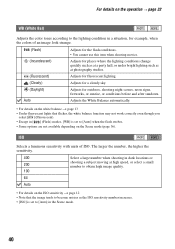
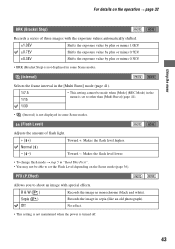
... select a small number to obtain high image quality. 100 64 Auto • For details on the ISO sensitivity t page 12 • Note that flicker, the white balance function may not work correctly even though you select [ ] (Fluorescent). • Except in [ WB ] (Flash) modes, [WB] is set to [Auto] when the ... the ISO sensitivity number increases. • [ISO] is set to [Auto] in the Scene mode. 40 For details on the operation t page 32 WB (White Bal) PHOTO MOVIE Adjusts the color tones according to the lighting condition in a situation, for example, when the colors of ISO.
... select a small number to obtain high image quality. 100 64 Auto • For details on the ISO sensitivity t page 12 • Note that flicker, the white balance function may not work correctly even though you select [ ] (Fluorescent). • Except in [ WB ] (Flash) modes, [WB] is set to [Auto] when the ... the ISO sensitivity number increases. • [ISO] is set to [Auto] in the Scene mode. 40 For details on the operation t page 32 WB (White Bal) PHOTO MOVIE Adjusts the color tones according to the lighting condition in a situation, for example, when the colors of ISO.
User Guide
Page 42
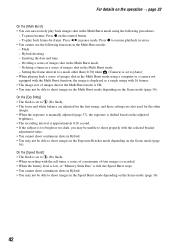
...On the [Exp Brktg] • The flash is set to (No flash). • The focus and white balance are adjusted for the first image, and these settings are also used for the other than [1/30] when (Camera) is set to (No flash). • When recording with the self timer, a series of a ... (page 36). 42 Hybrid shooting - Inserting the date and time - To play back images shot in the Multi Burst mode using a computer or a camera not equipped with the Multi Burst function, the image is displayed as a single image with the selected bracket adjustment value. • You cannot shoot continuous...
...On the [Exp Brktg] • The flash is set to (No flash). • The focus and white balance are adjusted for the first image, and these settings are also used for the other than [1/30] when (Camera) is set to (No flash). • When recording with the self timer, a series of a ... (page 36). 42 Hybrid shooting - Inserting the date and time - To play back images shot in the Multi Burst mode using a computer or a camera not equipped with the Multi Burst function, the image is displayed as a single image with the selected bracket adjustment value. • You cannot shoot continuous...
User Guide
Page 43
... 36). Off No effect. • This setting is not maintained when the power is turned off. 43 Sepia ( ) Records the image in monochrome (black and white). B&W( ) Records the image in sepia (like an old photograph). Normal ( ) - ( -) Toward -: Makes the flash level lower. • To change flash mode t step 5 in "Read This...
... 36). Off No effect. • This setting is not maintained when the power is turned off. 43 Sepia ( ) Records the image in monochrome (black and white). B&W( ) Records the image in sepia (like an old photograph). Normal ( ) - ( -) Toward -: Makes the flash level lower. • To change flash mode t step 5 in "Read This...
User Guide
Page 46
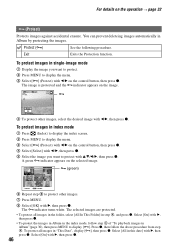
indicator turns white. To protect images in Album"(page 30), then press MENU to display [-]. indicator appears on the control button, then press z. Press z, then follow step 3 of "...
indicator turns white. To protect images in Album"(page 30), then press MENU to display [-]. indicator appears on the control button, then press z. Press z, then follow step 3 of "...
User Guide
Page 64
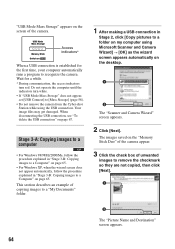
...To delete the USB connection" on MENU Access indicators* When a USB connection is established for a while. * During communication, the access indicators turn white. • If "USB Mode Mass Storage" does not appear, set [USB Connect] to a folder on my computer using the USB connection....[Next]. 1 2 The "Picture Name and Destination" screen appears. 64 Wait for the first time, your computer automatically runs a program to recognize the camera. Stage 3-A: Copying images to a computer • For Windows 98/98SE/2000/Me, follow the procedure explained in "Stage 3-B: Copying images to a ...
...To delete the USB connection" on MENU Access indicators* When a USB connection is established for a while. * During communication, the access indicators turn white. • If "USB Mode Mass Storage" does not appear, set [USB Connect] to a folder on my computer using the USB connection....[Next]. 1 2 The "Picture Name and Destination" screen appears. 64 Wait for the first time, your computer automatically runs a program to recognize the camera. Stage 3-A: Copying images to a computer • For Windows 98/98SE/2000/Me, follow the procedure explained in "Stage 3-B: Copying images to a ...
User Guide
Page 67
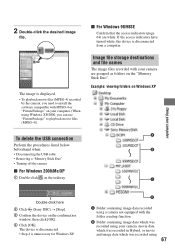
... Confirm that the access indicators (page 64) are grouped as folders on your camera are white. C Using your camera, movie data which was recorded in Hybrid, or movie and image data which was recorded using your computer Double-click here 2 Click (Sony DSC) t [Stop]. 3 Confirm the device on the tasktray. 2 Double-click the desired image...
... Confirm that the access indicators (page 64) are grouped as folders on your camera are white. C Using your camera, movie data which was recorded in Hybrid, or movie and image data which was recorded using your computer Double-click here 2 Click (Sony DSC) t [Stop]. 3 Confirm the device on the tasktray. 2 Double-click the desired image...
User Guide
Page 80
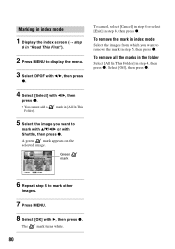
... z. • SELECT MENU TONEXT 6 Repeat step 5 to mark other images. 7 Press MENU. 8 Select [OK] with b/B, then press z. • You cannot add a Folder]. The mark turns white. 80 A green mark appears on the selected image. mark in [All In This 5 Select the image you want to mark with v/V/b/B or with Shuttle, then...
... z. • SELECT MENU TONEXT 6 Repeat step 5 to mark other images. 7 Press MENU. 8 Select [OK] with b/B, then press z. • You cannot add a Folder]. The mark turns white. 80 A green mark appears on the selected image. mark in [All In This 5 Select the image you want to mark with v/V/b/B or with Shuttle, then...
User Guide
Page 81
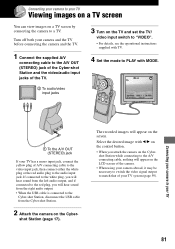
...the desired image with TV. 4 Set the mode to a TV. If connected to the white plug, you will hear sound from the left audio output, and if connected to the red plug, you attach the camera on the Cybershot Station while connecting to the A/V connecting cable, nothing will hear sound from the Cyber...-shot Station. 2 Attach the camera on the Cyber- The recorded images will appear on the TV and set the TV...
...the desired image with TV. 4 Set the mode to a TV. If connected to the white plug, you will hear sound from the left audio output, and if connected to the red plug, you attach the camera on the Cybershot Station while connecting to the A/V connecting cable, nothing will hear sound from the Cyber...-shot Station. 2 Attach the camera on the Cyber- The recorded images will appear on the TV and set the TV...
User Guide
Page 102
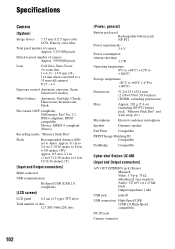
... pixels Lens Carl Zeiss Vario-Tessar 3× zoom lens f = 6.33 - 19.0 mm (38 - 114 mm when converted to a 35 mm still camera) F3.5 - 4.4 Exposure control Automatic exposure, Scene Selection (9 modes) White balance Automatic, Daylight, Cloudy, Fluorescent, Incandescent, Flash File format (DCF compliant) Still images: Exif Ver. 2.2 JPEG compliant, DPOF compatible Movies: MPEG... Audio: 327 mV (at a 47 kΩ load) Output impedance 1 kΩ USB jack mini-B USB connection High-Speed USB (USB 2.0 High-Speed compatible) DC IN jack Camera connector 102
... pixels Lens Carl Zeiss Vario-Tessar 3× zoom lens f = 6.33 - 19.0 mm (38 - 114 mm when converted to a 35 mm still camera) F3.5 - 4.4 Exposure control Automatic exposure, Scene Selection (9 modes) White balance Automatic, Daylight, Cloudy, Fluorescent, Incandescent, Flash File format (DCF compliant) Still images: Exif Ver. 2.2 JPEG compliant, DPOF compatible Movies: MPEG... Audio: 327 mV (at a 47 kΩ load) Output impedance 1 kΩ USB jack mini-B USB connection High-Speed USB (USB 2.0 High-Speed compatible) DC IN jack Camera connector 102
User Guide
Page 106
... Troubleshooting 83 TV 81 Twilight mode 35 Twilight portrait mode ......... 35 U Underexposure 12 USB cable 63, 76 USB Connect 58 USB Driver 62 Using your camera abroad t step 1 in "Read This First" V VGA t step 4 in "Read This First" Video Out 59 Viewing Images in Album ...........30 Movie t step... t step 6 in "Read This First" Viewing menu 45 Volume t step 6 in "Read This First" W Warning indicators and messages 94 WB 40 White balance 40 Windows computer 60 Recommended environment 61 Wrist strap t in "Read This First" Write-protect switch 97 Z Zoom t step 5 in "Read This First"
... Troubleshooting 83 TV 81 Twilight mode 35 Twilight portrait mode ......... 35 U Underexposure 12 USB cable 63, 76 USB Connect 58 USB Driver 62 Using your camera abroad t step 1 in "Read This First" V VGA t step 4 in "Read This First" Video Out 59 Viewing Images in Album ...........30 Movie t step... t step 6 in "Read This First" Viewing menu 45 Volume t step 6 in "Read This First" W Warning indicators and messages 94 WB 40 White balance 40 Windows computer 60 Recommended environment 61 Wrist strap t in "Read This First" Write-protect switch 97 Z Zoom t step 5 in "Read This First"


