

Operating Instructions
Page 3
...WITH PART 15 OF THE FCC RULES. THIS CLASS B DIGITAL APPARATUS COMPLIES WITH CANADIAN ICES-003. and Canada RECYCLING LITHIUM-ION BATTERIES Lithium-Ion batteries are recyclable. You can help preserve our environment by returning your used rechargeable batteries to discontinue midway (fail), restart the application or disconnect and... toll free 1-800-822-8837, or visit http://www.rbrc.org/ Caution: Do not handle damaged or leaking Lithium-Ion batteries. "Memory Stick" For the Customers in the U.S.A. OPERATION IS SUBJECT TO THE FOLLOWING TWO CONDITIONS: (1) THIS DEVICE MAY NOT CAUSE HARMFUL...
...WITH PART 15 OF THE FCC RULES. THIS CLASS B DIGITAL APPARATUS COMPLIES WITH CANADIAN ICES-003. and Canada RECYCLING LITHIUM-ION BATTERIES Lithium-Ion batteries are recyclable. You can help preserve our environment by returning your used rechargeable batteries to discontinue midway (fail), restart the application or disconnect and... toll free 1-800-822-8837, or visit http://www.rbrc.org/ Caution: Do not handle damaged or leaking Lithium-Ion batteries. "Memory Stick" For the Customers in the U.S.A. OPERATION IS SUBJECT TO THE FOLLOWING TWO CONDITIONS: (1) THIS DEVICE MAY NOT CAUSE HARMFUL...
Operating Instructions
Page 6
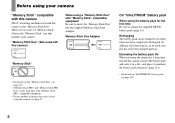
... can be saved using this camera, see page 120. 6 On "InfoLITHIUM" battery pack When using the battery pack for a long time, turn off the camera, remove the battery pack and store it has not been completely discharged. In addition, the battery pack can be used with this camera) When using a "Memory ...Stick Duo" with "Memory Stick" compatible equipment Be sure to charge the supplied NP-FT1 battery pack (page 14). Extending the battery pack life When not using the camera for the first time Be sure to insert the "Memory Stick Duo" into the supplied Memory Stick Duo...
... can be saved using this camera, see page 120. 6 On "InfoLITHIUM" battery pack When using the battery pack for a long time, turn off the camera, remove the battery pack and store it has not been completely discharged. In addition, the battery pack can be used with this camera) When using a "Memory ...Stick Duo" with "Memory Stick" compatible equipment Be sure to charge the supplied NP-FT1 battery pack (page 14). Extending the battery pack life When not using the camera for the first time Be sure to insert the "Memory Stick Duo" into the supplied Memory Stick Duo...
Operating Instructions
Page 8
...TV screen 46 Deleting images Deleting images 49 Formatting a "Memory Stick Duo" ........ 51 Before advanced operations How to setup and operate your camera 19 How to use the control button 20 Adjusting the LCD screen 20 Setting the date and time 21 Changing the language setting 22 ... Number of contents Read this first 4 Before using your camera 6 Identifying the parts 10 Camera 10 Cyber-shot Station 12 How to handle the camera 13 Getting started Charging the battery pack 14 Using the AC adaptor 18 Using your camera abroad 18 Turning on the LCD screen during shooting 35 ...
...TV screen 46 Deleting images Deleting images 49 Formatting a "Memory Stick Duo" ........ 51 Before advanced operations How to setup and operate your camera 19 How to use the control button 20 Adjusting the LCD screen 20 Setting the date and time 21 Changing the language setting 22 ... Number of contents Read this first 4 Before using your camera 6 Identifying the parts 10 Camera 10 Cyber-shot Station 12 How to handle the camera 13 Getting started Charging the battery pack 14 Using the AC adaptor 18 Using your camera abroad 18 Turning on the LCD screen during shooting 35 ...
Operating Instructions
Page 9
... 85 Enjoying images on your computer 91 Image file storage destinations and file names 92 Viewing image files once copied to a computer with your camera 94 Installing "Picture Package 94 Copying images using "Picture Package" 96 Using "Picture Package 97 Printing images 98 Copying images to your computer ...110 Self-diagnosis display 112 Additional information Menu items 113 Setup items 116 Precautions 118 On "Memory Stick 119 On "InfoLITHIUM" battery pack .........120 Specifications 121 The LCD screen 123 Index Index 127 9 Playback zoom 72 Recording an enlarged image -
... 85 Enjoying images on your computer 91 Image file storage destinations and file names 92 Viewing image files once copied to a computer with your camera 94 Installing "Picture Package 94 Copying images using "Picture Package" 96 Using "Picture Package 97 Printing images 98 Copying images to your computer ...110 Self-diagnosis display 112 Additional information Menu items 113 Setup items 116 Precautions 118 On "Memory Stick 119 On "InfoLITHIUM" battery pack .........120 Specifications 121 The LCD screen 123 Index Index 127 9 Playback zoom 72 Recording an enlarged image -
Operating Instructions
Page 11
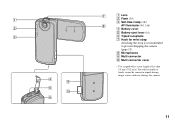
You will be unable to firmly secure the camera to prevent dropping the camera (page 13). 7 A Lens 1 B Flash (39) C Self-timer lamp (38)/ 8 AF illuminator (40, 116) 2 D Battery cover E Battery eject lever (16) 3 F Tripod receptacle G Hook for wrist strap Attaching the strap is recommended to tripods having longer screws, and may damage the camera. 5 q; 6 11 H Microphones I Multi connector J Multi connector cover 4 9 • Use a tripod with a screw length of less than 5.5 mm (7/32 inch).
You will be unable to firmly secure the camera to prevent dropping the camera (page 13). 7 A Lens 1 B Flash (39) C Self-timer lamp (38)/ 8 AF illuminator (40, 116) 2 D Battery cover E Battery eject lever (16) 3 F Tripod receptacle G Hook for wrist strap Attaching the strap is recommended to tripods having longer screws, and may damage the camera. 5 q; 6 11 H Microphones I Multi connector J Multi connector cover 4 9 • Use a tripod with a screw length of less than 5.5 mm (7/32 inch).
Operating Instructions
Page 12
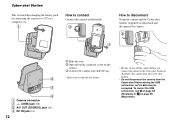
Cyber-shot Station This is used when charging the battery pack or connecting the camera to a TV or a computer, etc. 1 How to connect Connect the camera as illustrated. 2 1 3 How to disconnect Grasp the camera and the Cyber-shot Station (supplied) as illustrated and disconnect the camera. 2 1 2 3 4 A Camera connector B (USB) jack (88) C A/V OUT (...the multi connector cover on page 99 (Macintosh). To cancel the USB connection, see P on page 89 (Windows) or 1 on the camera. 3 Connect the camera and slide the tray. • Make sure to slide the tray firmly. • Be sure to turn off the...
Cyber-shot Station This is used when charging the battery pack or connecting the camera to a TV or a computer, etc. 1 How to connect Connect the camera as illustrated. 2 1 3 How to disconnect Grasp the camera and the Cyber-shot Station (supplied) as illustrated and disconnect the camera. 2 1 2 3 4 A Camera connector B (USB) jack (88) C A/V OUT (...the multi connector cover on page 99 (Macintosh). To cancel the USB connection, see P on page 89 (Windows) or 1 on the camera. 3 Connect the camera and slide the tray. • Make sure to slide the tray firmly. • Be sure to turn off the...
Operating Instructions
Page 14
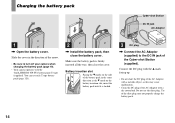
... the dirty plug. Do not use only T type battery pack (page 120). 2 , Install the battery pack, then close the cover. Make sure the battery pack is locked. 3 DC plug , Connect the AC Adaptor (supplied) to turn off your camera when charging the battery pack (page 19). • Your camera operates with a dry cotton bud. Use of...
... the dirty plug. Do not use only T type battery pack (page 120). 2 , Install the battery pack, then close the cover. Make sure the battery pack is locked. 3 DC plug , Connect the AC Adaptor (supplied) to turn off your camera when charging the battery pack (page 19). • Your camera operates with a dry cotton bud. Use of...
Operating Instructions
Page 16
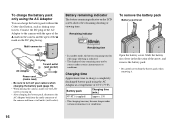
...the DC plug facing. Battery remaining indicator The battery remaining indicator on the camera and the apex of 25°C (77°F). To remove the battery pack Battery eject lever Open the battery cover. Remaining indicator 60min Remaining time • In standby mode, the battery remaining time for still ...charging time may not be correct under certain circumstances or conditions. Slide the battery eject lever in the direction of the camera and from the multi connector of the arrow, and remove the battery pack. • Be careful not to turn off your travels. Connect ...
...the DC plug facing. Battery remaining indicator The battery remaining indicator on the camera and the apex of 25°C (77°F). To remove the battery pack Battery eject lever Open the battery cover. Remaining indicator 60min Remaining time • In standby mode, the battery remaining time for still ...charging time may not be correct under certain circumstances or conditions. Slide the battery eject lever in the direction of the camera and from the multi connector of the arrow, and remove the battery pack. • Be careful not to turn off your travels. Connect ...
Operating Instructions
Page 17
...) NP-FT1 (supplied) No. The camera has been turned on and off once every ten times The measurement method is low - The flash strobes once every two times - The power turns on and off many times - Approx. 120 min. • The number of images and the battery life that can be recorded...) NP-FT1 (supplied) LCD No. The numbers of images that can be less than indicated depending on the conditions of 25°C (77°F). of Battery life backlight images (min.) On Normal Off On Hybrid Off Approx. 160 Approx. 80 Approx. 190 Approx. 95 Approx. 120 Approx. 60 Approx. 140 ...
...) NP-FT1 (supplied) No. The camera has been turned on and off once every ten times The measurement method is low - The flash strobes once every two times - The power turns on and off many times - Approx. 120 min. • The number of images and the battery life that can be recorded...) NP-FT1 (supplied) LCD No. The numbers of images that can be less than indicated depending on the conditions of 25°C (77°F). of Battery life backlight images (min.) On Normal Off On Hybrid Off Approx. 160 Approx. 80 Approx. 190 Approx. 95 Approx. 120 Approx. 60 Approx. 140 ...
Operating Instructions
Page 19
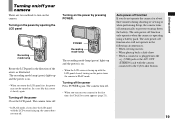
... case like this, rotate it slowly again. The auto power-off function only operates when the camera is plugged into the (USB) jack or the A/V OUT (STEREO) jack with the camera connected to prevent wearing down the battery. The recording mode lamp (green) lights up and the power is facing up with the... Rotate the LCD panel in the following circumstances. • When viewing movies • When playing back a slide show • When a connector is operating using a battery pack. Turning on/off your camera for about three minutes during shooting or viewing or when performing Setup, the...
... case like this, rotate it slowly again. The auto power-off function only operates when the camera is plugged into the (USB) jack or the A/V OUT (STEREO) jack with the camera connected to prevent wearing down the battery. The recording mode lamp (green) lights up and the power is facing up with the... Rotate the LCD panel in the following circumstances. • When viewing movies • When playing back a slide show • When a connector is operating using a battery pack. Turning on/off your camera for about three minutes during shooting or viewing or when performing Setup, the...

Operating Instructions
Page 21
... item you want to set is indicated with v/V. 21 Select from [Y/M/D] (year/month/day), [M/D/Y] (month/day/year) or [D/M/Y] (day/month/year). • If the rechargeable battery (page 119), which provides the power for saving the time data, ever becomes low, the Clock Set screen will appear again.
... item you want to set is indicated with v/V. 21 Select from [Y/M/D] (year/month/day), [M/D/Y] (month/day/year) or [D/M/Y] (day/month/year). • If the rechargeable battery (page 119), which provides the power for saving the time data, ever becomes low, the Clock Set screen will appear again.
Operating Instructions
Page 30
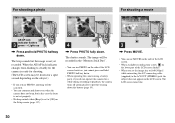
... ready for shooting. (The LCD screen may be frozen for a while during recording or playback, the camera turns off automatically to prevent wearing down the battery (page 19). 640 30f 00:00:02 3 , Press MOVIE. • You can use MOVIE on the side of the LCD screen. • ... 30 F2.8 AE/AF lock 3 indicator flashes green t Lights up , Press and hold PHOTO halfway down. • When operating the camera using a battery pack, if you do not operate the camera for a split second depending on the subject.) • If you release PHOTO, shooting will be canceled. • You can continue and...
... ready for shooting. (The LCD screen may be frozen for a while during recording or playback, the camera turns off automatically to prevent wearing down the battery (page 19). 640 30f 00:00:02 3 , Press MOVIE. • You can use MOVIE on the side of the LCD screen. • ... 30 F2.8 AE/AF lock 3 indicator flashes green t Lights up , Press and hold PHOTO halfway down. • When operating the camera using a battery pack, if you do not operate the camera for a split second depending on the subject.) • If you release PHOTO, shooting will be canceled. • You can continue and...
Operating Instructions
Page 33
... Rec] on the Setup screen, you do not want to record a beep sound, set to [Off] on the Setup screen. • In hybrid shooting, the battery quickly runs low as picture effect, just before a still image and an approximately 3second movie after shooting. • Status of the LCD screen is directly.... So, the following cases. - The light of the LCD screen. Beep sound during an operation (When you can shoot the next image or operate the camera.
... Rec] on the Setup screen, you do not want to record a beep sound, set to [Off] on the Setup screen. • In hybrid shooting, the battery quickly runs low as picture effect, just before a still image and an approximately 3second movie after shooting. • Status of the LCD screen is directly.... So, the following cases. - The light of the LCD screen. Beep sound during an operation (When you can shoot the next image or operate the camera.

Operating Instructions
Page 35
.... • For a detailed description of the indicators, see page 123. • For a detailed description of the histogram, see page 60. • You can extend the battery remaining time by turning off the LCD backlight. • This setting is maintained even when the power is turned off r Indicators on 60min 101 , Slide...
.... • For a detailed description of the indicators, see page 123. • For a detailed description of the histogram, see page 60. • You can extend the battery remaining time by turning off the LCD backlight. • This setting is maintained even when the power is turned off r Indicators on 60min 101 , Slide...

Operating Instructions
Page 65
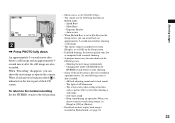
... Press MENU. d Shoot the image. MENU Control button • When the battery power decreases with the self timer, a series of the "Memory Stick Duo" ... depending on the Scene Selection mode. The menu appears. If you press and hold down PHOTO, the camera records up to set to (No flash). • When recording with use or the capacity of maximum...you press PHOTO. • When shooting in hybrid mode, you press and hold PHOTO in this mode, the camera records maximum four images in succession. a Turn to shoot images in succession. Each time you release PHOTO, shooting...
... Press MENU. d Shoot the image. MENU Control button • When the battery power decreases with the self timer, a series of the "Memory Stick Duo" ... depending on the Scene Selection mode. The menu appears. If you press and hold down PHOTO, the camera records up to set to (No flash). • When recording with use or the capacity of maximum...you press PHOTO. • When shooting in hybrid mode, you press and hold PHOTO in this mode, the camera records maximum four images in succession. a Turn to shoot images in succession. Each time you release PHOTO, shooting...

Operating Instructions
Page 88
...USB Mode Normal Switch on MENU Access indicators* "USB Mode Normal" appears on the camera. Wait for the first time, your computer. • When using the battery pack, copying may be failed or cause data corruption by battery shutoff. d Connect the USB cable to slide the tray firmly. USB cable e... Connect the USB cable to your computer automatically runs the used program to copy into a wall outlet (wall socket). POWER • Make sure to the (USB) jack of the camera. We recommend ...
...USB Mode Normal Switch on MENU Access indicators* "USB Mode Normal" appears on the camera. Wait for the first time, your computer. • When using the battery pack, copying may be failed or cause data corruption by battery shutoff. d Connect the USB cable to slide the tray firmly. USB cable e... Connect the USB cable to your computer automatically runs the used program to copy into a wall outlet (wall socket). POWER • Make sure to the (USB) jack of the camera. We recommend ...

Operating Instructions
Page 101
..." appear on . Consult your Sony dealer or local authorized Sony service facility. • The battery pack is working (page 112). 2 Should your Sony dealer or local authorized Sony service facility. • Install the battery pack correctly (page 14). • The battery pack is completely charged. • The battery pack is discharged. Consult your camera still not work properly, press...
..." appear on . Consult your Sony dealer or local authorized Sony service facility. • The battery pack is working (page 112). 2 Should your Sony dealer or local authorized Sony service facility. • Install the battery pack correctly (page 14). • The battery pack is completely charged. • The battery pack is discharged. Consult your camera still not work properly, press...

Operating Instructions
Page 102
...[640 (30fps)]. The power turns off with MODE (page 29). • The image size is disconnected. Consult your camera. • Install the battery pack correctly (page 14). • The AC Adaptor is set the image size to the Cyber-shot Station (page 12...; The battery pack is discharged. Replace the battery pack with a cotton swab, etc., and charge the battery pack. • After charging the battery pack, disconnect the DC plug from your Sony dealer or local authorized Sony service facility. • The battery pack is dead (page 121). Symptom The battery remaining indicator...
...[640 (30fps)]. The power turns off with MODE (page 29). • The image size is disconnected. Consult your camera. • Install the battery pack correctly (page 14). • The AC Adaptor is set the image size to the Cyber-shot Station (page 12...; The battery pack is discharged. Replace the battery pack with a cotton swab, etc., and charge the battery pack. • After charging the battery pack, disconnect the DC plug from your Sony dealer or local authorized Sony service facility. • The battery pack is dead (page 121). Symptom The battery remaining indicator...

Operating Instructions
Page 104
... 117). • Adjust the correct exposure (page 59). 104 This is discharged, so you press and hold PHOTO halfway down. Install a charged battery pack (page 14). • Set [Red Eye Reduction] on the Setup screen to (No flash). The date and time are recorded incorrectly. You...can shoot only one image. Delete unnecessary images saved in the "Memory Stick Duo" (page 49) or change the "Memory Stick Duo". • The battery pack is not a malfunction. • Select the other mode than (Magnifying glass mode), (Twilight mode), (Landscape mode), (Fireworks mode) or (Candle ...
... 117). • Adjust the correct exposure (page 59). 104 This is discharged, so you press and hold PHOTO halfway down. Install a charged battery pack (page 14). • Set [Red Eye Reduction] on the Setup screen to (No flash). The date and time are recorded incorrectly. You...can shoot only one image. Delete unnecessary images saved in the "Memory Stick Duo" (page 49) or change the "Memory Stick Duo". • The battery pack is not a malfunction. • Select the other mode than (Magnifying glass mode), (Twilight mode), (Landscape mode), (Fireworks mode) or (Candle ...
Operating Instructions
Page 106
...from the USB connectors (page 86). • The camera is compatible. After making a USB connection, "Picture Package" does not automatically start. Shoot using the "Picture Package" application software, click on the camera (page 19). • The battery level is displayed on the LCD screen (page 88...). • Properly install the camera to the Cyber-shot Station (page 12). • Set [USB Connect] to [...
...from the USB connectors (page 86). • The camera is compatible. After making a USB connection, "Picture Package" does not automatically start. Shoot using the "Picture Package" application software, click on the camera (page 19). • The battery level is displayed on the LCD screen (page 88...). • Properly install the camera to the Cyber-shot Station (page 12). • Set [USB Connect] to [...


