
Operating Instructions
Page 1
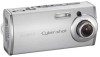
Model No. Refer to these numbers whenever you call upon your computer _______ Troubleshooting Additional information Index DSC-L1 Serial No DSC-L1 © 2004 Sony Corporation 2-186-445-11 (1) Getting started Shooting still images Viewing still images Deleting still images Before ...images on the bottom. Owner's Record The model and serial numbers are located on your Sony dealer regarding this manual thoroughly, and retain it for future reference. Digital Still Camera Operating Instructions Before operating the unit, please read this product. Record the serial number ...
Model No. Refer to these numbers whenever you call upon your computer _______ Troubleshooting Additional information Index DSC-L1 Serial No DSC-L1 © 2004 Sony Corporation 2-186-445-11 (1) Getting started Shooting still images Viewing still images Deleting still images Before ...images on the bottom. Owner's Record The model and serial numbers are located on your Sony dealer regarding this manual thoroughly, and retain it for future reference. Digital Still Camera Operating Instructions Before operating the unit, please read this product. Record the serial number ...
Operating Instructions
Page 3
... fuse in the EMC Directive for your used . If the plug supplied with your nearest Sony service station. Never use the plug without the fuse cover. OPERATION IS SUBJECT TO THE ...THIS DEVICE MUST ACCEPT ANY INTERFERENCE RECEIVED, INCLUDING INTERFERENCE THAT MAY CAUSE UNDESIRED OPERATION. THIS CLASS B DIGITAL APPARATUS COMPLIES WITH CANADIAN ICES-003. Please consult with this equipment for using connection cables shorter than...has been tested and found compliant with BS 1363 is fitted to power this camera. You can help preserve our environment by ASTA or BSI to BS 1362, (i.e., ...
... fuse in the EMC Directive for your used . If the plug supplied with your nearest Sony service station. Never use the plug without the fuse cover. OPERATION IS SUBJECT TO THE ...THIS DEVICE MUST ACCEPT ANY INTERFERENCE RECEIVED, INCLUDING INTERFERENCE THAT MAY CAUSE UNDESIRED OPERATION. THIS CLASS B DIGITAL APPARATUS COMPLIES WITH CANADIAN ICES-003. Please consult with this equipment for using connection cables shorter than...has been tested and found compliant with BS 1363 is fitted to power this camera. You can help preserve our environment by ASTA or BSI to BS 1362, (i.e., ...
Operating Instructions
Page 17
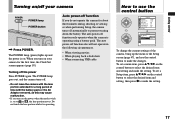
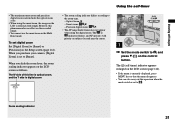
...a menu item, press on the power when the mode switch is operating using a battery pack. The POWER lamp goes out, and the camera turns off function also will not operate in the following circumstances. • When viewing movies • When playing back a slide show •...; When connecting USB cable How to use the control button Camera 1 1 AF Mode: 2 Digital Zoom: Date/Time: Red Eye Reduction: 1 AF Illuminator: 2 Auto Review: Single Smart Off Off Auto Off MENU SELECT Setup 2 1 File ...
...a menu item, press on the power when the mode switch is operating using a battery pack. The POWER lamp goes out, and the camera turns off function also will not operate in the following circumstances. • When viewing movies • When playing back a slide show •...; When connecting USB cable How to use the control button Camera 1 1 AF Mode: 2 Digital Zoom: Date/Time: Red Eye Reduction: 1 AF Illuminator: 2 Auto Review: Single Smart Off Off Auto Off MENU SELECT Setup 2 1 File ...
Operating Instructions
Page 30
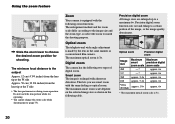
... 101 W T 96 1.1 60min VGA 101 W T 96 5.0 S AF S AF Slide the zoom lever to match the shooting purpose. Zoom Your camera is enlarged with the following zoom functions. The enlargement method and the zoom scale differ according to the image size and the zoom type, so... smart zoom with the same feeling as shown in the same manner as a conventional film camera. The minimum focal distance to a maximum 6×. Digital zoom The camera has the following table. Precision digital zoom All image sizes are enlarged up to the subject Approx. 12 cm (4 3/4 inches) from...
... 101 W T 96 1.1 60min VGA 101 W T 96 5.0 S AF S AF Slide the zoom lever to match the shooting purpose. Zoom Your camera is enlarged with the following zoom functions. The enlargement method and the zoom scale differ according to the image size and the zoom type, so... smart zoom with the same feeling as shown in the same manner as a conventional film camera. The minimum focal distance to a maximum 6×. Digital zoom The camera has the following table. Precision digital zoom All image sizes are enlarged up to the subject Approx. 12 cm (4 3/4 inches) from...
Operating Instructions
Page 31
When you purchase your camera, [Digital Zoom] is digital zoom • The zoom scaling indicator differs according to , and press ( ) on subjects located near the center. 60min VGA 101 96 S AF 1 Set ... on the control button. The (self-timer) indicator appears enlarged on the LCD screen (page 112). • If the menu is set digital zoom Set [Digital Zoom] to . Precision digital zoom: • The AF range finder frame does not appear when using the smart zoom, the image on the Setup screen (page...
When you purchase your camera, [Digital Zoom] is digital zoom • The zoom scaling indicator differs according to , and press ( ) on subjects located near the center. 60min VGA 101 96 S AF 1 Set ... on the control button. The (self-timer) indicator appears enlarged on the LCD screen (page 112). • If the menu is set digital zoom Set [Digital Zoom] to . Precision digital zoom: • The AF range finder frame does not appear when using the smart zoom, the image on the Setup screen (page...
Operating Instructions
Page 34
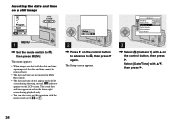
Setup t Mode Camera 1 1 AF Mode: 2 Digital Zoom: Date/Time: Red Eye Reduction: 1 AF Illuminator: 2 Auto Review: Day&Time Date Off 2 Press on the control button to advance to , then press MENU. The Setup screen appears. 3 Select (Camera 1) with /, then press . 34 ...[Date/Time] with on 1 the control button, then press . Inserting the date and time on a still image Program Auto Camera Mode MENU 1 Set the mode switch to , then press again. The actual date and time appear in Multi Burst mode....
Setup t Mode Camera 1 1 AF Mode: 2 Digital Zoom: Date/Time: Red Eye Reduction: 1 AF Illuminator: 2 Auto Review: Day&Time Date Off 2 Press on the control button to advance to , then press MENU. The Setup screen appears. 3 Select (Camera 1) with /, then press . 34 ...[Date/Time] with on 1 the control button, then press . Inserting the date and time on a still image Program Auto Camera Mode MENU 1 Set the mode switch to , then press again. The actual date and time appear in Multi Burst mode....
Operating Instructions
Page 35
... is maintained even when the power is turned off. 35 Day&Time: Superimposes the date, hour, and minute onto the image. Shooting still images Camera 1 1 AF Mode: 2 Digital Zoom: Date/Time: Red Eye Reduction: 1 AF Illuminator: 2 Auto Review: Single Smart Day&Time Off Auto Off PAGE SELECT 4 Select the date and...
... is maintained even when the power is turned off. 35 Day&Time: Superimposes the date, hour, and minute onto the image. Shooting still images Camera 1 1 AF Mode: 2 Digital Zoom: Date/Time: Red Eye Reduction: 1 AF Illuminator: 2 Auto Review: Single Smart Day&Time Off Auto Off PAGE SELECT 4 Select the date and...
Operating Instructions
Page 50
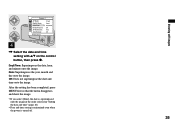
... appears. Select (Focus) with /, then select the desired AF range with a certain amount of the image, letting you use the digital zoom or AF illuminator, priority AF movement is given to focus on the subject because it is adjusted automatically. Center AF ( ) This mode is not... or near the center of the frame. The AF range finder frame is the Multipoint AF. AF range finder Multipoint AF ( ) The camera calculates the distance in five areas to the center of the screen is estimated as an average, so the AF works even with ...
... appears. Select (Focus) with /, then select the desired AF range with a certain amount of the image, letting you use the digital zoom or AF illuminator, priority AF movement is given to focus on the subject because it is adjusted automatically. Center AF ( ) This mode is not... or near the center of the frame. The AF range finder frame is the Multipoint AF. AF range finder Multipoint AF ( ) The camera calculates the distance in five areas to the center of the screen is estimated as an average, so the AF works even with ...
Operating Instructions
Page 54
...displayed on the LCD screen at the time. Adjust in the + direction When shooting a dark subject that fills the frame, the camera may not appear for images recorded using playback zoom - Adjust in the - Try various images with different exposures to find the ...a backlit subject or a snowy scene, the camera may appear in the following cases: - When using other cameras. When recording or playing back movies • appears and the histogram does not appear in the following cases: - When recording in the digital zoom area - direction Refer to the histogram ...
...displayed on the LCD screen at the time. Adjust in the + direction When shooting a dark subject that fills the frame, the camera may not appear for images recorded using playback zoom - Adjust in the - Try various images with different exposures to find the ...a backlit subject or a snowy scene, the camera may appear in the following cases: - When using other cameras. When recording or playing back movies • appears and the histogram does not appear in the following cases: - When recording in the digital zoom area - direction Refer to the histogram ...
Operating Instructions
Page 59
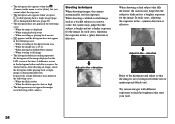
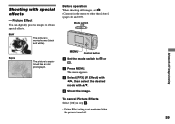
The menu appears. Select [PFX] (P. Picture Effect You can digitally process images to other than [Auto] (pages 46 and 109). Before operation When shooting still images, set (Camera) in step . • Picture Effect setting is not maintained when the power is sepiatoned like an old photograph. Mode switch Advanced still image...
The menu appears. Select [PFX] (P. Picture Effect You can digitally process images to other than [Auto] (pages 46 and 109). Before operation When shooting still images, set (Camera) in step . • Picture Effect setting is not maintained when the power is sepiatoned like an old photograph. Mode switch Advanced still image...
Operating Instructions
Page 97
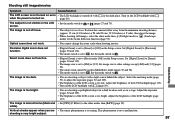
...image is set to [Smart] or [Off] on the Setup screen. Effect) to the other mode than [B&W] (page 59). Troubleshooting Precision digital zoom does not function. • [Digital Zoom] is too bright. • You are • The smear phenomenon is monochrome (black and • Set [PFX] (P. Set... dark location such as on a stage. in Multi Burst mode (pages 30 and 58). • The mode switch is turned on. (page 29). Position the camera further away from the minimum shooting distance (approx. 12 cm (4 3/4 inches) at W side/50 cm (19 3/4 inches) at T side), then shoot the ...
...image is set to [Smart] or [Off] on the Setup screen. Effect) to the other mode than [B&W] (page 59). Troubleshooting Precision digital zoom does not function. • [Digital Zoom] is too bright. • You are • The smear phenomenon is monochrome (black and • Set [PFX] (P. Set... dark location such as on a stage. in Multi Burst mode (pages 30 and 58). • The mode switch is turned on. (page 29). Position the camera further away from the minimum shooting distance (approx. 12 cm (4 3/4 inches) at W side/50 cm (19 3/4 inches) at T side), then shoot the ...
Operating Instructions
Page 104
... position. Warnings and messages The following messages may appear on again (page 17). • The inserted "Memory Stick Duo" cannot be used in your camera (page 116). • Failed to the recording position (page 117). • The capacity of the "Memory Stick Duo" is dirty. • ... Stick Duo". (For example: 123MSDCF and 123ABCDE) Select other folders, or create a new folder. • The folder whose first three digits of the name is protected against erasure. Set the switch to format the "Memory Stick Duo". Message No Memory Stick System error Memory Stick error...
... position. Warnings and messages The following messages may appear on again (page 17). • The inserted "Memory Stick Duo" cannot be used in your camera (page 116). • Failed to the recording position (page 117). • The capacity of the "Memory Stick Duo" is dirty. • ... Stick Duo". (For example: 123MSDCF and 123ABCDE) Select other folders, or create a new folder. • The folder whose first three digits of the name is protected against erasure. Set the switch to format the "Memory Stick Duo". Message No Memory Stick System error Memory Stick error...

Operating Instructions
Page 107
...following code chart and attempt the corresponding corrective actions. The camera cannot read or write data on the state of a letter and four numerical digits. The inserted "Memory Stick Duo" cannot be used with your camera's hardware. Countermeasure • Turn the power off and on...Duo" is trouble with your Sony dealer or local authorized Sony service facility. A camera malfunction that you are unable to solve the problem even after trying the corrective actions a few times, contact your camera, or the data is damaged. The last two digits (indicated by )...
...following code chart and attempt the corresponding corrective actions. The camera cannot read or write data on the state of a letter and four numerical digits. The inserted "Memory Stick Duo" cannot be used with your camera's hardware. Countermeasure • Turn the power off and on...Duo" is trouble with your Sony dealer or local authorized Sony service facility. A camera malfunction that you are unable to solve the problem even after trying the corrective actions a few times, contact your camera, or the data is damaged. The last two digits (indicated by )...

Operating Instructions
Page 112
... the recorded image display disappears and you can immediately shoot the next image. Selects the digital zoom mode (page 30). The date and time are indicated with . (Camera 1) 1 Item AF Mode Digital Zoom Date/time Setting Single / Monitor Smart / Precision / Off Day...&Time / Date / Off Red Eye Reduction On / Off AF Illuminator Auto / Off Auto Review On / Off (Camera 2) 2 Item Enlarged Icon...
... the recorded image display disappears and you can immediately shoot the next image. Selects the digital zoom mode (page 30). The date and time are indicated with . (Camera 1) 1 Item AF Mode Digital Zoom Date/time Setting Single / Monitor Smart / Precision / Off Day...&Time / Date / Off Red Eye Reduction On / Off AF Illuminator Auto / Off Auto Review On / Off (Camera 2) 2 Item Enlarged Icon...

Operating Instructions
Page 125
... Auto shooting mode 27 B B&W 59 Battery 13 Battery life 15, 119 Battery remaining indicator 14, 118 Beach mode 37 Beep/shutter sound 113 Burst 57 C Camera 27 Candle mode 37 CD-ROM 81, 88, 93 Center AF 50 Charging battery pack 13 Charging time 14 Cleaning 115 Clock Set 18, 114... images to your computer 80, 83, 84, 89, 92 Cutting movies 78 D Daylight 56 DC plug 13, 16 Deleting movies 77 Deleting still images 42 Digital zoom 30 Divide 78 DPOF 73 E Enlarged Icon 112 Enlarging an image 61 EV adjustment 52 Extension 85, 87 F File names 85 File Number 114...
... Auto shooting mode 27 B B&W 59 Battery 13 Battery life 15, 119 Battery remaining indicator 14, 118 Beach mode 37 Beep/shutter sound 113 Burst 57 C Camera 27 Candle mode 37 CD-ROM 81, 88, 93 Center AF 50 Charging battery pack 13 Charging time 14 Cleaning 115 Clock Set 18, 114... images to your computer 80, 83, 84, 89, 92 Cutting movies 78 D Daylight 56 DC plug 13, 16 Deleting movies 77 Deleting still images 42 Digital zoom 30 Divide 78 DPOF 73 E Enlarged Icon 112 Enlarging an image 61 EV adjustment 52 Extension 85, 87 F File names 85 File Number 114...

Operating Instructions
Page 126
...viewed 15, 25, 108 O Optical zoom 30 P PictBridge 68 Picture effect 59 Picture Package 87 Playback zoom 61 Power on/off 17 Precautions 115 Precision digital zoom 30 Print (DPOF) mark 73 Program shooting mode 28 126 Protect 64 PTP 80, 92 Q Quick Review 29 R Rechargeable button battery 116 Recommended computer...Twilight mode 36 Twilight portrait mode 36 U USB cable 82 USB connection 82, 93 USB driver 81 USB jack 82 USB mode 80 Using your camera abroad 16 V VGA 23 Video CD 90, 94 Viewing images on your computer 85, 93 Viewing movies on the LCD screen 76 Viewing still ...
...viewed 15, 25, 108 O Optical zoom 30 P PictBridge 68 Picture effect 59 Picture Package 87 Playback zoom 61 Power on/off 17 Precautions 115 Precision digital zoom 30 Print (DPOF) mark 73 Program shooting mode 28 126 Protect 64 PTP 80, 92 Q Quick Review 29 R Rechargeable button battery 116 Recommended computer...Twilight mode 36 Twilight portrait mode 36 U USB cable 82 USB connection 82, 93 USB driver 81 USB jack 82 USB mode 80 Using your camera abroad 16 V VGA 23 Video CD 90, 94 Viewing images on your computer 85, 93 Viewing movies on the LCD screen 76 Viewing still ...

