
Operating Instructions
Page 1
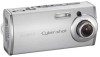
... this manual thoroughly, and retain it for future reference. Record the serial number in the space provided below. Model No. Refer to these numbers whenever you call upon your computer _______ Troubleshooting Additional information Index DSC-L1 Serial No DSC-L1 © 2004 Sony Corporation 2-186-445-11 (1) Getting started Shooting still images Viewing still images Deleting still images Before advanced operations Advanced still image shooting Advanced still image viewing Still image printing Enjoying movies Enjoying images...
... this manual thoroughly, and retain it for future reference. Record the serial number in the space provided below. Model No. Refer to these numbers whenever you call upon your computer _______ Troubleshooting Additional information Index DSC-L1 Serial No DSC-L1 © 2004 Sony Corporation 2-186-445-11 (1) Getting started Shooting still images Viewing still images Deleting still images Before advanced operations Advanced still image shooting Advanced still image viewing Still image printing Enjoying movies Enjoying images...
Operating Instructions
Page 3
...;uence the picture and sound of the battery used to power this equipment has a detachable fuse cover, be used rechargeable batteries to discontinue midway (fail), restart the application or disconnect and connect the USB cable again. Attention for your used . For the Customers in the U.S.A. Notice If static electricity or electromagnetism causes data transfer to the collection and recycling location nearest you change the fuse...
...;uence the picture and sound of the battery used to power this equipment has a detachable fuse cover, be used rechargeable batteries to discontinue midway (fail), restart the application or disconnect and connect the USB cable again. Attention for your used . For the Customers in the U.S.A. Notice If static electricity or electromagnetism causes data transfer to the collection and recycling location nearest you change the fuse...
Operating Instructions
Page 4
... playback is turned on the LCD screen and the LCD finder. Exposing the LCD screen, the finder or the lens to a malfunction of such materials may be repairable. Be careful not to a disk. The power zoom lens This camera is not a malfunction. Water entering the inside of the camera may cause malfunctions which in some tiny black points and/or bright points (white, red, blue or green...
... playback is turned on the LCD screen and the LCD finder. Exposing the LCD screen, the finder or the lens to a malfunction of such materials may be repairable. Be careful not to a disk. The power zoom lens This camera is not a malfunction. Water entering the inside of the camera may cause malfunctions which in some tiny black points and/or bright points (white, red, blue or green...

Operating Instructions
Page 8
... a focus operation - White Balance 56 Adjusting the flash level - Playback zoom 61 Playing back successive images - AF Mode 51 Adjusting the exposure - Quick Review 29 Indicators on the LCD screen during shooting 29 Using the zoom feature 30 Using the self-timer 31 Selecting a flash mode 32 8 Inserting the date and time on a still image 34 Shooting according to use the control button 17 Setting the date and time 18 Changing the language setting 20 Shooting still images Inserting and removing a "Memory Stick Duo 21 Setting the still image size 22 Image size and...
... a focus operation - White Balance 56 Adjusting the flash level - Playback zoom 61 Playing back successive images - AF Mode 51 Adjusting the exposure - Quick Review 29 Indicators on the LCD screen during shooting 29 Using the zoom feature 30 Using the self-timer 31 Selecting a flash mode 32 8 Inserting the date and time on a still image 34 Shooting according to use the control button 17 Setting the date and time 18 Changing the language setting 20 Shooting still images Inserting and removing a "Memory Stick Duo 21 Setting the still image size 22 Image size and...
Operating Instructions
Page 9
... saved or shooting time 108 Menu items 109 Setup items 112 Precautions 115 On "Memory Stick 116 On "InfoLITHIUM" battery pack......... 118 Specifications 119 The LCD screen 121 Index Index 125 9 For Macintosh users 92 Using "ImageMixer VCD2 93 Troubleshooting Troubleshooting 95 Warnings and messages 104 Self-diagnosis display - Resize 66 Still image printing Printing still images 67 Direct printing 68 Preparing the camera 68 Connecting the camera to the printer.. 69 Printing in single-image mode...
... saved or shooting time 108 Menu items 109 Setup items 112 Precautions 115 On "Memory Stick 116 On "InfoLITHIUM" battery pack......... 118 Specifications 119 The LCD screen 121 Index Index 125 9 For Macintosh users 92 Using "ImageMixer VCD2 93 Troubleshooting Troubleshooting 95 Warnings and messages 104 Self-diagnosis display - Resize 66 Still image printing Printing still images 67 Direct printing 68 Preparing the camera 68 Connecting the camera to the printer.. 69 Printing in single-image mode...
Operating Instructions
Page 17
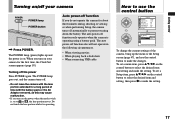
... the lens portion while it is operating using a battery pack. Auto power-off function If you turn on the power when the mode switch is on. The POWER lamp (green) lights up the menu or the Setup screen (page 47), and use the control button Camera 1 1 AF Mode: 2 Digital Zoom: Date/Time: Red Eye Reduction: 1 AF Illuminator: 2 Auto Review: Single Smart Off Off Auto Off MENU SELECT Setup 2 1 File Number: USB Connect: 2 Clock Set: OK Cancel 1 2 To change the current settings of time with the battery pack or the AC Adaptor removed, as...
... the lens portion while it is operating using a battery pack. Auto power-off function If you turn on the power when the mode switch is on. The POWER lamp (green) lights up the menu or the Setup screen (page 47), and use the control button Camera 1 1 AF Mode: 2 Digital Zoom: Date/Time: Red Eye Reduction: 1 AF Illuminator: 2 Auto Review: Single Smart Off Off Auto Off MENU SELECT Setup 2 1 File Number: USB Connect: 2 Clock Set: OK Cancel 1 2 To change the current settings of time with the battery pack or the AC Adaptor removed, as...
Operating Instructions
Page 27
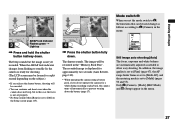
... be used change as needed to steadily lit, the camera is not yet recorded. Program Auto Camera Mode Still image auto shooting [Auto] The focus, exposure and white balance are automatically adjusted as follows according to prevent wearing down . Only (Camera), [Mode] (REC Mode) and (Setup) appear in the menu. The beep sounds but in the "Memory Stick Duo". The shutter sounds. Mode switch When you do not operate the camera for approximately two seconds (Auto Review, page 112). • When operating the camera using a battery...
... be used change as needed to steadily lit, the camera is not yet recorded. Program Auto Camera Mode Still image auto shooting [Auto] The focus, exposure and white balance are automatically adjusted as follows according to prevent wearing down . Only (Camera), [Mode] (REC Mode) and (Setup) appear in the menu. The beep sounds but in the "Memory Stick Duo". The shutter sounds. Mode switch When you do not operate the camera for approximately two seconds (Auto Review, page 112). • When operating the camera using a battery...
Operating Instructions
Page 75
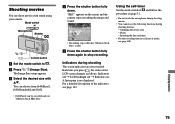
...;. Shooting movies You can be recorded only on "Memory Stick PRO Duo". Press the shutter button fully down again to . Press (Image Size). "REC" appears on page 31. • Do not touch the microphone during shooting movies. • You cannot use the following functions during shooting The screen indicators are not recorded. Using the self-timer Set the mode switch to and follow the procedure on the screen and the camera starts recording the image...
...;. Shooting movies You can be recorded only on "Memory Stick PRO Duo". Press the shutter button fully down again to . Press (Image Size). "REC" appears on page 31. • Do not touch the microphone during shooting movies. • You cannot use the following functions during shooting The screen indicators are not recorded. Using the self-timer Set the mode switch to and follow the procedure on the screen and the camera starts recording the image...

Operating Instructions
Page 80
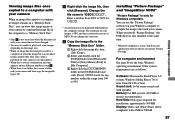
... same time. When a USB connector is not provided on the type of the CD-ROM USB Driver This driver is used to transfer images from the suspend or sleep mode, communication between your camera and your computer may not recover at the factory. See the Sony Website for a USB connection when connecting with Hi-Speed USB (USB 2.0-compliant) allows advanced transfer (highspeed transfer). • If you need not install the USB driver. Picture...
... same time. When a USB connector is not provided on the type of the CD-ROM USB Driver This driver is used to transfer images from the suspend or sleep mode, communication between your camera and your computer may not recover at the factory. See the Sony Website for a USB connection when connecting with Hi-Speed USB (USB 2.0-compliant) allows advanced transfer (highspeed transfer). • If you need not install the USB driver. Picture...
Operating Instructions
Page 84
... deleted. The "Confirm Device Removal" screen appears. • For Windows 98, 98SE, Me users, click [Remove]. Click [OK]. The images stored on the "Memory Stick Duo" are displayed. Click the checkbox of images that you do not want to copy to your pictures, then click [Next]. Try the USB driver installation again using the Windows XP AutoPlay wizard Make a USB connection (page 82). I'm finished working...
... deleted. The "Confirm Device Removal" screen appears. • For Windows 98, 98SE, Me users, click [Remove]. Click [OK]. The images stored on the "Memory Stick Duo" are displayed. Click the checkbox of images that you do not want to copy to your pictures, then click [Next]. Try the USB driver installation again using the Windows XP AutoPlay wizard Make a USB connection (page 82). I'm finished working...
Operating Instructions
Page 87
... image file copied to a computer no longer remains in a "Memory Stick Duo", you can use , shut down all application software before you install "Picture Package," the USB driver is also installed at the same time. • When the computer is in the [DCIM] folder and click [Paste stands for movies is JPG, and the extension for any number within the range from [Removable Disk] or [Sony...
... image file copied to a computer no longer remains in a "Memory Stick Duo", you can use , shut down all application software before you install "Picture Package," the USB driver is also installed at the same time. • When the computer is in the [DCIM] folder and click [Paste stands for movies is JPG, and the extension for any number within the range from [Removable Disk] or [Sony...

Operating Instructions
Page 88
... to write to the computer before you install the "Picture Package" software (except for Windows XP). Click [Picture Package/ ImageMixer VCD2]. Select the desired language, then click [Next]. • This section describes the English screen. Click [Next]. The "License Agreement" screen appears. "DirectX" must be installed for use. • A separate environment for operating the recording device is compatible with DirectX technology. The installation starts.
... to write to the computer before you install the "Picture Package" software (except for Windows XP). Click [Picture Package/ ImageMixer VCD2]. Select the desired language, then click [Next]. • This section describes the English screen. Click [Next]. The "License Agreement" screen appears. "DirectX" must be installed for use. • A separate environment for operating the recording device is compatible with DirectX technology. The installation starts.
Operating Instructions
Page 94
.... Installing "ImageMixer VCD2" 1 Turn on your computer. • The display settings should be installed at the factory. The installation of the software starts. Creating a video CD with High resolution still image video CD. 1 Open the [ImageMixer] folder in the copy-to on page 90. 4 Click [Next] and enter the disk name and its destination. CPU: iMac, eMac, iBook, PowerBook, Power Mac G3/G4 series Memory: 128...
.... Installing "ImageMixer VCD2" 1 Turn on your computer. • The display settings should be installed at the factory. The installation of the software starts. Creating a video CD with High resolution still image video CD. 1 Open the [ImageMixer] folder in the copy-to on page 90. 4 Click [Next] and enter the disk name and its destination. CPU: iMac, eMac, iBook, PowerBook, Power Mac G3/G4 series Memory: 128...

Operating Instructions
Page 95
... camera using a fine-tipped object, then turn on the screen, the self-diagnosis display function is working (page 107). 2 Should your camera still not work properly, consult your Sony dealer or local authorized Sony service facility. • The battery pack is turned on the tables below. Consult your Sony dealer or local authorized Sony service facility. RESET button Troubleshooting Battery pack and power Symptom You cannot charge the battery pack. The battery pack cannot be installed...
... camera using a fine-tipped object, then turn on the screen, the self-diagnosis display function is working (page 107). 2 Should your camera still not work properly, consult your Sony dealer or local authorized Sony service facility. • The battery pack is turned on the tables below. Consult your Sony dealer or local authorized Sony service facility. RESET button Troubleshooting Battery pack and power Symptom You cannot charge the battery pack. The battery pack cannot be installed...

Operating Instructions
Page 100
...;rmly. Connect the camera directly to cut. • Protected movie cannot be cut a movie. You cannot copy images. Use the AC Adaptor (page 16). • Use the supplied USB cable (pages 82 and 92). • Disconnect the USB cable from the USB connectors (page 80). • The camera is not connected directly to your camera. • Start up the "Picture Package Menu" and check [Settings]. • Make a USB connection when the computer is low. Delete the erroneously...
...;rmly. Connect the camera directly to cut. • Protected movie cannot be cut a movie. You cannot copy images. Use the AC Adaptor (page 16). • Use the supplied USB cable (pages 82 and 92). • Disconnect the USB cable from the USB connectors (page 80). • The camera is not connected directly to your camera. • Start up the "Picture Package Menu" and check [Settings]. • Make a USB connection when the computer is low. Delete the erroneously...
Operating Instructions
Page 104
...; An error occurred while playing back the image. • The image is insufficient. Set the switch to this "Memory Stick Duo". • No images have been recorded in this folder Folder error Cannot create more folders Cannot record File error File protect Meaning/Corrective Action • Insert a "Memory Stick Duo" (page 21). • Turn the power off and on the screen. Message No Memory Stick System error Memory Stick error Memory Stick type error Format error Memory Stick locked No memory space...
...; An error occurred while playing back the image. • The image is insufficient. Set the switch to this "Memory Stick Duo". • No images have been recorded in this folder Folder error Cannot create more folders Cannot record File error File protect Meaning/Corrective Action • Insert a "Memory Stick Duo" (page 21). • Turn the power off and on the screen. Message No Memory Stick System error Memory Stick error Memory Stick type error Format error Memory Stick locked No memory space...

Operating Instructions
Page 112
... The Setup screen appears when you press (Flash mode), (Self-timer) or (Metering mode). Reduces the red-eye phenomenon when using a flash (page 33). Description Selects whether to temporarily enlarge the setting indication when you advance to emit an AF assist light in movie or Multi Burst mode. Selects whether to focus on the LCD screen immediately after shooting a still image. If you can immediately shoot the next image. Helps when it is displayed...
... The Setup screen appears when you press (Flash mode), (Self-timer) or (Metering mode). Reduces the red-eye phenomenon when using a flash (page 33). Description Selects whether to temporarily enlarge the setting indication when you advance to emit an AF assist light in movie or Multi Burst mode. Selects whether to focus on the LCD screen immediately after shooting a still image. If you can immediately shoot the next image. Helps when it is displayed...
Operating Instructions
Page 116
.... Charging method Connect the camera to record clear images. The types of whether the power is a compact, portable IC recording medium. "Memory Stick" type Recording/ Playback3) Memory Stick - Memory Stick PRO Duo 1)2) 1) "MagicGate Memory Stick Duo" and "Memory Stick PRO Duo" are using the camera. Note that requires MagicGate functions cannot be performed with MagicGate functions. However, proper operation cannot be sure to evaporate. Never remove the rechargeable button battery. Memory...
.... Charging method Connect the camera to record clear images. The types of whether the power is a compact, portable IC recording medium. "Memory Stick" type Recording/ Playback3) Memory Stick - Memory Stick PRO Duo 1)2) 1) "MagicGate Memory Stick Duo" and "Memory Stick PRO Duo" are using the camera. Note that requires MagicGate functions cannot be performed with MagicGate functions. However, proper operation cannot be sure to evaporate. Never remove the rechargeable button battery. Memory...

Operating Instructions
Page 125
... frame 50 Auto adjustment mode 26 Auto Focus 28 Auto power-off function 17 Auto Review 112 Auto shooting mode 27 B B&W 59 Battery 13 Battery life 15, 119 Battery remaining indicator 14, 118 Beach mode 37 Beep/shutter sound 113 Burst 57 C Camera 27 Candle mode 37 CD-ROM 81, 88, 93 Center AF 50 Charging battery pack 13 Charging time 14 Cleaning 115 Clock Set 18, 114 Cloudy 56 Compression ratio 23 Contrast 110 Control button 17 Copying images to...
... frame 50 Auto adjustment mode 26 Auto Focus 28 Auto power-off function 17 Auto Review 112 Auto shooting mode 27 B B&W 59 Battery 13 Battery life 15, 119 Battery remaining indicator 14, 118 Beach mode 37 Beep/shutter sound 113 Burst 57 C Camera 27 Candle mode 37 CD-ROM 81, 88, 93 Center AF 50 Charging battery pack 13 Charging time 14 Cleaning 115 Clock Set 18, 114 Cloudy 56 Compression ratio 23 Contrast 110 Control button 17 Copying images to...

Operating Instructions
Page 126
... Playback zoom 61 Power on/off 17 Precautions 115 Precision digital zoom 30 Print (DPOF) mark 73 Program shooting mode 28 126 Protect 64 PTP 80, 92 Q Quick Review 29 R Rechargeable button battery 116 Recommended computer environment ..... 80, 92 Red Eye Reduction 33 Remaining shooting/viewing time .......... 15, 108 RESET button 95 Resize 66 Rotate 62 S Saturation 110 Scene Selection 36 Screen display 29, 121 Self-diagnosis display 107 Self-timer 31 Sepia 59 Setting date and time 18 Setup...
... Playback zoom 61 Power on/off 17 Precautions 115 Precision digital zoom 30 Print (DPOF) mark 73 Program shooting mode 28 126 Protect 64 PTP 80, 92 Q Quick Review 29 R Rechargeable button battery 116 Recommended computer environment ..... 80, 92 Red Eye Reduction 33 Remaining shooting/viewing time .......... 15, 108 RESET button 95 Resize 66 Rotate 62 S Saturation 110 Scene Selection 36 Screen display 29, 121 Self-diagnosis display 107 Self-timer 31 Sepia 59 Setting date and time 18 Setup...


