Instruction Manual
Page 23
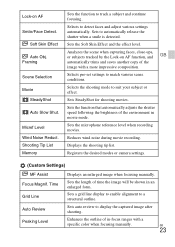
... List Memory Sets the function to display the captured image after shooting. Sets the microphone reference level when recording movies. Sets auto review to track a subject and continue focusing. Micref Level Wind Noise Reduct. Sets SteadyShot for shooting movies. Registers the desired modes or...Face Detect. Selects the shooting mode to suit your subject or effect. Displays the shooting tip list. Time Grid Line Auto Review Peaking Level Displays an enlarged image when focusing manually. Sets the length of in-focus ranges with a more impressive composition. ...
... List Memory Sets the function to display the captured image after shooting. Sets the microphone reference level when recording movies. Sets auto review to track a subject and continue focusing. Micref Level Wind Noise Reduct. Sets SteadyShot for shooting movies. Registers the desired modes or...Face Detect. Selects the shooting mode to suit your subject or effect. Displays the shooting tip list. Time Grid Line Auto Review Peaking Level Displays an enlarged image when focusing manually. Sets the length of in-focus ranges with a more impressive composition. ...
User Guide
Page 5
... Red Eye Reduction...89 Auto Obj. Framing (still image 89 High ISO NR (still image 90 Write Date (still image 91 Grid Line...91 Auto Review...92 FINDER/MONITOR...92 Viewing...6 Viewing still images...6 Playing back images 93 Playback zoom...93 Image Index...94 Switching the screen display (during playback 95...
... Red Eye Reduction...89 Auto Obj. Framing (still image 89 High ISO NR (still image 90 Write Date (still image 91 Grid Line...91 Auto Review...92 FINDER/MONITOR...92 Viewing...6 Viewing still images...6 Playing back images 93 Playback zoom...93 Image Index...94 Switching the screen display (during playback 95...
User Guide
Page 16
Auto Review FINDER/MONITOR Viewing Viewing still images Playing back images Playback zoom Image Index Switching the screen display (during playback) Deleting images Deleting a displayed image Deleting multiple selected images Playing back movies Playing back movies Motion Shot Video Viewing panoramic images Playing back panoramic images Printing Specify Printing Using viewing functions View Mode Slide Show Rotate 6
Auto Review FINDER/MONITOR Viewing Viewing still images Playing back images Playback zoom Image Index Switching the screen display (during playback) Deleting images Deleting a displayed image Deleting multiple selected images Playing back movies Playing back movies Motion Shot Video Viewing panoramic images Playing back panoramic images Printing Specify Printing Using viewing functions View Mode Slide Show Rotate 6
User Guide
Page 79
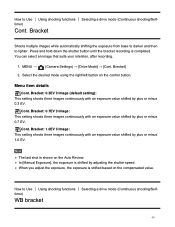
... Exposure], the exposure is completed. MENU → (Camera Settings) → [Drive Mode] → [Cont. Bracket] 2. Note The last shot is shifted based on the Auto Review. Bracket: 0.3EV 3 Image (default setting): This setting shoots three images continuously with an exposure value shifted by plus or minus 0.7 EV. Cont. Bracket: 1.0EV 3 Image...
... Exposure], the exposure is completed. MENU → (Camera Settings) → [Drive Mode] → [Cont. Bracket] 2. Note The last shot is shifted based on the Auto Review. Bracket: 0.3EV 3 Image (default setting): This setting shoots three images continuously with an exposure value shifted by plus or minus 0.7 EV. Cont. Bracket: 1.0EV 3 Image...
User Guide
Page 80
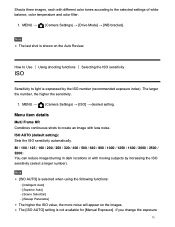
... using the following functions: [Intelligent Auto] [Superior Auto] [Scene Selection] [iSweep Panorama] The higher the ISO value, the more noise will appear on the Auto Review. Note [ISO AUTO] is expressed by increasing the ISO sensitivity (select a larger number).
... using the following functions: [Intelligent Auto] [Superior Auto] [Scene Selection] [iSweep Panorama] The higher the ISO value, the more noise will appear on the Auto Review. Note [ISO AUTO] is expressed by increasing the ISO sensitivity (select a larger number).
User Guide
Page 100
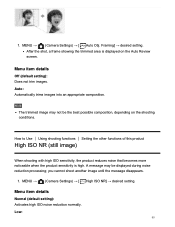
...; desired setting. Low: 90 MENU → (Camera Settings) → [ Auto Obj. Note The trimmed image may be the best possible composition, depending on the Auto Review screen. you cannot shoot another image until the message disappears. 1. After the shot, a frame showing the trimmed area is high.
...; desired setting. Low: 90 MENU → (Camera Settings) → [ Auto Obj. Note The trimmed image may be the best possible composition, depending on the Auto Review screen. you cannot shoot another image until the message disappears. 1. After the shot, a frame showing the trimmed area is high.
User Guide
Page 102
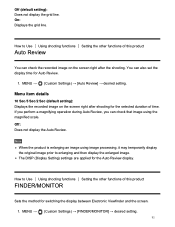
... shooting. Menu item details 10 Sec/5 Sec/2 Sec (default setting): Displays the recorded image on the screen right after shooting for Auto Review. 1. The DISP (Display Setting) settings are applied for switching the display between Electronic Viewfinder and the screen. 1. On: Displays the ...grid line. Off (default setting): Does not display the grid line. Off: Does not display the Auto Review. MENU → (Custom Settings) → [Auto Review] → desired setting. MENU → (Custom Settings) → [FINDER/MONITOR] → desired setting. 92 Note When ...
... shooting. Menu item details 10 Sec/5 Sec/2 Sec (default setting): Displays the recorded image on the screen right after shooting for Auto Review. 1. The DISP (Display Setting) settings are applied for switching the display between Electronic Viewfinder and the screen. 1. On: Displays the ...grid line. Off (default setting): Does not display the grid line. Off: Does not display the Auto Review. MENU → (Custom Settings) → [Auto Review] → desired setting. MENU → (Custom Settings) → [FINDER/MONITOR] → desired setting. 92 Note When ...
User Guide
Page 105
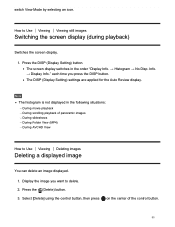
... The histogram is not displayed in the order "Display Info. → Histogram → No Disp. The DISP (Display Setting) settings are applied for the Auto Review display. Press the (Delete) button. 3. each time you want to Use Viewing Viewing still images Switching the screen display (during playback) Switches the screen display...
... The histogram is not displayed in the order "Display Info. → Histogram → No Disp. The DISP (Display Setting) settings are applied for the Auto Review display. Press the (Delete) button. 3. each time you want to Use Viewing Viewing still images Switching the screen display (during playback) Switches the screen display...
User Guide
Page 136
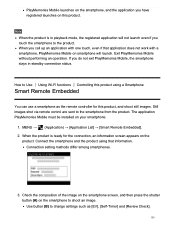
... touch, even if that information. Connect the smartphone and the product using a Smartphone Smart Remote Embedded You can use a smartphone as [EV], [Self-Timer] and [Review Check]. 126 The application PlayMemories Mobile must be installed on smartphone will not launch even if you touch the smartphone to the product. When the...
... touch, even if that information. Connect the smartphone and the product using a Smartphone Smart Remote Embedded You can use a smartphone as [EV], [Self-Timer] and [Review Check]. 126 The application PlayMemories Mobile must be installed on smartphone will not launch even if you touch the smartphone to the product. When the...
