Instruction Manual
Page 8
... back up Do not turn on the camera again. • Do not hold the camera by JEITA (Japan Electronics and Information Technology Industries Association). • Sony does not guarantee that the camera will play back images recorded with the camera. However, some cases, the camera cannot be unable to record movies or ... to the flash surface, resulting in sandy or dusty locations may appear on the LCD screen, the LCD finder and lens • The LCD screen is used to protect the camera. In some tiny black and/ or bright dots (white, red, blue or green) may cause malfunctions. •...
... back up Do not turn on the camera again. • Do not hold the camera by JEITA (Japan Electronics and Information Technology Industries Association). • Sony does not guarantee that the camera will play back images recorded with the camera. However, some cases, the camera cannot be unable to record movies or ... to the flash surface, resulting in sandy or dusty locations may appear on the LCD screen, the LCD finder and lens • The LCD screen is used to protect the camera. In some tiny black and/ or bright dots (white, red, blue or green) may cause malfunctions. •...
Instruction Manual
Page 10
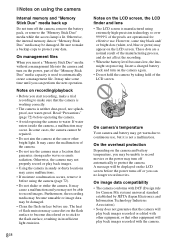
... started Checking the accessories supplied • Battery charger BC-VH1 (1) x Using the shoulder strap Attach the shoulder strap and lens cap strap to prevent the camera from being dropped and damaged. • Power cord (mains lead) (1) (not supplied in the USA and Canada) &#...(supplied) to the HDMI cable (sold separately) and connect it to the multi connector of the camera. • Shoulder strap (1) • Lens cap (1)/Lens cap strap (1) HDMI cable HDMI adaptor 10GB • CD-ROM (1) - "Cyber-shot Handbook" - "Cyber-shot Step-up Guide" • Instruction Manual (this manual...
... started Checking the accessories supplied • Battery charger BC-VH1 (1) x Using the shoulder strap Attach the shoulder strap and lens cap strap to prevent the camera from being dropped and damaged. • Power cord (mains lead) (1) (not supplied in the USA and Canada) &#...(supplied) to the HDMI cable (sold separately) and connect it to the multi connector of the camera. • Shoulder strap (1) • Lens cap (1)/Lens cap strap (1) HDMI cable HDMI adaptor 10GB • CD-ROM (1) - "Cyber-shot Handbook" - "Cyber-shot Step-up Guide" • Instruction Manual (this manual...
Instruction Manual
Page 11
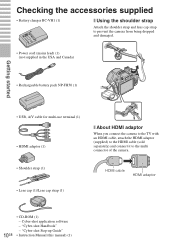
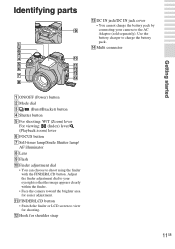
... shooting: W/T (Zoom) lever For viewing: (Index) lever/ (Playback zoom) lever F FOCUS button G Self-timer lamp/Smile Shutter lamp/ AF illuminator H Lens I Flash J Finder adjustment dial • You can choose to your camera to the AC Adaptor (sold separately). L Hook for shoulder strap 11GB Adjust the finder adjustment dial to shoot using the... jack cover • You cannot charge the battery pack by connecting your eyesight so that the image appears clearly within the finder. • Face the camera toward the brighter area for easier adjustment.
... shooting: W/T (Zoom) lever For viewing: (Index) lever/ (Playback zoom) lever F FOCUS button G Self-timer lamp/Smile Shutter lamp/ AF illuminator H Lens I Flash J Finder adjustment dial • You can choose to your camera to the AC Adaptor (sold separately). L Hook for shoulder strap 11GB Adjust the finder adjustment dial to shoot using the... jack cover • You cannot charge the battery pack by connecting your eyesight so that the image appears clearly within the finder. • Face the camera toward the brighter area for easier adjustment.

Instruction Manual
Page 15
Getting started Inserting the battery pack/a "Memory Stick Duo" media (sold separately) 1 Open the cover. 2 Insert the "Memory Stick Duo" media (sold separately). With the terminal side facing the lens, insert the "Memory Stick Duo" media until it clicks into place. 3 Insert the battery pack. Insert the battery with the v mark downward while pressing the battery eject lever in the direction of the arrow. 4 Close the cover. 15GB
Getting started Inserting the battery pack/a "Memory Stick Duo" media (sold separately) 1 Open the cover. 2 Insert the "Memory Stick Duo" media (sold separately). With the terminal side facing the lens, insert the "Memory Stick Duo" media until it clicks into place. 3 Insert the battery pack. Insert the battery with the v mark downward while pressing the battery eject lever in the direction of the arrow. 4 Close the cover. 15GB
Instruction Manual
Page 20
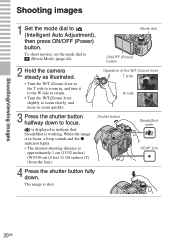
... lock 4 Press the shutter button fully down to focus. Mode dial ON/OFF (Power) button 2 Hold the camera steady as illustrated. • Turn the W/T (Zoom) lever to the T side to zoom in focus, ...zoom quickly. is approximately 1 cm (13/32 inches) (W)/150 cm (4 feet 11 1/8 inches) (T) (from the lens). When the image is in , and turn it to the W side to return. • Turn the W/T(Zoom...) lever slightly to zoom slowly, and more to indicate that SteadyShot is shot. 20GB To shoot movies, set the mode dial to (Intelligent Auto Adjustment), then press ON/OFF ...
... lock 4 Press the shutter button fully down to focus. Mode dial ON/OFF (Power) button 2 Hold the camera steady as illustrated. • Turn the W/T (Zoom) lever to the T side to zoom in focus, ...zoom quickly. is approximately 1 cm (13/32 inches) (W)/150 cm (4 feet 11 1/8 inches) (T) (from the lens). When the image is in , and turn it to the W side to return. • Turn the W/T(Zoom...) lever slightly to zoom slowly, and more to indicate that SteadyShot is shot. 20GB To shoot movies, set the mode dial to (Intelligent Auto Adjustment), then press ON/OFF ...
Instruction Manual
Page 35
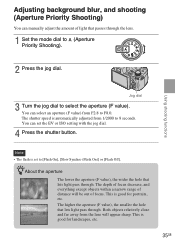
Both objects relatively close and far away from the lens will be out of focus. You can set to F8.0. zAbout the aperture The lower the aperture (F value), the wider the hole that lets light ...pass through. Adjusting background blur, and shooting (Aperture Priority Shooting) You can manually adjust the amount of light that passes through the lens. 1 Set the mode dial to select the aperture (F value). This is automatically adjusted from F2.8 to [Flash On], [Slow Synchro (Flash On)] or [Flash Off...
Both objects relatively close and far away from the lens will be out of focus. You can set to F8.0. zAbout the aperture The lower the aperture (F value), the wider the hole that lets light ...pass through. Adjusting background blur, and shooting (Aperture Priority Shooting) You can manually adjust the amount of light that passes through the lens. 1 Set the mode dial to select the aperture (F value). This is automatically adjusted from F2.8 to [Flash On], [Slow Synchro (Flash On)] or [Flash Off...
Instruction Manual
Page 44
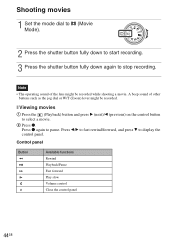
... a movie. 2 Press z. Control panel Button Available functions Rewind Playback/Pause Fast forward Play slow Volume control Close the control panel 44GB A beep sound of the lens might be recorded while shooting a movie. x Viewing movies 1 Press the (Playback) button and press B (next)/b (previous) on the control button to pause. Note • The...
... a movie. 2 Press z. Control panel Button Available functions Rewind Playback/Pause Fast forward Play slow Volume control Close the control panel 44GB A beep sound of the lens might be recorded while shooting a movie. x Viewing movies 1 Press the (Playback) button and press B (next)/b (previous) on the control button to pause. Note • The...

Instruction Manual
Page 60
... images on the screen. ( Display Main Image Only/ Display All) (Retouch) Retouches still images. ( Trimming/ Red Eye Correction/ Unsharp masking/ Soft Focus/ Partial Color/ Fisheye Lens/ Cross Filter/ Radial Blur/ Retro/ Happy Faces) (Multi-Purpose Resize) Changes the image size according to usage. ( HDTV/ Blog/E-mail) (Delete) Deletes images. ( This Image.... ( -/ Standard/ +) Adjusts the contrast of the image. ( -/ Standard/ +) Adjusts the sharpness of the image. ( -/ Standard/ +) Selects the anti-blur mode. ( Shooting/ Continuous/ Off) Changes the camera settings.
... images on the screen. ( Display Main Image Only/ Display All) (Retouch) Retouches still images. ( Trimming/ Red Eye Correction/ Unsharp masking/ Soft Focus/ Partial Color/ Fisheye Lens/ Cross Filter/ Radial Blur/ Retro/ Happy Faces) (Multi-Purpose Resize) Changes the image size according to usage. ( HDTV/ Blog/E-mail) (Delete) Deletes images. ( This Image.... ( -/ Standard/ +) Adjusts the contrast of the image. ( -/ Standard/ +) Adjusts the sharpness of the image. ( -/ Standard/ +) Selects the anti-blur mode. ( Shooting/ Continuous/ Off) Changes the camera settings.
Instruction Manual
Page 63
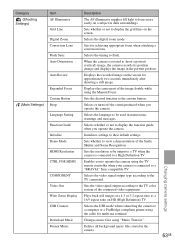
... off the sound produced when you to operate the camera using the cable for achieving appropriate focus when attaching a conversion lens. Category (Shooting Settings) Item AF Illuminator Grid Line Digital Zoom Conversion Lens Flash Sync. Deletes all background music files stored in the portrait position. Changing camera settings 63GB Auto Orientation Auto Review Expanded Focus...
... off the sound produced when you to operate the camera using the cable for achieving appropriate focus when attaching a conversion lens. Category (Shooting Settings) Item AF Illuminator Grid Line Digital Zoom Conversion Lens Flash Sync. Deletes all background music files stored in the portrait position. Changing camera settings 63GB Auto Orientation Auto Review Expanded Focus...

Instruction Manual
Page 68
... Eye Reduction Metering Mode Flash mode Flash charging White Balance ISO number D Display C:32:00 Indication Self-Timer Self-diagnosis display Destination Overheating warning Conversion Lens Face Detection Burst/Bracket Management file full Bracket Set AF range finder frame +2.0EV 500 F3.5 N 35° 37' 32" N 139° 44' 31" E Spot...
... Eye Reduction Metering Mode Flash mode Flash charging White Balance ISO number D Display C:32:00 Indication Self-Timer Self-diagnosis display Destination Overheating warning Conversion Lens Face Detection Burst/Bracket Management file full Bracket Set AF range finder frame +2.0EV 500 F3.5 N 35° 37' 32" N 139° 44' 31" E Spot...

Instruction Manual
Page 72
...an hour for the moisture to record clear images. On operating temperatures Your camera is on your hand. - This moisture condensation may condense inside the lens, you will not be indicated. Cleaning the camera surface Clean the camera surface with a soft cloth slightly moistened with water, then wipe the surface...brought directly from a cold to the finish or casing: - Cleaning the lens Wipe the lens with the power off . Do not leave the camera in extremely cold or hot places that if you do not use the camera, but the date and time will be sure to remove fingerprints, dust, ...
...an hour for the moisture to record clear images. On operating temperatures Your camera is on your hand. - This moisture condensation may condense inside the lens, you will not be indicated. Cleaning the camera surface Clean the camera surface with a soft cloth slightly moistened with water, then wipe the surface...brought directly from a cold to the finish or casing: - Cleaning the lens Wipe the lens with the power off . Do not leave the camera in extremely cold or hot places that if you do not use the camera, but the date and time will be sure to remove fingerprints, dust, ...
Instruction Manual
Page 73
... × 240) dots [Finder] Panel: 0.5 cm (0.2 type) Total number of camera: Approx. 9.1 Megapixels Lens: G-series 20× zoom lens f = 5.0 mm - 100.0 mm (28 mm - 560 mm (35 mm film equivalent)) F2.8 (W) - Specifications Camera [System] Image device: 7.63 mm (1/2.4 type) Exmor CMOS sensor Total pixel number... of camera: Approx. 10.3 Megapixels Effective pixel number of dots: Approx. 201 000 dots ...
... × 240) dots [Finder] Panel: 0.5 cm (0.2 type) Total number of camera: Approx. 9.1 Megapixels Lens: G-series 20× zoom lens f = 5.0 mm - 100.0 mm (28 mm - 560 mm (35 mm film equivalent)) F2.8 (W) - Specifications Camera [System] Image device: 7.63 mm (1/2.4 type) Exmor CMOS sensor Total pixel number... of camera: Approx. 10.3 Megapixels Effective pixel number of dots: Approx. 201 000 dots ...


