Instruction Manual
Page 7
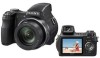
...can be recorded/viewed .......... 32 Number of still images and recording time of contents IMPORTANT SAFEGUARDS 2 Read this first 4 Notes on using your camera 8 Getting started 10 Checking the accessories supplied 10 1 Preparing the battery pack 12 2 Inserting the battery pack/a "Memory Stick Duo" (not... supplied) ........ 13 3 Turning the camera on/setting the clock 15 Shooting images easily 16 Mode dial/Zoom/Flash/Macro/Self-timer/Display/Finder/Lens hood ...... 17 Shooting with manual adjustment 20 Viewing/deleting images 21 ...
...can be recorded/viewed .......... 32 Number of still images and recording time of contents IMPORTANT SAFEGUARDS 2 Read this first 4 Notes on using your camera 8 Getting started 10 Checking the accessories supplied 10 1 Preparing the battery pack 12 2 Inserting the battery pack/a "Memory Stick Duo" (not... supplied) ........ 13 3 Turning the camera on/setting the clock 15 Shooting images easily 16 Mode dial/Zoom/Flash/Macro/Self-timer/Display/Finder/Lens hood ...... 17 Shooting with manual adjustment 20 Viewing/deleting images 21 ...

Instruction Manual
Page 8
...Information Technology Industries Association). • Playback of images recorded with your camera on other equipment and playback of flash emission may cause dirt on the flash surface to become discolored or to stick to the flash surface, resulting in sandy or dusty locations may cause malfunctions. &#...recording medium unusable, or cause image data breakdown, damage or loss. • Clean the flash surface before operating the camera. • Be careful not to get the camera wet. Notes on using your camera [ Internal memory and "Memory Stick Duo" back up copy. [ Notes on recording/...
...Information Technology Industries Association). • Playback of images recorded with your camera on other equipment and playback of flash emission may cause dirt on the flash surface to become discolored or to stick to the flash surface, resulting in sandy or dusty locations may cause malfunctions. &#...recording medium unusable, or cause image data breakdown, damage or loss. • Clean the flash surface before operating the camera. • Be careful not to get the camera wet. Notes on using your camera [ Internal memory and "Memory Stick Duo" back up copy. [ Notes on recording/...

Instruction Manual
Page 13
...it clicks. ɠ Insert the battery pack while pressing the battery eject lever with fully charged one, or charge the battery. (The warning indicator flashes.) • It takes about one minute until it clicks. 3 Insert the battery pack. 4 Close the battery/"Memory Stick Duo" cover. [... displayed battery remaining indicator may not be correct under certain circumstances. • The Clock Set screen appears when the camera is no "Memory Stick Duo" inserted The camera records/plays back images using the internal memory (approx. 31 MB). [ To check the remaining battery time Press POWER...
...it clicks. ɠ Insert the battery pack while pressing the battery eject lever with fully charged one, or charge the battery. (The warning indicator flashes.) • It takes about one minute until it clicks. 3 Insert the battery pack. 4 Close the battery/"Memory Stick Duo" cover. [... displayed battery remaining indicator may not be correct under certain circumstances. • The Clock Set screen appears when the camera is no "Memory Stick Duo" inserted The camera records/plays back images using the internal memory (approx. 31 MB). [ To check the remaining battery time Press POWER...
Instruction Manual
Page 16
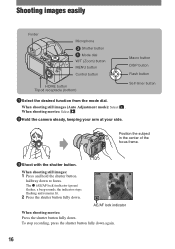
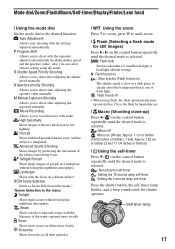
When shooting movies: Select . 2Hold the camera steady, keeping your arm at your side. When shooting still images: 1 Press and hold the shutter button halfway down again. 16 To stop recording, press ... the focus frame. 3Shoot with the shutter button. When shooting still images (Auto Adjustment mode): Select . The z (AE/AF lock) indicator (green) flashes, a beep sounds, the indicator stops flashing and remains lit. 2 Press the shutter button fully down . Shooting images easily Finder Microphone ɠ Shutter button Mode dial W/T (Zoom) button MENU button...
When shooting movies: Select . 2Hold the camera steady, keeping your arm at your side. When shooting still images: 1 Press and hold the shutter button halfway down again. 16 To stop recording, press ... the focus frame. 3Shoot with the shutter button. When shooting still images (Auto Adjustment mode): Select . The z (AE/AF lock) indicator (green) flashes, a beep sounds, the indicator stops flashing and remains lit. 2 Press the shutter button fully down . Shooting images easily Finder Microphone ɠ Shutter button Mode dial W/T (Zoom) button MENU button...
Instruction Manual
Page 17
... settings adjusted automatically. SCN Scene Selection Selects a Scene Selection in the menu.* *Scene Selection in the menu Twilight Shoot night scenes without a flash even in a dark place to shoot after use. [ Macro (Shooting close-up and strobes. Self-timer lamp 17 Auto Adjustment Allows easy...-timer : Setting the 10-second delay self-timer : Setting the 2-second delay self-timer Press the shutter button, the self-timer lamp flashes, and a beep sounds until the shutter operates. M Manual Exposure Shooting Allows you to shoot after adjusting the aperture value manually. Movie Recording...
... settings adjusted automatically. SCN Scene Selection Selects a Scene Selection in the menu.* *Scene Selection in the menu Twilight Shoot night scenes without a flash even in a dark place to shoot after use. [ Macro (Shooting close-up and strobes. Self-timer lamp 17 Auto Adjustment Allows easy...-timer : Setting the 10-second delay self-timer : Setting the 2-second delay self-timer Press the shutter button, the self-timer lamp flashes, and a beep sounds until the shutter operates. M Manual Exposure Shooting Allows you to shoot after adjusting the aperture value manually. Movie Recording...

Instruction Manual
Page 18
...switch • Forcing the LCD screen to shoot either using the finder or the LCD screen. Set NIGHTSHOT switch to ON. [ To shoot using the flash. [ DISP Changing the screen display Press v (DISP) on the LCD screen. Adjust the finder adjustment dial to normal brightness. [ Shooting in the... dark places without using the finder With the FINDER/LCD button, you shoot subjects in the dark (DSC-H9 only) The Night Shot function lets you can adjust the angle of LCD backlight up r Histogram on r Indicators off r Indicators on* *...
...switch • Forcing the LCD screen to shoot either using the finder or the LCD screen. Set NIGHTSHOT switch to ON. [ To shoot using the flash. [ DISP Changing the screen display Press v (DISP) on the LCD screen. Adjust the finder adjustment dial to normal brightness. [ Shooting in the... dark places without using the finder With the FINDER/LCD button, you shoot subjects in the dark (DSC-H9 only) The Night Shot function lets you can adjust the angle of LCD backlight up r Histogram on r Indicators off r Indicators on* *...

Instruction Manual
Page 24
... 2 USB Connect Video Out Shooting Settings Shooting Settings 1 AF Illuminator AF Mode Conversion Lens Shooting Settings 2 Flash Sync. Auto Review Clock Settings Language Setting Format Music Create REC. Folder Copy Function Guide COMPONENT Grid Line Digital Zoom Auto Orientation Expanded Focus For details on the operation 1 page 23 HOME items Press HOME...
... 2 USB Connect Video Out Shooting Settings Shooting Settings 1 AF Illuminator AF Mode Conversion Lens Shooting Settings 2 Flash Sync. Auto Review Clock Settings Language Setting Format Music Create REC. Folder Copy Function Guide COMPONENT Grid Line Digital Zoom Auto Orientation Expanded Focus For details on the operation 1 page 23 HOME items Press HOME...
Instruction Manual
Page 26
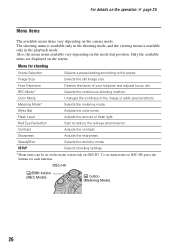
... Sharpness Adjusts the sharpness. Face Detection Detects the faces of flash light. Metering Mode* Selects the metering mode. Contrast Adjusts the contrast. SETUP Selects shooting settings. * Menu items can be set menu items on DSC-H7. Color Mode Changes the vividness of the image or adds ...items The available menu items vary depending on the mode dial position. Also, the menu items available vary depending on the camera mode. Only the available items are displayed on the screen. REC Mode* Selects the continuous shooting method. White Bal Adjusts the color...
... Sharpness Adjusts the sharpness. Face Detection Detects the faces of flash light. Metering Mode* Selects the metering mode. Contrast Adjusts the contrast. SETUP Selects shooting settings. * Menu items can be set menu items on DSC-H7. Color Mode Changes the vividness of the image or adds ...items The available menu items vary depending on the mode dial position. Also, the menu items available vary depending on the camera mode. Only the available items are displayed on the screen. REC Mode* Selects the continuous shooting method. White Bal Adjusts the color...
Instruction Manual
Page 31
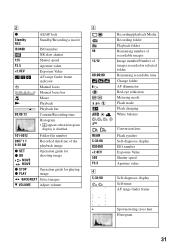
... images Image number/Number of images recorded in selected folder Remaining recordable time Change folder AF illuminator Red-eye reduction Metering mode Flash mode Flash charging White balance Conversion lens Flash synchro Self-diagnosis display ISO number Exposure Value Shutter speed Aperture value Self-diagnosis display Self-timer AF range finder frame + Spot...
... images Image number/Number of images recorded in selected folder Remaining recordable time Change folder AF illuminator Red-eye reduction Metering mode Flash mode Flash charging White balance Conversion lens Flash synchro Self-diagnosis display ISO number Exposure Value Shutter speed Aperture value Self-diagnosis display Self-timer AF range finder frame + Spot...
Instruction Manual
Page 32
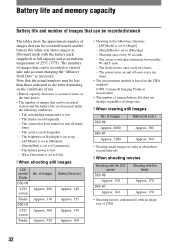
... Approx. 160 • Shooting in [Normal] mode with an image size of [320] 32 The power turns on the CIPA standard. (CIPA: Camera & Imaging Products Association) • The number of images/battery life does not change, regardless of image size. [ When viewing still images No....Stick Duo" as you shoot images in the following conditions: - The surrounding temperature is used frequently. - The flash strobes once every two times. - of Images DSC-H9 Approx. 6000 DSC-H7 Approx. 7200 Battery life (min.) Approx. 300 Approx. 360 • Viewing single images in the table depending ...
... Approx. 160 • Shooting in [Normal] mode with an image size of [320] 32 The power turns on the CIPA standard. (CIPA: Camera & Imaging Products Association) • The number of images/battery life does not change, regardless of image size. [ When viewing still images No....Stick Duo" as you shoot images in the following conditions: - The surrounding temperature is used frequently. - The flash strobes once every two times. - of Images DSC-H9 Approx. 6000 DSC-H7 Approx. 7200 Battery life (min.) Approx. 300 Approx. 360 • Viewing single images in the table depending ...

Instruction Manual
Page 35
...Insert the charged battery pack (page 12). • The battery pack is attached. If it . Cannot insert dates on images. • This camera does not have a feature for superimposing dates on the image. Vertical streaks appear when you are using a model other than that of the internal ...; The displayed battery remaining differs from the current one . Set the switch to the recording position. • You cannot record images while charging the flash. • When shooting a still image, set the mode dial to the LOCK position. Do one of the following : - This phenmenon is discharged...
...Insert the charged battery pack (page 12). • The battery pack is attached. If it . Cannot insert dates on images. • This camera does not have a feature for superimposing dates on the image. Vertical streaks appear when you are using a model other than that of the internal ...; The displayed battery remaining differs from the current one . Set the switch to the recording position. • You cannot record images while charging the flash. • When shooting a still image, set the mode dial to the LOCK position. Do one of the following : - This phenmenon is discharged...
Instruction Manual
Page 37
... - 465 mm when converted to a 35 mm still camera) F2.7 - 4.5 Exposure control: Automatic exposure, Shutter speed priority, Aperture priority, Manual exposure, Scene Selection (9 modes) White balance: Automatic, Daylight, Cloudy, Fluorescent 1,2,3, Incandescent, Flash, One push File format (DCF compliant): Still images: ...: Rechargeable battery pack NP-BG1, 3.6 V AC-LS5K AC Adaptor (not supplied), 4.2 V Power consumption (during shooting with the LCD screen): DSC-H9: 1.2 W DSC-H7: 1.1 W Operating temperature: 0 to 40°C (32 to 104°F) Storage temperature: -20 to +60°C (-4 to +140&#...
... - 465 mm when converted to a 35 mm still camera) F2.7 - 4.5 Exposure control: Automatic exposure, Shutter speed priority, Aperture priority, Manual exposure, Scene Selection (9 modes) White balance: Automatic, Daylight, Cloudy, Fluorescent 1,2,3, Incandescent, Flash, One push File format (DCF compliant): Still images: ...: Rechargeable battery pack NP-BG1, 3.6 V AC-LS5K AC Adaptor (not supplied), 4.2 V Power consumption (during shooting with the LCD screen): DSC-H9: 1.2 W DSC-H7: 1.1 W Operating temperature: 0 to 40°C (32 to 104°F) Storage temperature: -20 to +60°C (-4 to +140&#...


