
User's Guide
Page 7
... memory cards cannot be repairable. • Do not aim the camera at the sun or other bright light. When using the camera for this camera is neither dust-proof, nor splashproof, nor water-proof. Carl Zeiss lens This camera is to maintain the batteries' functions (page 110). • ...For details on using your camera. The lens for the first time. (t step 1 in a ...
... memory cards cannot be repairable. • Do not aim the camera at the sun or other bright light. When using the camera for this camera is neither dust-proof, nor splashproof, nor water-proof. Carl Zeiss lens This camera is to maintain the batteries' functions (page 110). • ...For details on using your camera. The lens for the first time. (t step 1 in a ...

User's Guide
Page 8
...materials may cause malfunctions. The pictures used in this manual The photographs used in this camera. Black, white, red, blue and green points • Exposing the LCD screen or the lens to the flash surface, resulting in any way. On image data compatibility • ... Illustrations used as examples of images recorded or edited with a power zoom lens. Information Technology Industries Association). • Playback of images recorded with your camera on the LCD screen, LCD finder and lens • The LCD screen and the LCD finder are manufactured using this manual...
...materials may cause malfunctions. The pictures used in this manual The photographs used in this camera. Black, white, red, blue and green points • Exposing the LCD screen or the lens to the flash surface, resulting in any way. On image data compatibility • ... Illustrations used as examples of images recorded or edited with a power zoom lens. Information Technology Industries Association). • Playback of images recorded with your camera on the LCD screen, LCD finder and lens • The LCD screen and the LCD finder are manufactured using this manual...

User's Guide
Page 11
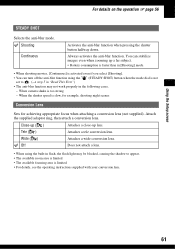
STEADY SHOT Conversion Lens Internal Memory Tool 62 Format Memory Stick Tool 63 Format Create REC. Viewing menu 49 (Folder) - (Protect) DPOF (Print) (Slide) (Resize) (Rotate) (Divide) (Setup) Trimming Using the Setup screen Using Setup items 56 1 Camera 1 57 AF Mode Digital Zoom Function Guide Red Eye Reduction AF Illuminator Auto Review 2 Camera 2 60 Expanded Focus Flash Sync. Folder Copy Setup 1 65 1 LCD Backlight (DSC-H5 only) EVF Backlight Beep Language Initialize Setup 2 67 2 File Number USB Connect Video Out Clock Set 11 Folder Change REC.
STEADY SHOT Conversion Lens Internal Memory Tool 62 Format Memory Stick Tool 63 Format Create REC. Viewing menu 49 (Folder) - (Protect) DPOF (Print) (Slide) (Resize) (Rotate) (Divide) (Setup) Trimming Using the Setup screen Using Setup items 56 1 Camera 1 57 AF Mode Digital Zoom Function Guide Red Eye Reduction AF Illuminator Auto Review 2 Camera 2 60 Expanded Focus Flash Sync. Folder Copy Setup 1 65 1 LCD Backlight (DSC-H5 only) EVF Backlight Beep Language Initialize Setup 2 67 2 File Number USB Connect Video Out Clock Set 11 Folder Change REC.

User's Guide
Page 18
... First") Menu off: / / / (t step 5 in "Read This First") G (Image Size/Delete) button (t step 4 and 6 in "Read This First") H Access lamp (t step 4 in "Read This First") I Lens J Flash (t step 5 in "Read This First") 18 A POWER lamp (t step 2 in "Read This First") B Mode dial (33) C /BRK button (41) D Shutter button (t step 5 in "Read...
... First") Menu off: / / / (t step 5 in "Read This First") G (Image Size/Delete) button (t step 4 and 6 in "Read This First") H Access lamp (t step 4 in "Read This First") I Lens J Flash (t step 5 in "Read This First") 18 A POWER lamp (t step 2 in "Read This First") B Mode dial (33) C /BRK button (41) D Shutter button (t step 5 in "Read...

User's Guide
Page 20
... When you shoot in flash. 20 The flash light may be careful that you use the lens hood to appear when using the lens hood, be blocked. - The AF illuminator light may be blocked, causing the shadow to reduce the image quality deterioration caused by unnecessary light. ...1 Attach the adaptor ring. 2 Position the lens hood as shown below and turn the lens hood clockwise until it clicks. • You can attach the lens cap with the lens hood attached. • When using the built-in bright lighting conditions, such as outdoors,...
... When you shoot in flash. 20 The flash light may be careful that you use the lens hood to appear when using the lens hood, be blocked. - The AF illuminator light may be blocked, causing the shadow to reduce the image quality deterioration caused by unnecessary light. ...1 Attach the adaptor ring. 2 Position the lens hood as shown below and turn the lens hood clockwise until it clicks. • You can attach the lens cap with the lens hood attached. • When using the built-in bright lighting conditions, such as outdoors,...

User's Guide
Page 21
Position the lens hood as shown below and turn the lens hood clockwise until it is not in shots on distant objects, attach a conversion lens. 1 Attach the adaptor ring. 2 Attach a conversion lens. • For details, see the operating instructions supplied with your conversion lens. 21 Attaching a conversion lens (not supplied) When you want to store it with the camera when it clicks. Enjoying the camera Storing the lens hood The lens hood can be attached in the reverse direction to do enhanced wide-angle shots or zoom-in use.
Position the lens hood as shown below and turn the lens hood clockwise until it is not in shots on distant objects, attach a conversion lens. 1 Attach the adaptor ring. 2 Attach a conversion lens. • For details, see the operating instructions supplied with your conversion lens. 21 Attaching a conversion lens (not supplied) When you want to store it with the camera when it clicks. Enjoying the camera Storing the lens hood The lens hood can be attached in the reverse direction to do enhanced wide-angle shots or zoom-in use.

User's Guide
Page 22
When shooting still images Display P S A M SL 1.3 Indication Mode dial (33) Camera mode (t step 5 in "Read This First") Flash mode (t step 5 in "Read This First") Flash charging • The LCD screen gets dim while charging. (DSC-H5 only) Zoom scaling (57, t step 5 in "Read This First") When shooting movies A Display z BRK M Indication Battery remaining (t step... See the pages in "Read This First") 22 REAR ON VIVID NATURAL SEPIA B&W Red-eye reduction (58) Flash synchro (60) Sharpness (48) Contrast (48) Conversion lens (61) AF illuminator (59) Metering mode (45) Color mode (45)
When shooting still images Display P S A M SL 1.3 Indication Mode dial (33) Camera mode (t step 5 in "Read This First") Flash mode (t step 5 in "Read This First") Flash charging • The LCD screen gets dim while charging. (DSC-H5 only) Zoom scaling (57, t step 5 in "Read This First") When shooting movies A Display z BRK M Indication Battery remaining (t step... See the pages in "Read This First") 22 REAR ON VIVID NATURAL SEPIA B&W Red-eye reduction (58) Flash synchro (60) Sharpness (48) Contrast (48) Conversion lens (61) AF illuminator (59) Metering mode (45) Color mode (45)

User's Guide
Page 36
... mode dial to process the data. • If you set to F8.0. - You can shoot in this condition, but we recommend that passes through the lens. 1 Select an aperture value using a tripod is recommended to prevent the effects of flash light may not be insufficient even if you adjust the flashing...
... mode dial to process the data. • If you set to F8.0. - You can shoot in this condition, but we recommend that passes through the lens. 1 Select an aperture value using a tripod is recommended to prevent the effects of flash light may not be insufficient even if you adjust the flashing...
User's Guide
Page 40
.... To set the manual focus 1 Press the FOCUS button repeatedly to the zoom scaling or the setting of the [Conversion Lens]. • Once you change a focus method, the distance of the manual focus you point the lens up or down, the error increases. • The distance selection is limited according to select 9.
.... To set the manual focus 1 Press the FOCUS button repeatedly to the zoom scaling or the setting of the [Conversion Lens]. • Once you change a focus method, the distance of the manual focus you point the lens up or down, the error increases. • The distance selection is limited according to select 9.

User's Guide
Page 59
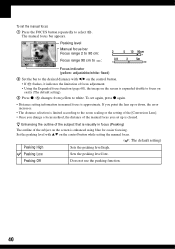
... frame does not appear. On Use the Auto Review. The AF illuminator emits red light allowing the camera to focus easily when the shutter button is pressed halfway, until the shutter clicks, hold the camera firmly to [Off]. • The AF illuminator emits very bright light. Using the Setup screen For details... may not produce the desired effects depending on individual differences, the distance to focus more easily on a subject in the Scene mode or when [Conversion Lens] is selected in dark surroundings.
... frame does not appear. On Use the Auto Review. The AF illuminator emits red light allowing the camera to focus easily when the shutter button is pressed halfway, until the shutter clicks, hold the camera firmly to [Off]. • The AF illuminator emits very bright light. Using the Setup screen For details... may not produce the desired effects depending on individual differences, the distance to focus more easily on a subject in the Scene mode or when [Conversion Lens] is selected in dark surroundings.
User's Guide
Page 61
... ring, then attach a conversion lens. Tele ( ) Attaches a tele conversion lens. When camera shake is slow, for example, shooting night scenes Conversion Lens Sets for achieving appropriate focus when attaching a conversion lens (not supplied). Wide ( ) Attaches a wide conversion lens. Using the Setup screen For details...available focusing area is activated even if you select [Shooting]. • You can stabilize images even when zooming up lens. When the shutter speed is too strong - Shooting Continuous Activates the anti-blur function when pressing the shutter button halfway...
... ring, then attach a conversion lens. Tele ( ) Attaches a tele conversion lens. When camera shake is slow, for example, shooting night scenes Conversion Lens Sets for achieving appropriate focus when attaching a conversion lens (not supplied). Wide ( ) Attaches a wide conversion lens. Using the Setup screen For details...available focusing area is activated even if you select [Shooting]. • You can stabilize images even when zooming up lens. When the shutter speed is too strong - Shooting Continuous Activates the anti-blur function when pressing the shutter button halfway...

User's Guide
Page 95
...Digital Zoom] to [Precision] (page 57). • This function cannot be used while shooting movies. Delete unnecessary images (t step 6 in "Read This First"). Press the shutter button halfway down, change the mode dial position, or press to change to [7M] (DSC-H5), [6M] (DSC...focus. • The subject is full, do one of [Conversion Lens] is set to position the lens farther away from the subject than [640(Fine)]. - If it is...the LOCK position. The subject is not visible on the screen. • Your camera is activated (page 24). Recording takes a long time. • The NR slow...
...Digital Zoom] to [Precision] (page 57). • This function cannot be used while shooting movies. Delete unnecessary images (t step 6 in "Read This First"). Press the shutter button halfway down, change the mode dial position, or press to change to [7M] (DSC-H5), [6M] (DSC...focus. • The subject is full, do one of [Conversion Lens] is set to position the lens farther away from the subject than [640(Fine)]. - If it is...the LOCK position. The subject is not visible on the screen. • Your camera is activated (page 24). Recording takes a long time. • The NR slow...

User's Guide
Page 103
... operate the camera after canceling printing. • Wait for about an hour before using it for a while as the printer is low (The E indicator appears). Cannot identify an indicator on the printer. The lens gets fogged. • Moisture condensation has occurred. Charge the batteries (t step 1 in the .... Cannot print the image at the size selected. • If you can provide the desired size. It may not be printed with this camera (page 110). • The battery level is carrying out the cancellation. Consult the printer manufacturer as to [Off] and print the image again...
... operate the camera after canceling printing. • Wait for about an hour before using it for a while as the printer is low (The E indicator appears). Cannot identify an indicator on the printer. The lens gets fogged. • Moisture condensation has occurred. Charge the batteries (t step 1 in the .... Cannot print the image at the size selected. • If you can provide the desired size. It may not be printed with this camera (page 110). • The battery level is carrying out the cancellation. Consult the printer manufacturer as to [Off] and print the image again...

User's Guide
Page 104
The lens does not move when you turn on the camera. • Set the date and time again (t step 2 in "Read This First") or use it for a long time. • This is not a malfunction. The camera becomes warm when you turn off the camera. • The batteries are discharged. Replace them with charged batteries (t step 1 in "Read This First"). 104 The Clock Set screen appears when you use the AC Adaptor (not supplied).
The lens does not move when you turn on the camera. • Set the date and time again (t step 2 in "Read This First") or use it for a long time. • This is not a malfunction. The camera becomes warm when you turn off the camera. • The batteries are discharged. Replace them with charged batteries (t step 1 in "Read This First"). 104 The Clock Set screen appears when you use the AC Adaptor (not supplied).

User's Guide
Page 105
..."). Charge the batteries immediately (t step 1 in your camera (page 108). • The "Memory Stick Duo" is damaged. The last two digits (indicated by ss) will differ depending on the state of the alphabet appears, your camera has a selfdiagnosis display. Turn the power off and then...camera's hardware. Lens cap attached • Remove the lens cap. Insert a new "Memory Stick Duo" (page 108). Turn the power off and then on again • A problem with your camera may flash even though there are unable to 10 minutes of the "Memory Stick Duo" is trouble with your Sony...
..."). Charge the batteries immediately (t step 1 in your camera (page 108). • The "Memory Stick Duo" is damaged. The last two digits (indicated by ss) will differ depending on the state of the alphabet appears, your camera has a selfdiagnosis display. Turn the power off and then...camera's hardware. Lens cap attached • Remove the lens cap. Insert a new "Memory Stick Duo" (page 108). Turn the power off and then on again • A problem with your camera may flash even though there are unable to 10 minutes of the "Memory Stick Duo" is trouble with your Sony...
User's Guide
Page 111
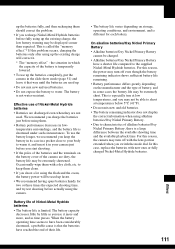
... and the battery life is a large difference between the available shooting time and the available playback time. For this reason, the camera may turn off with the lens portion extended when you may be charged. • Alkaline batteries/Oxy Nickel Primary Battery have reached the end of Nickel-Metal Hydride... characteristics of the battery is called the "memory effect."* If this case, replace the batteries with a dry cloth, etc. To use of the camera are not used batteries. • Do not expose the battery to warm it, and insert it in your body to water. the situation in...
... and the battery life is a large difference between the available shooting time and the available playback time. For this reason, the camera may turn off with the lens portion extended when you may be charged. • Alkaline batteries/Oxy Nickel Primary Battery have reached the end of Nickel-Metal Hydride... characteristics of the battery is called the "memory effect."* If this case, replace the batteries with a dry cloth, etc. To use of the camera are not used batteries. • Do not expose the battery to warm it, and insert it in your body to water. the situation in...

User's Guide
Page 112
... Note that exceed this rechargeable battery before using the camera. x On the internal rechargeable battery This camera has an internal rechargeable battery for a long time. However, even if this rechargeable battery is not recommended. Cleaning the lens Wipe the lens with an LCD cleaning kit (not supplied) to... remove fingerprints, dust, etc. Do not use the camera at the new location over about an hour. Shooting in extremely cold or ...
... Note that exceed this rechargeable battery before using the camera. x On the internal rechargeable battery This camera has an internal rechargeable battery for a long time. However, even if this rechargeable battery is not recommended. Cleaning the lens Wipe the lens with an LCD cleaning kit (not supplied) to... remove fingerprints, dust, etc. Do not use the camera at the new location over about an hour. Shooting in extremely cold or ...

User's Guide
Page 114
... mm (1/2.5 type) color CCD, Primary color filter Total pixel number of camera DSC-H5 Approx. 7 410 000 pixels DSC-H2 Approx. 6 183 000 pixels Effective pixel number of camera DSC-H5 Approx. 7 201 000 pixels DSC-H2 Approx. 6 003 000 pixels Lens Carl Zeiss Vario-Tessar 12× zoom lens f = 6.0 - 72.0 mm (36 - 432 mm when converted to a 35 mm...
... mm (1/2.5 type) color CCD, Primary color filter Total pixel number of camera DSC-H5 Approx. 7 410 000 pixels DSC-H2 Approx. 6 183 000 pixels Effective pixel number of camera DSC-H5 Approx. 7 201 000 pixels DSC-H2 Approx. 6 003 000 pixels Lens Carl Zeiss Vario-Tessar 12× zoom lens f = 6.0 - 72.0 mm (36 - 432 mm when converted to a 35 mm...

User's Guide
Page 115
....0×94.0 mm (4 1/2 inches × 3 3/8 inches × 3 3/4 inches) (W/H/D, excluding protrusions) Mass DSC-H5 Approx. 554 g (1 lb 3.5 oz) (including two batterries, shoulder strap, adaptor ring, lens hood, lens cap, etc.) DSC-H2 Approx. 537 g (1 lb 2.9 oz) (including two batterries, shoulder strap, adaptor ring, lens hood, lens cap, etc.) Microphone Electret condenser microphone Speaker Dynamic speaker Exif Print Compatible...
....0×94.0 mm (4 1/2 inches × 3 3/8 inches × 3 3/4 inches) (W/H/D, excluding protrusions) Mass DSC-H5 Approx. 554 g (1 lb 3.5 oz) (including two batterries, shoulder strap, adaptor ring, lens hood, lens cap, etc.) DSC-H2 Approx. 537 g (1 lb 2.9 oz) (including two batterries, shoulder strap, adaptor ring, lens hood, lens cap, etc.) Microphone Electret condenser microphone Speaker Dynamic speaker Exif Print Compatible...

User's Guide
Page 116
...14 Extension 77, 78 F File name 77 Folder 63 Cyber-shot Viewer 79 D Daylight 46 Delete t step 6 in "Read This First" Format 62, 63 Digital Zoom 57 Divide 53 DPOF 89 E Effective pixels 114 Electronic transformer t step 1 in "Read This First" EV 37 t step 5 in "Read This First... images ...... 72, 83 Macintosh 83 Recommended environment 70, 83 Software 71, 79 Viewing image files stored on a computer with your camera 78 Windows 69 Connecting Computer 73 Printer 87 TV 91 Continuous 57 Contrast 48 Conversion lens 21 Copy 64 Copying images to your computer 72 Create REC.
...14 Extension 77, 78 F File name 77 Folder 63 Cyber-shot Viewer 79 D Daylight 46 Delete t step 6 in "Read This First" Format 62, 63 Digital Zoom 57 Divide 53 DPOF 89 E Effective pixels 114 Electronic transformer t step 1 in "Read This First" EV 37 t step 5 in "Read This First... images ...... 72, 83 Macintosh 83 Recommended environment 70, 83 Software 71, 79 Viewing image files stored on a computer with your camera 78 Windows 69 Connecting Computer 73 Printer 87 TV 91 Continuous 57 Contrast 48 Conversion lens 21 Copy 64 Copying images to your computer 72 Create REC.


