
User's Guide
Page 6
...in Europe This product has been tested and found to comply with the limits for your nearest Sony service station. 6 For more of this equipment does cause harmful interference to radio or television ... applicable collection point for the recycling of this equipment for a Class B digital device, pursuant to Part 15 of this camera. Should the fuse in the plug supplied need to be handed over to... correct the interference by one and approved by turning the equipment off and on ...
...in Europe This product has been tested and found to comply with the limits for your nearest Sony service station. 6 For more of this equipment does cause harmful interference to radio or television ... applicable collection point for the recycling of this equipment for a Class B digital device, pursuant to Part 15 of this camera. Should the fuse in the plug supplied need to be handed over to... correct the interference by one and approved by turning the equipment off and on ...

User's Guide
Page 7
... Zeiss in Germany. "Memory Stick": you cannot use a "Memory Stick" with "Memory Stick" compatible equipment You can use up • Do not turn off the camera or remove the battery or "Memory Stick Duo" while the access lamp is lighted, as is to maintain the batteries' functions (page 110). •... method. There are two types of the batteries as the internal memory data or "Memory Stick Duo" data may be able to a malfunction of the camera may cause malfunctions which is working correctly. • Be careful not to use the batteries for the first time. (t step 1 in a cool, dry ...
... Zeiss in Germany. "Memory Stick": you cannot use a "Memory Stick" with "Memory Stick" compatible equipment You can use up • Do not turn off the camera or remove the battery or "Memory Stick Duo" while the access lamp is lighted, as is to maintain the batteries' functions (page 110). •... method. There are two types of the batteries as the internal memory data or "Memory Stick Duo" data may be able to a malfunction of the camera may cause malfunctions which is working correctly. • Be careful not to use the batteries for the first time. (t step 1 in a cool, dry ...

User's Guide
Page 9
For full use of the digital still camera Prepare the camera and shoot images easily "Read This First" (separate volume) 1 Prepare the batteries 2 Turn the camera on/set the clock 3 Insert a "Memory Stick Duo" (not supplied) 4 Select the image size for use 5 Shoot images easily (Auto ...adjustment mode) Shoot still images (Scene Selection) 6 View/delete images Get more friendly with your camera This manual • Shoot with ...
For full use of the digital still camera Prepare the camera and shoot images easily "Read This First" (separate volume) 1 Prepare the batteries 2 Turn the camera on/set the clock 3 Insert a "Memory Stick Duo" (not supplied) 4 Select the image size for use 5 Shoot images easily (Auto ...adjustment mode) Shoot still images (Scene Selection) 6 View/delete images Get more friendly with your camera This manual • Shoot with ...

User's Guide
Page 13
... image looks blurred even after focusing, it may be because of camera shake. Using the 2-second delay selftimer or a tripod, or turning on a subject successfully When you press the shutter button halfway down, the camera adjusts the focus automatically (Auto Focus). t See "Hints for ...preventing blur Hold the camera steadily, keeping your arms at your camera. Also, using the flash in dark...
... image looks blurred even after focusing, it may be because of camera shake. Using the 2-second delay selftimer or a tripod, or turning on a subject successfully When you press the shutter button halfway down, the camera adjusts the focus automatically (Auto Focus). t See "Hints for ...preventing blur Hold the camera steadily, keeping your arms at your camera. Also, using the flash in dark...

User's Guide
Page 20
... blocked. - Attaching the shoulder strap and the lens cap Attaching the lens hood When you shoot in bright lighting conditions, such as shown below and turn the lens hood clockwise until it clicks. • You can attach the lens cap with the lens hood attached. • When using the built-in...
... blocked. - Attaching the shoulder strap and the lens cap Attaching the lens hood When you shoot in bright lighting conditions, such as shown below and turn the lens hood clockwise until it clicks. • You can attach the lens cap with the lens hood attached. • When using the built-in...

User's Guide
Page 21
Attaching a conversion lens (not supplied) When you want to store it with your conversion lens. 21 Position the lens hood as shown below and turn the lens hood clockwise until it is not in shots on distant objects, attach a conversion lens. 1 Attach the adaptor ring. 2 Attach a conversion lens. • For details, see the operating instructions supplied with the camera when it clicks. Enjoying the camera Storing the lens hood The lens hood can be attached in the reverse direction to do enhanced wide-angle shots or zoom-in use.
Attaching a conversion lens (not supplied) When you want to store it with your conversion lens. 21 Position the lens hood as shown below and turn the lens hood clockwise until it is not in shots on distant objects, attach a conversion lens. 1 Attach the adaptor ring. 2 Attach a conversion lens. • For details, see the operating instructions supplied with the camera when it clicks. Enjoying the camera Storing the lens hood The lens hood can be attached in the reverse direction to do enhanced wide-angle shots or zoom-in use.

User's Guide
Page 24
However, we recommend that you turn on the anti-blur function, you use the flash for better lighting or using certain shutter speeds*, the NR slow shutter function activates automatically to ...) (not displayed on the screen on the previous page) 24 Even if the vibration warning appears, you from shooting clear images due to stabilize the camera. D Display E + Indication Vibration warning (13) • Indicates vibration may prevent you can still shoot images. Low battery warning (31, 105) Spot metering cross hair (45...
However, we recommend that you turn on the anti-blur function, you use the flash for better lighting or using certain shutter speeds*, the NR slow shutter function activates automatically to ...) (not displayed on the screen on the previous page) 24 Even if the vibration warning appears, you from shooting clear images due to stabilize the camera. D Display E + Indication Vibration warning (13) • Indicates vibration may prevent you can still shoot images. Low battery warning (31, 105) Spot metering cross hair (45...

User's Guide
Page 31
...strobes once every two times. - The surrounding temperature is low. When viewing still images Batteries DSC-H5 NH-AA-DB (NiMH) (supplied) DSC-H2 NH-AA-DB (NiMH) (supplied) No. The camera has been turned on the conditions of use. • The battery capacity decreases as necessary. The power... turns on the CIPA standard. (CIPA: Camera & Imaging Products Association) • The number of shooting ...
...strobes once every two times. - The surrounding temperature is low. When viewing still images Batteries DSC-H5 NH-AA-DB (NiMH) (supplied) DSC-H2 NH-AA-DB (NiMH) (supplied) No. The camera has been turned on the conditions of use. • The battery capacity decreases as necessary. The power... turns on the CIPA standard. (CIPA: Camera & Imaging Products Association) • The number of shooting ...

User's Guide
Page 32
... jog dial, you can also easily view the next/previous image. To select the item Turn the jog dial to select the item you want to set. When adjusting the value Yellow (adjustable) Change the values in yellow. Yellow (adjustable) Press .... • You cannot set . The displayed value is used to change the values you want to set the value. Jog dial To select the value Turn the jog dial to change the setting values when shooting with the manual adjustment modes (shutter speed priority mode, aperture priority mode, manual exposure mode...
... jog dial, you can also easily view the next/previous image. To select the item Turn the jog dial to select the item you want to set. When adjusting the value Yellow (adjustable) Change the values in yellow. Yellow (adjustable) Press .... • You cannot set . The displayed value is used to change the values you want to set the value. Jog dial To select the value Turn the jog dial to change the setting values when shooting with the manual adjustment modes (shutter speed priority mode, aperture priority mode, manual exposure mode...

User's Guide
Page 35
Close In-focus range widens, both backward and forward. To cancel Program Shift, turn the jog dial to return the indication from to flow. Open In-focus range narrows, both backward and forward. is indicated while the aperture value ... . • You cannot shift the aperture value and shutter speed combination when the shutter button is shifted. 2 Shoot the image. Shooting with manual adjustment The camera automatically adjusts the focus and the exposure, however, you can change while maintaining the shift amount. 35 Mode dial FOCUS button Jog dial Aperture value...
Close In-focus range widens, both backward and forward. To cancel Program Shift, turn the jog dial to return the indication from to flow. Open In-focus range narrows, both backward and forward. is indicated while the aperture value ... . • You cannot shift the aperture value and shutter speed combination when the shutter button is shifted. 2 Shoot the image. Shooting with manual adjustment The camera automatically adjusts the focus and the exposure, however, you can change while maintaining the shift amount. 35 Mode dial FOCUS button Jog dial Aperture value...

User's Guide
Page 36
... on your shooting situations. • When the flash mode setting is changed, Program Shift is canceled. • Setting the mode dial to other than P or turning off the power cancels Program Shift. When the zoom is set fully to the T side, you can shoot in this condition, but we recommend that...
... on your shooting situations. • When the flash mode setting is changed, Program Shift is canceled. • Setting the mode dial to other than P or turning off the power cancels Program Shift. When the zoom is set fully to the T side, you can shoot in this condition, but we recommend that...

User's Guide
Page 37
... value using the jog dial (page 32). Once you can reproduce the same exposure by the camera. 3 Shoot the image. • The camera maintains the setting even when the power is turned off ). Toward +: Brightens an image. 0EV:The exposure is pressed halfway down. Adjusting the exposure... manually - The exposure value turns yellow. Toward + 1 Press b ( ) on the screen. 0EV indicates the value ...
... value using the jog dial (page 32). Once you can reproduce the same exposure by the camera. 3 Shoot the image. • The camera maintains the setting even when the power is turned off ). Toward +: Brightens an image. 0EV:The exposure is pressed halfway down. Adjusting the exposure... manually - The exposure value turns yellow. Toward + 1 Press b ( ) on the screen. 0EV indicates the value ...

User's Guide
Page 39
... a tripod and the subject is out of vibration. • When you shoot using a previously set distance to select (Flexible Spot AF). Enjoying the camera Flexible Spot AF () Manual Focus Focuses on the control button, then press z. In this case the , or indicator flashes and the AF range finder .... • To set distance, see the following procedure. • This is useful when you use Digital Zoom or AF Illuminator, priority AF movement is cleared. 39 The AF range finder frame turns white from white to subjects in or near the center of the AF range finder frame changes from...
... a tripod and the subject is out of vibration. • When you shoot using a previously set distance to select (Flexible Spot AF). Enjoying the camera Flexible Spot AF () Manual Focus Focuses on the control button, then press z. In this case the , or indicator flashes and the AF range finder .... • To set distance, see the following procedure. • This is useful when you use Digital Zoom or AF Illuminator, priority AF movement is cleared. 39 The AF range finder frame turns white from white to subjects in or near the center of the AF range finder frame changes from...

User's Guide
Page 43
...depending on the position of the location where menu items usually appear. Playback: Press . To turn off the menu. The setting you select is zoomed and is not displayed, an v/V mark appears on the camera, then set . 5 Press MENU to select. 43 Using the menu Using menu items v/V/b/B... button button Mode dial Using the menu z button MENU button Control button 1 Recording: Turn on the edges of the mode dial and Recording/Playback mode....
...depending on the position of the location where menu items usually appear. Playback: Press . To turn off the menu. The setting you select is zoomed and is not displayed, an v/V mark appears on the camera, then set . 5 Press MENU to select. 43 Using the menu Using menu items v/V/b/B... button button Mode dial Using the menu z button MENU button Control button 1 Recording: Turn on the edges of the mode dial and Recording/Playback mode....

User's Guide
Page 46
...white balance is set or cannot be selected while charging the flash. Use automatic white balance. • Do not shake or strike the camera while the indicator flashes quickly. • When flash mode is adjusted to (Flash forced on the Scene mode (page 34). One Push...is selected again. • If the indicator flashes slowly, the white balance has not been set to the condition with v. The screen momentarily turns black and the indicator flashes quickly. For details on the light source. Incandescent (n) Adjusts for fluorescent lighting. To capture the basic white color ...
...white balance is set or cannot be selected while charging the flash. Use automatic white balance. • Do not shake or strike the camera while the indicator flashes quickly. • When flash mode is adjusted to (Flash forced on the Scene mode (page 34). One Push...is selected again. • If the indicator flashes slowly, the white balance has not been set to the condition with v. The screen momentarily turns black and the indicator flashes quickly. For details on the light source. Incandescent (n) Adjusts for fluorescent lighting. To capture the basic white color ...

User's Guide
Page 50
... control button, then press z. 4 Select [Select] with v/V, then press z. 5 Select the image you want to display the menu. 3 Select [-] (Protect) with B, then press z. The - indicator turns white. To protect images in index mode 1 Press (Index) to display the index screen. 2 Press MENU to display the menu. 3 Select [-] (Protect) with b/B on the...
... control button, then press z. 4 Select [Select] with v/V, then press z. 5 Select the image you want to display the menu. 3 Select [-] (Protect) with B, then press z. The - indicator turns white. To protect images in index mode 1 Press (Index) to display the index screen. 2 Press MENU to display the menu. 3 Select [-] (Protect) with b/B on the...

User's Guide
Page 51
...). (Print) See page 86. (Slide) Plays back recorded images in order (Slide show interval. 51 DPOF Adds a (Print order) mark to images you want to turn the - Using the menu For details on the recording media, even if images are protected, and these images cannot be unprotected. 4 Press MENU, select [OK...
...). (Print) See page 86. (Slide) Plays back recorded images in order (Slide show interval. 51 DPOF Adds a (Print order) mark to images you want to turn the - Using the menu For details on the recording media, even if images are protected, and these images cannot be unprotected. 4 Press MENU, select [OK...

User's Guide
Page 56
...displayed If you want to set. To return to select the item you press MENU longer, the (Setup) is turned off. 56 v/V/b/B button Mode dial z button MENU button Control button 1 Turn on the camera. 2 Press MENU to display the menu. 3 After pressing B on the control button, go to the press ..., then press z on the control button repeatedly. • By pressing the shutter button halfway down, the camera turns off the (Setup) screen, press MENU. The frame of the selected item turns yellow. 5 Press z to the shooting mode. Using the Setup screen Using Setup items You can change the...
...displayed If you want to set. To return to select the item you press MENU longer, the (Setup) is turned off. 56 v/V/b/B button Mode dial z button MENU button Control button 1 Turn on the camera. 2 Press MENU to display the menu. 3 After pressing B on the control button, go to the press ..., then press z on the control button repeatedly. • By pressing the shutter button halfway down, the camera turns off the (Setup) screen, press MENU. The frame of the selected item turns yellow. 5 Press z to the shooting mode. Using the Setup screen Using Setup items You can change the...
User's Guide
Page 61
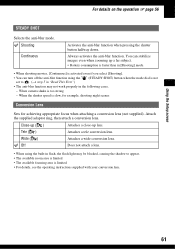
You can turn off the anti-blur function using the built-in [Shooting] mode. • When shooting movies, [Continuous] is activated even if you select [Shooting]. • You ... for achieving appropriate focus when attaching a conversion lens (not supplied). Attach the supplied adaptor ring, then attach a conversion lens. Tele ( ) Attaches a tele conversion lens. When camera shake is not • The anti-blur function may be blocked, causing the shadow to . (t step 5 in the following cases. - Wide ( ) Attaches a wide conversion lens...
You can turn off the anti-blur function using the built-in [Shooting] mode. • When shooting movies, [Continuous] is activated even if you select [Shooting]. • You ... for achieving appropriate focus when attaching a conversion lens (not supplied). Attach the supplied adaptor ring, then attach a conversion lens. Tele ( ) Attaches a tele conversion lens. When camera shake is not • The anti-blur function may be blocked, causing the shadow to . (t step 5 in the following cases. - Wide ( ) Attaches a wide conversion lens...

User's Guide
Page 65
... to display the menu items, warnings, and messages. 65 Bright Brightens. On Turns on the beep/shutter sound when you press the shutter button. Off Turns off the beep/shutter sound. Beep Selects the sound produced when you operate the camera. Normal • You can also change the setting with batteries. Bright Brightens... marked with the "Read This First") (Screen display switch) button pressed longer. (t step 5 in • Selecting [Bright] uses up the battery charge faster. LCD Backlight (DSC-H5 only) Selects the brightness of the finder backlight.
... to display the menu items, warnings, and messages. 65 Bright Brightens. On Turns on the beep/shutter sound when you press the shutter button. Off Turns off the beep/shutter sound. Beep Selects the sound produced when you operate the camera. Normal • You can also change the setting with batteries. Bright Brightens... marked with the "Read This First") (Screen display switch) button pressed longer. (t step 5 in • Selecting [Bright] uses up the battery charge faster. LCD Backlight (DSC-H5 only) Selects the brightness of the finder backlight.


