
Instruction Manual
Page 5
... the microwave range while being used in this manual could void your authority to operate this equipment. If this DSC-G1 Digital Still Camera is in the following measures: - For the State of RF can radiate radio frequency energy and, if not...Sony Corporation, declares that this equipment does cause harmful interference to radio or television reception, which can be determined by additional research. However, there is no known adverse health effects. This product has been tested and found any changes or modifications not expressly approved in accordance with the Cyber-shot...
... the microwave range while being used in this manual could void your authority to operate this equipment. If this DSC-G1 Digital Still Camera is in the following measures: - For the State of RF can radiate radio frequency energy and, if not...Sony Corporation, declares that this equipment does cause harmful interference to radio or television reception, which can be determined by additional research. However, there is no known adverse health effects. This product has been tested and found any changes or modifications not expressly approved in accordance with the Cyber-shot...
Instruction Manual
Page 8
... supplied 10 1 Inserting the battery pack 11 2 Charging the battery pack 13 3 Turning the camera on/setting the clock 15 4 Connecting the camera with your computer 16 Viewing "Cyber-shot Handbook 16 Installing the software 17 Shooting images easily (Auto adjustment mode 18 Zoom/Flash/Macro/Self...30 Indicators on using your computer 28 "Album Editor 28 "Picture Motion Browser 28 Using the wireless LAN 29 Exchanging images among the DSC-G1s 29 Making your images public via an access point 29 Listening to operate - Table of contents IMPORTANT SAFEGUARDS 2 Read this first ...
... supplied 10 1 Inserting the battery pack 11 2 Charging the battery pack 13 3 Turning the camera on/setting the clock 15 4 Connecting the camera with your computer 16 Viewing "Cyber-shot Handbook 16 Installing the software 17 Shooting images easily (Auto adjustment mode 18 Zoom/Flash/Macro/Self...30 Indicators on using your computer 28 "Album Editor 28 "Picture Motion Browser 28 Using the wireless LAN 29 Exchanging images among the DSC-G1s 29 Making your images public via an access point 29 Listening to operate - Table of contents IMPORTANT SAFEGUARDS 2 Read this first ...
Instruction Manual
Page 10
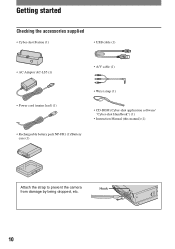
Hook 10 Getting started Checking the accessories supplied • Cyber-shot Station (1) • USB cable (1) • AC Adaptor AC-LS5 (1) • A/V cable (1) • Power cord (mains lead) (1) • Wrist strap (1) • CD-ROM (Cyber-shot application software/ "Cyber-shot Handbook") (1) • Instruction Manual (this manual) (1) • Rechargeable battery pack NP-FR1 (1)/Battery case (1) Attach the strap to prevent the camera from damage by being dropped, etc.
Hook 10 Getting started Checking the accessories supplied • Cyber-shot Station (1) • USB cable (1) • AC Adaptor AC-LS5 (1) • A/V cable (1) • Power cord (mains lead) (1) • Wrist strap (1) • CD-ROM (Cyber-shot application software/ "Cyber-shot Handbook") (1) • Instruction Manual (this manual) (1) • Rechargeable battery pack NP-FR1 (1)/Battery case (1) Attach the strap to prevent the camera from damage by being dropped, etc.
Instruction Manual
Page 13
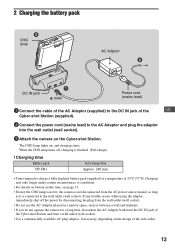
... ɟ DC IN jack v mark Power cord (mains lead) 1Connect the cable of the AC Adaptor (supplied) to the DC IN jack of the GB Cyber-shot Station (supplied). 2Connect the power cord (mains lead) to charge a fully depleted battery pack (supplied) at a temperature of 25°C (77°F). If any ... power source (mains) as long as between a wall and furniture. • If you do not operate the camera for a long time, disconnect the AC Adaptor both from the DC IN jack of the Cyber-shot Station and from the wall outlet (wall socket). • Do not use the AC Adaptor placed in a narrow...
... ɟ DC IN jack v mark Power cord (mains lead) 1Connect the cable of the AC Adaptor (supplied) to the DC IN jack of the GB Cyber-shot Station (supplied). 2Connect the power cord (mains lead) to charge a fully depleted battery pack (supplied) at a temperature of 25°C (77°F). If any ... power source (mains) as long as between a wall and furniture. • If you do not operate the camera for a long time, disconnect the AC Adaptor both from the DC IN jack of the Cyber-shot Station and from the wall outlet (wall socket). • Do not use the AC Adaptor placed in a narrow...
Instruction Manual
Page 16
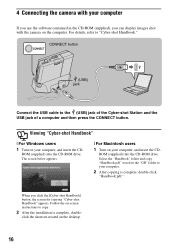
... [ For Macintosh users 1 Turn on your computer, and insert the CD- Viewing "Cyber-shot Handbook" [ For Windows users 1 Turn on the computer. ROM (supplied) into the CD-ROM drive. 4 Connecting the camera with your computer. 2 After copying is complete, double- For details, refer to the ...(USB) jack of the Cyber-shot Station and the USB jack of a computer and then press the CONNECT button. Select ...
... [ For Macintosh users 1 Turn on your computer, and insert the CD- Viewing "Cyber-shot Handbook" [ For Windows users 1 Turn on the computer. ROM (supplied) into the CD-ROM drive. 4 Connecting the camera with your computer. 2 After copying is complete, double- For details, refer to the ...(USB) jack of the Cyber-shot Station and the USB jack of a computer and then press the CONNECT button. Select ...
Instruction Manual
Page 17
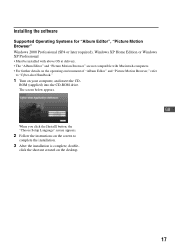
... Motion Browser" are not compatible with Macintosh computers. • For further details on the operating environment of "Album Editor" and "Picture Motion Browser," refer to "Cyber-shot Handbook." 1 Turn on the screen to complete the installation. 3 After the installation is complete, double- ROM (supplied) into the CD-ROM drive. click the shortcut...
... Motion Browser" are not compatible with Macintosh computers. • For further details on the operating environment of "Album Editor" and "Picture Motion Browser," refer to "Cyber-shot Handbook." 1 Turn on the screen to complete the installation. 3 After the installation is complete, double- ROM (supplied) into the CD-ROM drive. click the shortcut...
Instruction Manual
Page 28
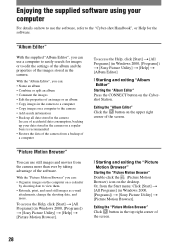
... than ever by shooting date to edit the settings of the album and the properties of the images stored in the camera. With the "Album Editor", you can : • Organize images on the computer on the upper right corner of the screen. 28 Exiting ... [All Programs] (in Windows 2000, [Programs]) t [Sony Picture Utility] t [Help] t [Album Editor] [ Starting and exiting "Album Editor" Starting the "Album Editor" Press the CONNECT button on the Cybershot Station. With the "Picture Motion Browser" you can use the software, refer to the "Cyber-shot Handbook", or Help for images or to view...
... than ever by shooting date to edit the settings of the album and the properties of the images stored in the camera. With the "Album Editor", you can : • Organize images on the computer on the upper right corner of the screen. 28 Exiting ... [All Programs] (in Windows 2000, [Programs]) t [Sony Picture Utility] t [Help] t [Album Editor] [ Starting and exiting "Album Editor" Starting the "Album Editor" Press the CONNECT button on the Cybershot Station. With the "Picture Motion Browser" you can use the software, refer to the "Cyber-shot Handbook", or Help for images or to view...
Instruction Manual
Page 29
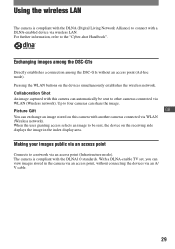
... the DLNA (Digital Living Network Alliance) to a network via an access point (Infrastructure mode). Making your images public via an access point Connects to connect with a DLNA-enabled device via wireless LAN. Using the wireless LAN The camera is compliant with the DLNA1.0 standards. Up to be sent to the "Cyber-shot Handbook". When...
... the DLNA (Digital Living Network Alliance) to a network via an access point (Infrastructure mode). Making your images public via an access point Connects to connect with a DLNA-enabled device via wireless LAN. Using the wireless LAN The camera is compliant with the DLNA1.0 standards. Up to be sent to the "Cyber-shot Handbook". When...
Instruction Manual
Page 30
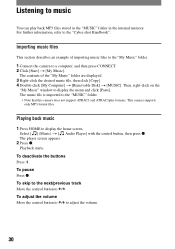
...the internal memory. The player screen appears. 2 Press z. To pause Press z. To skip to the next/previous track Move the control button to the "Cyber-shot Handbook". For further information, refer to C/c. Select [ ] (Music) t [ Audio Player] with the control button, then press z. To deactivate the buttons... to adjust the volume. 30 To adjust the volume Move the control button to X/x to the "MUSIC" folder. • Note that this camera does not support ATRAC3 and ATRAC3plus formats. Playback starts. Then, right-click on the "My Music" window to a computer, and then press ...
...the internal memory. The player screen appears. 2 Press z. To pause Press z. To skip to the next/previous track Move the control button to the "Cyber-shot Handbook". For further information, refer to C/c. Select [ ] (Music) t [ Audio Player] with the control button, then press z. To deactivate the buttons... to adjust the volume. 30 To adjust the volume Move the control button to X/x to the "MUSIC" folder. • Note that this camera does not support ATRAC3 and ATRAC3plus formats. Playback starts. Then, right-click on the "My Music" window to a computer, and then press ...
Instruction Manual
Page 35
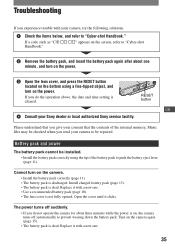
... using the tip of the internal memory, Music files may be checked when you experience trouble with your camera, try the following solutions. 1 Check the items below, and refer to "Cyber-shot Handbook." Open the cover until it with a new one minute, and turn on the power. 3 ... is on the screen, refer to "Cyber-shot Handbook." 2 Remove the battery pack, and insert the battery pack again after about three minutes while the power is cleared. RESET button GB 4 Consult your Sony dealer or local authorized Sony service facility. Troubleshooting If you send your camera to be repaired.
... using the tip of the internal memory, Music files may be checked when you experience trouble with your camera, try the following solutions. 1 Check the items below, and refer to "Cyber-shot Handbook." Open the cover until it with a new one minute, and turn on the power. 3 ... is on the screen, refer to "Cyber-shot Handbook." 2 Remove the battery pack, and insert the battery pack again after about three minutes while the power is cleared. RESET button GB 4 Consult your Sony dealer or local authorized Sony service facility. Troubleshooting If you send your camera to be repaired.
Instruction Manual
Page 37
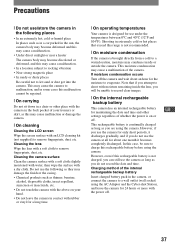
...an extremely hot, cold or humid place In places such as in a car parked in the camera, or connect the camera to a wall outlet (wall socket) using the AC Adaptor and the Cyber-shot Station, and leave the camera for 24 hours or more with the power off. 37 Charging method of the... camera. This moisture condensation may damage the finish or the casing. • Chemical products such as thinner, benzine, alcohol, ...
...an extremely hot, cold or humid place In places such as in a car parked in the camera, or connect the camera to a wall outlet (wall socket) using the AC Adaptor and the Cyber-shot Station, and leave the camera for 24 hours or more with the power off. 37 Charging method of the... camera. This moisture condensation may damage the finish or the casing. • Chemical products such as thinner, benzine, alcohol, ...
Instruction Manual
Page 38
...Stick Duo", , "Memory Stick PRO Duo", and , "MagicGate", are trademarks of Sony Corporation. • "InfoLITHIUM" is a trademark of Sony Corporation. • ATRAC3, ATRAC3plus are registered trademarks of dots: 921 000 (1 920...supplied): Stereo) Exif Print: Compatible PRINT Image Matching III: Compatible PictBridge: Compatible 38 Cyber-shot Station UC-GA [Input and Output connectors] A/V OUT (STEREO) jack (Stereo): ...jack: mini-B USB connection: Hi-Speed USB (USB 2.0 Hi- Speed compatible) DC IN jack Camera connector AC Adaptor AC-LS5 Input rating: 100 V to 240 V AC, 50/60 Hz, ...
...Stick Duo", , "Memory Stick PRO Duo", and , "MagicGate", are trademarks of Sony Corporation. • "InfoLITHIUM" is a trademark of Sony Corporation. • ATRAC3, ATRAC3plus are registered trademarks of dots: 921 000 (1 920...supplied): Stereo) Exif Print: Compatible PRINT Image Matching III: Compatible PictBridge: Compatible 38 Cyber-shot Station UC-GA [Input and Output connectors] A/V OUT (STEREO) jack (Stereo): ...jack: mini-B USB connection: Hi-Speed USB (USB 2.0 Hi- Speed compatible) DC IN jack Camera connector AC Adaptor AC-LS5 Input rating: 100 V to 240 V AC, 50/60 Hz, ...


