Instruction Manual
Page 1
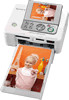
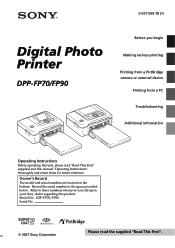
3-097-069-13 (1) Digital Photo Printer DPP-FP70/FP90 Before you call upon your Sony dealer regarding this product. Refer to these numbers whenever you begin Making various printing Printing from a PictBridge camera or external device...from a PC Troubleshooting Additional information Operating Instructions Before operating this manual "Operating Instructions" thoroughly and retain them for future reference. DPP-FP70/FP90 Serial No. 2007 Sony Corporation Please read "Read This First" supplied and this unit, please read the supplied "Read This First". Record the serial...
3-097-069-13 (1) Digital Photo Printer DPP-FP70/FP90 Before you call upon your Sony dealer regarding this product. Refer to these numbers whenever you begin Making various printing Printing from a PictBridge camera or external device...from a PC Troubleshooting Additional information Operating Instructions Before operating this manual "Operating Instructions" thoroughly and retain them for future reference. DPP-FP70/FP90 Serial No. 2007 Sony Corporation Please read "Read This First" supplied and this unit, please read the supplied "Read This First". Record the serial...
Instruction Manual
Page 2
.... Disposal of Old Electrical & Electronic Equipment (Applicable in a residential installation. Regulatory Information Declaration of Conformity Trade Name: SONY Model No.: DPP-FP90 Responsible Party: Sony Electronics Inc. Operation is connected. - This equipment generates, uses, and can be determined by one or more of... may cause undesired operation. These limits are cautioned that may not cause harmful interference, and (2) this digital photo printer. Telephone No.: 858-942-2230 This device complies with part 15 of the FCC Rules. WARNING To reduce fire...
.... Disposal of Old Electrical & Electronic Equipment (Applicable in a residential installation. Regulatory Information Declaration of Conformity Trade Name: SONY Model No.: DPP-FP90 Responsible Party: Sony Electronics Inc. Operation is connected. - This equipment generates, uses, and can be determined by one or more of... may cause undesired operation. These limits are cautioned that may not cause harmful interference, and (2) this digital photo printer. Telephone No.: 858-942-2230 This device complies with part 15 of the FCC Rules. WARNING To reduce fire...
Instruction Manual
Page 3
... the fuse in picture quality and colors with BS 1363 is limited to Sony Corporation. • Microsoft, Windows, Windows Vista and DirectX are operational for effective use or malfunction of the printer or memory card. Never use only. Duplication, edition, or printing of ...discolored and that may cause a malfunction. • Exposing the LCD screen to this printer, pay special attention not to conserve natural resources. Sony Face Recognition technology developed by Sony is manufactured using photo images with face recognition feature. environment and human health, which may...
... the fuse in picture quality and colors with BS 1363 is limited to Sony Corporation. • Microsoft, Windows, Windows Vista and DirectX are operational for effective use or malfunction of the printer or memory card. Never use only. Duplication, edition, or printing of ...discolored and that may cause a malfunction. • Exposing the LCD screen to this printer, pay special attention not to conserve natural resources. Sony Face Recognition technology developed by Sony is manufactured using photo images with face recognition feature. environment and human health, which may...
Instruction Manual
Page 5
...27 Deleting selected images 28 Formatting a "Memory Stick 29 Changing the print settings (Print setup 30 Changing the display and printer preferences (Display/Printer setup) .... 33 Printing from a PictBridge camera or external device Printing from the PictBridge digital camera 35 Printing from a ...Printing procedures 36 Printing from an external device 38 Printing from a PC Installing the software 39 System requirements 39 Installing the printer driver 40 Installing the Picture Motion Browser ...... 42 Printing photos from the Picture Motion Browser 44 Printing from a commercially-...
...27 Deleting selected images 28 Formatting a "Memory Stick 29 Changing the print settings (Print setup 30 Changing the display and printer preferences (Display/Printer setup) .... 33 Printing from a PictBridge camera or external device Printing from the PictBridge digital camera 35 Printing from a ...Printing procedures 36 Printing from an external device 38 Printing from a PC Installing the software 39 System requirements 39 Installing the printer driver 40 Installing the Picture Motion Browser ...... 42 Printing photos from the Picture Motion Browser 44 Printing from a commercially-...
Instruction Manual
Page 6
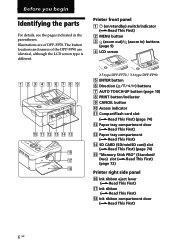
...Printer front panel 1 1 (on/standby) switch/indicator (.Read This First) 2 MENU button 3 (zoom out)/ (zoom in the parentheses. Illustrations are of the DPP-FP90 are identical, although the LCD screen type is different. Before you begin Identifying the parts For details, see the pages indicated in ) buttons (page 9) 4 LCD screen 2.5 type DPP-FP70 / 3.6 type DPP-FP90... This First) (page 74) qg "Memory Stick PRO" (Standard/ Duo) slot (.Read This First) (page 72) Printer right side panel qh Ink ribbon eject lever (.Read This First) qj Ink ribbon (.Read This First) qk Ink ribbon compartment...
...Printer front panel 1 1 (on/standby) switch/indicator (.Read This First) 2 MENU button 3 (zoom out)/ (zoom in the parentheses. Illustrations are of the DPP-FP90 are identical, although the LCD screen type is different. Before you begin Identifying the parts For details, see the pages indicated in ) buttons (page 9) 4 LCD screen 2.5 type DPP-FP70 / 3.6 type DPP-FP90... This First) (page 74) qg "Memory Stick PRO" (Standard/ Duo) slot (.Read This First) (page 72) Printer right side panel qh Ink ribbon eject lever (.Read This First) qj Ink ribbon (.Read This First) qk Ink ribbon compartment...
Instruction Manual
Page 7
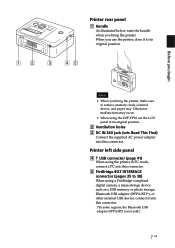
...mode, connect a PC into this connector. 5 PictBridge/EXT INTERFACE connector (pages 35 to 38) When using the DPP-FP90, set the LCD panel to its original position. When you use the printer, close it into this connector. (*In some regions, the Bluetooth USB adaptor DPPA-BT1 is not sold.) 7... GB Before you begin Printer rear panel 1 Handle As illustrated below, raise the handle when you bring the printer, make sure to remove memory cards, external device, and paper tray. Otherwise malfunctions may occur. •...
...mode, connect a PC into this connector. 5 PictBridge/EXT INTERFACE connector (pages 35 to 38) When using the DPP-FP90, set the LCD panel to its original position. When you use the printer, close it into this connector. (*In some regions, the Bluetooth USB adaptor DPPA-BT1 is not sold.) 7... GB Before you begin Printer rear panel 1 Handle As illustrated below, raise the handle when you bring the printer, make sure to remove memory cards, external device, and paper tray. Otherwise malfunctions may occur. •...

Instruction Manual
Page 10
... displayed with the AUTO TOUCH-UP adjustments Buttons to be corrected. If brightness of the camera. • Depending on blur caused by flash. In this printer uses the technology of the selected image(s) starts. Making various printing Correcting a failed photo automatically (AUTO TOUCH-UP) What is displayed. To display the adjusted...
... displayed with the AUTO TOUCH-UP adjustments Buttons to be corrected. If brightness of the camera. • Depending on blur caused by flash. In this printer uses the technology of the selected image(s) starts. Making various printing Correcting a failed photo automatically (AUTO TOUCH-UP) What is displayed. To display the adjusted...
Instruction Manual
Page 11
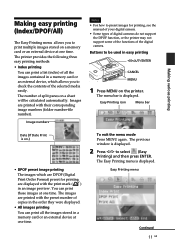
...of your digital camera. • Some types of digital cameras do not support the DPOF function, or the printer may not support some of the functions of the digital camera. The printer provides the following three easy printing methods: • Index printing You can print a list (index) of...allows you to select (Easy Printing) and then press ENTER. The menu bar is displayed. 2 Press g/G to print multiple images stored on the printer. The images are printed with the print mark ( ) in a memory card or an external device, which are displayed with their corresponding image numbers ...
...of your digital camera. • Some types of digital cameras do not support the DPOF function, or the printer may not support some of the functions of the digital camera. The printer provides the following three easy printing methods: • Index printing You can print a list (index) of...allows you to select (Easy Printing) and then press ENTER. The menu bar is displayed. 2 Press g/G to print multiple images stored on the printer. The images are printed with the print mark ( ) in a memory card or an external device, which are displayed with their corresponding image numbers ...
Instruction Manual
Page 12
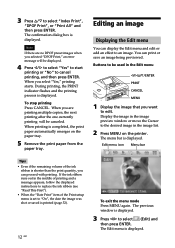
The confirmation dialog box is displayed. When printing is completed, the print paper automatically emerges on the printer. Editing an image Displaying the Edit menu You can display the Edit menu and edit or add an effect to select (Edit) and then press ...
The confirmation dialog box is displayed. When printing is completed, the print paper automatically emerges on the printer. Editing an image Displaying the Edit menu You can display the Edit menu and edit or add an effect to select (Edit) and then press ...

Instruction Manual
Page 13
... image becomes larger or smaller: : up to 200% : up to 60% Note The picture quality of an enlarged image may be deteriorated depending on the printer. Tip To print the image previewed, press PRINT (page 17). 13 GB Undoes the editing just done and resets the image to the selected direction...
... image becomes larger or smaller: : up to 200% : up to 60% Note The picture quality of an enlarged image may be deteriorated depending on the printer. Tip To print the image previewed, press PRINT (page 17). 13 GB Undoes the editing just done and resets the image to the selected direction...

Instruction Manual
Page 16
To change the size of the adjustment frame. The adjustment frame appears on the printer. Make the red-eye correction for other eyes, repeat steps 3 to 5. 6 Press g/G to select and press ENTER. The frame moves in the current position. The ...
To change the size of the adjustment frame. The adjustment frame appears on the printer. Make the red-eye correction for other eyes, repeat steps 3 to 5. 6 Press g/G to select and press ENTER. The frame moves in the current position. The ...

Instruction Manual
Page 17
.... 17 GB The image previewed is displayed. Then press ENTER. Note While saving the image, do not turn off the printer or remove a memory card or an external device from the printer. The printer, memory card, USB card, or external device may be damaged or the data may be displayed. You can save...
.... 17 GB The image previewed is displayed. Then press ENTER. Note While saving the image, do not turn off the printer or remove a memory card or an external device from the printer. The printer, memory card, USB card, or external device may be damaged or the data may be displayed. You can save...
Instruction Manual
Page 19
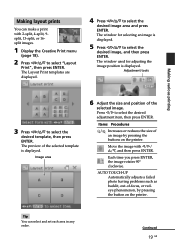
...Press g/G/f/F to select the desired image, and then press ENTER. The preview of -focus, or redeye phenomenon, by pressing the buttons on the printer. Making layout prints You can select and set each area in any order. Move the image with 2-split, 4-split, 9split, 13-split, or... for adjusting the image position is displayed. Image area 6 Adjust the size and position of an image by pressing the button on the printer. Items Procedures / Increases or reduces the size of the selected image. AUTO TOUCH-UP Automatically adjusts a failed photo having problems such as...
...Press g/G/f/F to select the desired image, and then press ENTER. The preview of -focus, or redeye phenomenon, by pressing the buttons on the printer. Making layout prints You can select and set each area in any order. Move the image with 2-split, 4-split, 9split, 13-split, or... for adjusting the image position is displayed. Image area 6 Adjust the size and position of an image by pressing the button on the printer. Items Procedures / Increases or reduces the size of the selected image. AUTO TOUCH-UP Automatically adjusts a failed photo having problems such as...
Instruction Manual
Page 22
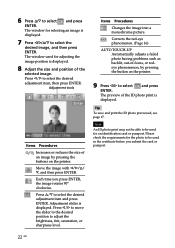
...g/G to move the slider to the desired position to select and press ENTER. The preview of an image by pressing the button on the printer. Adjustment tools Items Procedures / Increases or reduces the size of the ID photo print is displayed. 7 Press g/G/f/F to be used in the...an image is displayed. Adjustment slider is displayed. 8 Adjust the size and position of -focus, or redeye phenomenon, by pressing the buttons on the printer. 9 Press g/G to be used for the photo to select and press ENTER. Corrects the red-eye phenomenon. (Page 16) AUTO TOUCH-UP Automatically...
...g/G to move the slider to the desired position to select and press ENTER. The preview of an image by pressing the button on the printer. Adjustment tools Items Procedures / Increases or reduces the size of the ID photo print is displayed. 7 Press g/G/f/F to be used in the...an image is displayed. Adjustment slider is displayed. 8 Adjust the size and position of -focus, or redeye phenomenon, by pressing the buttons on the printer. 9 Press g/G to be used for the photo to select and press ENTER. Corrects the red-eye phenomenon. (Page 16) AUTO TOUCH-UP Automatically...

Instruction Manual
Page 28
Note While copying images, do not turn off the printer or remove a memory card or an external device from the printer. Tip When you want to select "Memory Stick", "SD Card", "CompactFlash", or "External Device", and press ENTER. 3 Press f/F to select "Copy all files" or "Copy ... or external device as those containing the image to select the destination drive. 28 GB The selected images are copied onto the destination folder. The printer, memory card, or USB external device may be damaged or the data may be copied. The image list is displayed. Follow the instructions on a memory...
Note While copying images, do not turn off the printer or remove a memory card or an external device from the printer. Tip When you want to select "Memory Stick", "SD Card", "CompactFlash", or "External Device", and press ENTER. 3 Press f/F to select "Copy all files" or "Copy ... or external device as those containing the image to select the destination drive. 28 GB The selected images are copied onto the destination folder. The printer, memory card, or USB external device may be damaged or the data may be copied. The image list is displayed. Follow the instructions on a memory...

Instruction Manual
Page 29
... operation menu, press CANCEL. The File operation menu is displayed. 4 Press g/G to select "Memory Stick Format" and press ENTER. The printer or the memory card may be lost . • An image, once deleted, will be also deleted. • Youcannotdeleteaprotectedimagewiththe protect indication ...( ) or a DPOF preset indication ( ) displayed. The printer or the memory card may be lost forever. Or the data may be damaged. For the details, see the operating instruction of...
... operation menu, press CANCEL. The File operation menu is displayed. 4 Press g/G to select "Memory Stick Format" and press ENTER. The printer or the memory card may be lost . • An image, once deleted, will be also deleted. • Youcannotdeleteaprotectedimagewiththe protect indication ...( ) or a DPOF preset indication ( ) displayed. The printer or the memory card may be lost forever. Or the data may be damaged. For the details, see the operating instruction of...
Instruction Manual
Page 31
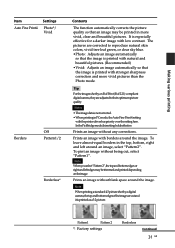
Prints an image without blank space around the image. Notes • Theimagedataisnotcorrected. • WhenprintinginPCmode,theAutoFinePrint4setting with the printer driver has priority over the setting here. To leave almost-equal borders in more vivid pictures than the Photo mode. The pictures are corrected to ...
Prints an image without blank space around the image. Notes • Theimagedataisnotcorrected. • WhenprintinginPCmode,theAutoFinePrint4setting with the printer driver has priority over the setting here. To leave almost-equal borders in more vivid pictures than the Photo mode. The pictures are corrected to ...

Instruction Manual
Page 32
When the image is saved with the printer, the date of saving is added. You can set the levels for R, G, B in the range from +7 to 0. The higher you set the level, the darker ...
When the image is saved with the printer, the date of saving is added. You can set the levels for R, G, B in the range from +7 to 0. The higher you set the level, the darker ...

Instruction Manual
Page 33
...ENTER. The setting window for the selected item is displayed. Those items which cannot be changed . Tip To exit the Display/Printer setup menu, press MENU. The Display/Printer setup menu is fixed. To display the hidden setting items, scroll the window with f/F. Continued 33 GB Note During Edit ...items cannot be used in gray. 4 Press f/F to select the desired setting item, and press ENTER. The setting is displayed. Menu bar Display/Printer setup menu icon To exit the menu mode Press MENU again. The previous window is displayed. 2 Press g/G to change the display and...
...ENTER. The setting window for the selected item is displayed. Those items which cannot be changed . Tip To exit the Display/Printer setup menu, press MENU. The Display/Printer setup menu is fixed. To display the hidden setting items, scroll the window with f/F. Continued 33 GB Note During Edit ...items cannot be used in gray. 4 Press f/F to select the desired setting item, and press ENTER. The setting is displayed. Menu bar Display/Printer setup menu icon To exit the menu mode Press MENU again. The previous window is displayed. 2 Press g/G to change the display and...

Instruction Manual
Page 34
... file will be started. Display Language You can select the unit you can select the language to explain the functions of the printer starts automatically after the printer has been left unused for about 5 seconds without thumbnail (miniature image used as index) data will be displayed as follows:... • cm* • inch Printer Information Version of the firmware and total print number will be displayed. Off* In the image list window, the images without any button...
... file will be started. Display Language You can select the unit you can select the language to explain the functions of the printer starts automatically after the printer has been left unused for about 5 seconds without thumbnail (miniature image used as index) data will be displayed as follows:... • cm* • inch Printer Information Version of the firmware and total print number will be displayed. Off* In the image list window, the images without any button...


