
Instruction Manual
Page 19
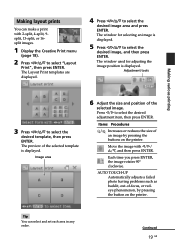
Continued 19 GB The preview of an image by pressing the button on the printer. Items Procedures / Increases or reduces the size of the selected template is displayed. 5 Press g/G/f/F to select the desired image, and then press ENTER. Move the ... select the desired template, then press ENTER. Each time you press ENTER, the image rotates 90° clockwise. AUTO TOUCH-UP Automatically adjusts a failed photo having problems such as backlit, out-of the selected image. Image area 6 Adjust the size and position of -focus, or redeye phenomenon, by pressing the buttons on...
Continued 19 GB The preview of an image by pressing the button on the printer. Items Procedures / Increases or reduces the size of the selected template is displayed. 5 Press g/G/f/F to select the desired image, and then press ENTER. Move the ... select the desired template, then press ENTER. Each time you press ENTER, the image rotates 90° clockwise. AUTO TOUCH-UP Automatically adjusts a failed photo having problems such as backlit, out-of the selected image. Image area 6 Adjust the size and position of -focus, or redeye phenomenon, by pressing the buttons on...
Instruction Manual
Page 22
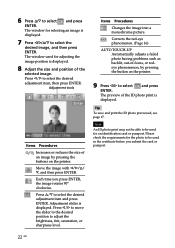
...for an identification card or passport. Move the image with g/G/f/ F, and then press ENTER. Items Procedures Changes the image into a monochrome picture. The window used for selecting an image is displayed. 7 Press g/G/f/F to select the desired adjustment item, then press ENTER. Each time... displayed. Corrects the red-eye phenomenon. (Page 16) AUTO TOUCH-UP Automatically adjusts a failed photo having problems such as backlit, out-of an image by pressing the button on the printer. Please check the requirements for adjusting the image position is displayed. 8 Adjust the size and ...
...for an identification card or passport. Move the image with g/G/f/ F, and then press ENTER. Items Procedures Changes the image into a monochrome picture. The window used for selecting an image is displayed. 7 Press g/G/f/F to select the desired adjustment item, then press ENTER. Each time... displayed. Corrects the red-eye phenomenon. (Page 16) AUTO TOUCH-UP Automatically adjusts a failed photo having problems such as backlit, out-of an image by pressing the button on the printer. Please check the requirements for adjusting the image position is displayed. 8 Adjust the size and ...
Instruction Manual
Page 46
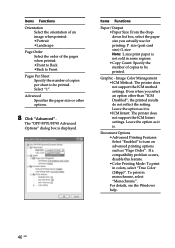
... option as it is . •ICM Intent: The printer does not support the ICM Intent settings. Advanced Specifies the paper size or other than "ICM Disabled", the printed results do not reflect the setting. Graphic - If a compatibility problem occurs, disable this feature. •Color Printing Mode: ...is . For details, see the Windows help. 46 GB To print in monochrome, select "Monochrome". Leave the option as "Page Order". The "DPP-FP70/FP90 Advanced Options" dialog box is not sold in colors, select "True Color (24bpp)". Even when you actually use for printing: P size (...
... option as it is . •ICM Intent: The printer does not support the ICM Intent settings. Advanced Specifies the paper size or other than "ICM Disabled", the printed results do not reflect the setting. Graphic - If a compatibility problem occurs, disable this feature. •Color Printing Mode: ...is . For details, see the Windows help. 46 GB To print in monochrome, select "Monochrome". Leave the option as "Page Order". The "DPP-FP70/FP90 Advanced Options" dialog box is not sold in colors, select "True Color (24bpp)". Even when you actually use for printing: P size (...

Instruction Manual
Page 50
...screen? c Follow the directions of a memory card or external device, remove the PictBridge camera or PC. • Are any problems using the printer, use the following guidance to an AC outlet securely. (.Read This First) Displaying images Symptom Check Cause/Solutions The LCD screen ...the PictBridge camera or PC. Cause/Solutions c Connect the AC power cord to solve the problem. c Check the file formats that contains the recorded images. If the problem persists, consult your Sony dealer. Check • Is the AC power cord properly connected? Operate with the DCF?...
...screen? c Follow the directions of a memory card or external device, remove the PictBridge camera or PC. • Are any problems using the printer, use the following guidance to an AC outlet securely. (.Read This First) Displaying images Symptom Check Cause/Solutions The LCD screen ...the PictBridge camera or PC. Cause/Solutions c Connect the AC power cord to solve the problem. c Check the file formats that contains the recorded images. If the problem persists, consult your Sony dealer. Check • Is the AC power cord properly connected? Operate with the DCF?...

Instruction Manual
Page 60
...smoothly. c The data size of the arrow to process it . If this does not solve the problem, contact Sony service facilities or your Sony dealer. Leave the printer until the head cools down and the printer resumes printing. 60 GB c Turn off the 1 (on/standby) switch and then turn it on.... If jammed paper cannot be removed, contact the Sony service facilities. See "If paper jams" (.page 68) and remove jammed paper from the printer. If jammed paper cannot be removed, contact the Sony service facilities. Only when the ink ribbon is lit, the thermal head...
...smoothly. c The data size of the arrow to process it . If this does not solve the problem, contact Sony service facilities or your Sony dealer. Leave the printer until the head cools down and the printer resumes printing. 60 GB c Turn off the 1 (on/standby) switch and then turn it on.... If jammed paper cannot be removed, contact the Sony service facilities. See "If paper jams" (.page 68) and remove jammed paper from the printer. If jammed paper cannot be removed, contact the Sony service facilities. Only when the ink ribbon is lit, the thermal head...
Instruction Manual
Page 62
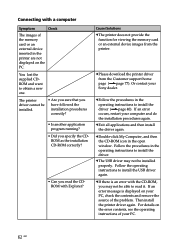
... a new one. c If there is displayed on your computer and do the installation procedures again. For details on the PC. The printer driver cannot be installed. • Are you sure that you have followed the installation procedures correctly? • Is another application program running...install the USB driver again. c Follow the procedures in the printer are not displayed on the error contents, see the operating instructions of your Sony dealer. Connecting with a computer Symptom Check The images of the problem. Follow the procedures in the open window. c Double-click My...
... a new one. c If there is displayed on your computer and do the installation procedures again. For details on the PC. The printer driver cannot be installed. • Are you sure that you have followed the installation procedures correctly? • Is another application program running...install the USB driver again. c Follow the procedures in the printer are not displayed on the error contents, see the operating instructions of your Sony dealer. Connecting with a computer Symptom Check The images of the problem. Follow the procedures in the open window. c Double-click My...

Instruction Manual
Page 63
... the following: 1. When you log onto Windows Vista/XP/ 2000 Professional using an Administrator user account. If the printer shows trouble, do not solve the problem, consult with an application, set an image to be printed fully in output of documents via USB? Troubleshooting Continued ...borderless with your computer. Cause/Solutions c If there is printed with borders even if you using an application other than Picture Motion Browser? Restart your Sony dealer or service facilities. • Is an error message displayed stating that an error was detected in the print ...
... the following: 1. When you log onto Windows Vista/XP/ 2000 Professional using an Administrator user account. If the printer shows trouble, do not solve the problem, consult with an application, set an image to be printed fully in output of documents via USB? Troubleshooting Continued ...borderless with your computer. Cause/Solutions c If there is printed with borders even if you using an application other than Picture Motion Browser? Restart your Sony dealer or service facilities. • Is an error message displayed stating that an error was detected in the print ...
Instruction Manual
Page 65
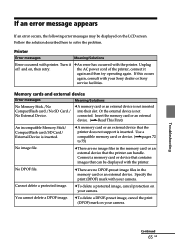
... is not inserted into their slot. Use a compatible memory card or device. (.pages 72 to solve the problem. Cannot delete a protected image. Unplug the AC power cord of the printer, connect it off and on your camera. Or the external device is inserted. You cannot delete a DPOF ... memory card or an external device. Specify the print (DPOF) mark with the printer. Follow the solution described here to 75) No image file. If this occurs again, consult with your Sony dealer or Sony service facilities. c To delete a protected image, cancel protection on the LCD screen...
... is not inserted into their slot. Use a compatible memory card or device. (.pages 72 to solve the problem. Cannot delete a protected image. Unplug the AC power cord of the printer, connect it off and on your camera. Or the external device is inserted. You cannot delete a DPOF ... memory card or an external device. Specify the print (DPOF) mark with the printer. Follow the solution described here to 75) No image file. If this occurs again, consult with your Sony dealer or Sony service facilities. c To delete a protected image, cancel protection on the LCD screen...