
Operating Instructions
Page 1
... you call upon your Sony dealer regarding this manual thoroughly and retain it for future reference. Record the serial number in the space provided below. Owner's Record The model and serial numbers are located on the bottom. 2-682-264-13 (1) Digital Photo Printer DPP-FP55 Operating Instructions Before operating this printer, please read this product...
... you call upon your Sony dealer regarding this manual thoroughly and retain it for future reference. Record the serial number in the space provided below. Owner's Record The model and serial numbers are located on the bottom. 2-682-264-13 (1) Digital Photo Printer DPP-FP55 Operating Instructions Before operating this printer, please read this product...

Operating Instructions
Page 2
... following two conditions: (1) this device may not cause harmful interference, and (2) this digital photo printer. Note: This equipment has been tested and found compliant with the limits for using connection cables ...Sony Customer Information Services Center 1-800-222-SONY (7669) The number below is disposed of this device must accept any changes or modifications not expressly approved in the U.S.A. Notice If static electricity or electromagnetism causes data transfer to rain or moisture. For more of Conformity Trade Name: SONY Model No.: DPP-FP55 Responsible Party: Sony...
... following two conditions: (1) this device may not cause harmful interference, and (2) this digital photo printer. Note: This equipment has been tested and found compliant with the limits for using connection cables ...Sony Customer Information Services Center 1-800-222-SONY (7669) The number below is disposed of this device must accept any changes or modifications not expressly approved in the U.S.A. Notice If static electricity or electromagnetism causes data transfer to rain or moisture. For more of Conformity Trade Name: SONY Model No.: DPP-FP55 Responsible Party: Sony...
Operating Instructions
Page 3
...copyright law and be duplicated, use . Backup recommendations To avoid potential risk of data loss caused by accidental operation or malfunction of the printer, we recommend that constantly appear on the FreeType Team software. •This software is not a malfunction. Furthermore, "™" and ...USE OF ANY PRODUCT. If you save a backup copy of their rights. However, there may also infringe their respective companies. Sony shall assume no responsibility for effective use of those materials beyond this limit may infringe the provisions of others' portrait may be ...
...copyright law and be duplicated, use . Backup recommendations To avoid potential risk of data loss caused by accidental operation or malfunction of the printer, we recommend that constantly appear on the FreeType Team software. •This software is not a malfunction. Furthermore, "™" and ...USE OF ANY PRODUCT. If you save a backup copy of their rights. However, there may also infringe their respective companies. Sony shall assume no responsibility for effective use of those materials beyond this limit may infringe the provisions of others' portrait may be ...

Operating Instructions
Page 4
...copyright law. Before you begin What you can do not accept these terms and conditions, please return this disk envelope unopened, along with this printer .......... 6 Identifying the parts 8 Preparations 1 Checking the contents of the package 10 2 Preparing the print pack 11 Size of print paper 11...Image list 25 4 GB If you do with the rest of the package, immediately to any time without prior written approval from Sony Corporation. Any unauthorized duplication of this manual or the information contained herein at any machine readable form without notice. Any design data ...
...copyright law. Before you begin What you can do not accept these terms and conditions, please return this disk envelope unopened, along with this printer .......... 6 Identifying the parts 8 Preparations 1 Checking the contents of the package 10 2 Preparing the print pack 11 Size of print paper 11...Image list 25 4 GB If you do with the rest of the package, immediately to any time without prior written approval from Sony Corporation. Any unauthorized duplication of this manual or the information contained herein at any machine readable form without notice. Any design data ...

Operating Instructions
Page 5
...38 Deleting images 39 Deleting selected images 40 Formatting a "Memory Stick 40 Changing the print settings (Set Up 41 Changing the printer preferences (Option 44 Printing from a PictBridge camera Printing images from the digital camera 46 Printing from a PC Installing the software... 47 System requirements 47 Installing the printer driver 48 Installing the Picture Motion Browser ...... 51 Printing photos from the Picture Motion Browser 53 Printing from other application software ...
...38 Deleting images 39 Deleting selected images 40 Formatting a "Memory Stick 40 Changing the print settings (Set Up 41 Changing the printer preferences (Option 44 Printing from a PictBridge camera Printing images from the digital camera 46 Printing from a PC Installing the software... 47 System requirements 47 Installing the printer driver 48 Installing the Picture Motion Browser ...... 51 Printing photos from the Picture Motion Browser 53 Printing from other application software ...

Operating Instructions
Page 6
... print from a memory card or an external device .pages 20 to 25 "Memory Stick" ("Memory Stick Duo"), or SD card You can print using the printer's LCD screen Digital Camera or other external device You can print from a PictBridge-compliant camera .page 46 You can select and print an image .page... can view a slideshow. .page 37 Calendar print (.page 34) You can search or delete an image. .pages 38 to 40 You can change print and printer settings. .pages 40 to 45
... print from a memory card or an external device .pages 20 to 25 "Memory Stick" ("Memory Stick Duo"), or SD card You can print using the printer's LCD screen Digital Camera or other external device You can print from a PictBridge-compliant camera .page 46 You can select and print an image .page... can view a slideshow. .page 37 Calendar print (.page 34) You can search or delete an image. .pages 38 to 40 You can change print and printer settings. .pages 40 to 45
Operating Instructions
Page 8
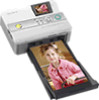
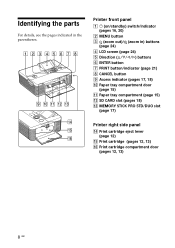
Printer front panel 1 1 (on/standby) switch/indicator (pages 16, 20) 2 MENU button 3 (zoom out)/ (zoom in the parentheses. Identifying the parts For details, see the pages ... compartment door (page 15) qa Paper tray compartment (page 15) qs SD CARD slot (pages 18) qd MEMORY STICK PRO STD/DUO slot (page 17) Printer right side panel qf Print cartridge eject lever (page 12) qg Print cartridge (pages 12, 13) qh Print cartridge compartment door (pages 12, 13) 8 GB...
Printer front panel 1 1 (on/standby) switch/indicator (pages 16, 20) 2 MENU button 3 (zoom out)/ (zoom in the parentheses. Identifying the parts For details, see the pages ... compartment door (page 15) qa Paper tray compartment (page 15) qs SD CARD slot (pages 18) qd MEMORY STICK PRO STD/DUO slot (page 17) Printer right side panel qf Print cartridge eject lever (page 12) qg Print cartridge (pages 12, 13) qh Print cartridge compartment door (pages 12, 13) 8 GB...

Operating Instructions
Page 9
Printer left side panel 3 USB connector (page 49) When using the printer in PC mode, connect a PC into this connector. 4 PictBridge connector (pages 19, 46) Paper tray 1 Paper eject tray (pages 13, 14) 2 Paper tray lid (pages 13, 14) 9 GB Before you begin Printer rear panel 1 Ventilation holes 2 DC IN 24V jack (page 16) Connect the supplied AC power adaptor into this connector.
Printer left side panel 3 USB connector (page 49) When using the printer in PC mode, connect a PC into this connector. 4 PictBridge connector (pages 19, 46) Paper tray 1 Paper eject tray (pages 13, 14) 2 Paper tray lid (pages 13, 14) 9 GB Before you begin Printer rear panel 1 Ventilation holes 2 DC IN 24V jack (page 16) Connect the supplied AC power adaptor into this connector.

Operating Instructions
Page 10
... In some regions, the warranty is for Windows® XP Professional/Windows® XP Home Edition/Windows® 2000 Professional/Windows® Millennium Edition - Sony DPP-FP55 Printer Driver Software for 120V only. Cleaning cartridge (1) 10 GB Paper tray (1) AC adaptor (AC-S2425) (1) CD-ROM (1) - The plug shape and specifications... of the package Make sure that the following accessories are supplied with your printer. Preparations 1 Checking the contents of the AC power cord differ depending on the region you purchased the...
... In some regions, the warranty is for Windows® XP Professional/Windows® XP Home Edition/Windows® 2000 Professional/Windows® Millennium Edition - Sony DPP-FP55 Printer Driver Software for 120V only. Cleaning cartridge (1) 10 GB Paper tray (1) AC adaptor (AC-S2425) (1) CD-ROM (1) - The plug shape and specifications... of the package Make sure that the following accessories are supplied with your printer. Preparations 1 Checking the contents of the AC power cord differ depending on the region you purchased the...

Operating Instructions
Page 11
... 6 inch print paper (20- Also avoid leaving printouts under plastic desk mats. 11 GB Doing so could result in all models are subject to the printer. • Please do not disassemble the print cartridge. • Do not pull out the ribbon from the date of production. Size of print paper... The size of the post card size print paper is the printing surface. sheet-pack x 4) • 2 print cartridges each for this printer only. Notes on storing printouts Do not affix cellophane tape or plastic erasers to printouts. If you use different types of print pack, printing may...
... 6 inch print paper (20- Also avoid leaving printouts under plastic desk mats. 11 GB Doing so could result in all models are subject to the printer. • Please do not disassemble the print cartridge. • Do not pull out the ribbon from the date of production. Size of print paper... The size of the post card size print paper is the printing surface. sheet-pack x 4) • 2 print cartridges each for this printer only. Notes on storing printouts Do not affix cellophane tape or plastic erasers to printouts. If you use different types of print pack, printing may...

Operating Instructions
Page 15
... the end. Remove the paper tray and feed the print paper. Do not attach sticker or stamps on the print paper using an ink-jet printer, etc. - Total number of the printed image may occur. • Avoid placing the print paper in a location subject to high temperatures, high humidity, ... print on the paper after printing. Insert the paper tray straight in contact with rubber or plastic products including vinyl chloride or plasticizer for this printer only. - Use the oil ink pen to store partially-used print paper. Printing an image twice on storing the print paper • Avoid storing...
... the end. Remove the paper tray and feed the print paper. Do not attach sticker or stamps on the print paper using an ink-jet printer, etc. - Total number of the printed image may occur. • Avoid placing the print paper in a location subject to high temperatures, high humidity, ... print on the paper after printing. Insert the paper tray straight in contact with rubber or plastic products including vinyl chloride or plasticizer for this printer only. - Use the oil ink pen to store partially-used print paper. Printing an image twice on storing the print paper • Avoid storing...
Operating Instructions
Page 16
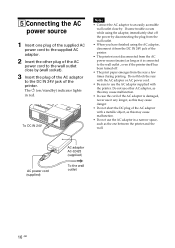
... in red. The 1 (on/standby) indicator lights in a narrow space, such as the one between the printer and the wall. If some trouble occurs while using the adaptor, immediately shut off . • The print paper...you have finished using the AC adaptor, disconnect it from the DC IN 24V jack of the printer. • The printer is not disconnected from the AC power source (mains) as long as it is damaged, ... this may cause danger. • Do not short the DC plug of the AC adaptor with the printer. AC power cord (supplied) AC adaptor AC-S2425 (supplied) To the wall outlet 16 GB 5Connecting ...
... in red. The 1 (on/standby) indicator lights in a narrow space, such as the one between the printer and the wall. If some trouble occurs while using the adaptor, immediately shut off . • The print paper...you have finished using the AC adaptor, disconnect it from the DC IN 24V jack of the printer. • The printer is not disconnected from the AC power source (mains) as long as it is damaged, ... this may cause danger. • Do not short the DC plug of the AC adaptor with the printer. AC power cord (supplied) AC adaptor AC-S2425 (supplied) To the wall outlet 16 GB 5Connecting ...
Operating Instructions
Page 17
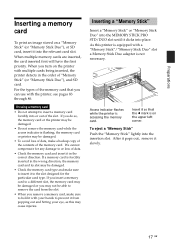
... MEMORY STICK PRO STD/DUO slot until it into the relevant card slot. When you remove a memory card, make sure to hold it with the printer, see pages 83 through 86. If you insert a memory card to insert it from the slot. • When you turn on the upper left corner.... If a memory card is flashing; After it pops out, remove it so that you do so, the memory card or the printer may be damaged. • Do not remove the memory card while the access indicator is forcibly inserted in the wrong direction, the memory card and...
... MEMORY STICK PRO STD/DUO slot until it into the relevant card slot. When you remove a memory card, make sure to hold it with the printer, see pages 83 through 86. If you insert a memory card to insert it from the slot. • When you turn on the upper left corner.... If a memory card is flashing; After it pops out, remove it so that you do so, the memory card or the printer may be damaged. • Do not remove the memory card while the access indicator is forcibly inserted in the wrong direction, the memory card and...
Operating Instructions
Page 18
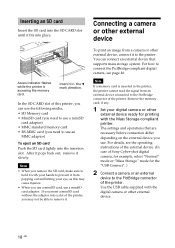
... or other external device ready for the "USB Connect". ) 2 Connect a camera or an external device to prevent it with the Mass Storage-compliant printer. Note If a memory card is accessing the memory card. The settings and operations that supports mass storage system. In the SD CARD slot of this... may not be able to connect the PictBridge-compliant digital camera, see the operating instructions of the external device. (In case of Sony Cyber-shot digital camera, for example, select "Normal" mode or "Mass Storage" mode for printing with your hands to the PictBridge connector ...
... or other external device ready for the "USB Connect". ) 2 Connect a camera or an external device to prevent it with the Mass Storage-compliant printer. Note If a memory card is accessing the memory card. The settings and operations that supports mass storage system. In the SD CARD slot of this... may not be able to connect the PictBridge-compliant digital camera, see the operating instructions of the external device. (In case of Sony Cyber-shot digital camera, for example, select "Normal" mode or "Mass Storage" mode for printing with your hands to the PictBridge connector ...

Operating Instructions
Page 19
The data inside the external device may be damaged. Use a USB cable with an A-TYPE connector for the printer and an appropriate type for your digital camera. • We cannot guarantee connection with all types of mass storage devices. • If you use a commercially ... loss or damage. 19 GB Preparations To PictBridge connector (USB A-TYPE) Camera or other external device To USB connector Notes • The type of the printer or an external device nor remove the USB cable.
The data inside the external device may be damaged. Use a USB cable with an A-TYPE connector for the printer and an appropriate type for your digital camera. • We cannot guarantee connection with all types of mass storage devices. • If you use a commercially ... loss or damage. 19 GB Preparations To PictBridge connector (USB A-TYPE) Camera or other external device To USB connector Notes • The type of the printer or an external device nor remove the USB cable.

Operating Instructions
Page 20
... external device with the input select switch. Make sure to print. If multiple memory cards or an external device are being inserted or connected, the printer detects in the order of "Memory Stick" (or "Memory Stick Duo"), SD card, and an external device connected to the PictBridge connector, and a ..." (page 18) Note The print paper emerges from the rear a few times during printing. When you want to spare enough space behind the printer during printing. Making basic printing Printing selected images This section explains how to the USB connector. The 1 (on the LCD screen. 20 GB
... external device with the input select switch. Make sure to print. If multiple memory cards or an external device are being inserted or connected, the printer detects in the order of "Memory Stick" (or "Memory Stick Duo"), SD card, and an external device connected to the PictBridge connector, and a ..." (page 18) Note The print paper emerges from the rear a few times during printing. When you want to spare enough space behind the printer during printing. Making basic printing Printing selected images This section explains how to the USB connector. The 1 (on the LCD screen. 20 GB

Operating Instructions
Page 21
... changes to fix the quantity. Printing of the selected image starts. Do not touch nor pull the emerged paper. In case you turn on the printer. 2 Press g/G/f/F repeatedly until the image that you want to print appears. Press g/G/f/F to move or turn off the power, keep the paper tray inserted and... then turn off the printer while it is displayed on the LCD screen. Notes on printing • Do not remove or connect a memory card or an external device while the...
... changes to fix the quantity. Printing of the selected image starts. Do not touch nor pull the emerged paper. In case you turn on the printer. 2 Press g/G/f/F repeatedly until the image that you want to print appears. Press g/G/f/F to move or turn off the power, keep the paper tray inserted and... then turn off the printer while it is displayed on the LCD screen. Notes on printing • Do not remove or connect a memory card or an external device while the...

Operating Instructions
Page 22
... external device is displayed on /standby) indicator of them and print them at a time. 1 Press 1 (on/standby) switch to turn on the printer. To display one image preview changes to the image list display. The orange frame shows the cursor. The 1 (on the LCD screen. 2 Press ...image and press (zoom in yellow green. Printing multiple images This section explains how to select multiple images, specify print quantity for each of the printer lights in ). 3 Press g/G/f/F to move the cursor to the top line and press f. Cursor (orange frame) The print quantity indication becomes "1"....
... external device is displayed on /standby) indicator of them and print them at a time. 1 Press 1 (on/standby) switch to turn on the printer. To display one image preview changes to the image list display. The orange frame shows the cursor. The 1 (on the LCD screen. 2 Press ...image and press (zoom in yellow green. Printing multiple images This section explains how to select multiple images, specify print quantity for each of the printer lights in ). 3 Press g/G/f/F to move the cursor to the top line and press f. Cursor (orange frame) The print quantity indication becomes "1"....

Operating Instructions
Page 26
... menu icon Menu bar To exit the menu mode Press MENU again. Adjusts the picture quality of an image by pressing the buttons on the printer. Adds an filter to select (Edit) and then press ENTER. Moves an image. Tip You can display the Edit menu and edit or add an.... The menu bar is displayed. Undoes the editing just done and resets the image to be used in the image list. 2 Press MENU on the printer. Saves the edited image. Buttons to the status before editing. Items / Procedures Increases or reduces the size of an image.
... menu icon Menu bar To exit the menu mode Press MENU again. Adjusts the picture quality of an image by pressing the buttons on the printer. Adds an filter to select (Edit) and then press ENTER. Moves an image. Tip You can display the Edit menu and edit or add an.... The menu bar is displayed. Undoes the editing just done and resets the image to be used in the image list. 2 Press MENU on the printer. Saves the edited image. Buttons to the status before editing. Items / Procedures Increases or reduces the size of an image.

Operating Instructions
Page 30
... the print quantity one by one, press f repeatedly. • To reduce the print quantity one by pressing (zoom in) or (zoom out) buttons on the printer. The image previewed is displayed. 2 Press f/F to specify the print quantity is printed. The red-eye reduction adjustment is canceled and the window of red...
... the print quantity one by one, press f repeatedly. • To reduce the print quantity one by pressing (zoom in) or (zoom out) buttons on the printer. The image previewed is displayed. 2 Press f/F to specify the print quantity is printed. The red-eye reduction adjustment is canceled and the window of red...


