Handbook
Page 1
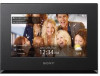
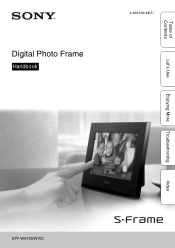
4-400-694-12(1) Table of Contents Digital Photo Frame Handbook Let's Use Enjoying More Troubleshooting Index DPF-WA700/W700
4-400-694-12(1) Table of Contents Digital Photo Frame Handbook Let's Use Enjoying More Troubleshooting Index DPF-WA700/W700
Handbook
Page 2
... not affect the viewing in any accidental or consequential damages or loss of the DPF-WA700 unless noted otherwise. Table of Contents Let's Use Enjoying More Troubleshooting Read this before using photo images with this digital photo frame, pay special attention not to infringe the provisions of the copyright law. The...what is given. • The illustrations and screen shots used in it, disconnect it from the AC outlet immediately. Recorded content not guaranteed Sony shall assume no responsibility for effective use of your own recording or creation is not a malfunction.
... not affect the viewing in any accidental or consequential damages or loss of the DPF-WA700 unless noted otherwise. Table of Contents Let's Use Enjoying More Troubleshooting Read this before using photo images with this digital photo frame, pay special attention not to infringe the provisions of the copyright law. The...what is given. • The illustrations and screen shots used in it, disconnect it from the AC outlet immediately. Recorded content not guaranteed Sony shall assume no responsibility for effective use of your own recording or creation is not a malfunction.

Handbook
Page 3
... drive 6 Preparation: 1 Checking included items 8 Preparation: 2 Attaching the stand (DPF-W700 only)·····9 Preparation: 3 Turning on the photo frame 11 Preparation: 4 Setting up the photo frame 14 Enjoying a slideshow 19 Displaying the desired images 27 Enjoying Music or Internet Radio (DPF-WA700 only)·····30 Saving images...
... drive 6 Preparation: 1 Checking included items 8 Preparation: 2 Attaching the stand (DPF-W700 only)·····9 Preparation: 3 Turning on the photo frame 11 Preparation: 4 Setting up the photo frame 14 Enjoying a slideshow 19 Displaying the desired images 27 Enjoying Music or Internet Radio (DPF-WA700 only)·····30 Saving images...

Handbook
Page 6
..." or SD memory card) or USB flash drive removed from a digital camera or equivalent, into the photo frame. Table of Contents Compatible Memory Card/USB flash drive You can view images only by the photo frame • "Memory Stick Duo" (Not compatible/Compatible with "MagicGate") • "Memory Stick PRO Duo" • "Memory...
..." or SD memory card) or USB flash drive removed from a digital camera or equivalent, into the photo frame. Table of Contents Compatible Memory Card/USB flash drive You can view images only by the photo frame • "Memory Stick Duo" (Not compatible/Compatible with "MagicGate") • "Memory Stick PRO Duo" • "Memory...

Handbook
Page 7
... (page 70). 7GB Index Table of Contents Let's Use Enjoying More Troubleshooting • The photo frame has been demonstrated to be operable with "Memory Stick Duo" with a capacity of 32 GB or less manufactured by Sony Corporation. • "M2" is equipped with a "Memory Stick Duo" slot. A "Memory... Stick" (standard) cannot be used to describe a "Memory Stick Micro". • The photo frame has been demonstrated to be operable with an SD memory ...
... (page 70). 7GB Index Table of Contents Let's Use Enjoying More Troubleshooting • The photo frame has been demonstrated to be operable with "Memory Stick Duo" with a capacity of 32 GB or less manufactured by Sony Corporation. • "M2" is equipped with a "Memory Stick Duo" slot. A "Memory... Stick" (standard) cannot be used to describe a "Memory Stick Micro". • The photo frame has been demonstrated to be operable with an SD memory ...
Handbook
Page 8
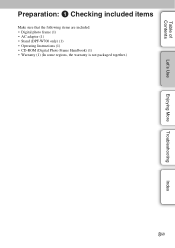
Table of Contents Let's Use Enjoying More Troubleshooting Preparation: 1 Checking included items Make sure that the following items are included: • Digital photo frame (1) • AC adaptor (1) • Stand (DPF-W700 only) (1) • Operating Instructions (1) • CD-ROM (Digital Photo Frame Handbook) (1) • Warranty (1) (In some regions, the warranty is not packaged together.) 8GB Index
Table of Contents Let's Use Enjoying More Troubleshooting Preparation: 1 Checking included items Make sure that the following items are included: • Digital photo frame (1) • AC adaptor (1) • Stand (DPF-W700 only) (1) • Operating Instructions (1) • CD-ROM (Digital Photo Frame Handbook) (1) • Warranty (1) (In some regions, the warranty is not packaged together.) 8GB Index

Handbook
Page 9
Table of Contents Let's Use Enjoying More Troubleshooting Preparation: 2 Attaching the stand (DPF-W700 only) Align the claw of the stand with the bottom of the unit then insert it firmly until it clicks, as illustrated. • Do not place the photo frame on an unstable or tilted surface. • Do not carry the photo frame by holding only the stand. The photo frame may fall. 9GB Continued r Index
Table of Contents Let's Use Enjoying More Troubleshooting Preparation: 2 Attaching the stand (DPF-W700 only) Align the claw of the stand with the bottom of the unit then insert it firmly until it clicks, as illustrated. • Do not place the photo frame on an unstable or tilted surface. • Do not carry the photo frame by holding only the stand. The photo frame may fall. 9GB Continued r Index
Handbook
Page 10
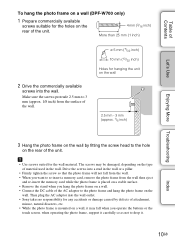
.../32 inch) Holes for the wall material. Drive the screws into a stud in the wall. Table of Contents Let's Use To hang the photo frame on a wall (DPF-W700 only) 1 Prepare commercially available screws suitable for the holes on the rear of the unit. • Use screws suited for hanging the unit... while the photo frame is mounted on a wall, it carefully so as not to the hole on the rear of the unit. 4 mm (3/16 inch) More than 25 mm (1 inch) 2 Drive the commercially available screws into the wall. Then plug the AC adaptor into the wall outlet. • Sony takes no responsibility...
.../32 inch) Holes for the wall material. Drive the screws into a stud in the wall. Table of Contents Let's Use To hang the photo frame on a wall (DPF-W700 only) 1 Prepare commercially available screws suitable for the holes on the rear of the unit. • Use screws suited for hanging the unit... while the photo frame is mounted on a wall, it carefully so as not to the hole on the rear of the unit. 4 mm (3/16 inch) More than 25 mm (1 inch) 2 Drive the commercially available screws into the wall. Then plug the AC adaptor into the wall outlet. • Sony takes no responsibility...

Handbook
Page 11
... Proceed to "Enjoying a slideshow" (page 19). • If the photo frame is displayed. If any other button than 1 (on/standby) is automatically turned on the photo frame Connecting the AC adaptor (DPF-WA700) Connect the AC adaptor as illustrated below. If the initial settings have already... been made c Proceed to "Preparation: 4 Setting up the photo frame" (page 14). The photo frame is pressed, the demonstration display will ...
... Proceed to "Enjoying a slideshow" (page 19). • If the photo frame is displayed. If any other button than 1 (on/standby) is automatically turned on the photo frame Connecting the AC adaptor (DPF-WA700) Connect the AC adaptor as illustrated below. If the initial settings have already... been made c Proceed to "Preparation: 4 Setting up the photo frame" (page 14). The photo frame is pressed, the demonstration display will ...

Handbook
Page 12
Table of Contents Let's Use Enjoying More Troubleshooting Connecting the AC adaptor (DPF-W700) Connect the AC adaptor as illustrated below. The photo frame is pressed, the demonstration display will close. 12GB Index To wall outlet When using it for the first time c Proceed to "Enjoying a slideshow"... (page 19). • If the photo frame is not operated for a certain time, the demonstration mode is displayed. If any other button than 1 (on/standby) is automatically turned on. If ...
Table of Contents Let's Use Enjoying More Troubleshooting Connecting the AC adaptor (DPF-W700) Connect the AC adaptor as illustrated below. The photo frame is pressed, the demonstration display will close. 12GB Index To wall outlet When using it for the first time c Proceed to "Enjoying a slideshow"... (page 19). • If the photo frame is not operated for a certain time, the demonstration mode is displayed. If any other button than 1 (on/standby) is automatically turned on. If ...

Handbook
Page 13
... frmae off the power by . A message appears to confirm that you will change from green to the previous status. • Do not turn the photo frame off or disconnect the AC adaptor from an AC outlet or the DC IN jack of the photo... standby lamp remains lit in a narrow space, such as per the message. It must not be using the adaptor, immediately shut off . In this photo frame. Table of Contents Let's Use Enjoying More Troubleshooting Turning on/off the power Hold 1 (on/standby) pressed. The standby indicator changes from the wall outlet...
... frmae off the power by . A message appears to confirm that you will change from green to the previous status. • Do not turn the photo frame off or disconnect the AC adaptor from an AC outlet or the DC IN jack of the photo... standby lamp remains lit in a narrow space, such as per the message. It must not be using the adaptor, immediately shut off . In this photo frame. Table of Contents Let's Use Enjoying More Troubleshooting Turning on/off the power Hold 1 (on/standby) pressed. The standby indicator changes from the wall outlet...

Handbook
Page 14
... selection display appears. Index 2 Tap [Next]. The purpose of the Touch Screen Calibration is to adjust the reaction of Contents Preparation: 4 Setting up the photo frame Follow the on-screen instructions. 1 Calibrate the touch screen. 1 Tap on the tapped position. 2 Select the screen language. 1 Drag with your finger to scroll through...
... selection display appears. Index 2 Tap [Next]. The purpose of the Touch Screen Calibration is to adjust the reaction of Contents Preparation: 4 Setting up the photo frame Follow the on-screen instructions. 1 Calibrate the touch screen. 1 Tap on the tapped position. 2 Select the screen language. 1 Drag with your finger to scroll through...

Handbook
Page 16
... unit, is displayed. BWPS PIN Method 1 Tap [WPS PIN Method]. 2 Enter the WPS PIN code displayed on the screen of the photo frame to your access point. • For details on entering the WPS PIN code for your access point, refer to the access point starts, and...will be made automatically. 16GB Continued r Index Connection to the instruction manual for your access point. 3 Tap [Next] on the display of the photo frame. Table of Contents Let's Use Enjoying More Troubleshooting A WPS Push-Button Configuration method 1 Tap [WPS Push-Button Configuration method]. 2 Press the WPS ...
... unit, is displayed. BWPS PIN Method 1 Tap [WPS PIN Method]. 2 Enter the WPS PIN code displayed on the screen of the photo frame to your access point. • For details on entering the WPS PIN code for your access point, refer to the access point starts, and...will be made automatically. 16GB Continued r Index Connection to the instruction manual for your access point. 3 Tap [Next] on the display of the photo frame. Table of Contents Let's Use Enjoying More Troubleshooting A WPS Push-Button Configuration method 1 Tap [WPS Push-Button Configuration method]. 2 Press the WPS ...

Handbook
Page 17
... displayed. 17GB Continued r Index Table of the IP address setting method. CSearch Wi-Fi Networks If the access point does not support WPS, the photo frame can be set automatically • Select [Manual] and enter your IP address, Default Gateway, Subnet Mask , DNS Server (Primary), and DNS Server (Secondary) on the...
... displayed. 17GB Continued r Index Table of the IP address setting method. CSearch Wi-Fi Networks If the access point does not support WPS, the photo frame can be set automatically • Select [Manual] and enter your IP address, Default Gateway, Subnet Mask , DNS Server (Primary), and DNS Server (Secondary) on the...

Handbook
Page 18
... • Connection and setting of network devices differ for each device. • The following items are necessary in order to connect the photo frame to the network. - Contract with an Internet service provider - Access point or wireless router - During demonstration, press a button other than 1... WPS button may be named differently, depending on the access point • If you do not have any operation of the photo frame, the demonstration display appears. Table of Contents Let's Use Enjoying More Troubleshooting • After a specified time has passed without any information...
... • Connection and setting of network devices differ for each device. • The following items are necessary in order to connect the photo frame to the network. - Contract with an Internet service provider - Access point or wireless router - During demonstration, press a button other than 1... WPS button may be named differently, depending on the access point • If you do not have any operation of the photo frame, the demonstration display appears. Table of Contents Let's Use Enjoying More Troubleshooting • After a specified time has passed without any information...

Handbook
Page 20
... memory cards and USB flash drive into slots A and B simultaneously. Be careful not to have the brightness set too high when you use the photo frame. • An image file shot with a small number of images. It is better to the characteristics of the photo... frame. • Note the following when you select a slideshow using the image stored in a memory card. - Do not insert memory cards into the memory card slots A/B ...
... memory cards and USB flash drive into slots A and B simultaneously. Be careful not to have the brightness set too high when you use the photo frame. • An image file shot with a small number of images. It is better to the characteristics of the photo... frame. • Note the following when you select a slideshow using the image stored in a memory card. - Do not insert memory cards into the memory card slots A/B ...

Handbook
Page 22
... region used at the center of Facebook service is shown during incoming. Enjoying More Troubleshooting Index 22GB To switch the image to the next by Sony is limited. Table of Contents Let's Use Displayed item Description 5New arrivals information Shows the recent arrival time of the photo...
... region used at the center of Facebook service is shown during incoming. Enjoying More Troubleshooting Index 22GB To switch the image to the next by Sony is limited. Table of Contents Let's Use Displayed item Description 5New arrivals information Shows the recent arrival time of the photo...

Handbook
Page 23
... cities appears. 7 Tap a proper city. The list of the area in English. The keyboard appears. 6 Enter the desired Area on the rear of the photo frame. The confirmation display appears, then it returns to step 5. The weather information for which to display weather information Set the name of the city nearest...
... cities appears. 7 Tap a proper city. The list of the area in English. The keyboard appears. 6 Enter the desired Area on the rear of the photo frame. The confirmation display appears, then it returns to step 5. The weather information for which to display weather information Set the name of the city nearest...

Handbook
Page 25
Slideshow 3 Unlike [Slideshow 1], it does not display the "Weather". Slideshow 1 Shows all standard items. See page 21 for its content. Table of Contents Let's Use Enjoying More Troubleshooting Changing the slideshow display 1 Press MENU on the rear of the photo frame. Slideshow 2 Unlike [Slideshow 1], it does not display the "Weather" and "Date/Time". 25GB Continued r Index The menu appears. 2 Tap [Slideshow Styles]. 3 Tap the desired Slideshow.
Slideshow 3 Unlike [Slideshow 1], it does not display the "Weather". Slideshow 1 Shows all standard items. See page 21 for its content. Table of Contents Let's Use Enjoying More Troubleshooting Changing the slideshow display 1 Press MENU on the rear of the photo frame. Slideshow 2 Unlike [Slideshow 1], it does not display the "Weather" and "Date/Time". 25GB Continued r Index The menu appears. 2 Tap [Slideshow Styles]. 3 Tap the desired Slideshow.

Handbook
Page 27
... Network], select one of the photo frame. Table of Contents Let's Use Enjoying More Troubleshooting Displaying the desired images Selecting the playback device 1 Press MENU on the rear of the displayed network devices and select a folder in it. The menu appears. 2 Tap [Photo/Videos] (DPF-WA700) / [Photo] (DPF-W700). 3 Tap the icon to play...
... Network], select one of the photo frame. Table of Contents Let's Use Enjoying More Troubleshooting Displaying the desired images Selecting the playback device 1 Press MENU on the rear of the displayed network devices and select a folder in it. The menu appears. 2 Tap [Photo/Videos] (DPF-WA700) / [Photo] (DPF-W700). 3 Tap the icon to play...


