Demo Mode Instructions
Page 3
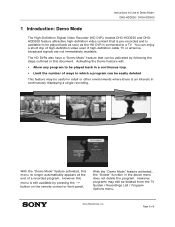
... Mode: DHG-HDD250 / DHG-HDD500 1 Introduction: Demo Mode The High-Definition Digital Video Recorder (HD DVR) models DHG-HDD250 and DHGHDD500 feature attractive high-definition video content that can be activated by pressing the → button on the remote control or front panel. You can be easily deleted This feature may still be deleted from the TV Guide® / Recordings List / Program Options menu. Sony Electronics...
... Mode: DHG-HDD250 / DHG-HDD500 1 Introduction: Demo Mode The High-Definition Digital Video Recorder (HD DVR) models DHG-HDD250 and DHGHDD500 feature attractive high-definition video content that can be activated by pressing the → button on the remote control or front panel. You can be easily deleted This feature may still be deleted from the TV Guide® / Recordings List / Program Options menu. Sony Electronics...
Demo Mode Instructions
Page 4
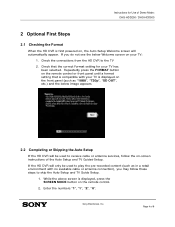
...screen will be used to skip the Auto Setup and TV Guide Setup. 1. Enter the numbers "1", "1", "2", "0". Sony Electronics, Inc. Check the connections from the HD DVR to play the pre-recorded content (such as "1080", "720p", "SD OUT", etc.) and the below image appears. 2.2 Completing or ...front panel until a format setting that the correct Format setting for Use of 8 Page 4 of Demo Mode: DHG-HDD250 / DHG-HDD500 2 Optional First Steps 2.1 Checking the Format When the HD DVR is displayed on the remote control. 2. Check that is displayed, press the SCREEN MODE button on the ...
...screen will be used to skip the Auto Setup and TV Guide Setup. 1. Enter the numbers "1", "1", "2", "0". Sony Electronics, Inc. Check the connections from the HD DVR to play the pre-recorded content (such as "1080", "720p", "SD OUT", etc.) and the below image appears. 2.2 Completing or ...front panel until a format setting that the correct Format setting for Use of 8 Page 4 of Demo Mode: DHG-HDD250 / DHG-HDD500 2 Optional First Steps 2.1 Checking the Format When the HD DVR is displayed on the remote control. 2. Check that is displayed, press the SCREEN MODE button on the ...
Demo Mode Instructions
Page 5
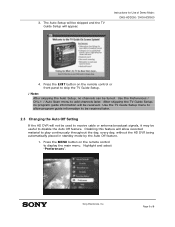
... will allow recorded material to play continuously throughout the day, every day, without the HD DVR being automatically placed in standby mode by the Auto Off feature. 1. Highlight and select "Preferences". Press the EXIT button on the remote control to add channels later. Sony Electronics, Inc. Use the ... TV Guide Setup will be tuned. After skipping the TV Guide Setup, no channels can be received. Page 5 of Demo Mode: DHG-HDD250 / DHG-HDD500 4. Instructions for Use of 8 Disabling this feature will not be used to receive cable or antenna broadcast signals, it may be...
... will allow recorded material to play continuously throughout the day, every day, without the HD DVR being automatically placed in standby mode by the Auto Off feature. 1. Highlight and select "Preferences". Press the EXIT button on the remote control to add channels later. Sony Electronics, Inc. Use the ... TV Guide Setup will be tuned. After skipping the TV Guide Setup, no channels can be received. Page 5 of Demo Mode: DHG-HDD250 / DHG-HDD500 4. Instructions for Use of 8 Disabling this feature will not be used to receive cable or antenna broadcast signals, it may be...
Operation Manual
Page 2
...have it checked by qualified personnel before operating it further. To reduce the risk of electric shock, do not expose the HD Digital Video Recorder to radio or television reception, which the receiver is no objects filled with radio communications. Regulatory Information: FCC Part 15 ...receiving antennas. ❏ Increase the separation between the equipment and receiver. ❏ Connect the equipment into the outlet, contact your Sony dealer regarding this device must accept any changes or modifications not expressly approved in accordance with part 15 of cable entry as vases...
...have it checked by qualified personnel before operating it further. To reduce the risk of electric shock, do not expose the HD Digital Video Recorder to radio or television reception, which the receiver is no objects filled with radio communications. Regulatory Information: FCC Part 15 ...receiving antennas. ❏ Increase the separation between the equipment and receiver. ❏ Connect the equipment into the outlet, contact your Sony dealer regarding this device must accept any changes or modifications not expressly approved in accordance with part 15 of cable entry as vases...

Operation Manual
Page 4
...specified by the manufacturer. 12. Use only with apparatus. Note that produce heat. 9. The HD DVR can easily be kept away from being walked on the unit, or described in accordance ...convenience receptacles and the point where they exit from the outlet and then wait 30 seconds before moving the cart/apparatus combinations to change the hard disk. Clean only... high storage density which enables long recording duration and quick access to qualified service personnel. - However, it can record programming even when in temperature (temperature gradient greater than 10° C/hour). ...
...specified by the manufacturer. 12. Use only with apparatus. Note that produce heat. 9. The HD DVR can easily be kept away from being walked on the unit, or described in accordance ...convenience receptacles and the point where they exit from the outlet and then wait 30 seconds before moving the cart/apparatus combinations to change the hard disk. Clean only... high storage density which enables long recording duration and quick access to qualified service personnel. - However, it can record programming even when in temperature (temperature gradient greater than 10° C/hour). ...
Operation Manual
Page 5
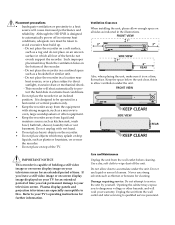
...dust to allow enough space on all four of the feet do not place on an uneven surface in which may expose you leave a still video image or on-screen display image displayed on top of time. Damage requiring service: Do not attempt to avoid excessive heat build up. - ...Although the HD DVR is on the recorder. • Do not place objects which all sides as a rug and do not evenly support the recorder. Do not place the recorder in a location near the recorder. • Do not place on your television screen for an extended...
...dust to allow enough space on all four of the feet do not place on an uneven surface in which may expose you leave a still video image or on-screen display image displayed on top of time. Damage requiring service: Do not attempt to avoid excessive heat build up. - ...Although the HD DVR is on the recorder. • Do not place objects which all sides as a rug and do not evenly support the recorder. Do not place the recorder in a location near the recorder. • Do not place on your television screen for an extended...
Operation Manual
Page 7
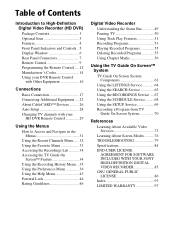
...Connection 17 Connecting Additional Equipment .... 23 About CableCARD™ Devices .......... 26 Auto Setup 28 Changing TV channels with your HD DVR Remote Control 29 Using the Menus How to Access and Navigate in the Menus 31 Using the Recent Channels Menu...the SETUP Service 69 Recording a Program from TV Guide On Screen System 70 References Learning About Available Video Services 73 Learning About Screen Modes...........76 TROUBLESHOOTING 79 Specifications 84 END-USER LICENSE AGREEMENT FOR SOFTWARE INCLUDED WITH YOUR SONY HIGH-DEFINITION DIGITAL VIDEO RECORDER 85 GNU GENERAL PUBLIC...
...Connection 17 Connecting Additional Equipment .... 23 About CableCARD™ Devices .......... 26 Auto Setup 28 Changing TV channels with your HD DVR Remote Control 29 Using the Menus How to Access and Navigate in the Menus 31 Using the Recent Channels Menu...the SETUP Service 69 Recording a Program from TV Guide On Screen System 70 References Learning About Available Video Services 73 Learning About Screen Modes...........76 TROUBLESHOOTING 79 Specifications 84 END-USER LICENSE AGREEMENT FOR SOFTWARE INCLUDED WITH YOUR SONY HIGH-DEFINITION DIGITAL VIDEO RECORDER 85 GNU GENERAL PUBLIC...
Operation Manual
Page 9
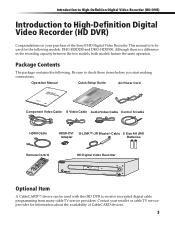
... information about the availability of the Sony® HD Digital Video Recorder. Contact your purchase of CableCARD devices. 3 Package Contents The package contains the following models: DHG-HDD250 and DHG-HDD500. This manual is a difference in the recording capacity between the two models, both models feature the same operation. Introduction to High-Definition Digital Video Recorder (HD DVR) Introduction to High-Definition Digital Video Recorder (HD DVR) Congratulations on your retailer...
... information about the availability of the Sony® HD Digital Video Recorder. Contact your purchase of CableCARD devices. 3 Package Contents The package contains the following models: DHG-HDD250 and DHG-HDD500. This manual is a difference in the recording capacity between the two models, both models feature the same operation. Introduction to High-Definition Digital Video Recorder (HD DVR) Introduction to High-Definition Digital Video Recorder (HD DVR) Congratulations on your retailer...
Operation Manual
Page 10
... while it is inserted into the HD DVR's rear panel CableCARD slot. (Check with your new HD DVR include: ❏ Digital Reception - Pause, rewind and fast forward shows at least 30 hours of high-definition programming or up to shows available for the clearest possible broadcast picture. ❏ Digital Video Recorder - You can watch digital television programs and enjoy the improved...
... while it is inserted into the HD DVR's rear panel CableCARD slot. (Check with your new HD DVR include: ❏ Digital Reception - Pause, rewind and fast forward shows at least 30 hours of high-definition programming or up to shows available for the clearest possible broadcast picture. ❏ Digital Video Recorder - You can watch digital television programs and enjoy the improved...
Operation Manual
Page 11
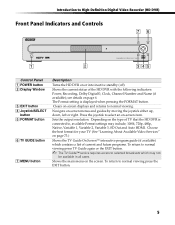
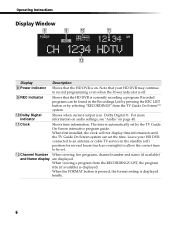
...with the following indicators: Power, Recording, Dolby Digital®, Clock, Channel Number and Name (if available); Choose the best format for your TV (See "Learning About Available Video Services" on the type of TV that the HD DVR is displayed when pressing the... FORMAT button. To return to normal viewing press the EXIT button. 5 Navigate on or into inactive standby (off). Introduction to High-Definition Digital Video Recorder (HD DVR) Front Panel Indicators and Controls 76 1 2 3 45 Control Panel 1 POWER button 2 Display Window 3 EXIT button 4 Joystick/SELECT ...
...with the following indicators: Power, Recording, Dolby Digital®, Clock, Channel Number and Name (if available); Choose the best format for your TV (See "Learning About Available Video Services" on the type of TV that the HD DVR is displayed when pressing the... FORMAT button. To return to normal viewing press the EXIT button. 5 Navigate on or into inactive standby (off). Introduction to High-Definition Digital Video Recorder (HD DVR) Front Panel Indicators and Controls 76 1 2 3 45 Control Panel 1 POWER button 2 Display Window 3 EXIT button 4 Joystick/SELECT ...
Operation Manual
Page 12
...is currently recording a program. Leave your HD DVR may continue to record programming even when the Power indicator is off ) position for several hours (such as overnight) to allow the correct time to an antenna or cable TV service in the standby (off . 9 REC indicator Shows that the HD DVR is...name (if available) and Name display are displayed. qa qs Display Description 8 Power indicator Shows that your HD DVR connected to be found in Dolby Digital ®. q; Note that the HD DVR is displayed briefly. 6 For more information on audio settings, see "Audio" on . When first ...
...is currently recording a program. Leave your HD DVR may continue to record programming even when the Power indicator is off ) position for several hours (such as overnight) to allow the correct time to an antenna or cable TV service in the standby (off . 9 REC indicator Shows that the HD DVR is...name (if available) and Name display are displayed. qa qs Display Description 8 Power indicator Shows that your HD DVR connected to be found in Dolby Digital ®. q; Note that the HD DVR is displayed briefly. 6 For more information on audio settings, see "Audio" on . When first ...
Operation Manual
Page 13
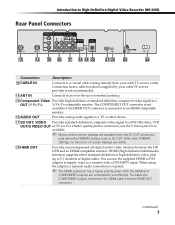
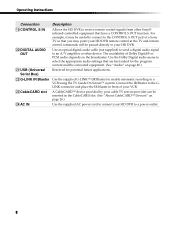
... if the HDMI OUT connector is required. ✍ The HDMI connector has a higher priority when both the HDMI and COMPONENT outputs are visible. Introduction to High-Definition Digital Video Recorder (HD DVR) Rear Panel Connectors RE RG RH RI RK RL RM X XB XT XE XG Connection Description qd CABLE IN Connects to an HDMI-compatible...
... if the HDMI OUT connector is required. ✍ The HDMI connector has a higher priority when both the HDMI and COMPONENT outputs are visible. Introduction to High-Definition Digital Video Recorder (HD DVR) Rear Panel Connectors RE RG RH RI RK RL RM X XB XT XE XG Connection Description qd CABLE IN Connects to an HDMI-compatible...
Operation Manual
Page 14
... to connect to your HD DVR. DIGITAL AUDIO OUT Use an optical digital audio cable (not supplied) to send a digital audio signal to a VCR using the TV Guide On Screen™ system. ws G-LINK IR Blaster Use the supplied G-LINK™ (IR Blaster) to enable automatic recording to an A/V amplifier or other Sony® infrared-controlled...
... to connect to your HD DVR. DIGITAL AUDIO OUT Use an optical digital audio cable (not supplied) to send a digital audio signal to a VCR using the TV Guide On Screen™ system. ws G-LINK IR Blaster Use the supplied G-LINK™ (IR Blaster) to enable automatic recording to an A/V amplifier or other Sony® infrared-controlled...
Operation Manual
Page 15
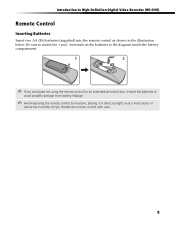
... the batteries to avoid possible damage from battery leakage. ✍ Avoid exposing the remote control to moisture, placing it in the illustration below. Introduction to High-Definition Digital Video Recorder (HD DVR) Remote Control Inserting Batteries Insert two AA (R6) batteries (supplied) into the remote control as shown in direct sunlight, near a heat source or where...
... the batteries to avoid possible damage from battery leakage. ✍ Avoid exposing the remote control to moisture, placing it in the illustration below. Introduction to High-Definition Digital Video Recorder (HD DVR) Remote Control Inserting Batteries Insert two AA (R6) batteries (supplied) into the remote control as shown in direct sunlight, near a heat source or where...
Operation Manual
Page 17
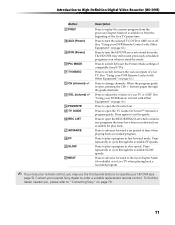
...Press repeatedly to play back. NEXT Description Press to order a suitable replacement remote control. The HD DVR may use the front panel buttons to operate your nearest Sony dealer to replay the current program from the previous Chapter Mark (if available) or from the ...the dealer nearest you may still record previously scheduled programs even when in stand-by mode. Introduction to advance forward a set period of your TV. (See "Using your DVR Remote Control with Other Equipment" on page 79. 11 Press to High-Definition Digital Video Recorder (HD DVR) Button qj PREV qk ...
...Press repeatedly to play back. NEXT Description Press to order a suitable replacement remote control. The HD DVR may use the front panel buttons to operate your nearest Sony dealer to replay the current program from the previous Chapter Mark (if available) or from the ...the dealer nearest you may still record previously scheduled programs even when in stand-by mode. Introduction to advance forward a set period of your TV. (See "Using your DVR Remote Control with Other Equipment" on page 79. 11 Press to High-Definition Digital Video Recorder (HD DVR) Button qj PREV qk ...
Operation Manual
Page 18
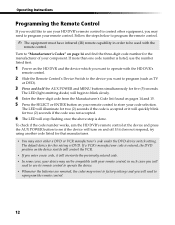
... on pages 14 and 15. 5 Press the SELECT or ENTER button on your remote control to "Manufacturer's Codes" on page 14 and find the three-digit code number for the manufacturer of your component. The default device for two (2) seconds if the code was not accepted. 6 The LED will need to... use the number listed first. 1 Power on and off. Operating Instructions Programming the Remote Control If you would like to use your HD DVR's remote control to control other equipment, you want to operate with the remote control. Follow the steps below to program the remote control. ✍...
... on pages 14 and 15. 5 Press the SELECT or ENTER button on your remote control to "Manufacturer's Codes" on page 14 and find the three-digit code number for the manufacturer of your component. The default device for two (2) seconds if the code was not accepted. 6 The LED will need to... use the number listed first. 1 Power on and off. Operating Instructions Programming the Remote Control If you would like to use your HD DVR's remote control to control other equipment, you want to operate with the remote control. Follow the steps below to program the remote control. ✍...
Operation Manual
Page 19
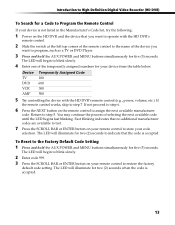
...assign the next available manufacturer code. Device TV DVD VCR AMP Temporarily Assigned Code 100 600 300 500 5 Try controlling the device with the HD DVR's remote control. 2 Slide the switch at the left top corner of the remote control to the name of the device you want...when the code is accepted. 13 You may continue the process of selecting the next available code until the LED begins fast blinking. Introduction to High-Definition Digital Video Recorder (HD DVR) To Search for a Code to Program the Remote Control If your device is not listed in the Manufacturer's Code list, try the ...
...assign the next available manufacturer code. Device TV DVD VCR AMP Temporarily Assigned Code 100 600 300 500 5 Try controlling the device with the HD DVR's remote control. 2 Slide the switch at the left top corner of the remote control to the name of the device you want...when the code is accepted. 13 You may continue the process of selecting the next available code until the LED begins fast blinking. Introduction to High-Definition Digital Video Recorder (HD DVR) To Search for a Code to Program the Remote Control If your device is not listed in the Manufacturer's Code list, try the ...
Operation Manual
Page 20
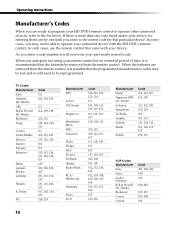
...105, 106, 107, 108 126, 112, 113, 103 125 123, 112 Manufacturer Sharp Signature 2000 (M. Wards) ABC Bell & Howell (M. TV Codes Manufacturer Sony Admiral (M. Wards) Broksonic Canon Citizen Code 301, 302, 303 338 314 330, 343 317, 319 309, 308 332 If there is possible that came with... your connected device with the HD DVR's remote control. Operating Instructions Manufacturer's Codes When you are removed from the remote control. Wards) Sylvania Symphonic Technika Toshiba Vidtech Wards ...
...105, 106, 107, 108 126, 112, 113, 103 125 123, 112 Manufacturer Sharp Signature 2000 (M. Wards) ABC Bell & Howell (M. TV Codes Manufacturer Sony Admiral (M. Wards) Broksonic Canon Citizen Code 301, 302, 303 338 314 330, 343 317, 319 309, 308 332 If there is possible that came with... your connected device with the HD DVR's remote control. Operating Instructions Manufacturer's Codes When you are removed from the remote control. Wards) Sylvania Symphonic Technika Toshiba Vidtech Wards ...
Operation Manual
Page 23
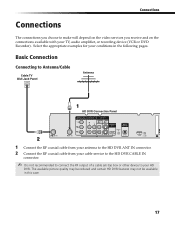
... set-top box or other device to make will depend on the connections available with your TV, audio amplifier, or recording device (VCR or DVD Recorder). Connections Connections The connections you receive and on the video services you choose to your HD DVR. Select the appropriate examples for your conditions in this case. 17
... set-top box or other device to make will depend on the connections available with your TV, audio amplifier, or recording device (VCR or DVD Recorder). Connections Connections The connections you receive and on the video services you choose to your HD DVR. Select the appropriate examples for your conditions in this case. 17
Operation Manual
Page 24
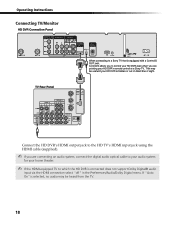
Operating Instructions Connecting TV/Monitor Connect the HD DVR's HDMI output jack to the HD TV's HDMI input jack using the HDMI cable (supplied). ✍ If you are connecting an audio system, connect the digital audio optical cable to your audio system for your home theater. ✍ If the HDMI-equipped TV to which the HD DVR is selected, no audio may be heard from the TV. 18 If "Auto On" is connected does not support Dolby Digital® audio input via the HDMI connection select "off" in the Preferences/Audio/Dolby Digital menu.
Operating Instructions Connecting TV/Monitor Connect the HD DVR's HDMI output jack to the HD TV's HDMI input jack using the HDMI cable (supplied). ✍ If you are connecting an audio system, connect the digital audio optical cable to your audio system for your home theater. ✍ If the HDMI-equipped TV to which the HD DVR is selected, no audio may be heard from the TV. 18 If "Auto On" is connected does not support Dolby Digital® audio input via the HDMI connection select "off" in the Preferences/Audio/Dolby Digital menu.