Instructions Manual
Page 4
...Connecting speakers 16 3a: Connecting the audio components.........17 3b: Connecting the video components ........20 4: Connecting the antennas 31 5: Preparing the receiver and the remote .....32 6: Selecting the speaker system 33 7: Calibrating the appropriate settings automatically (AUTO CALIBRATION 34 8: Adjusting the speaker levels... Navigating through menus 45 Adjusting the level (LEVEL menu 50 Adjusting the equalizer (EQ menu 51 Settings for the surround sound (SUR menu 51 Settings for the tuner (TUNER menu).........53 Settings for the audio (AUDIO menu) ........54 Settings for...
...Connecting speakers 16 3a: Connecting the audio components.........17 3b: Connecting the video components ........20 4: Connecting the antennas 31 5: Preparing the receiver and the remote .....32 6: Selecting the speaker system 33 7: Calibrating the appropriate settings automatically (AUTO CALIBRATION 34 8: Adjusting the speaker levels... Navigating through menus 45 Adjusting the level (LEVEL menu 50 Adjusting the equalizer (EQ menu 51 Settings for the surround sound (SUR menu 51 Settings for the tuner (TUNER menu).........53 Settings for the audio (AUDIO menu) ........54 Settings for...

Instructions Manual
Page 6
Press to select a category for XM Radio (page 74). Press to select a sound field (page 60, 62, 65). IN jacks T PHONES jack Connects to high quality analog sound (page 65). Press to listen to headphones (page 94). S VIDEO 3 IN/ Connects to the supplied optimizer microphone for XM ...Radio (page 73). U AUTO CAL MIC jack Connects to a camcorder or PORTABLE AV video game (page 28, 41). R MEMORY...
Press to select a category for XM Radio (page 74). Press to select a sound field (page 60, 62, 65). IN jacks T PHONES jack Connects to high quality analog sound (page 65). Press to listen to headphones (page 94). S VIDEO 3 IN/ Connects to the supplied optimizer microphone for XM ...Radio (page 73). U AUTO CAL MIC jack Connects to a camcorder or PORTABLE AV video game (page 28, 41). R MEMORY...
Instructions Manual
Page 7
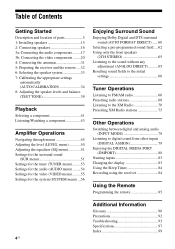
... 78). Name E ; button. Lights up according to output the center and surround channel signals. D EX ; D (EX) Function Lights up when the receiver applies Pro Logic processing to 2 channel signals in order to the speaker system used (page 33). "; Note When playing a Dolby Digital format disc, be .... PL G OPT Function Lights up if both the center and surround speakers are set to "NO" (page 48) and you select a sound field using the A.F.D. button. However, these indicators do not light up if both the center and surround speakers are set to "NO" (page...
... 78). Name E ; button. Lights up according to output the center and surround channel signals. D EX ; D (EX) Function Lights up when the receiver applies Pro Logic processing to 2 channel signals in order to the speaker system used (page 33). "; Note When playing a Dolby Digital format disc, be .... PL G OPT Function Lights up if both the center and surround speakers are set to "NO" (page 48) and you select a sound field using the A.F.D. button. However, these indicators do not light up if both the center and surround speakers are set to "NO" (page...
Instructions Manual
Page 8
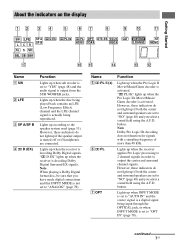
... tune in preset radio stations. Lights up when the receiver is decoding DTS signals. Lights up when using the receiver to tune in radio stations (page 66), etc. The boxes around the letters vary to "NO" (page 48) Sound Field: A.F.D. Note When playing a DTS format disc, be sure that you have made digital... (page 61). Lights up when DTS Neo:6 Cinema/Music decoder is activated. Lights up when dynamic range compression is not set to show how the receiver downmixes the source sound (based on presetting radio stations, see page 68.
... tune in preset radio stations. Lights up when the receiver is decoding DTS signals. Lights up when using the receiver to tune in radio stations (page 66), etc. The boxes around the letters vary to "NO" (page 48) Sound Field: A.F.D. Note When playing a DTS format disc, be sure that you have made digital... (page 61). Lights up when DTS Neo:6 Cinema/Music decoder is activated. Lights up when dynamic range compression is not set to show how the receiver downmixes the source sound (based on presetting radio stations, see page 68.
Instructions Manual
Page 9
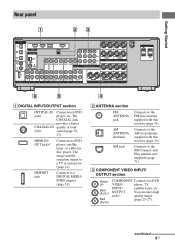
The image and the sound are output to the XM Connect-andPlay antenna (not supplied) (page 71). Connects to the AM loop antenna supplied with this receiver (page 31). DMPORT jack Connects to a DIGITAL MEDIA PORT adapter (page 81). 4 B ANTENNA section FM ANTENNA jack AM ANTENNA...Red (PR/CR) COMPONENT Connects to a DVD jacks player, etc. continued 9US The COAXIAL jack provides a better COAXIAL IN quality of loud jacks sound (page 25, 27). OUTPUT You can enjoy high jacks* quality image (page 23-27). Getting Started Rear panel 1 23 DIGITAL (ASSIGNABLE) ...
The image and the sound are output to the XM Connect-andPlay antenna (not supplied) (page 71). Connects to the AM loop antenna supplied with this receiver (page 31). DMPORT jack Connects to a DIGITAL MEDIA PORT adapter (page 81). 4 B ANTENNA section FM ANTENNA jack AM ANTENNA...Red (PR/CR) COMPONENT Connects to a DVD jacks player, etc. continued 9US The COAXIAL jack provides a better COAXIAL IN quality of loud jacks sound (page 25, 27). OUTPUT You can enjoy high jacks* quality image (page 23-27). Getting Started Rear panel 1 23 DIGITAL (ASSIGNABLE) ...
Instructions Manual
Page 13
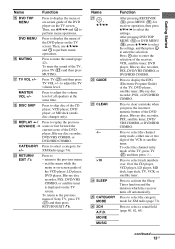
...or MD deck (multidisc changer only). return to activate the Sleep Timer function and the duration which the receiver turns off automatically. Press to skip disc of the TV, DVD player, satellite tuner, Blu-ray disc... to select the settings, and then press to mute the sound (page 42). Press also to replay the previous scene or fast forward the current scene of the receiver, VCR, satellite tuner, DVD player, Blu-ray disc recorder...the previous menu of the DVD player on -screen guide of Sony TV, press TV (wj) and then press RETURN/EXIT O. R DISC SKIP S REPLAY < / ADVANCE CATEGORY +/-
...or MD deck (multidisc changer only). return to activate the Sleep Timer function and the duration which the receiver turns off automatically. Press to skip disc of the TV, DVD player, satellite tuner, Blu-ray disc... to select the settings, and then press to mute the sound (page 42). Press also to replay the previous scene or fast forward the current scene of the receiver, VCR, satellite tuner, DVD player, Blu-ray disc recorder...the previous menu of the DVD player on -screen guide of Sony TV, press TV (wj) and then press RETURN/EXIT O. R DISC SKIP S REPLAY < / ADVANCE CATEGORY +/-

Instructions Manual
Page 15
Example of DVD software recorded sound in the Surround EX format if you to use a 7 channel speaker with 4 sub woofer system. Getting Started 1: Installing speakers This receiver allows you connect one additional surround back speaker (6.1 channel) or two surround back speakers (7.1 channel) (see "Using the surround back... configuration You can place it wherever you want. 15US Enjoying a 5.1/7.1 channel system To fully enjoy theater-like multi channel surround sound requires five speakers (two front speakers, a center speaker, and two surround speakers) and a sub woofer (5.1 channel).
Example of DVD software recorded sound in the Surround EX format if you to use a 7 channel speaker with 4 sub woofer system. Getting Started 1: Installing speakers This receiver allows you connect one additional surround back speaker (6.1 channel) or two surround back speakers (7.1 channel) (see "Using the surround back... configuration You can place it wherever you want. 15US Enjoying a 5.1/7.1 channel system To fully enjoy theater-like multi channel surround sound requires five speakers (two front speakers, a center speaker, and two surround speakers) and a sub woofer (5.1 channel).

Instructions Manual
Page 17
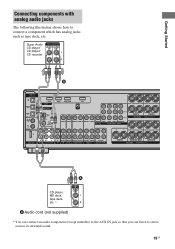
... to connect each component. Analog audio output 19 onlyb) a)Model with AUDIO OUT L/R jacks, etc. 17US After connecting your audio components to this receiver. Before you want to use with an auto standby function, turn off the function when watching movies. You can connect up to 4 sub woofers... sub woofer, connect it turns to standby mode automatically based on , it to any of the input signal to a sub woofer, then sound may not be output. 3a: Connecting the audio components How to connect your components This section describes how to connect your audio component, proceed...
... to connect each component. Analog audio output 19 onlyb) a)Model with AUDIO OUT L/R jacks, etc. 17US After connecting your audio components to this receiver. Before you want to use with an auto standby function, turn off the function when watching movies. You can connect up to 4 sub woofers... sub woofer, connect it turns to standby mode automatically based on , it to any of the input signal to a sub woofer, then sound may not be output. 3a: Connecting the audio components How to connect your components This section describes how to connect your audio component, proceed...

Instructions Manual
Page 18
... how to connect a Super Audio CD player, CD player or CD recorder. Refer to SA-CD/CD/CD-R IN jacks (analog input jack) on this receiver. Super Audio CD player/ CD player/ CD recorder A B DIGITAL (ASSIGNABLE) SAT IN VIDEO 2/ BD IN VIDEO 1 IN OPTICAL SA-CD/ CD/CD-R IN DVD IN... A Coaxial digital cord (not supplied) B Audio cord (not supplied) Notes • When you play back a Super Audio CD disc on a Super Audio CD player, the sound is output only if you make the connection to the operating instructions supplied with the Super Audio CD player. • You can only make analog...
... how to connect a Super Audio CD player, CD player or CD recorder. Refer to SA-CD/CD/CD-R IN jacks (analog input jack) on this receiver. Super Audio CD player/ CD player/ CD recorder A B DIGITAL (ASSIGNABLE) SAT IN VIDEO 2/ BD IN VIDEO 1 IN OPTICAL SA-CD/ CD/CD-R IN DVD IN... A Coaxial digital cord (not supplied) B Audio cord (not supplied) Notes • When you play back a Super Audio CD disc on a Super Audio CD player, the sound is output only if you make the connection to the operating instructions supplied with the Super Audio CD player. • You can only make analog...
Instructions Manual
Page 19
... analog jacks such as tape deck, etc. Getting Started Connecting components with analog audio jacks The following illustration shows how to stereo sources in surround sound. 19US
... analog jacks such as tape deck, etc. Getting Started Connecting components with analog audio jacks The following illustration shows how to stereo sources in surround sound. 19US
Instructions Manual
Page 22
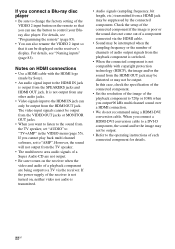
...the receiver. For details, see "Programming the remote" (page 85). • You can also rename the VIDEO 2 input so that you can use the button to control your Bluray disc player. When you connect a HDMI-DVI conversion cable to a DVI-D component, the sound and/or the image may not be suppressed by Sony...). • An audio signal input to the HDMI IN jack is output from the TV speaker. • The multi/stereo area audio signals of a Super Audio CD are not output. • Be sure to turn on the receiver when the...
...the receiver. For details, see "Programming the remote" (page 85). • You can also rename the VIDEO 2 input so that you can use the button to control your Bluray disc player. When you connect a HDMI-DVI conversion cable to a DVI-D component, the sound and/or the image may not be suppressed by Sony...). • An audio signal input to the HDMI IN jack is output from the TV speaker. • The multi/stereo area audio signals of a Super Audio CD are not output. • Be sure to turn on the receiver when the...

Instructions Manual
Page 24
... to the TV IN jacks of the receiver is not turned on the receiver when the video and audio of a playback component are being output to - turn on , neither video nor audio is not output. • To output the TV sound from the speakers connected to the receiver, be sure to a TV via the... receiver. connect the audio output jacks of the ...
... to the TV IN jacks of the receiver is not turned on the receiver when the video and audio of a playback component are being output to - turn on , neither video nor audio is not output. • To output the TV sound from the speakers connected to the receiver, be sure to a TV via the... receiver. connect the audio output jacks of the ...
Instructions Manual
Page 32
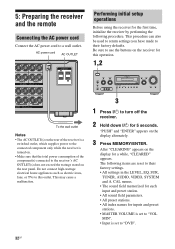
.... CAL menus. • The sound field memorized for each input and preset station. • All sound field parameters. • All preset stations. • All index names for the first time, initialize the receiver by performing the following items are ...receiver is set to their factory defaults. This may cause a malfunction. This procedure can also be used to return settings you have made to a wall outlet. MOVIE MUSIC AUTO CAL DIRECT 3 1 Press ?/1 to this operation. 1,2 ?/1 SPEAKERS (OFF/A/B/A+B) TONE MODE TONE TUNING MODE TUNING AUTO CAL MIC PHONES VIDEO 3 IN/PORTABLE AV...
.... CAL menus. • The sound field memorized for each input and preset station. • All sound field parameters. • All preset stations. • All index names for the first time, initialize the receiver by performing the following items are ...receiver is set to their factory defaults. This may cause a malfunction. This procedure can also be used to return settings you have made to a wall outlet. MOVIE MUSIC AUTO CAL DIRECT 3 1 Press ?/1 to this operation. 1,2 ?/1 SPEAKERS (OFF/A/B/A+B) TONE MODE TONE TUNING MODE TUNING AUTO CAL MIC PHONES VIDEO 3 IN/PORTABLE AV...

Instructions Manual
Page 34
...performed correctly. Headphones are connected. ?/1 SPEAKERS (OFF/A/B/A+B) TONE MODE TONE TUNING MODE TUNING AUTO CAL MIC PHONES VIDEO 3 IN/PORTABLE AV IN VIDEO L AUDIO R MULTI CHANNEL DECODING DISPLAY INPUT MODE INPUT SELECTOR MASTER VOLUME MEMORY/ CATEGORY ENTER MODE CATEGORY 2CH A.F.D. Before...on your neighborhood. • Perform the Auto Calibration in your preference. Doing so may damage the receiver and the microphone. • During the calibration, the sound that comes out of the speakers is used for signals with a sampling frequency of more accurate measurement....
...performed correctly. Headphones are connected. ?/1 SPEAKERS (OFF/A/B/A+B) TONE MODE TONE TUNING MODE TUNING AUTO CAL MIC PHONES VIDEO 3 IN/PORTABLE AV IN VIDEO L AUDIO R MULTI CHANNEL DECODING DISPLAY INPUT MODE INPUT SELECTOR MASTER VOLUME MEMORY/ CATEGORY ENTER MODE CATEGORY 2CH A.F.D. Before...on your neighborhood. • Perform the Auto Calibration in your preference. Doing so may damage the receiver and the microphone. • During the calibration, the sound that comes out of the speakers is used for signals with a sampling frequency of more accurate measurement....

Instructions Manual
Page 36
...speaker (in 5 seconds and the display changes as dipole speakers are used. When the measurement ends, a beep sounds and the measurement result appears on the receiver. - Then, press . Displays warning concerning the measurement results. See "When you select "PHASE"" (page 38)....the measurement results 1 Confirm the measurement result. When the measurement process fails ERROR XXXX See "When error codes appear" (page 37). 2 Press RECEIVER and then press V/v repeatedly to step 2. Change the volume level. - CAL [3] t A. CAL [2] t A. Measurement for speaker level. Press...
...speaker (in 5 seconds and the display changes as dipole speakers are used. When the measurement ends, a beep sounds and the measurement result appears on the receiver. - Then, press . Displays warning concerning the measurement results. See "When you select "PHASE"" (page 38)....the measurement results 1 Confirm the measurement result. When the measurement process fails ERROR XXXX See "When error codes appear" (page 37). 2 Press RECEIVER and then press V/v repeatedly to step 2. Change the volume level. - CAL [3] t A. CAL [2] t A. Measurement for speaker level. Press...

Instructions Manual
Page 38
... from the optimizer microphone is because of phase). It is louder than the loudest sound that value. 38US This may be able to perform the Auto Calibration properly if you select "PHASE" You can be performed in phase/out of ... though the speakers are connected properly. You may be detected. WARN 42 The volume of the receiver is out of range. However, there will be connected the other way around. Try to use the receiver with that can check the phase of range. Try to perform the Auto Calibration when the environment...
... from the optimizer microphone is because of phase). It is louder than the loudest sound that value. 38US This may be able to perform the Auto Calibration properly if you select "PHASE" You can be performed in phase/out of ... though the speakers are connected properly. You may be detected. WARN 42 The volume of the receiver is out of range. However, there will be connected the other way around. Try to use the receiver with that can check the phase of range. Try to perform the Auto Calibration when the environment...

Instructions Manual
Page 40
You can also use MASTER VOLUME on the receiver. • The adjusted value are shown on the display. 3 Press or b to enter the menu. 4 Press V/v repeatedly to select "T. Note The test tone does not ... b to enter the parameter. 6 Press V/v repeatedly to select "T. The test tone is output from the - Tips • To adjust the level of the test tone sounds the same from each speaker in sequence as follows: Front left t Center t Front right t Surround right t Surround back right* t Surround back left* t Surround left t Sub...
You can also use MASTER VOLUME on the receiver. • The adjusted value are shown on the display. 3 Press or b to enter the menu. 4 Press V/v repeatedly to select "T. Note The test tone does not ... b to enter the parameter. 6 Press V/v repeatedly to select "T. The test tone is output from the - Tips • To adjust the level of the test tone sounds the same from each speaker in sequence as follows: Front left t Center t Front right t Surround right t Surround back right* t Surround back left* t Surround left t Sub...

Instructions Manual
Page 42
To avoid damaging your speakers Before you do the following. • Press MUTING again. • Increase the volume. • Turn off the receiver. The muting function will be sure to turn off the receiver, be canceled when you turn down the volume level. 42US To mute the sound Press MUTING.
To avoid damaging your speakers Before you do the following. • Press MUTING again. • Increase the volume. • Turn off the receiver. The muting function will be sure to turn off the receiver, be canceled when you turn down the volume level. 42US To mute the sound Press MUTING.

Instructions Manual
Page 43
MOVIE MUSIC AUTO CAL DIRECT 5 3 Notes • The operation is described for details. Refer to page 62 for a Sony Super Audio CD player. • Refer to the sound that was recorded in the 2 channel format from all speakers (multi channel). MOVIE MUSIC CATEGORY SLEEP MODE D.TUNING AUTO CAL 123 456 7 ...: HALL Jazz: JAZZ Live concert: CONCERT • You can select the sound field to a Super Audio CD/CD TV RM SET UP AV ?/1 ?/1 SYSTEM STANDBY VIDEO 1 VIDEO 2 VIDEO 3 DVD SAT TV SA-CD/CD TUNER AUX DMPORT RECEIVER 2CH A.F.D. Refer to the Super Audio CD/CD, eject the disc and ...
MOVIE MUSIC AUTO CAL DIRECT 5 3 Notes • The operation is described for details. Refer to page 62 for a Sony Super Audio CD player. • Refer to the sound that was recorded in the 2 channel format from all speakers (multi channel). MOVIE MUSIC CATEGORY SLEEP MODE D.TUNING AUTO CAL 123 456 7 ...: HALL Jazz: JAZZ Live concert: CONCERT • You can select the sound field to a Super Audio CD/CD TV RM SET UP AV ?/1 ?/1 SYSTEM STANDBY VIDEO 1 VIDEO 2 VIDEO 3 DVD SAT TV SA-CD/CD TUNER AUX DMPORT RECEIVER 2CH A.F.D. Refer to the Super Audio CD/CD, eject the disc and ...
Instructions Manual
Page 44
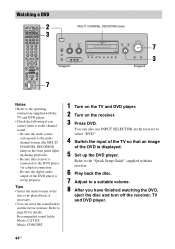
Watching a DVD TV RM SET UP AV ?/1 ?/1 SYSTEM STANDBY VIDEO 1 VIDEO 2 VIDEO 3 DVD SAT TV SA-CD/CD TUNER AUX DMPORT RECEIVER 2CH A.F.D. Tips • Select the audio format of the DVD player is set up properly. Recommended sound fields: Movie: C.ST.EX Music: CONCERT 1 Turn on the TV ...page 62 for details. MOVIE MUSIC AUTO CAL DIRECT 7 3 Notes • Refer to the operating instructions supplied with the receiver. 6 Play back the disc. 7 Adjust to multi channel sound. - Refer to the "Quick Setup Guide" supplied with the TV and DVD player. • Check the following if...
Watching a DVD TV RM SET UP AV ?/1 ?/1 SYSTEM STANDBY VIDEO 1 VIDEO 2 VIDEO 3 DVD SAT TV SA-CD/CD TUNER AUX DMPORT RECEIVER 2CH A.F.D. Tips • Select the audio format of the DVD player is set up properly. Recommended sound fields: Movie: C.ST.EX Music: CONCERT 1 Turn on the TV ...page 62 for details. MOVIE MUSIC AUTO CAL DIRECT 7 3 Notes • Refer to the operating instructions supplied with the receiver. 6 Play back the disc. 7 Adjust to multi channel sound. - Refer to the "Quick Setup Guide" supplied with the TV and DVD player. • Check the following if...


