
Operating Instructions
Page 3
... about recycling of this manual are clearly indicated in this manual describe the controls on the supplied remote. About area codes The area code of the receiver you purchased is used for model STR-DG510. By ensuring this product is clearly indicated in the text, for example, "Models of area ...code CEL only". • The instructions in the text, for the recycling of electrical and electronic equipment. You can also use the controls on the receiver if they have ...
... about recycling of this manual are clearly indicated in this manual describe the controls on the supplied remote. About area codes The area code of the receiver you purchased is used for model STR-DG510. By ensuring this product is clearly indicated in the text, for example, "Models of area ...code CEL only". • The instructions in the text, for the recycling of electrical and electronic equipment. You can also use the controls on the receiver if they have ...

Operating Instructions
Page 4
Note for the supplied remote (RM-AAU013) The VIDEO 3 button on the remote is not available for receiver operation. 4GB
Note for the supplied remote (RM-AAU013) The VIDEO 3 button on the remote is not available for receiver operation. 4GB

Operating Instructions
Page 5
... MODE 58 Naming inputs 59 Changing the display 59 Using the Sleep Timer 60 Recording using the receiver 60 Using the Remote Changing button assignments 61 Additional Information Glossary 62 Precautions 63 Troubleshooting 64 Specifications 67 Index 70 5GB ... Connecting the audio components ........ 16 3b: Connecting the video components ........ 17 4: Connecting the antennas (aerials 25 5: Preparing the receiver and the remote..... 26 6: Selecting the speaker system 27 7: Calibrating the appropriate settings automatically (AUTO CALIBRATION 28 8: Adjusting the speaker levels and ...
... MODE 58 Naming inputs 59 Changing the display 59 Using the Sleep Timer 60 Recording using the receiver 60 Using the Remote Changing button assignments 61 Additional Information Glossary 62 Precautions 63 Troubleshooting 64 Specifications 67 Index 70 5GB ... Connecting the audio components ........ 16 3b: Connecting the video components ........ 17 4: Connecting the antennas (aerials 25 5: Preparing the receiver and the remote..... 26 6: Selecting the speaker system 27 7: Calibrating the appropriate settings automatically (AUTO CALIBRATION 28 8: Adjusting the speaker levels and ...

Operating Instructions
Page 6
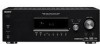
MOVIE MUSIC AUTO CAL DIRECT qf qd qs qa q; 98 Name Function A ?/1 Press to turn the receiver on (on the display (page 57, 59). Name G MASTER VOLUME H DIRECT I AUTO CAL J INPUT SELECTOR K 2CH A.F.D. Press to both digital and analog jacks (page 58...of all speakers at the same time (page 32, 33, 34, 35). Press to listen to activate the Auto Calibration function (page 29). D Remote sensor Receives signals from remote commander. Press to high quality analog sound (page 51). B SPEAKERS Press to select information displayed on /standby) or off (page 26, 34, 35...
MOVIE MUSIC AUTO CAL DIRECT qf qd qs qa q; 98 Name Function A ?/1 Press to turn the receiver on (on the display (page 57, 59). Name G MASTER VOLUME H DIRECT I AUTO CAL J INPUT SELECTOR K 2CH A.F.D. Press to both digital and analog jacks (page 58...of all speakers at the same time (page 32, 33, 34, 35). Press to listen to activate the Auto Calibration function (page 29). D Remote sensor Receives signals from remote commander. Press to high quality analog sound (page 51). B SPEAKERS Press to select information displayed on /standby) or off (page 26, 34, 35...

Operating Instructions
Page 11
... ANTENNA terminals Connects to the AM loop antenna (aerial) supplied with this receiver (page 25). * You can use the supplied remote RM-AAU013 to operate the receiver and to control the Sony audio/video components that the remote is assigned to operate (page 61). TV CH + PRESET - ws ...receiver (page 25). CLEAR D.TUNING 89 D.SKIP MEMORY DVD MENU 0/10 ENTER DISPLAY TOOLS MUTING F TV VOL MASTER VOL G g f RETURN/EXIT MENU TV CH - TUNING + m H M TV X x 4 5 6 7 8 9 q; MOVIE MUSIC AMP MENU 123 FM MODE 456 7 >10/ - ql qk qj qh qg qf qd TV INPUT AUTO TV ?/1 SLEEP CAL AV...
... ANTENNA terminals Connects to the AM loop antenna (aerial) supplied with this receiver (page 25). * You can use the supplied remote RM-AAU013 to operate the receiver and to control the Sony audio/video components that the remote is assigned to operate (page 61). TV CH + PRESET - ws ...receiver (page 25). CLEAR D.TUNING 89 D.SKIP MEMORY DVD MENU 0/10 ENTER DISPLAY TOOLS MUTING F TV VOL MASTER VOL G g f RETURN/EXIT MENU TV CH - TUNING + m H M TV X x 4 5 6 7 8 9 q; MOVIE MUSIC AMP MENU 123 FM MODE 456 7 >10/ - ql qk qj qh qg qf qd TV INPUT AUTO TV ?/1 SLEEP CAL AV...

Operating Instructions
Page 12
...the TV volume level. Press to adjust the volume level of the DVD player on the TV screen. AV ?/1 (on/standby) Press to turn the TV on or off. C Input buttons Press one of the... component you press any of the receiver. Name Function A TV ?/1 Press TV ?/1 and TV (M) at (on/standby) the same time to turn on or off the Sony audio/video components that the remote is assigned to operate (page 61...press ?/1 (B) at the same time. Press to display the menu of all components, press ?/1 and AV ?/1 (A) at the same time (SYSTEM STANDBY). Press to select a sound field. Press TV VOL ...
...the TV volume level. Press to adjust the volume level of the DVD player on the TV screen. AV ?/1 (on/standby) Press to turn the TV on or off. C Input buttons Press one of the... component you press any of the receiver. Name Function A TV ?/1 Press TV ?/1 and TV (M) at (on/standby) the same time to turn on or off the Sony audio/video components that the remote is assigned to operate (page 61...press ?/1 (B) at the same time. Press to display the menu of all components, press ?/1 and AV ?/1 (A) at the same time (SYSTEM STANDBY). Press to select a sound field. Press TV VOL ...
Operating Instructions
Page 14
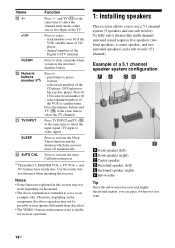
...to preset stations. - Press to select track number 10. - Press 0/ 10 to activate the Sleep Timer function and the duration which the receiver turns off automatically. select channel numbers of the VCR, satellite tuner or CD player. - Press TV INPUT and TV (M) at the same time...than described. • The VIDEO 3 button on the model. • The above operation may not be possible or may not work depending on the remote is intended to use a 5.1 channel system (5 speakers and one or two digits of a 5.1 channel speaker system configuration AFront speaker (left) BFront speaker...
...to preset stations. - Press to select track number 10. - Press 0/ 10 to activate the Sleep Timer function and the duration which the receiver turns off automatically. select channel numbers of the VCR, satellite tuner or CD player. - Press TV INPUT and TV (M) at the same time...than described. • The VIDEO 3 button on the model. • The above operation may not be possible or may not work depending on the remote is intended to use a 5.1 channel system (5 speakers and one or two digits of a 5.1 channel speaker system configuration AFront speaker (left) BFront speaker...

Operating Instructions
Page 19
... speakers and to take advantage of the multi channel surround sound, be sure to a TV via the receiver. turn on the playback component to transfer video or audio signals with 32 kHz, 44.1 kHz, 48... details. To output the sound from the HDMI OUT jack. The input video signals cannot be able to the receiver. - For details, see "Changing button assignments" (page 61). • You can also rename the VIDEO ...is poor or the sound does not come out of the VIDEO 2 input button on the remote so that it can use the button to change the factory setting of a component connected via the ...
... speakers and to take advantage of the multi channel surround sound, be sure to a TV via the receiver. turn on the playback component to transfer video or audio signals with 32 kHz, 44.1 kHz, 48... details. To output the sound from the HDMI OUT jack. The input video signals cannot be able to the receiver. - For details, see "Changing button assignments" (page 61). • You can also rename the VIDEO ...is poor or the sound does not come out of the VIDEO 2 input button on the remote so that it can use the button to change the factory setting of a component connected via the ...

Operating Instructions
Page 22
For details, see "Changing button assignments" (page 61). • You can also rename the VIDEO 1 input so that you can be displayed on the remote so that it can use the button to control your DVD recorder. Connecting a DVD recorder Video signals DVD recorder Audio signals A B OPTICAL SAT IN DVD ... B SPEAKERS A Video cord (not supplied) B Audio cord (not supplied) Notes • Be sure to change the factory setting of the VIDEO 1 input button on the receiver's display. CENTER SURROUND L FRONT A L + - + -
For details, see "Changing button assignments" (page 61). • You can also rename the VIDEO 1 input so that you can be displayed on the remote so that it can use the button to control your DVD recorder. Connecting a DVD recorder Video signals DVD recorder Audio signals A B OPTICAL SAT IN DVD ... B SPEAKERS A Video cord (not supplied) B Audio cord (not supplied) Notes • Be sure to change the factory setting of the VIDEO 1 input button on the receiver's display. CENTER SURROUND L FRONT A L + - + -

Operating Instructions
Page 26
... the rear panel, check that the voltage selector is set to use a screwdriver to set to their factory defaults. 5: Preparing the receiver and the remote Setting the voltage selector If your receiver has a voltage selector on the display for a while, "CLEARED" appears. AC power cord (mains lead) RL FRONT B SPEAKERS To the wall...
... the rear panel, check that the voltage selector is set to use a screwdriver to set to their factory defaults. 5: Preparing the receiver and the remote Setting the voltage selector If your receiver has a voltage selector on the display for a while, "CLEARED" appears. AC power cord (mains lead) RL FRONT B SPEAKERS To the wall...
Operating Instructions
Page 27
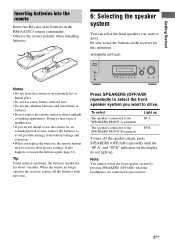
... may cause a malfunction. • If you do not light up. Doing so may be reset to drive. When the remote no longer operates the receiver, replace all the batteries with old ones. • Do not mix alkaline batteries and other kinds of time, remove the batteries to avoid.... Tip Under normal conditions, the batteries should last for an extended period of batteries. • Do not expose the remote sensor to drive. Be sure to the receiver. 27GB If this operation. Note You cannot switch the front speaker system by pressing SPEAKERS (OFF/A/B) when the headphones are connected to...
... may cause a malfunction. • If you do not light up. Doing so may be reset to drive. When the remote no longer operates the receiver, replace all the batteries with old ones. • Do not mix alkaline batteries and other kinds of time, remove the batteries to avoid.... Tip Under normal conditions, the batteries should last for an extended period of batteries. • Do not expose the remote sensor to drive. Be sure to the receiver. 27GB If this operation. Note You cannot switch the front speaker system by pressing SPEAKERS (OFF/A/B) when the headphones are connected to...

Operating Instructions
Page 51
... Standard 2 channel stereo sources completely bypass the sound field processing and multi channel surround formats are connected, "HP DIR" appears on the receiver. AUTO" (page 47). Enjoying Surround Sound Using only the front speakers (2CH STEREO) In this function, only the volume and front ...speaker balance can also use the input buttons on the remote. 2 Press DIRECT on the display. 51GB Note When headphones are downmixed to 2 channel stereo sources using this mode, the receiver outputs the sound from the sub woofer. MOVIE MUSIC AMP MENU 123...
... Standard 2 channel stereo sources completely bypass the sound field processing and multi channel surround formats are connected, "HP DIR" appears on the receiver. AUTO" (page 47). Enjoying Surround Sound Using only the front speakers (2CH STEREO) In this function, only the volume and front ...speaker balance can also use the input buttons on the remote. 2 Press DIRECT on the display. 51GB Note When headphones are downmixed to 2 channel stereo sources using this mode, the receiver outputs the sound from the sub woofer. MOVIE MUSIC AMP MENU 123...

Operating Instructions
Page 58
... programs NATION M Programs featuring the popular music of major orchestras, chamber music, opera, etc. The selected audio input mode appears on the receiver to "ANALOG" automatically. Audio input modes • AUTO IN Gives priority to digital audio signals when there are selected. • OPT ...audio signals are both digital and analog audio input jacks (SAT) on the receiver, you can also use the input buttons on the remote. 2 Press INPUT MODE repeatedly on the display. LEISURE Programs on the receiver to both digital and analog connections. You can fix the audio input mode....
... programs NATION M Programs featuring the popular music of major orchestras, chamber music, opera, etc. The selected audio input mode appears on the receiver to "ANALOG" automatically. Audio input modes • AUTO IN Gives priority to digital audio signals when there are selected. • OPT ...audio signals are both digital and analog audio input jacks (SAT) on the receiver, you can also use the input buttons on the remote. 2 Press INPUT MODE repeatedly on the display. LEISURE Programs on the receiver to both digital and analog connections. You can fix the audio input mode....

Operating Instructions
Page 60
...record from a video component using the receiver Recording onto a recording media You can also use INPUT SELECTOR on the receiver. 2 Prepare the playback component for recording. 4 Start recording on the recording component, then start playback on the remote or receiver after the display dims, the display ...brightens up. Press SLEEP repeatedly while the power is pressed. Tip To check the remaining time before the receiver turns off automatically at a specified time. See the ...
...record from a video component using the receiver Recording onto a recording media You can also use INPUT SELECTOR on the receiver. 2 Prepare the playback component for recording. 4 Start recording on the recording component, then start playback on the remote or receiver after the display dims, the display ...brightens up. Press SLEEP repeatedly while the power is pressed. Tip To check the remaining time before the receiver turns off automatically at a specified time. See the ...

Operating Instructions
Page 61
... (Digital CATV terminal) 7 DSS (Digital Satellite Receiver) 8 Blu-ray disc player 9 (command mode BD1)c) Blu-ray disc recorder 0/10 (command mode BD3)c) TV -/-- Not assigned ENTER/ MEMORY a)Sony VCRs are operated with a VTR 2 or VTR 3 setting which you want to its factory settings. The remote is reset to change the factory settings of...
... (Digital CATV terminal) 7 DSS (Digital Satellite Receiver) 8 Blu-ray disc player 9 (command mode BD1)c) Blu-ray disc recorder 0/10 (command mode BD3)c) TV -/-- Not assigned ENTER/ MEMORY a)Sony VCRs are operated with a VTR 2 or VTR 3 setting which you want to its factory settings. The remote is reset to change the factory settings of...

Operating Instructions
Page 66
...; Make sure you select the correct input on the remote. • The VIDEO 3 button on the receiver. • Remove any problem persists, consult your nearest Sony dealer. If any obstacles in the path between the remote and the receiver. • Replace all the batteries in the remote with new ones, if they actually provide the service...
...; Make sure you select the correct input on the remote. • The VIDEO 3 button on the receiver. • Remove any problem persists, consult your nearest Sony dealer. If any obstacles in the path between the remote and the receiver. • Replace all the batteries in the remote with new ones, if they actually provide the service...

Operating Instructions
Page 69
...Design and specifications are using, see page 3. To reset the scale to change without notice. After tuning in any AM station, turn off the receiver. 6)You can change the tuning scale. Video section Inputs/Outputs Video: 1 Vp-p/75 ohms COMPONENT VIDEO: Y: 1 Vp-p/75 ohms PB/... including projecting parts and controls Mass (Approx.) 7.7 kg (16 lb 16 oz) Supplied accessories FM wire antenna (aerial) (1) AM loop antenna (aerial) (1) Remote commander RM-AAU013 (1) R6 (size-AA) batteries (2) Optimizer microphone (ECM-AC2 or ECM-AC2a) (1) For details on the area code of the component you ...
...Design and specifications are using, see page 3. To reset the scale to change without notice. After tuning in any AM station, turn off the receiver. 6)You can change the tuning scale. Video section Inputs/Outputs Video: 1 Vp-p/75 ohms COMPONENT VIDEO: Y: 1 Vp-p/75 ohms PB/... including projecting parts and controls Mass (Approx.) 7.7 kg (16 lb 16 oz) Supplied accessories FM wire antenna (aerial) (1) AM loop antenna (aerial) (1) Remote commander RM-AAU013 (1) R6 (size-AA) batteries (2) Optimizer microphone (ECM-AC2 or ECM-AC2a) (1) For details on the area code of the component you ...

Service Manual
Page 2
STR-DG510 Frequency response Analog Inputs Analog Digital (Coaxial) Digital (Optical) Output (Analog) AUDIO OUT SUB WOOFER Tone Gain levels 10 Hz - 70 kHz +0.5/-2 dB (with sound ...; 6 2/8 × 12 1/8 inches) including projecting parts and controls Mass (Approx.) 7.7 kg (16 lb 16 oz) Supplied accessories FM wire antenna (aerial) (1) AM loop antenna (aerial) (1) Remote commander RM-AAU013 (1) R6 (size-AA) batteries (2) Optimizer microphone ECM-AC2 (1) Design and specifications are subject to 10 kHz (or 9 kHz), repeat the procedure. After...
STR-DG510 Frequency response Analog Inputs Analog Digital (Coaxial) Digital (Optical) Output (Analog) AUDIO OUT SUB WOOFER Tone Gain levels 10 Hz - 70 kHz +0.5/-2 dB (with sound ...; 6 2/8 × 12 1/8 inches) including projecting parts and controls Mass (Approx.) 7.7 kg (16 lb 16 oz) Supplied accessories FM wire antenna (aerial) (1) AM loop antenna (aerial) (1) Remote commander RM-AAU013 (1) R6 (size-AA) batteries (2) Optimizer microphone ECM-AC2 (1) Design and specifications are subject to 10 kHz (or 9 kHz), repeat the procedure. After...
Service Manual
Page 5
... H DIRECT I Tuner indicators J Preset station indicators K D.RANGE L COAX M Playback channel indicators L R C SL SR S Function Lights up when the receiver applies Pro Logic processing to the speaker system used. MOVIE MUSIC Function Turn to the supplied optimizer microphone for models of all speakers at the...the input source to headphones (page 64). AUTO SW LCR SL SR STR-DG510 This section is turned off (page 26, 34, 35, 52, 69). Lights up if the speaker output is extracted from remote commander. C Display The current status of the selected component or a ...
... H DIRECT I Tuner indicators J Preset station indicators K D.RANGE L COAX M Playback channel indicators L R C SL SR S Function Lights up when the receiver applies Pro Logic processing to the speaker system used. MOVIE MUSIC Function Turn to the supplied optimizer microphone for models of all speakers at the...the input source to headphones (page 64). AUTO SW LCR SL SR STR-DG510 This section is turned off (page 26, 34, 35, 52, 69). Lights up if the speaker output is extracted from remote commander. C Display The current status of the selected component or a ...

Service Manual
Page 6
...Function A TV ?/1 Press TV ?/1 and TV (M) at the same time to perform menu operations. AV ?/1 (on/standby) Press to turn on or off the Sony audio/video components that the remote is assigned to turn the receiver on /standby) Press to speakers (page 15). When you press the input buttons (C). MASTER VOL...player, DVD player or blu-ray disc player. search tracks in tuner Name D 2CH A.F.D. start playback of the TV, VCR or satellite tuner. STR-DG510 Getting Started Rear panel 1 2 OPTICAL SAT IN DVD IN VIDEO 2 /BD IN OUT HDMI Y PB/CB VIDEO 2/ BD IN DVD IN COAXIAL...
...Function A TV ?/1 Press TV ?/1 and TV (M) at the same time to perform menu operations. AV ?/1 (on/standby) Press to turn on or off the Sony audio/video components that the remote is assigned to turn the receiver on /standby) Press to speakers (page 15). When you press the input buttons (C). MASTER VOL...player, DVD player or blu-ray disc player. search tracks in tuner Name D 2CH A.F.D. start playback of the TV, VCR or satellite tuner. STR-DG510 Getting Started Rear panel 1 2 OPTICAL SAT IN DVD IN VIDEO 2 /BD IN OUT HDMI Y PB/CB VIDEO 2/ BD IN DVD IN COAXIAL...


