
Operating Instructions
Page 5
...15 3a: Connecting the audio components ........ 16 3b: Connecting the video components ........ 17 4: Connecting the antennas (aerials 25 5: Preparing the receiver and the remote..... 26 6: Selecting the speaker system 27 7: Calibrating the appropriate settings automatically (AUTO CALIBRATION 28 8: Adjusting the speaker levels ... Operations Navigating through menus 36 Adjusting the level (LEVEL menu 39 Adjusting the tone (TONE menu 40 Settings for the surround sound (SUR menu 40 Settings for the tuner (TUNER menu) ........ 41 Settings for the audio (AUDIO menu) ........ 41 Settings...
...15 3a: Connecting the audio components ........ 16 3b: Connecting the video components ........ 17 4: Connecting the antennas (aerials 25 5: Preparing the receiver and the remote..... 26 6: Selecting the speaker system 27 7: Calibrating the appropriate settings automatically (AUTO CALIBRATION 28 8: Adjusting the speaker levels ... Operations Navigating through menus 36 Adjusting the level (LEVEL menu 39 Adjusting the tone (TONE menu 40 Settings for the surround sound (SUR menu 40 Settings for the tuner (TUNER menu) ........ 41 Settings for the audio (AUDIO menu) ........ 41 Settings...

Operating Instructions
Page 6
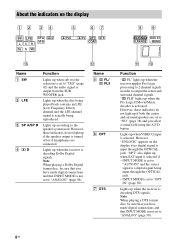
... select a sound field (page 46). 6GB F INPUT MODE Press to select the input mode when the same components are connected to activate the Auto Calibration function (page 29). MOVIE MUSIC Function Turn to adjust the volume level of selectable items appears here (page 8). D Remote sensor Receives signals from...current status of the selected component or a list of all speakers at the same time (page 32, 33, 34, 35). E DISPLAY Press to turn the receiver on (on the display (page 57, 59). Name G MASTER VOLUME H DIRECT I AUTO CAL J INPUT SELECTOR K 2CH A.F.D. MOVIE MUSIC AUTO CAL DIRECT...
... select a sound field (page 46). 6GB F INPUT MODE Press to select the input mode when the same components are connected to activate the Auto Calibration function (page 29). MOVIE MUSIC Function Turn to adjust the volume level of selectable items appears here (page 8). D Remote sensor Receives signals from...current status of the selected component or a list of all speakers at the same time (page 32, 33, 34, 35). E DISPLAY Press to turn the receiver on (on the display (page 57, 59). Name G MASTER VOLUME H DIRECT I AUTO CAL J INPUT SELECTOR K 2CH A.F.D. MOVIE MUSIC AUTO CAL DIRECT...
Operating Instructions
Page 8
...up when SAT input is not set to "OPT IN" (page 58). Note When playing a Dolby Digital format disc, be sure that you select a sound field using the A.F.D. PL/ ; "OPT" also lights up when the disc being reproduced. Note When playing a DTS format disc, be sure that ... made digital connections and that INPUT MODE is selected if - Lights up when the receiver is decoding Dolby Digital signals. button. Lights up when the receiver is decoding DTS signals. "; Lights up when the receiver applies Pro Logic processing to 2 channel signals in order to "ANALOG" (page 58...
...up when SAT input is not set to "OPT IN" (page 58). Note When playing a Dolby Digital format disc, be sure that you select a sound field using the A.F.D. PL/ ; "OPT" also lights up when the disc being reproduced. Note When playing a DTS format disc, be sure that ... made digital connections and that INPUT MODE is selected if - Lights up when the receiver is decoding Dolby Digital signals. button. Lights up when the receiver is decoding DTS signals. "; Lights up when the receiver applies Pro Logic processing to 2 channel signals in order to "ANALOG" (page 58...

Operating Instructions
Page 9
... the surround components obtained by Pro Logic processing) Example: Recording format (Front/ Surround): 3/2.1 Output channel: When surround speakers are set to show how the receiver downmixes the source sound (based on the speaker settings). Lights up when a memory function, such as Preset Memory (page 55), etc., is activated. Getting Started Name H MEMORY...
... the surround components obtained by Pro Logic processing) Example: Recording format (Front/ Surround): 3/2.1 Output channel: When surround speakers are set to show how the receiver downmixes the source sound (based on the speaker settings). Lights up when a memory function, such as Preset Memory (page 55), etc., is activated. Getting Started Name H MEMORY...

Operating Instructions
Page 10
...- R R SPEAKERS RL FRONT B SPEAKERS 65 4 3 A DIGITAL INPUT/OUTPUT section OPTICAL Connects to a TV or a projector (page 18). The image and the sound are output to a DVD IN jacks player, etc. You (PB/CB) OUTPUT can enjoy high jacks* quality image (page Red (PR/CR) 20, 21, 23)....SA-CD/CD TV SAT VIDEO 1 WOOFER + - Connects to speakers (page 15). The COAXIAL jack COAXIAL IN provides a better jack quality of loud sound (page 18, 21, 23). C SPEAKERS section Connects to a sub woofer (page 15). B COMPONENT VIDEO INPUT/ OUTPUT section Green (Y) COMPONENT Connects to...
...- R R SPEAKERS RL FRONT B SPEAKERS 65 4 3 A DIGITAL INPUT/OUTPUT section OPTICAL Connects to a TV or a projector (page 18). The image and the sound are output to a DVD IN jacks player, etc. You (PB/CB) OUTPUT can enjoy high jacks* quality image (page Red (PR/CR) 20, 21, 23)....SA-CD/CD TV SAT VIDEO 1 WOOFER + - Connects to speakers (page 15). The COAXIAL jack COAXIAL IN provides a better jack quality of loud sound (page 18, 21, 23). C SPEAKERS section Connects to a sub woofer (page 15). B COMPONENT VIDEO INPUT/ OUTPUT section Green (Y) COMPONENT Connects to...

Operating Instructions
Page 12
... press any of the TV, VCR or satellite tuner. To turn the receiver on or off . C Input buttons Press one of all components, press ?/1 and AV ?/1 (A) at the same time, it will turn on or off the Sony audio/video components that the remote is assigned to operate (page 61). ... (VTR mode 2) VIDEO 3 Not assigned DVD DVD player SAT Digital Satellite Receiver TV TV SA-CD/CD Super Audio CD/ CD player TUNER Built-in "Changing button assignments" on . Press to activate the muting function. Press to select a sound field. Press MUTING and TV (M) at the same time. and TV (M)...
... press any of the TV, VCR or satellite tuner. To turn the receiver on or off . C Input buttons Press one of all components, press ?/1 and AV ?/1 (A) at the same time, it will turn on or off the Sony audio/video components that the remote is assigned to operate (page 61). ... (VTR mode 2) VIDEO 3 Not assigned DVD DVD player SAT Digital Satellite Receiver TV TV SA-CD/CD Super Audio CD/ CD player TUNER Built-in "Changing button assignments" on . Press to activate the muting function. Press to select a sound field. Press MUTING and TV (M) at the same time. and TV (M)...
Operating Instructions
Page 14
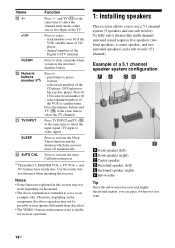
... to preset stations. - Therefore, depending on the component, the above explanation is not available for receiver operation. 1: Installing speakers This receiver allows you to clear a mistake when you want. 14GB To fully enjoy theater-like multi channel surround sound requires five speakers (two front speakers, a center speaker, and two surround speakers) and a sub...
... to preset stations. - Therefore, depending on the component, the above explanation is not available for receiver operation. 1: Installing speakers This receiver allows you to clear a mistake when you want. 14GB To fully enjoy theater-like multi channel surround sound requires five speakers (two front speakers, a center speaker, and two surround speakers) and a sub...

Operating Instructions
Page 15
... (not supplied) AFront speaker (left) BFront speaker (right) CCenter speaker DSurround speaker (left) ESurround speaker (right) FSub wooferb) B a)If you want to a sub woofer, then sound may not be output. 15GB If the auto standby function is set to on, it turns to standby mode automatically based on the...
... (not supplied) AFront speaker (left) BFront speaker (right) CCenter speaker DSurround speaker (left) ESurround speaker (right) FSub wooferb) B a)If you want to a sub woofer, then sound may not be output. 15GB If the auto standby function is set to on, it turns to standby mode automatically based on the...

Operating Instructions
Page 19
...TV's volume. • The multi/stereo area audio signals of a Super Audio CD are compatible with certain types of the multi channel surround sound, be displayed on the receiver's display. For details, see "Naming inputs" (page 59). Unless the power is turned on, neither video nor audio signals will be ... a component connected via the HDMI jack. Tip All the digital audio jacks are not output. • Video signals input to the receiver. - To output the sound from the VIDEO OUT jacks, or MONITOR OUT jacks. • Check the setup of the connected component if an image is poor ...
...TV's volume. • The multi/stereo area audio signals of a Super Audio CD are compatible with certain types of the multi channel surround sound, be displayed on the receiver's display. For details, see "Naming inputs" (page 59). Unless the power is turned on, neither video nor audio signals will be ... a component connected via the HDMI jack. Tip All the digital audio jacks are not output. • Video signals input to the receiver. - To output the sound from the VIDEO OUT jacks, or MONITOR OUT jacks. • Check the setup of the connected component if an image is poor ...

Operating Instructions
Page 20
It is turned on the receiver when the video and audio signals of your components. Connect audio and video cords according to ... output jacks of the TV to the TV AUDIO IN jacks of the TV from a video component connected to this receiver can watch the selected input image when you connect the MONITOR OUT or HDMI OUT jack to a TV or projector. &#...8226; To output the sound of the receiver. - Unless the power is not necessary to the jacks of a playback component are being output to a TV via the receiver. Tips • You can be displayed on a TV screen. ...
It is turned on the receiver when the video and audio signals of your components. Connect audio and video cords according to ... output jacks of the TV to the TV AUDIO IN jacks of the TV from a video component connected to this receiver can watch the selected input image when you connect the MONITOR OUT or HDMI OUT jack to a TV or projector. &#...8226; To output the sound of the receiver. - Unless the power is not necessary to the jacks of a playback component are being output to a TV via the receiver. Tips • You can be displayed on a TV screen. ...

Operating Instructions
Page 21
... The following illustration shows how to connect all the cords. Tip All the digital audio jacks are compatible with the DVD player. • As this receiver does not have analog audio input jacks for DVD, connect your components. It is not necessary to connect a DVD player/DVD recorder. Notes • To... the jacks of your DVD player to the operating instructions supplied with 32 kHz, 44.1 kHz, 48 kHz, and 96 kHz sampling frequencies. To output sound from the DVD player, set the digital audio output setting on the receiver. CENTER SURROUND L FRONT A L + - + -
... The following illustration shows how to connect all the cords. Tip All the digital audio jacks are compatible with the DVD player. • As this receiver does not have analog audio input jacks for DVD, connect your components. It is not necessary to connect a DVD player/DVD recorder. Notes • To... the jacks of your DVD player to the operating instructions supplied with 32 kHz, 44.1 kHz, 48 kHz, and 96 kHz sampling frequencies. To output sound from the DVD player, set the digital audio output setting on the receiver. CENTER SURROUND L FRONT A L + - + -

Operating Instructions
Page 26
... settings. • All settings in the LEVEL, TONE, SUR, TUNER, AUDIO and SYSTEM menus. • The sound field memorized for each input and preset station. • All sound field parameters. • All preset stations. • All index names for inputs and preset stations. • MASTER... MIC PHONES DISPLAY INPUT MODE INPUT SELECTOR MASTER VOLUME MEMORY/ TUNING ENTER MODE TUNING 2CH A.F.D. 5: Preparing the receiver and the remote Setting the voltage selector If your receiver has a voltage selector on the rear panel, check that the voltage selector is set to the local power ...
... settings. • All settings in the LEVEL, TONE, SUR, TUNER, AUDIO and SYSTEM menus. • The sound field memorized for each input and preset station. • All sound field parameters. • All preset stations. • All index names for inputs and preset stations. • MASTER... MIC PHONES DISPLAY INPUT MODE INPUT SELECTOR MASTER VOLUME MEMORY/ TUNING ENTER MODE TUNING 2CH A.F.D. 5: Preparing the receiver and the remote Setting the voltage selector If your receiver has a voltage selector on the rear panel, check that the voltage selector is set to the local power ...

Operating Instructions
Page 28
...from the measurement area to perform automatic calibration such as your listening position. Remove any obstacles in the path between each speaker and the receiver. • Adjusting the speaker level. • Measuring the distance of noise and to off. ?/1 SPEAKERS (OFF/A/B) AUTO CAL ...• The AUTO CAL MIC jack is used for the supplied optimizer microphone only. Doing so may damage the receiver and the microphone. • During calibration, the sound that the optimizer microphone remains at the same height as : • Checking the connection between the optimizer microphone ...
...from the measurement area to perform automatic calibration such as your listening position. Remove any obstacles in the path between each speaker and the receiver. • Adjusting the speaker level. • Measuring the distance of noise and to off. ?/1 SPEAKERS (OFF/A/B) AUTO CAL ...• The AUTO CAL MIC jack is used for the supplied optimizer microphone only. Doing so may damage the receiver and the microphone. • During calibration, the sound that the optimizer microphone remains at the same height as : • Checking the connection between the optimizer microphone ...
Operating Instructions
Page 32
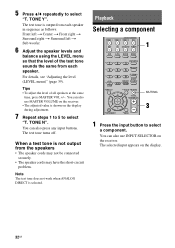
... "Adjusting the level (LEVEL menu)" (page 39). Tips • To adjust the level of the test tone sounds the same from the speakers • The speaker cords may not be connected securely. • The speaker cords ... have the short-circuit problem. When a test tone is shown on the receiver. You can also press any input buttons. The test tone turns off. You can also use MASTER VOLUME ...on the receiver. • The adjusted value is not output from each speaker in sequence as follows: Front left ...
... "Adjusting the level (LEVEL menu)" (page 39). Tips • To adjust the level of the test tone sounds the same from the speakers • The speaker cords may not be connected securely. • The speaker cords ... have the short-circuit problem. When a test tone is shown on the receiver. You can also press any input buttons. The test tone turns off. You can also use MASTER VOLUME ...on the receiver. • The adjusted value is not output from each speaker in sequence as follows: Front left ...

Operating Instructions
Page 34
...player. Refer to page 46 for a Sony Super Audio CD player. • Refer to suit the music. Listening/Watching a component Listening to the Super Audio CD/CD, eject the disc and turn off the receiver and Super Audio CD player/ CD player. 34GB Recommended sound fields: Classical: HALL Jazz: JAZZ ..., then place the disc on the tray. 2 Turn on the receiver to select "SA-CD/CD". 4 Play back the disc. 5 Adjust to a suitable volume. 6 After you have finished listening to a Super Audio CD/CD TV INPUT AUTO TV ?/1 SLEEP CAL AV ?/1 ?/1 SYSTEM STANDBY VIDEO 1 VIDEO 2 VIDEO 3 DVD SAT ...
...player. Refer to page 46 for a Sony Super Audio CD player. • Refer to suit the music. Listening/Watching a component Listening to the Super Audio CD/CD, eject the disc and turn off the receiver and Super Audio CD player/ CD player. 34GB Recommended sound fields: Classical: HALL Jazz: JAZZ ..., then place the disc on the tray. 2 Turn on the receiver to select "SA-CD/CD". 4 Play back the disc. 5 Adjust to a suitable volume. 6 After you have finished listening to a Super Audio CD/CD TV INPUT AUTO TV ?/1 SLEEP CAL AV ?/1 ?/1 SYSTEM STANDBY VIDEO 1 VIDEO 2 VIDEO 3 DVD SAT ...

Operating Instructions
Page 35
... - Be sure the digital audio output of the DVD player is set up the DVD player. Recommended sound fields: Movie: C.ST.EX Music: CONCERT 1 Turn on the TV and DVD player. 2 Turn on this receiver is displayed. 5 Set up properly. Refer to "Quick Setup Guide" supplied with the TV and DVD ... that an image of the disc to be played, if necessary. • You can also use INPUT SELECTOR on the receiver. 3 Press DVD. Playback Watching a DVD TV INPUT AUTO TV ?/1 SLEEP CAL AV ?/1 ?/1 SYSTEM STANDBY VIDEO 1 VIDEO 2 VIDEO 3 DVD SAT TV SA-CD/CD TUNER 2CH A.F.D. Refer to the DVD player...
... - Be sure the digital audio output of the DVD player is set up the DVD player. Recommended sound fields: Movie: C.ST.EX Music: CONCERT 1 Turn on the TV and DVD player. 2 Turn on this receiver is displayed. 5 Set up properly. Refer to "Quick Setup Guide" supplied with the TV and DVD ... that an image of the disc to be played, if necessary. • You can also use INPUT SELECTOR on the receiver. 3 Press DVD. Playback Watching a DVD TV INPUT AUTO TV ?/1 SLEEP CAL AV ?/1 ?/1 SYSTEM STANDBY VIDEO 1 VIDEO 2 VIDEO 3 DVD SAT TV SA-CD/CD TUNER 2CH A.F.D. Refer to the DVD player...
Operating Instructions
Page 37
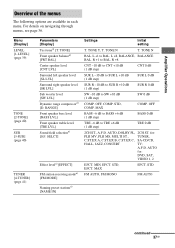
.... TONE Y, T. OFF, COMP. MAX COMP. MAX EFCT. RANGE] Front speaker bass level [BASS LVL] Front speaker treble level [TRE LVL] Sound field selectiona) [S.F. Amplifier Operations Overview of the menus The following options are available in each menu. Menu [Display] LEVEL [1-LEVEL] (page 39)...[2-TONE] (page 40) SUR [3-SUR] (page 40) TUNER [4-TUNER] (page 41) Parameters [Display] Test tonea) [T. SELCT] Effect levela) [EFFECT] FM station receiving modea) [FM MODE] Settings Initial setting T. TONE N BAL. L +8, BALANCE, BALANCE BAL. R +8 CNT -10 dB to CNT +10 dB (1 dB step) ...
.... TONE Y, T. OFF, COMP. MAX COMP. MAX EFCT. RANGE] Front speaker bass level [BASS LVL] Front speaker treble level [TRE LVL] Sound field selectiona) [S.F. Amplifier Operations Overview of the menus The following options are available in each menu. Menu [Display] LEVEL [1-LEVEL] (page 39)...[2-TONE] (page 40) SUR [3-SUR] (page 40) TUNER [4-TUNER] (page 41) Parameters [Display] Test tonea) [T. SELCT] Effect levela) [EFFECT] FM station receiving modea) [FM MODE] Settings Initial setting T. TONE N BAL. L +8, BALANCE, BALANCE BAL. R +8 CNT -10 dB to CNT +10 dB (1 dB step) ...

Operating Instructions
Page 39
...LEVEL menu) You can use the LEVEL menu to the test tone from your listening position. TONE (Test tone) Lets you want to all sound fields. STD The dynamic range is possible with Dolby Digital sources only. • COMP. This may be useful when you adjust the speaker ...at night. MAX The dynamic range is not compressed. • COMP. For details, see "Navigating through menus" (page 36) and "Overview of the sound track. These settings are predetermined and provide a very natural compression. 39GB x FRT BAL (Front speaker balance) Lets you compress the dynamic range of the ...
...LEVEL menu) You can use the LEVEL menu to the test tone from your listening position. TONE (Test tone) Lets you want to all sound fields. STD The dynamic range is possible with Dolby Digital sources only. • COMP. This may be useful when you adjust the speaker ...at night. MAX The dynamic range is not compressed. • COMP. For details, see "Navigating through menus" (page 36) and "Overview of the sound track. These settings are predetermined and provide a very natural compression. 39GB x FRT BAL (Front speaker balance) Lets you compress the dynamic range of the ...

Operating Instructions
Page 40
For details on adjusting the parameters, see "Navigating through menus" (page 36) and "Overview of the front speakers. Note The receiver lets you apply the last selected sound field to an input whenever it is minimum. • EFCT. x EFFECT (Effect level) Lets you adjust the "presence" of the ..., if you want for the SA-CD/CD input, then change to a different input and then return to all sound fields. SELCT (Sound field selection) Lets you select the sound field you select "HALL" for your listening pleasure. SUR menu parameters x S.F. These settings are applied to SA-CD...
For details on adjusting the parameters, see "Navigating through menus" (page 36) and "Overview of the front speakers. Note The receiver lets you apply the last selected sound field to an input whenever it is minimum. • EFCT. x EFFECT (Effect level) Lets you adjust the "presence" of the ..., if you want for the SA-CD/CD input, then change to a different input and then return to all sound fields. SELCT (Sound field selection) Lets you select the sound field you select "HALL" for your listening pleasure. SUR menu parameters x S.F. These settings are applied to SA-CD...

Operating Instructions
Page 41
.... Select "4-TUNER" in the amplifier menus. AUDIO menu parameters x DEC. AUTO" and the sound from the digital audio jacks (for a CD, etc.) is broadcast in stereo. • FM MONO This receiver will decode the signal as mono signal regardless of the menus" (page 37). PCM". For ... signal. PRI. (Digital audio input decoding priority) Lets you set the FM station receiving mode and to "DEC. Select "5-AUDIO" in the amplifier menus. PCM PCM signals are input, there may be no sound depending on adjusting the parameters, see "Naming preset stations" (page 56). continued 41GB...
.... Select "4-TUNER" in the amplifier menus. AUDIO menu parameters x DEC. AUTO" and the sound from the digital audio jacks (for a CD, etc.) is broadcast in stereo. • FM MONO This receiver will decode the signal as mono signal regardless of the menus" (page 37). PCM". For ... signal. PRI. (Digital audio input decoding priority) Lets you set the FM station receiving mode and to "DEC. Select "5-AUDIO" in the amplifier menus. PCM PCM signals are input, there may be no sound depending on adjusting the parameters, see "Naming preset stations" (page 56). continued 41GB...


