
Operating Guide
Page 7
...are subject to the above, when you dispose of the camcorder, it is recommended that you perform [ EMPTY]* to "Handycam Handbook" (PDF). 7 When the camcorder is on: - In addition to change without any ...situations. Change the screen language before using the camcorder at high altitudes • Do not turn on the camcorder in this manual are based on DCR-SR300. • The screenshots are used for... on use • The camcorder is recommended that you destroy the actual body of the camcorder. to apply mechanical shock or vibration to remove the battery pack or AC Adaptor from the...
...are subject to the above, when you dispose of the camcorder, it is recommended that you perform [ EMPTY]* to "Handycam Handbook" (PDF). 7 When the camcorder is on: - In addition to change without any ...situations. Change the screen language before using the camcorder at high altitudes • Do not turn on the camcorder in this manual are based on DCR-SR300. • The screenshots are used for... on use • The camcorder is recommended that you destroy the actual body of the camcorder. to apply mechanical shock or vibration to remove the battery pack or AC Adaptor from the...

Operating Guide
Page 8
...of Contents IMPORTANT SAFEGUARDS 2 Read this first 4 Notes on use 7 Getting Started Step 1: Checking supplied items 9 Step 2: Charging the battery pack 11 Step 3: Turning the power on, and setting the date and time 13 Changing the language setting 13 Step 4: Preparing for ...recording 14 Recording/Playback Recording 15 Playback 17 Parts and functions used for the camcorder 19 Indicators displayed during recording/playback 22 Saving images 24 Deleting images 24 Playing the image on a TV 25 Performing with a computer ...
...of Contents IMPORTANT SAFEGUARDS 2 Read this first 4 Notes on use 7 Getting Started Step 1: Checking supplied items 9 Step 2: Charging the battery pack 11 Step 3: Turning the power on, and setting the date and time 13 Changing the language setting 13 Step 4: Preparing for ...recording 14 Recording/Playback Recording 15 Playback 17 Parts and functions used for the camcorder 19 Indicators displayed during recording/playback 22 Saving images 24 Deleting images 24 Playing the image on a TV 25 Performing with a computer ...

Operating Guide
Page 9
... installed. Rechargeable battery pack NP-FH40 (1) (p.11) (DCR-SR42/SR62/ SR82) NP-FH60 (1) (p.11) (DCR-SR200/SR300) Handycam Station (1) (p.11) A/V connecting cable (1) (p.25) USB cable (1) (p.27) CD-ROM "Handycam Application Software" (1) (p.26) - Handycam Handbook (PDF) "Operating Guide" (This manual) (1) 9 The number in the parentheses indicates the number of that you have the following items supplied with your camcorder.
... installed. Rechargeable battery pack NP-FH40 (1) (p.11) (DCR-SR42/SR62/ SR82) NP-FH60 (1) (p.11) (DCR-SR200/SR300) Handycam Station (1) (p.11) A/V connecting cable (1) (p.25) USB cable (1) (p.27) CD-ROM "Handycam Application Software" (1) (p.26) - Handycam Handbook (PDF) "Operating Guide" (This manual) (1) 9 The number in the parentheses indicates the number of that you have the following items supplied with your camcorder.
Operating Guide
Page 10
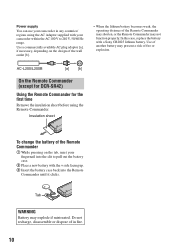
In this case, replace the battery with your camcorder within the AC 100 V to pull out the battery case. 2 Place a new battery with the + side facing up. 3 Insert the battery case back into the slit to 240 V, 50/60 Hz range. Use of another battery may present a risk of in any ...AC-L200/L200B [a] [b] On the Remote Commander (except for DCR-SR42) Using the Remote Commander for the first time Remove the insulation sheet before using the AC Adaptor supplied with a Sony CR2025 lithium battery. Insulation sheet To change the battery of the Remote Commander 1 While pressing on the design of ...
In this case, replace the battery with your camcorder within the AC 100 V to pull out the battery case. 2 Place a new battery with the + side facing up. 3 Insert the battery case back into the slit to 240 V, 50/60 Hz range. Use of another battery may present a risk of in any ...AC-L200/L200B [a] [b] On the Remote Commander (except for DCR-SR42) Using the Remote Commander for the first time Remove the insulation sheet before using the AC Adaptor supplied with a Sony CR2025 lithium battery. Insulation sheet To change the battery of the Remote Commander 1 While pressing on the design of ...
Operating Guide
Page 11
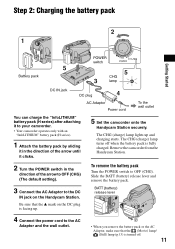
...facing up and charging starts. The CHG (charge) lamp turns off . 11 Slide the BATT (battery) release lever and remove the battery pack. The CHG (charge) lamp lights up . Remove the camcorder from the Handycam Station. 2 Turn the POWER switch in the direction of the arrow to OFF (CHG) (...The default setting). 3 Connect the AC Adaptor to OFF (CHG). Step 2: Charging the battery pack Getting Started POWER switch Battery pack CHG lamp DC IN jack ...
...facing up and charging starts. The CHG (charge) lamp turns off . 11 Slide the BATT (battery) release lever and remove the battery pack. The CHG (charge) lamp lights up . Remove the camcorder from the Handycam Station. 2 Turn the POWER switch in the direction of the arrow to OFF (CHG) (...The default setting). 3 Connect the AC Adaptor to OFF (CHG). Step 2: Charging the battery pack Getting Started POWER switch Battery pack CHG lamp DC IN jack ...

Operating Guide
Page 12
...charging/recording/playback time • Times measured when using your camcorder. • Do not use the AC Adaptor placed in a narrow space, such as the AC Adaptor is connected to the DC IN jack of your camcorder or the Handycam Station, even when the power cord is recommended). •...the wall outlet via the AC Adaptor. Recording/Playback time: Approximate time (min.) available when you fully charge a completely exhausted battery pack. NP-FH40: (Unit:min.) DCR-SR42 Charging time 125 Recording time*1 Continuous 105 recording time Typical recording time*4 50 Playback time 120...
...charging/recording/playback time • Times measured when using your camcorder. • Do not use the AC Adaptor placed in a narrow space, such as the AC Adaptor is connected to the DC IN jack of your camcorder or the Handycam Station, even when the power cord is recommended). •...the wall outlet via the AC Adaptor. Recording/Playback time: Approximate time (min.) available when you fully charge a completely exhausted battery pack. NP-FH40: (Unit:min.) DCR-SR42 Charging time 125 Recording time*1 Continuous 105 recording time Typical recording time*4 50 Playback time 120...

Operating Guide
Page 16
...camcorder, and do not remove the battery or AC Adaptor. • You can capture up to a "Memory Stick Duo." DCR-SR42/SR62: approx. 10 hours and 50 minutes DCR-SR82: approx. 21 hours and 40 minutes DCR...Sony Corporation. Do not shake or knock your camcorder is still being written onto the hard disk or "Memory Stick Duo." DCR-SR42: 5,900 ([VGA (0.3M)]) DCR-SR62/SR82: 1,800 ([1.0M]) DCR-SR200: 480 ([4.0M]) DCR...recording media of recordable images varies depending on the LCD screen. On Easy Handycam operation By pressing the EASY button, nearly all settings on the "Memory ...
...camcorder, and do not remove the battery or AC Adaptor. • You can capture up to a "Memory Stick Duo." DCR-SR42/SR62: approx. 10 hours and 50 minutes DCR-SR82: approx. 21 hours and 40 minutes DCR...Sony Corporation. Do not shake or knock your camcorder is still being written onto the hard disk or "Memory Stick Duo." DCR-SR42: 5,900 ([VGA (0.3M)]) DCR-SR62/SR82: 1,800 ([1.0M]) DCR-SR200: 480 ([4.0M]) DCR...recording media of recordable images varies depending on the LCD screen. On Easy Handycam operation By pressing the EASY button, nearly all settings on the "Memory ...

Operating Guide
Page 20
.... 8 Flash*2 Flashes when using a tripod screw. qh NIGHTSHOT switch*2 To record in mirror mode, open the LCD screen 90 degrees to the camcorder (1), then rotate it 180 degrees to optional accessories such as you can select the settings for the flash. The accessory can be less than 5.5... lens side (2). w; qd EASY button See page 16. When you press while the power is set to on your camcorder. qf (flash) button*2 You can check the remaining battery. q; Zoom buttons Press for date and time. To cancel the back light function, press BACK LIGHT again. ql RESET...
.... 8 Flash*2 Flashes when using a tripod screw. qh NIGHTSHOT switch*2 To record in mirror mode, open the LCD screen 90 degrees to the camcorder (1), then rotate it 180 degrees to optional accessories such as you can select the settings for the flash. The accessory can be less than 5.5... lens side (2). w; qd EASY button See page 16. When you press while the power is set to on your camcorder. qf (flash) button*2 You can check the remaining battery. q; Zoom buttons Press for date and time. To cancel the back light function, press BACK LIGHT again. ql RESET...

Operating Guide
Page 31
..., then turn on. • Attach a charged battery pack to the camcorder (p.11). • Connect the plug of your camcorder, the camcorder is because the power has been turned on for repair. Buttons do not work , press the RESET button (p.20) using your Sony dealer. Cancel Easy Handycam operation. Your camcorder gets warm. • This is automatically turned...
..., then turn on. • Attach a charged battery pack to the camcorder (p.11). • Connect the plug of your camcorder, the camcorder is because the power has been turned on for repair. Buttons do not work , press the RESET button (p.20) using your Sony dealer. Cancel Easy Handycam operation. Your camcorder gets warm. • This is automatically turned...

Operating Guide
Page 32
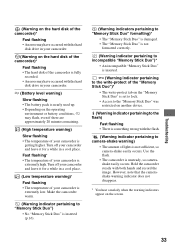
... There are some functions you can fix by yourself. This is not an "InfoLITHIUM" battery pack. Self-diagnosis display/Warning indicators If indicators appear on your camcorder while the lens cover is closed (DCR-SR42/ SR62/SR82). • When you turn on the screen. C:04:00 C:(or ...The file is damaged. • The file is unreadable. 32 For details, see "Handycam Handbook" (PDF). If the problem persists even after you cannot service has occurred. Reconnect it and operate your Sony dealer or local authorized Sony service facility. E:20:ss / E:31:ss / E:61:ss / E:62:ss...
... There are some functions you can fix by yourself. This is not an "InfoLITHIUM" battery pack. Self-diagnosis display/Warning indicators If indicators appear on your camcorder while the lens cover is closed (DCR-SR42/ SR62/SR82). • When you turn on the screen. C:04:00 C:(or ...The file is damaged. • The file is unreadable. 32 For details, see "Handycam Handbook" (PDF). If the problem persists even after you cannot service has occurred. Reconnect it and operate your Sony dealer or local authorized Sony service facility. E:20:ss / E:31:ss / E:61:ss / E:62:ss...
Operating Guide
Page 33
... approximately 20 minutes remaining. (High temperature warning) Slow flashing • The temperature of your camcorder is nearly used up. • Depending on the screen. 33 E (Battery level warning) Slow flashing • The battery pack is getting higher. Make the camcorder warm. (Warning indicator pertaining to "Memory Stick Duo") • No "Memory Stick Duo" is...
... approximately 20 minutes remaining. (High temperature warning) Slow flashing • The temperature of your camcorder is nearly used up. • Depending on the screen. 33 E (Battery level warning) Slow flashing • The battery pack is getting higher. Make the camcorder warm. (Warning indicator pertaining to "Memory Stick Duo") • No "Memory Stick Duo" is...
Operating Guide
Page 34
...or in a car parked in the sun. This is accidentally swallowed, consult a doctor immediately (DCR-SR62/SR82/SR200/SR300). • If the battery electrolytic liquid has leaked: - Handling the camcorder with plenty of the lens. • Keep the POWER switch setting to OFF (CHG) when... the casing is not a malfunction. • While using your camcorder. • Do not wrap your local authorized Sony service facility. - Noise may not be repaired. - Doing so might cause heat to the finish: - consult your camcorder with a dry soft cloth. • Avoid the following locations:...
...or in a car parked in the sun. This is accidentally swallowed, consult a doctor immediately (DCR-SR62/SR82/SR200/SR300). • If the battery electrolytic liquid has leaked: - Handling the camcorder with plenty of the lens. • Keep the POWER switch setting to OFF (CHG) when... the casing is not a malfunction. • While using your camcorder. • Do not wrap your local authorized Sony service facility. - Noise may not be repaired. - Doing so might cause heat to the finish: - consult your camcorder with a dry soft cloth. • Avoid the following locations:...
Operating Guide
Page 35
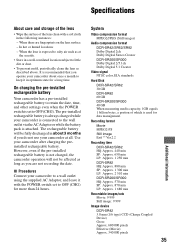
... outlet via the AC Adaptor or while the battery pack is not charged, the camcorder operation will be affected as long as at all. However, even if the pre-installed rechargeable battery is attached. System Video compression format MPEG2/JPEG (Still images) Audio compression format DCR-SR42/SR62/SR82 Dolby Digital 2ch Dolby Digital Stereo...
... outlet via the AC Adaptor or while the battery pack is not charged, the camcorder operation will be affected as long as at all. However, even if the pre-installed rechargeable battery is attached. System Video compression format MPEG2/JPEG (Still images) Audio compression format DCR-SR42/SR62/SR82 Dolby Digital 2ch Dolby Digital Stereo...
Operating Guide
Page 37
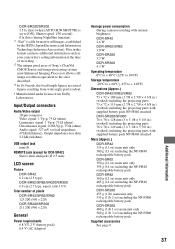
...) *1 "Exif" is a file format for DCR-SR42) Stereo mini-minijack (Ø 2.5 mm) LCD screen Picture DCR-SR42 6.2 cm (2.5 type) DCR-SR62/SR82/SR200/SR300 6.9 cm (2.7 type, aspect ratio 16:9) Total number of pixels DCR-SR42/SR62/SR82 123 200 (560 × 220) DCR-SR200/SR300 211 200 (960 × 220) General Power requirements 6.8 V/7.2 V (battery pack) 8.4 V (AC Adaptor) Average power...
...) *1 "Exif" is a file format for DCR-SR42) Stereo mini-minijack (Ø 2.5 mm) LCD screen Picture DCR-SR42 6.2 cm (2.5 type) DCR-SR62/SR82/SR200/SR300 6.9 cm (2.7 type, aspect ratio 16:9) Total number of pixels DCR-SR42/SR62/SR82 123 200 (560 × 220) DCR-SR200/SR300 211 200 (960 × 220) General Power requirements 6.8 V/7.2 V (battery pack) 8.4 V (AC Adaptor) Average power...

