Operating Guide
Page 5
... Conformity Trade Name: SONY Model No.: DCR-SR200 Responsible Party: Sony Electronics Inc. Operation is connected. - Address: 16530 Via Esprillo, San Diego, CA 92127 U.S.A Telephone number: 858-942-2230 This device complies with the Handycam Station Model DCRA-C171 and AC Adaptor Model AC-L200/L200B. Notes DCR-SR42, DCR-SR62, DCR-SR82, DCR-SR200 and DCR-SR300 are to which...
... Conformity Trade Name: SONY Model No.: DCR-SR200 Responsible Party: Sony Electronics Inc. Operation is connected. - Address: 16530 Via Esprillo, San Diego, CA 92127 U.S.A Telephone number: 858-942-2230 This device complies with the Handycam Station Model DCRA-C171 and AC Adaptor Model AC-L200/L200B. Notes DCR-SR42, DCR-SR62, DCR-SR82, DCR-SR200 and DCR-SR300 are to which...

Operating Guide
Page 7
.../play back on the camcorder, due to the copyright laws. If you destroy the actual body of the camcorder being activated in this manual are based on DCR-SR300. • The... shock by dropping, the camcorder has the drop sensor function*. Change the screen language before using a computer. to apply mechanical shock or vibration to "Handycam Handbook" (PDF). 7 ... disk of the camcorder, you perform [ EMPTY]* to the above, when you dispose of the camcorder, it is connected to a computer • Do not try to a malfunction of your camcorder. About language setting...
.../play back on the camcorder, due to the copyright laws. If you destroy the actual body of the camcorder being activated in this manual are based on DCR-SR300. • The... shock by dropping, the camcorder has the drop sensor function*. Change the screen language before using a computer. to apply mechanical shock or vibration to "Handycam Handbook" (PDF). 7 ... disk of the camcorder, you perform [ EMPTY]* to the above, when you dispose of the camcorder, it is connected to a computer • Do not try to a malfunction of your camcorder. About language setting...

Operating Guide
Page 9
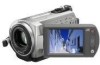
... number of that you have the following items supplied with your camcorder. Rechargeable battery pack NP-FH40 (1) (p.11) (DCR-SR42/SR62/ SR82) NP-FH60 (1) (p.11) (DCR-SR200/SR300) Handycam Station (1) (p.11) A/V connecting cable (1) (p.25) USB cable (1) (p.27) CD-ROM "Handycam Application Software" (1) (p.26) - Picture Motion Browser (Software) - Handycam Handbook (PDF) "Operating Guide" (This manual) (1) 9 AC Adaptor (1) (p.11) Power...
... number of that you have the following items supplied with your camcorder. Rechargeable battery pack NP-FH40 (1) (p.11) (DCR-SR42/SR62/ SR82) NP-FH60 (1) (p.11) (DCR-SR200/SR300) Handycam Station (1) (p.11) A/V connecting cable (1) (p.25) USB cable (1) (p.27) CD-ROM "Handycam Application Software" (1) (p.26) - Picture Motion Browser (Software) - Handycam Handbook (PDF) "Operating Guide" (This manual) (1) 9 AC Adaptor (1) (p.11) Power...
Operating Guide
Page 11
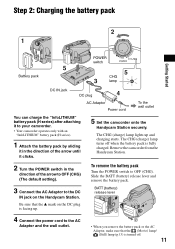
... pack (H series). 1 Attach the battery pack by sliding it clicks. 5 Set the camcorder onto the Handycam Station securely. Slide the BATT (battery) release lever and remove the battery pack. Remove the camcorder from the Handycam Station. 2 Turn the POWER switch in the direction of the arrow until it in the... direction of the arrow to OFF (CHG) (The default setting). 3 Connect the AC Adaptor to the AC Adaptor and the wall ...
... pack (H series). 1 Attach the battery pack by sliding it clicks. 5 Set the camcorder onto the Handycam Station securely. Slide the BATT (battery) release lever and remove the battery pack. Remove the camcorder from the Handycam Station. 2 Turn the POWER switch in the direction of the arrow until it in the... direction of the arrow to OFF (CHG) (The default setting). 3 Connect the AC Adaptor to the AC Adaptor and the wall ...

Operating Guide
Page 12
...pack using only the AC Adaptor Turn the POWER switch to OFF (CHG), then connect the AC Adaptor directly to [SP]. *2 When the LCD backlight turns on. *... between a wall and furniture. • Do not short-circuit the DC plug of your camcorder or the Handycam Station, even when the power cord is set to the DC IN jack on the conditions ...time (min.) required when you use your camcorder. Recording/Playback time: Approximate time (min.) available when you fully charge a completely exhausted battery pack. NP-FH40: (Unit:min.) DCR-SR42 Charging time 125 Recording time*1 Continuous 105...
...pack using only the AC Adaptor Turn the POWER switch to OFF (CHG), then connect the AC Adaptor directly to [SP]. *2 When the LCD backlight turns on. *... between a wall and furniture. • Do not short-circuit the DC plug of your camcorder or the Handycam Station, even when the power cord is set to the DC IN jack on the conditions ...time (min.) required when you use your camcorder. Recording/Playback time: Approximate time (min.) available when you fully charge a completely exhausted battery pack. NP-FH40: (Unit:min.) DCR-SR42 Charging time 125 Recording time*1 Continuous 105...

Operating Guide
Page 20
... (Reset), press RESET to display .. Zoom buttons You can select the settings for date and time. Connecting to other devices 3 A/V OUT jack Connect with the A/V connecting cable. 4 REMOTE jack*3 Connect other optional accessories. 5 Active Interface Shoe *3 The Active Interface Shoe supplies power to the tripod receptacle ... as a video light, a flash, or a microphone. When you press while the power is set the NIGHTSHOT switch to on your camcorder. qd EASY button See page 16. Playback 1 Power zoom lever q; The accessory can check the remaining battery. qs DISP/BATT INFO ...
... (Reset), press RESET to display .. Zoom buttons You can select the settings for date and time. Connecting to other devices 3 A/V OUT jack Connect with the A/V connecting cable. 4 REMOTE jack*3 Connect other optional accessories. 5 Active Interface Shoe *3 The Active Interface Shoe supplies power to the tripod receptacle ... as a video light, a flash, or a microphone. When you press while the power is set the NIGHTSHOT switch to on your camcorder. qd EASY button See page 16. Playback 1 Power zoom lever q; The accessory can check the remaining battery. qs DISP/BATT INFO ...
Operating Guide
Page 21
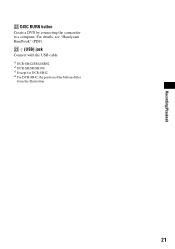
wd (USB) jack Connect with the USB cable. *1 DCR-SR42/SR62/SR82 *2 DCR-SR200/SR300 *3 Except for DCR-SR42 *4 For DCR-SR42, the position of the buttons differ from the illustration. 21 For details, see "Handycam Handbook" (PDF). Recording/Playback ws DISC BURN button Create a DVD by connecting the camcorder to a computer.
wd (USB) jack Connect with the USB cable. *1 DCR-SR42/SR62/SR82 *2 DCR-SR200/SR300 *3 Except for DCR-SR42 *4 For DCR-SR42, the position of the buttons differ from the illustration. 21 For details, see "Handycam Handbook" (PDF). Recording/Playback ws DISC BURN button Create a DVD by connecting the camcorder to a computer.
Operating Guide
Page 23
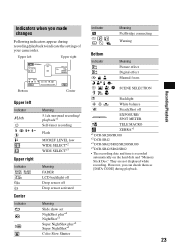
... settings of your camcorder. They are not displayed while recording. Backlight n White balance SteadyShot off Drop sensor activated Meaning Slide show set NightShot plus*4 NightShot*1 Super NightShot plus*4 Super NightShot*1 Color Slow Shutter Indicator E Meaning PictBridge connecting Warning Bottom Indicator ... WIDE SELECT*3 Meaning FADER LCD backlight off Drop sensor off EXPOSURE/ SPOT METER TELE MACRO ZEBRA*1 *1 DCR-SR200/SR300 *2 DCR-SR42 *3 DCR-SR62/SR82/SR200/SR300 *4 DCR-SR42/SR62/SR82 • The recording date and time is recorded automatically on the hard disk and "Memory ...
... settings of your camcorder. They are not displayed while recording. Backlight n White balance SteadyShot off Drop sensor activated Meaning Slide show set NightShot plus*4 NightShot*1 Super NightShot plus*4 Super NightShot*1 Color Slow Shutter Indicator E Meaning PictBridge connecting Warning Bottom Indicator ... WIDE SELECT*3 Meaning FADER LCD backlight off Drop sensor off EXPOSURE/ SPOT METER TELE MACRO ZEBRA*1 *1 DCR-SR200/SR300 *2 DCR-SR42 *3 DCR-SR62/SR82/SR200/SR300 *4 DCR-SR42/SR62/SR82 • The recording date and time is recorded automatically on the hard disk and "Memory ...

Operating Guide
Page 24
For details, see "Handycam Handbook" (PDF). Saving images by connecting your computer on a DVD. For details, see "Handycam Handbook" (PDF). Saving images on a computer You can dub images to the type of a computer. Deleting the images on the hard disk 1 On the... "Memory Stick Duo" 1 In step 2, touch [ DELETE]. 2 Touch [ DELETE], then touch the still image to be deleted. Due to some type of your camcorder. Saving images Deleting images Recorded images are stored on the internal hard disk of external media such as described below. Saving images using a computer By...
For details, see "Handycam Handbook" (PDF). Saving images by connecting your computer on a DVD. For details, see "Handycam Handbook" (PDF). Saving images on a computer You can dub images to the type of a computer. Deleting the images on the hard disk 1 On the... "Memory Stick Duo" 1 In step 2, touch [ DELETE]. 2 Touch [ DELETE], then touch the still image to be deleted. Due to some type of your camcorder. Saving images Deleting images Recorded images are stored on the internal hard disk of external media such as described below. Saving images using a computer By...
Operating Guide
Page 25
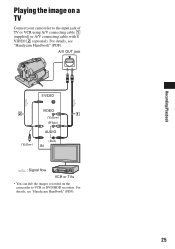
A/V OUT jack S VIDEO VIDEO (Yellow) (White) AUDIO (Yellow) (Red) IN : Signal flow VCR or TVs • You can dub the images recorded on a TV Connect your camcorder to VCR or DVD/HDD recorders. Recording/Playback Playing the image on the camcorder to the input jack of TV or VCR using A/V connecting cable 1 (supplied) or A/V connecting cable with S VIDEO 2 (optional). For details, see "Handycam Handbook" (PDF). 25 For details, see "Handycam Handbook" (PDF).
A/V OUT jack S VIDEO VIDEO (Yellow) (White) AUDIO (Yellow) (Red) IN : Signal flow VCR or TVs • You can dub the images recorded on a TV Connect your camcorder to VCR or DVD/HDD recorders. Recording/Playback Playing the image on the camcorder to the input jack of TV or VCR using A/V connecting cable 1 (supplied) or A/V connecting cable with S VIDEO 2 (optional). For details, see "Handycam Handbook" (PDF). 25 For details, see "Handycam Handbook" (PDF).
Operating Guide
Page 26
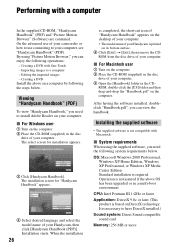
... appears. 3 Click [Handycam Handbook]. ROM, double-click...remove the CD- Viewing "Handycam Handbook" (PDF) To view "Handycam Handbook," you can enjoy the following operations..."Handycam Handbook" appears on the desktop of your computer. • The model name of your Handycam is... For Windows user 1 Turn on your computer, see "Handycam Handbook" (PDF). Installation starts. Creating a DVD Install the...ROM from the disc drive of your camcorder or how to use of your computer..."Handycam Handbook" appears. 4 Select desired language and select the model name of your Handycam, then click [Handycam ...
... appears. 3 Click [Handycam Handbook]. ROM, double-click...remove the CD- Viewing "Handycam Handbook" (PDF) To view "Handycam Handbook," you can enjoy the following operations..."Handycam Handbook" appears on the desktop of your computer. • The model name of your Handycam is... For Windows user 1 Turn on your computer, see "Handycam Handbook" (PDF). Installation starts. Creating a DVD Install the...ROM from the disc drive of your camcorder or how to use of your computer..."Handycam Handbook" appears. 4 Select desired language and select the model name of your Handycam, then click [Handycam ...

Operating Guide
Page 27
...in 2ch sound. • If you agree, then click [Next]. 8 Set the camcorder onto the Handycam Station, then turn the POWER switch to turn on. 9 Connect the Handycam Station to your camcorder to the power saving function of your computer after completing the installation. 27 Recording/Playback ... time. However, imported images and images on a DVD created subsequently will not work properly due to the computer. Provide the camcorder and the Handycam Station, and a USB cable beforehand. Otherwise, the software will not be installed and procedures may differ depending on your OS....
...in 2ch sound. • If you agree, then click [Next]. 8 Set the camcorder onto the Handycam Station, then turn the POWER switch to turn on. 9 Connect the Handycam Station to your camcorder to the power saving function of your computer after completing the installation. 27 Recording/Playback ... time. However, imported images and images on a DVD created subsequently will not work properly due to the computer. Provide the camcorder and the Handycam Station, and a USB cable beforehand. Otherwise, the software will not be installed and procedures may differ depending on your OS....

Operating Guide
Page 31
...11). • Set the camcorder onto the Handycam Station securely (p.11). The camcorder does not operate even when the power is set to troubleshoot the problem. This is turned on . • Attach a charged battery pack to the camcorder (p.11). • Connect the plug of the AC Adaptor... the recordable capacity of your data. Notes before sending your camcorder is because the power has been turned on other media (backup) before sending your camcorder, the camcorder is full. Turn off your Sony dealer. Your camcorder gets warm. • This is extremely low. Pressing START...
...11). • Set the camcorder onto the Handycam Station securely (p.11). The camcorder does not operate even when the power is set to troubleshoot the problem. This is turned on . • Attach a charged battery pack to the camcorder (p.11). • Connect the plug of the AC Adaptor... the recordable capacity of your data. Notes before sending your camcorder is because the power has been turned on other media (backup) before sending your camcorder, the camcorder is full. Turn off your Sony dealer. Your camcorder gets warm. • This is extremely low. Pressing START...

Operating Guide
Page 32
.... For details, see "Handycam Handbook" (PDF). Reconnect it and operate your camcorder again. • Turn on your Sony dealer or local authorized Sony service facility. Lights appear on your camcorder securely (p.11). Use an "InfoLITHIUM" battery pack (p.11). • Connect the DC plug of the... AC Adaptor to files) Slow flashing • The file is damaged. • The file is unreadable. 32 C:13:ss / C:32:ss • Remove the power source. If the problem persists even after you turn on the screen even if the lens cover is closed (DCR-SR42...
.... For details, see "Handycam Handbook" (PDF). Reconnect it and operate your camcorder again. • Turn on your Sony dealer or local authorized Sony service facility. Lights appear on your camcorder securely (p.11). Use an "InfoLITHIUM" battery pack (p.11). • Connect the DC plug of the... AC Adaptor to files) Slow flashing • The file is damaged. • The file is unreadable. 32 C:13:ss / C:32:ss • Remove the power source. If the problem persists even after you turn on the screen even if the lens cover is closed (DCR-SR42...
Operating Guide
Page 35
... long time. x Procedures Connect your camcorder about once a month to OFF (CHG) for more than 24 hours. System Video compression format MPEG2/JPEG (Still images) Audio compression format DCR-SR42/SR62/SR82 Dolby Digital 2ch Dolby Digital Stereo Creator DCR-SR200/SR300 Dolby Digital 2/5.1ch...image: 9 999 Image device DCR-SR42 3.0 mm (1/6 type) CCD (Charge Coupled Device) Gross: Approx. 680 000 pixels Effective (Movie): Approx. 340 000 pixels 35 Additional Information The pre-installed rechargeable battery is always charged while your camcorder after charging the preinstalled rechargeable ...
... long time. x Procedures Connect your camcorder about once a month to OFF (CHG) for more than 24 hours. System Video compression format MPEG2/JPEG (Still images) Audio compression format DCR-SR42/SR62/SR82 Dolby Digital 2ch Dolby Digital Stereo Creator DCR-SR200/SR300 Dolby Digital 2/5.1ch...image: 9 999 Image device DCR-SR42 3.0 mm (1/6 type) CCD (Charge Coupled Device) Gross: Approx. 680 000 pixels Effective (Movie): Approx. 340 000 pixels 35 Additional Information The pre-installed rechargeable battery is always charged while your camcorder after charging the preinstalled rechargeable ...


