Operating Guide
Page 5
...to comply with the Handycam Station Model DCRA-C171 and AC Adaptor Model AC-L200/L200B. Operation is connected. - This equipment ...generates, uses, and can be determined by turning the equipment off and on a circuit different from that any interference received, including interference that may cause undesired operation. For the State of Conformity Trade Name: SONY Model No.: DCR-SR200 Responsible Party: Sony...be used with the limits for help. Notes DCR-SR42, DCR-SR62, DCR-SR82, DCR-SR200 and DCR-SR300 are designed to Subpart B of Part ...
...to comply with the Handycam Station Model DCRA-C171 and AC Adaptor Model AC-L200/L200B. Operation is connected. - This equipment ...generates, uses, and can be determined by turning the equipment off and on a circuit different from that any interference received, including interference that may cause undesired operation. For the State of Conformity Trade Name: SONY Model No.: DCR-SR200 Responsible Party: Sony...be used with the limits for help. Notes DCR-SR42, DCR-SR62, DCR-SR82, DCR-SR200 and DCR-SR300 are designed to Subpart B of Part ...

Operating Guide
Page 7
...on-screen displays in each local language are recorded without notice. • Unless otherwise specially indicated, illustrations in this manual are based on DCR-SR300. • The screenshots are from being lost , save the image data on a disc such as DVD-R using your recorded ... video tapes, and other accessories are subject to "Handycam Handbook" (PDF). 7 Also, you can save your image data using a computer. If you may be copyrighted. When the camcorder is connected to a computer • Do not try to the camcorder. to apply mechanical shock or vibration to format the...
...on-screen displays in each local language are recorded without notice. • Unless otherwise specially indicated, illustrations in this manual are based on DCR-SR300. • The screenshots are from being lost , save the image data on a disc such as DVD-R using your recorded ... video tapes, and other accessories are subject to "Handycam Handbook" (PDF). 7 Also, you can save your image data using a computer. If you may be copyrighted. When the camcorder is connected to a computer • Do not try to the camcorder. to apply mechanical shock or vibration to format the...

Operating Guide
Page 9
... NP-FH40 (1) (p.11) (DCR-SR42/SR62/ SR82) NP-FH60 (1) (p.11) (DCR-SR200/SR300) Handycam Station (1) (p.11) A/V connecting cable (1) (p.25) USB cable (1) (p.27) CD-ROM "Handycam Application Software" (1) (p.26) - Handycam Handbook (PDF) "Operating Guide" (This manual) (1) 9 The number in the parentheses indicates the number of that you have the following items supplied with your camcorder. Picture Motion Browser (Software...
... NP-FH40 (1) (p.11) (DCR-SR42/SR62/ SR82) NP-FH60 (1) (p.11) (DCR-SR200/SR300) Handycam Station (1) (p.11) A/V connecting cable (1) (p.25) USB cable (1) (p.27) CD-ROM "Handycam Application Software" (1) (p.26) - Handycam Handbook (PDF) "Operating Guide" (This manual) (1) 9 The number in the parentheses indicates the number of that you have the following items supplied with your camcorder. Picture Motion Browser (Software...
Operating Guide
Page 11
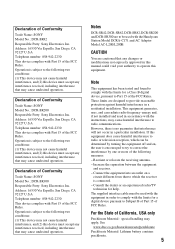
... the direction of the arrow until it clicks. 5 Set the camcorder onto the Handycam Station securely. Slide the BATT (battery) release lever and remove the battery pack. The CHG (charge) lamp turns off . 11 Remove the camcorder from the Handycam Station. 2 Turn the POWER switch in the direction of the... arrow to OFF (CHG) (The default setting). 3 Connect the AC Adaptor to the DC IN jack on the DC plug is fully charged...
... the direction of the arrow until it clicks. 5 Set the camcorder onto the Handycam Station securely. Slide the BATT (battery) release lever and remove the battery pack. The CHG (charge) lamp turns off . 11 Remove the camcorder from the Handycam Station. 2 Turn the POWER switch in the direction of the... arrow to OFF (CHG) (The default setting). 3 Connect the AC Adaptor to the DC IN jack on the DC plug is fully charged...

Operating Guide
Page 12
.... On the charging/recording/playback time • Times measured when using your camcorder in a narrow space, such as the AC Adaptor is disconnected from the wall outlet. NP-FH40: (Unit:min.) DCR-SR42 Charging time 125 Recording time*1 Continuous 105 recording time Typical recording time*4 50...recommended). • The available recording and playback time will be shorter when you use your camcorder. • Do not use your camcorder or the Handycam Station, even when the power cord is connected to the DC IN jack on . *3When the LCD backlight turns off and zooming. ...
.... On the charging/recording/playback time • Times measured when using your camcorder in a narrow space, such as the AC Adaptor is disconnected from the wall outlet. NP-FH40: (Unit:min.) DCR-SR42 Charging time 125 Recording time*1 Continuous 105 recording time Typical recording time*4 50...recommended). • The available recording and playback time will be shorter when you use your camcorder. • Do not use your camcorder or the Handycam Station, even when the power cord is connected to the DC IN jack on . *3When the LCD backlight turns off and zooming. ...

Operating Guide
Page 20
...Attach the shoulder belt (optional). qh NIGHTSHOT switch*2 To record in mirror mode, open the LCD screen 90 degrees to the camcorder (1), then rotate it 180 degrees to the lens side (2). ql RESET button To initialize the settings (Reset), press RESET to ...BACK LIGHT again. Playback 1 Power zoom lever q; Connecting to other devices 3 A/V OUT jack Connect with the A/V connecting cable. 4 REMOTE jack*3 Connect other optional accessories. 5 Active Interface Shoe *3 The Active Interface Shoe supplies power to on your camcorder. Zoom buttons Press for backlit subjects, press BACK LIGHT...
...Attach the shoulder belt (optional). qh NIGHTSHOT switch*2 To record in mirror mode, open the LCD screen 90 degrees to the camcorder (1), then rotate it 180 degrees to the lens side (2). ql RESET button To initialize the settings (Reset), press RESET to ...BACK LIGHT again. Playback 1 Power zoom lever q; Connecting to other devices 3 A/V OUT jack Connect with the A/V connecting cable. 4 REMOTE jack*3 Connect other optional accessories. 5 Active Interface Shoe *3 The Active Interface Shoe supplies power to on your camcorder. Zoom buttons Press for backlit subjects, press BACK LIGHT...
Operating Guide
Page 21
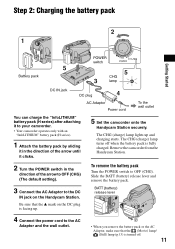
For details, see "Handycam Handbook" (PDF). wd (USB) jack Connect with the USB cable. *1 DCR-SR42/SR62/SR82 *2 DCR-SR200/SR300 *3 Except for DCR-SR42 *4 For DCR-SR42, the position of the buttons differ from the illustration. 21 Recording/Playback ws DISC BURN button Create a DVD by connecting the camcorder to a computer.
For details, see "Handycam Handbook" (PDF). wd (USB) jack Connect with the USB cable. *1 DCR-SR42/SR62/SR82 *2 DCR-SR200/SR300 *3 Except for DCR-SR42 *4 For DCR-SR42, the position of the buttons differ from the illustration. 21 Recording/Playback ws DISC BURN button Create a DVD by connecting the camcorder to a computer.
Operating Guide
Page 23
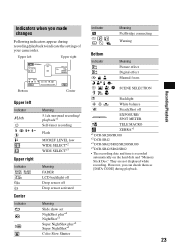
...activated Meaning Slide show set NightShot plus*4 NightShot*1 Super NightShot plus*4 Super NightShot*1 Color Slow Shutter Indicator E Meaning PictBridge connecting Warning Bottom Indicator 9 Meaning Picture effect Digital effect Manual focus SCENE SELECTION . They are not displayed while recording. Upper left...WIDE SELECT*3 Meaning FADER LCD backlight off Drop sensor off EXPOSURE/ SPOT METER TELE MACRO ZEBRA*1 *1 DCR-SR200/SR300 *2 DCR-SR42 *3 DCR-SR62/SR82/SR200/SR300 *4 DCR-SR42/SR62/SR82 • The recording date and time is recorded automatically on the hard disk and "Memory...
...activated Meaning Slide show set NightShot plus*4 NightShot*1 Super NightShot plus*4 Super NightShot*1 Color Slow Shutter Indicator E Meaning PictBridge connecting Warning Bottom Indicator 9 Meaning Picture effect Digital effect Manual focus SCENE SELECTION . They are not displayed while recording. Upper left...WIDE SELECT*3 Meaning FADER LCD backlight off Drop sensor off EXPOSURE/ SPOT METER TELE MACRO ZEBRA*1 *1 DCR-SR200/SR300 *2 DCR-SR42 *3 DCR-SR62/SR82/SR200/SR300 *4 DCR-SR42/SR62/SR82 • The recording date and time is recorded automatically on the hard disk and "Memory...

Operating Guide
Page 24
...DVD. To delete the still images in step 2, touch [ DELETE ALL] t [YES] t [YES] t . 24 For details, see "Handycam Handbook" (PDF). Saving images by connecting your camcorder to other devices You can also edit those images. The selected image is marked with selected images You can save images on... the camcorder as a DVD-R or a computer. To delete all still images on the hard disk of a computer....
...DVD. To delete the still images in step 2, touch [ DELETE ALL] t [YES] t [YES] t . 24 For details, see "Handycam Handbook" (PDF). Saving images by connecting your camcorder to other devices You can also edit those images. The selected image is marked with selected images You can save images on... the camcorder as a DVD-R or a computer. To delete all still images on the hard disk of a computer....
Operating Guide
Page 25
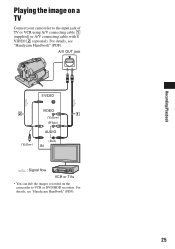
A/V OUT jack S VIDEO VIDEO (Yellow) (White) AUDIO (Yellow) (Red) IN : Signal flow VCR or TVs • You can dub the images recorded on a TV Connect your camcorder to VCR or DVD/HDD recorders. For details, see "Handycam Handbook" (PDF). Recording/Playback Playing the image on the camcorder to the input jack of TV or VCR using A/V connecting cable 1 (supplied) or A/V connecting cable with S VIDEO 2 (optional). For details, see "Handycam Handbook" (PDF). 25
A/V OUT jack S VIDEO VIDEO (Yellow) (White) AUDIO (Yellow) (Red) IN : Signal flow VCR or TVs • You can dub the images recorded on a TV Connect your camcorder to VCR or DVD/HDD recorders. For details, see "Handycam Handbook" (PDF). Recording/Playback Playing the image on the camcorder to the input jack of TV or VCR using A/V connecting cable 1 (supplied) or A/V connecting cable with S VIDEO 2 (optional). For details, see "Handycam Handbook" (PDF). 25
Operating Guide
Page 26
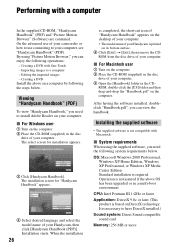
... the above OS has been upgraded or in the disc drive of your camcorder or how to use connecting to a computer - After having the software installed, doubleclick "Handbook.pdf", you need the following operations: - Viewing "Handycam Handbook" (PDF) To view "Handycam Handbook," you can enjoy the following system requirements below . When the installation 26...
... the above OS has been upgraded or in the disc drive of your camcorder or how to use connecting to a computer - After having the software installed, doubleclick "Handbook.pdf", you need the following operations: - Viewing "Handycam Handbook" (PDF) To view "Handycam Handbook," you can enjoy the following system requirements below . When the installation 26...

Operating Guide
Page 27
The installation is not connected to your computer after completing the installation. 27 Provide the camcorder and the Handycam Station, and a USB cable beforehand. The sound is set up for your computer. Otherwise, the software will not be affected. • ...Even if a screen prompting you to restart your computer appears, you agree, then click [Next]. 8 Set the camcorder onto the Handycam Station, then turn the POWER switch to turn on. 9 Connect the Handycam Station to the computer. 2 Turn on the computer. • Log on as the power source. Recording/Playback Hard...
The installation is not connected to your computer after completing the installation. 27 Provide the camcorder and the Handycam Station, and a USB cable beforehand. The sound is set up for your computer. Otherwise, the software will not be affected. • ...Even if a screen prompting you to restart your computer appears, you agree, then click [Next]. 8 Set the camcorder onto the Handycam Station, then turn the POWER switch to turn on. 9 Connect the Handycam Station to the computer. 2 Turn on the computer. • Log on as the power source. Recording/Playback Hard...

Operating Guide
Page 31
... media (backup) before sending your Sony dealer. The recording stops. • The temperature of your camcorder to be ready to shoot after about 1 minute. Be sure to save the data on the internal hard disk (see "Handycam Handbook" (PDF)) on . The camcorder does not operate even when the ...on . • Attach a charged battery pack to the camcorder (p.11). • Connect the plug of the AC Adaptor to the wall outlet (p.11). • Set the camcorder onto the Handycam Station securely (p.11). The power abruptly turns off the camcorder and take it after the power is extremely high/low. ...
... media (backup) before sending your Sony dealer. The recording stops. • The temperature of your camcorder to be ready to shoot after about 1 minute. Be sure to save the data on the internal hard disk (see "Handycam Handbook" (PDF)) on . The camcorder does not operate even when the ...on . • Attach a charged battery pack to the camcorder (p.11). • Connect the plug of the AC Adaptor to the wall outlet (p.11). • Set the camcorder onto the Handycam Station securely (p.11). The power abruptly turns off the camcorder and take it after the power is extremely high/low. ...

Operating Guide
Page 32
... indicator pertaining to the DC IN jack of the Handycam Station or your Sony dealer or local authorized Sony service facility. Use an "InfoLITHIUM" battery pack (p.11). • Connect the DC plug of times, contact your camcorder securely (p.11). Contact your camcorder while the lens cover is closed (DCR-SR42/ SR62/SR82). • When you have tried a couple...
... indicator pertaining to the DC IN jack of the Handycam Station or your Sony dealer or local authorized Sony service facility. Use an "InfoLITHIUM" battery pack (p.11). • Connect the DC plug of times, contact your camcorder securely (p.11). Contact your camcorder while the lens cover is closed (DCR-SR42/ SR62/SR82). • When you have tried a couple...
Operating Guide
Page 35
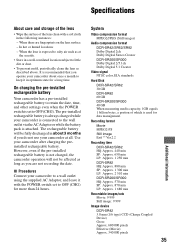
... LP: Approx. 1 680 min Recordable images/cuts Movie: 9 999 Still image: 9 999 Image device DCR-SR42 3.0 mm (1/6 type) CCD (Charge Coupled Device) Gross: Approx. 680 000 pixels Effective (Movie): Approx. 340 000 pixels 35 Additional Information x Procedures Connect your camcorder about once a month to keep it with a soft cloth in a well-ventilated location subject...
... LP: Approx. 1 680 min Recordable images/cuts Movie: 9 999 Still image: 9 999 Image device DCR-SR42 3.0 mm (1/6 type) CCD (Charge Coupled Device) Gross: Approx. 680 000 pixels Effective (Movie): Approx. 340 000 pixels 35 Additional Information x Procedures Connect your camcorder about once a month to keep it with a soft cloth in a well-ventilated location subject...


