
Operating Guide
Page 2
WARNING To reduce fire or shock hazard, do not expose the unit to the presence of electric shock to persons. This symbol is intended to alert the user to the presence of uninsulated "dangerous voltage" within the product's enclosure that may be of sufficient magnitude to constitute a risk of important operating and maintenance (servicing) instructions in the literature accompanying the appliance. 2 This symbol is intended to alert the user to rain or moisture.
WARNING To reduce fire or shock hazard, do not expose the unit to the presence of electric shock to persons. This symbol is intended to alert the user to the presence of uninsulated "dangerous voltage" within the product's enclosure that may be of sufficient magnitude to constitute a risk of important operating and maintenance (servicing) instructions in the literature accompanying the appliance. 2 This symbol is intended to alert the user to rain or moisture.
Operating Guide
Page 3
This plug will fit into the power outlet only one described in the operating instructions and adhere to them , paying particular attention to the plugs, receptacles, and the point where the cord exits from the appliance. If you are not sure of the type of electrical power supplied to your home, consult your electrician to protect it from the type of the set. Overloading Do not overload wall outlets, extension cords or convenience receptacles beyond their capacity, since this manual for cleaning the exterior of power source indicated on a bed, sofa, rug, or other similar surface. -...
This plug will fit into the power outlet only one described in the operating instructions and adhere to them , paying particular attention to the plugs, receptacles, and the point where the cord exits from the appliance. If you are not sure of the type of electrical power supplied to your home, consult your electrician to protect it from the type of the set. Overloading Do not overload wall outlets, extension cords or convenience receptacles beyond their capacity, since this manual for cleaning the exterior of power source indicated on a bed, sofa, rug, or other similar surface. -...
Operating Guide
Page 4
Improper adjustment of other controls may result in damage and will prevent damage to the set due to determine that the set is in performance - If the set has been exposed to normal operation. - Adjust only those controls that have fallen into the set exhibits a distinct change in safe operating condition. 4 Servicing Do not attempt to service the set yourself as opening or removing covers may result in the operating instructions. IMPORTANT SAFEGUARDS (Continued) Lightning For added protection for this indicates a need for long periods of any service or repairs to ...
Improper adjustment of other controls may result in damage and will prevent damage to the set due to determine that the set is in performance - If the set has been exposed to normal operation. - Adjust only those controls that have fallen into the set exhibits a distinct change in safe operating condition. 4 Servicing Do not attempt to service the set yourself as opening or removing covers may result in the operating instructions. IMPORTANT SAFEGUARDS (Continued) Lightning For added protection for this indicates a need for long periods of any service or repairs to ...
Operating Guide
Page 5
...of the FCC Rules. These limits are recyclable. For more information regarding recycling of Conformity Trade Name: SONY Model No.: DCR-HC38 Responsible Party: Sony Electronics Inc. This equipment generates, uses, and can radiate radio frequency energy and, if not installed.../ Caution: Do not handle damaged or leaking Lithium-Ion batteries. Regulatory Information Declaration of rechargeable batteries, call : Sony Customer Information Center 1-800222-SONY (7669). Address: 16530 Via Esprillo, San Diego, CA 92127 U.S.A. Operation is subject to the following two conditions...
...of the FCC Rules. These limits are recyclable. For more information regarding recycling of Conformity Trade Name: SONY Model No.: DCR-HC38 Responsible Party: Sony Electronics Inc. This equipment generates, uses, and can radiate radio frequency energy and, if not installed.../ Caution: Do not handle damaged or leaking Lithium-Ion batteries. Regulatory Information Declaration of rechargeable batteries, call : Sony Customer Information Center 1-800222-SONY (7669). Address: 16530 Via Esprillo, San Diego, CA 92127 U.S.A. Operation is subject to the following two conditions...

Operating Guide
Page 6
... See "On use and care" (p. 61). • Before connecting your Sony dealer regarding this first (Continued) the user is encouraged to try to these numbers whenever you can use Your camcorder is connected. - Consult the dealer or an experienced radio/TV technician for effective...serial number in order to comply with the limits for connecting the camcorder to a computer and using extremely highprecision technology, so over 99.99% of manuals - Refer to correct the interference by the following measures: - DCR-HC38 Serial No. For the State of the following parts. "Operating Guide...
... See "On use and care" (p. 61). • Before connecting your Sony dealer regarding this first (Continued) the user is encouraged to try to these numbers whenever you can use Your camcorder is connected. - Consult the dealer or an experienced radio/TV technician for effective...serial number in order to comply with the limits for connecting the camcorder to a computer and using extremely highprecision technology, so over 99.99% of manuals - Refer to correct the interference by the following measures: - DCR-HC38 Serial No. For the State of the following parts. "Operating Guide...
Operating Guide
Page 7
... without notice. Black point White, red, blue or green point • Exposing the LCD screen, the viewfinder, or the lens to a malfunction of the camcorder, storage media, etc. • TV color systems differ depending on a TV, you need a NTSC system-based TV. • Television programs, films, ... provided, even if recording or playback is equipped with a Carl Zeiss lens, which was developed jointly by Carl Zeiss, in Germany, and Sony Corporation, and produces superior images. On recording • Before starting to record, test the recording function to make sure the picture and sound...
... without notice. Black point White, red, blue or green point • Exposing the LCD screen, the viewfinder, or the lens to a malfunction of the camcorder, storage media, etc. • TV color systems differ depending on a TV, you need a NTSC system-based TV. • Television programs, films, ... provided, even if recording or playback is equipped with a Carl Zeiss lens, which was developed jointly by Carl Zeiss, in Germany, and Sony Corporation, and produces superior images. On recording • Before starting to record, test the recording function to make sure the picture and sound...
Operating Guide
Page 8
... and time 14 Changing the language setting 14 Step 4: Making setting adjustments before recording 15 Step 5: Inserting a Cassette ......... 16 Recording/Playback Easy Recording/Playback (Easy Handycam 17 Recording 19 Zooming 20 Recording in dark places (NightShot plus 20 Adjusting the exposure for backlit subjects 21 Recording in mirror mode 21 Playback...
... and time 14 Changing the language setting 14 Step 4: Making setting adjustments before recording 15 Step 5: Inserting a Cassette ......... 16 Recording/Playback Easy Recording/Playback (Easy Handycam 17 Recording 19 Zooming 20 Recording in dark places (NightShot plus 20 Adjusting the exposure for backlit subjects 21 Recording in mirror mode 21 Playback...
Operating Guide
Page 10
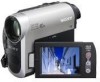
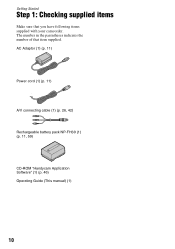
AC Adaptor (1) (p. 11) Power cord (1) (p. 11) A/V connecting cable (1) (p. 26, 42) Rechargeable battery pack NP-FH30 (1) (p. 11, 59) CD-ROM "Handycam Application Software" (1) (p. 46) Operating Guide (This manual) (1) 10 The number in the parentheses indicates the number of that you have following items supplied with your camcorder. Getting Started Step 1: Checking supplied items Make sure that item supplied.
AC Adaptor (1) (p. 11) Power cord (1) (p. 11) A/V connecting cable (1) (p. 26, 42) Rechargeable battery pack NP-FH30 (1) (p. 11, 59) CD-ROM "Handycam Application Software" (1) (p. 46) Operating Guide (This manual) (1) 10 The number in the parentheses indicates the number of that you have following items supplied with your camcorder. Getting Started Step 1: Checking supplied items Make sure that item supplied.

Operating Guide
Page 11
... lamp The CHG (charge) lamp lights up and charging starts. b Notes • You cannot attach any "InfoLITHIUM" battery pack other than the H series to your camcorder. 1 Align the terminals of the arrow to OFF(CHG) (The default setting). 3 Connect the AC Adaptor to the AC Adaptor and the wall outlet. Continued... the "InfoLITHIUM" battery pack (H series) (p. 59) after attaching it into place 2. 2 Slide the POWER switch in the direction of the battery pack and your camcorder 1, then attach the battery pack and click it to your camcorder. 4 Connect the power cord to the DC IN jack on your...
... lamp The CHG (charge) lamp lights up and charging starts. b Notes • You cannot attach any "InfoLITHIUM" battery pack other than the H series to your camcorder. 1 Align the terminals of the arrow to OFF(CHG) (The default setting). 3 Connect the AC Adaptor to the AC Adaptor and the wall outlet. Continued... the "InfoLITHIUM" battery pack (H series) (p. 59) after attaching it into place 2. 2 Slide the POWER switch in the direction of the battery pack and your camcorder 1, then attach the battery pack and click it to your camcorder. 4 Connect the power cord to the DC IN jack on your...

Operating Guide
Page 12
Disconnect the AC Adaptor from the DC IN jack holding both the camcorder and the DC plug. Remaining battery (approx.) BATTERY INFO BATTERY CHARGE LEVEL 0% 50% 100% REC TIME AVAILABLE LCD SCREEN : 85 min VIEWFINDER : 99 min Recording ... pack will stop soon. You can check the remaining battery charge on the LCD screen. To use an outside power source You can operate your camcorder using the power from the wall outlet by pressing DISP/BATT INFO again while the information is fully charged. POWER switch 1 2 PUSH When storing the...
Disconnect the AC Adaptor from the DC IN jack holding both the camcorder and the DC plug. Remaining battery (approx.) BATTERY INFO BATTERY CHARGE LEVEL 0% 50% 100% REC TIME AVAILABLE LCD SCREEN : 85 min VIEWFINDER : 99 min Recording ... pack will stop soon. You can check the remaining battery charge on the LCD screen. To use an outside power source You can operate your camcorder using the power from the wall outlet by pressing DISP/BATT INFO again while the information is fully charged. POWER switch 1 2 PUSH When storing the...
Operating Guide
Page 13
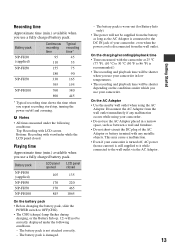
...pack is damaged. - On the charging/recording/playback time • Times measured with LCD screen. This may cause a malfunction. • Even if your camcorder is turned off, AC power (house current) is still supplied to it while connected to 86 °F) is recommended.) • The recording and playback ...time will be shorter when you use your camcorder in a narrow space, such as the AC Adaptor is disconnected from the wall outlet. Battery pack NP-FH30 (supplied) NP-FH50 NP-FH70 NP...
...pack is damaged. - On the charging/recording/playback time • Times measured with LCD screen. This may cause a malfunction. • Even if your camcorder is turned off, AC power (house current) is still supplied to it while connected to 86 °F) is recommended.) • The recording and playback ...time will be shorter when you use your camcorder in a narrow space, such as the AC Adaptor is disconnected from the wall outlet. Battery pack NP-FH30 (supplied) NP-FH50 NP-FH70 NP...
Operating Guide
Page 14
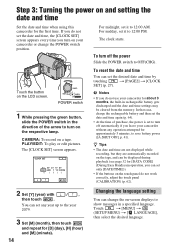
... the respective lamp. Step 3: Turning the power on and setting the date and time Set the date and time when using this camcorder for about 3 months, the built-in rechargeable battery gets discharged and the date and time settings may be displayed during playback (see page... 32 for [DATA CODE] (During Easy Handycam operation, you can set any operation attempted for [D] (day), [H] (hour) and [M] (minute). 14 Changing the language setting You can change the on your camcorder or change the POWER switch position. b Notes • If you do...
... the respective lamp. Step 3: Turning the power on and setting the date and time Set the date and time when using this camcorder for about 3 months, the built-in rechargeable battery gets discharged and the date and time settings may be displayed during playback (see page... 32 for [DATA CODE] (During Easy Handycam operation, you can set any operation attempted for [D] (day), [H] (hour) and [M] (minute). 14 Changing the language setting You can change the on your camcorder or change the POWER switch position. b Notes • If you do...
Operating Guide
Page 15
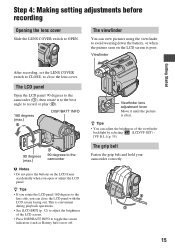
...side, you open or adjust the LCD panel. The grip belt Fasten the grip belt and hold your camcorder correctly. 4 1 2 3 15 The LCD panel Open the LCD panel 90 degrees to the camcorder (1), then rotate it until the picture is poor. Viewfinder lens adjustment lever Move it to the best angle... down the battery, or when the picture seen on the LCD screen is clear. The viewfinder You can view pictures using the viewfinder to the camcorder b Notes • Do not press the buttons on or off. Step 4: Making setting adjustments before recording Opening the lens cover Slide the LENS ...
...side, you open or adjust the LCD panel. The grip belt Fasten the grip belt and hold your camcorder correctly. 4 1 2 3 15 The LCD panel Open the LCD panel 90 degrees to the camcorder (1), then rotate it until the picture is poor. Viewfinder lens adjustment lever Move it to the best angle... down the battery, or when the picture seen on the LCD screen is clear. The viewfinder You can view pictures using the viewfinder to the camcorder b Notes • Do not press the buttons on or off. Step 4: Making setting adjustments before recording Opening the lens cover Slide the LENS ...
Operating Guide
Page 16
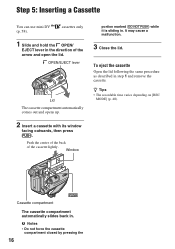
Step 5: Inserting a Cassette You can use mini DV (p. 58). b Notes • Do not force the cassette compartment closed by pressing the 16 OPEN/EJECT lever Lid The cassette compartment automatically comes out and opens up. 2 Insert a cassette with its window facing outwards, then press . Cassette compartment The cassette compartment automatically slides back in . Window portion marked {DO NOT PUSH} while it is sliding in . It may cause a malfunction. 3 Close the lid. Push the center of the back of the arrow and open the lid. To eject the cassette Open the lid following the ...
Step 5: Inserting a Cassette You can use mini DV (p. 58). b Notes • Do not force the cassette compartment closed by pressing the 16 OPEN/EJECT lever Lid The cassette compartment automatically comes out and opens up. 2 Insert a cassette with its window facing outwards, then press . Cassette compartment The cassette compartment automatically slides back in . Window portion marked {DO NOT PUSH} while it is sliding in . It may cause a malfunction. 3 Close the lid. Push the center of the back of the arrow and open the lid. To eject the cassette Open the lid following the ...
Operating Guide
Page 17
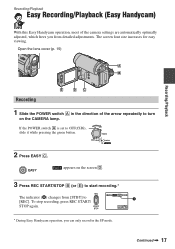
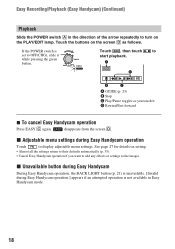
...Press EASY C. EASY appears on the CAMERA lamp. To stop recording, press REC START/ STOP again. 60min REC 0:00:00 A GUIDE FN * During Easy Handycam operation, you from [STBY] to [REC]. Open the lens cover (p. 15) A B Recording E DC 1 Slide the POWER switch A in the SP ...mode. Recording/Playback Easy Recording/Playback (Easy Handycam) With this Easy Handycam operation, most of the camera settings are automatically optimally adjusted, which frees you can only record in the direction of the arrow repeatedly to...
...Press EASY C. EASY appears on the CAMERA lamp. To stop recording, press REC START/ STOP again. 60min REC 0:00:00 A GUIDE FN * During Easy Handycam operation, you from [STBY] to [REC]. Open the lens cover (p. 15) A B Recording E DC 1 Slide the POWER switch A in the SP ...mode. Recording/Playback Easy Recording/Playback (Easy Handycam) With this Easy Handycam operation, most of the camera settings are automatically optimally adjusted, which frees you can only record in the direction of the arrow repeatedly to...
Operating Guide
Page 18
... is not available in the direction of the arrow repeatedly to OFF(CHG), slide it D Rewind/Fast forward x To cancel Easy Handycam operation Press EASY C again. Touch , then touch to the images. See page 27 for details on setting. • Almost ...display adjustable menu settings. x Unavailable button during Easy Handycam During Easy Handycam operation, the BACK LIGHT button (p. 21) is unavailable. [Invalid during Easy Handycam operation Touch to their defaults automatically (p. 35). • Cancel Easy Handycam operation if you touch it while pressing the green button...
... is not available in the direction of the arrow repeatedly to OFF(CHG), slide it D Rewind/Fast forward x To cancel Easy Handycam operation Press EASY C again. Touch , then touch to the images. See page 27 for details on setting. • Almost ...display adjustable menu settings. x Unavailable button during Easy Handycam During Easy Handycam operation, the BACK LIGHT button (p. 21) is unavailable. [Invalid during Easy Handycam operation Touch to their defaults automatically (p. 35). • Cancel Easy Handycam operation if you touch it while pressing the green button...

Operating Guide
Page 19
POWER switch REC START/ STOP A REC START/STOP B Slide the POWER switch in the direction of the arrow repeatedly to OFF(CHG), slide it while pressing the green button. If the POWER switch is set to turn on the CAMERA lamp. Press REC START/STOP A (or B). [STBY] [REC] To stop recording, press REC START/STOP again. Recording/Playback Recording Open the lens cover (p. 15). Continued , 19
POWER switch REC START/ STOP A REC START/STOP B Slide the POWER switch in the direction of the arrow repeatedly to OFF(CHG), slide it while pressing the green button. If the POWER switch is set to turn on the CAMERA lamp. Press REC START/STOP A (or B). [STBY] [REC] To stop recording, press REC START/STOP again. Recording/Playback Recording Open the lens cover (p. 15). Continued , 19
Operating Guide
Page 20
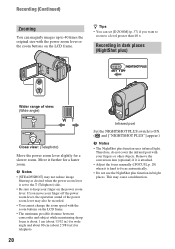
... greater than 40 ×. Therefore, do not cover the infrared port with the zoom buttons on the LCD frame. • The minimum possible distance between camcorder and subject while maintaining sharp focus is about 1 cm (about 13/32 in dark places (NightShot plus function uses infrared light. Remove the conversion lens...
... greater than 40 ×. Therefore, do not cover the infrared port with the zoom buttons on the LCD frame. • The minimum possible distance between camcorder and subject while maintaining sharp focus is about 1 cm (about 13/32 in dark places (NightShot plus function uses infrared light. Remove the conversion lens...

Operating Guide
Page 21
Recording in mirror mode Open the LCD panel 90 degrees to the camcorder (1), then rotate it 180 degrees to display .. To cancel the back light function, press BACK LIGHT again. Recording/Playback Adjusting the exposure for backlit subjects To adjust the exposure for backlit subjects, press BACK LIGHT to the lens side (2). z Tips • A mirror-image of the subject appears on the LCD screen, but the image will be normal when recorded. 21
Recording in mirror mode Open the LCD panel 90 degrees to the camcorder (1), then rotate it 180 degrees to display .. To cancel the back light function, press BACK LIGHT again. Recording/Playback Adjusting the exposure for backlit subjects To adjust the exposure for backlit subjects, press BACK LIGHT to the lens side (2). z Tips • A mirror-image of the subject appears on the LCD screen, but the image will be normal when recorded. 21

Operating Guide
Page 22
Touch to rewind the tape to the desired point, then touch Play/Pause* toggles as you touch it while pressing the green button. Stop Rewind/Fast forward * Playback automatically stops if pause is set to turn on the PLAY/EDIT lamp. To search for more than 3 minutes. To adjust the volume Touch t [PAGE1] t [VOL], then / to start playback. Start playing back. z Tips • You can play back in the direction of the arrow repeatedly to OFF(CHG), slide it to adjust the volume. Playback Slide the POWER switch in various modes ([V SPD PLAY], p. 32). 22 If the POWER ...
Touch to rewind the tape to the desired point, then touch Play/Pause* toggles as you touch it while pressing the green button. Stop Rewind/Fast forward * Playback automatically stops if pause is set to turn on the PLAY/EDIT lamp. To search for more than 3 minutes. To adjust the volume Touch t [PAGE1] t [VOL], then / to start playback. Start playing back. z Tips • You can play back in the direction of the arrow repeatedly to OFF(CHG), slide it to adjust the volume. Playback Slide the POWER switch in various modes ([V SPD PLAY], p. 32). 22 If the POWER ...
