
Operating Guide
Page 6
..., to correct the interference by the following measures: - Increase the separation between the equipment and receiver. - Model No. Your camcorder is not available under the current recording or playback conditions. • The LCD screen and the viewfinder are manufactured using the supplied...• The camcorder is encouraged to try to avoid damaging the terminal or cause a malfunction of cassette you call your Sony dealer regarding this first (Continued) the user is not dustproof, dripproof or waterproof. Reorient or relocate the receiving antenna. - DCR-HC38 Serial No. ...
..., to correct the interference by the following measures: - Increase the separation between the equipment and receiver. - Model No. Your camcorder is not available under the current recording or playback conditions. • The LCD screen and the viewfinder are manufactured using the supplied...• The camcorder is encouraged to try to avoid damaging the terminal or cause a malfunction of cassette you call your Sony dealer regarding this first (Continued) the user is not dustproof, dripproof or waterproof. Reorient or relocate the receiving antenna. - DCR-HC38 Serial No. ...
Operating Guide
Page 7
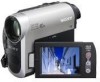
... camera, and therefore may cause malfunctions. • Do not aim at dusk. To view your recordings on the country/region. Unauthorized recording of the camcorder, storage media, etc. • TV color systems differ depending on a TV, you need a NTSC system-based TV. • Television programs,... cameras and offers a quality typical of a Carl Zeiss lens. * MTF stands for the contents of the sun only in Germany, and Sony Corporation, and produces superior images. Take pictures of recordings cannot be copyrighted. results of light from a subject coming into the lens. 7 Doing...
... camera, and therefore may cause malfunctions. • Do not aim at dusk. To view your recordings on the country/region. Unauthorized recording of the camcorder, storage media, etc. • TV color systems differ depending on a TV, you need a NTSC system-based TV. • Television programs,... cameras and offers a quality typical of a Carl Zeiss lens. * MTF stands for the contents of the sun only in Germany, and Sony Corporation, and produces superior images. Take pictures of recordings cannot be copyrighted. results of light from a subject coming into the lens. 7 Doing...
Operating Guide
Page 10
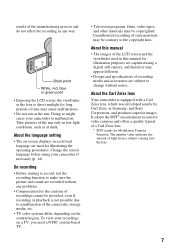
Getting Started Step 1: Checking supplied items Make sure that item supplied. The number in the parentheses indicates the number of that you have following items supplied with your camcorder. AC Adaptor (1) (p. 11) Power cord (1) (p. 11) A/V connecting cable (1) (p. 26, 42) Rechargeable battery pack NP-FH30 (1) (p. 11, 59) CD-ROM "Handycam Application Software" (1) (p. 46) Operating Guide (This manual) (1) 10
Getting Started Step 1: Checking supplied items Make sure that item supplied. The number in the parentheses indicates the number of that you have following items supplied with your camcorder. AC Adaptor (1) (p. 11) Power cord (1) (p. 11) A/V connecting cable (1) (p. 26, 42) Rechargeable battery pack NP-FH30 (1) (p. 11, 59) CD-ROM "Handycam Application Software" (1) (p. 46) Operating Guide (This manual) (1) 10

Operating Guide
Page 11
... place 2. 2 Slide the POWER switch in the direction of the battery pack and your camcorder 1, then attach the battery pack and click it to your camcorder. 4 Connect the power cord to the DC IN jack on your camcorder. CHG (charge) lamp The CHG (charge) lamp lights up and charging starts. b ...Notes • You cannot attach any "InfoLITHIUM" battery pack other than the H series to your camcorder. 1 Align the terminals of the arrow to OFF(CHG) (The default setting). 3 Connect the AC Adaptor to the AC Adaptor and the wall outlet. ...
... place 2. 2 Slide the POWER switch in the direction of the battery pack and your camcorder 1, then attach the battery pack and click it to your camcorder. 4 Connect the power cord to the DC IN jack on your camcorder. CHG (charge) lamp The CHG (charge) lamp lights up and charging starts. b ...Notes • You cannot attach any "InfoLITHIUM" battery pack other than the H series to your camcorder. 1 Align the terminals of the arrow to OFF(CHG) (The default setting). 3 Connect the AC Adaptor to the AC Adaptor and the wall outlet. ...

Operating Guide
Page 12
... direction of the arrow. Replace the battery with a fully charged one, or charge the battery. To use an outside power source You can operate your camcorder using the power from the DC IN jack. You can check the remaining battery charge on the LCD screen. To check the remaining battery (Battery... off the power, then press PUSH. 2 Remove the battery pack in this case. Disconnect the AC Adaptor from the DC IN jack holding both the camcorder and the DC plug.
... direction of the arrow. Replace the battery with a fully charged one, or charge the battery. To use an outside power source You can operate your camcorder using the power from the DC IN jack. You can check the remaining battery charge on the LCD screen. To check the remaining battery (Battery... off the power, then press PUSH. 2 Remove the battery pack in this case. Disconnect the AC Adaptor from the DC IN jack holding both the camcorder and the DC plug.
Operating Guide
Page 13
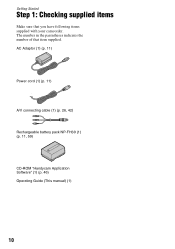
... NP-FH70 NP-FH100 LCD panel opened 105 170 370 845 LCD panel closed . On the charging/recording/playback time • Times measured with the camcorder at 25 °C (77 °F). (10 °C to 30 °C (50 °F to OFF(CHG). • The CHG (charge) lamp flashes during...under the following conditions: Top: Recording with any malfunction occurs while using the AC Adaptor. This may cause a malfunction. • Even if your camcorder is turned off and zooming. Disconnect the AC Adaptor from the wall outlet. The battery pack is damaged. - The battery pack is not attached...
... NP-FH70 NP-FH100 LCD panel opened 105 170 370 845 LCD panel closed . On the charging/recording/playback time • Times measured with the camcorder at 25 °C (77 °F). (10 °C to 30 °C (50 °F to OFF(CHG). • The CHG (charge) lamp flashes during...under the following conditions: Top: Recording with any malfunction occurs while using the AC Adaptor. This may cause a malfunction. • Even if your camcorder is turned off and zooming. Disconnect the AC Adaptor from the wall outlet. The battery pack is damaged. - The battery pack is not attached...
Operating Guide
Page 14
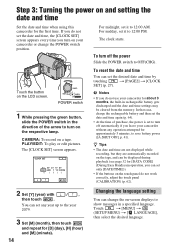
...(day), [H] (hour) and [M] (minute). 14 Changing the language setting You can set any operation attempted for [DATA CODE] (During Easy Handycam operation, you can be cleared from the memory. To reset the date and time You can change the POWER switch position. In that case, ...[Y] (year) with / , then touch . Step 3: Turning the power on and setting the date and time Set the date and time when using this camcorder for about 3 months, the built-in a specified language. z Tips • The date and time are not displayed while recording, but they are automatically ...
...(day), [H] (hour) and [M] (minute). 14 Changing the language setting You can set any operation attempted for [DATA CODE] (During Easy Handycam operation, you can be cleared from the memory. To reset the date and time You can change the POWER switch position. In that case, ...[Y] (year) with / , then touch . Step 3: Turning the power on and setting the date and time Set the date and time when using this camcorder for about 3 months, the built-in a specified language. z Tips • The date and time are not displayed while recording, but they are automatically ...
Operating Guide
Page 15
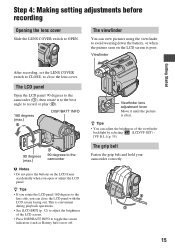
...DISP/BATT INFO to close the LCD panel with the LCD screen facing out. z Tips • You can view pictures using the viewfinder to the camcorder b Notes • Do not press the buttons on or off. Viewfinder Getting Started After recording, set the LENS COVER switch to CLOSE, to ... the LCD frame accidentally when you can close the lens cover. This is clear. The LCD panel Open the LCD panel 90 degrees to the camcorder (1), then rotate it until the picture is convenient during playback operations. • See [LCD BRT] (p. 32) to adjust the brightness of the viewfinder ...
...DISP/BATT INFO to close the LCD panel with the LCD screen facing out. z Tips • You can view pictures using the viewfinder to the camcorder b Notes • Do not press the buttons on or off. Viewfinder Getting Started After recording, set the LENS COVER switch to CLOSE, to ... the LCD frame accidentally when you can close the lens cover. This is clear. The LCD panel Open the LCD panel 90 degrees to the camcorder (1), then rotate it until the picture is convenient during playback operations. • See [LCD BRT] (p. 32) to adjust the brightness of the viewfinder ...
Operating Guide
Page 20
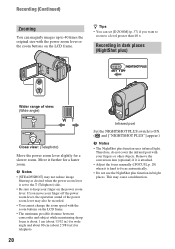
... to 40 times the original size with the power zoom lever or the zoom buttons on the LCD frame. • The minimum possible distance between camcorder and subject while maintaining sharp focus is about 1 cm (about 2 5/8 feet) for telephoto. 20 Infrared port Set the NIGHTSHOT PLUS switch to ON. ( and ["NIGHTSHOT...
... to 40 times the original size with the power zoom lever or the zoom buttons on the LCD frame. • The minimum possible distance between camcorder and subject while maintaining sharp focus is about 1 cm (about 2 5/8 feet) for telephoto. 20 Infrared port Set the NIGHTSHOT PLUS switch to ON. ( and ["NIGHTSHOT...

Operating Guide
Page 21
Recording in mirror mode Open the LCD panel 90 degrees to the camcorder (1), then rotate it 180 degrees to display .. To cancel the back light function, press BACK LIGHT again. Recording/Playback Adjusting the exposure for backlit subjects To adjust the exposure for backlit subjects, press BACK LIGHT to the lens side (2). z Tips • A mirror-image of the subject appears on the LCD screen, but the image will be normal when recorded. 21
Recording in mirror mode Open the LCD panel 90 degrees to the camcorder (1), then rotate it 180 degrees to display .. To cancel the back light function, press BACK LIGHT again. Recording/Playback Adjusting the exposure for backlit subjects To adjust the exposure for backlit subjects, press BACK LIGHT to the lens side (2). z Tips • A mirror-image of the subject appears on the LCD screen, but the image will be normal when recorded. 21

Operating Guide
Page 23
...camcorder has 2 guide functions as shown below. See page 71 for details. 1 Touch [GUIDE]. 2 Select the desired item. Recording/Playback Using the guide functions (USAGE GUIDE) You can easily select the desired setting screens by using the guide functions (USAGE GUIDE). Adjust the settings according to cancel Easy Handycam.... Enables you to the setting screens related to display an on the LCD screen. Unavailable settings during Easy Handycam During Easy Handycam operation, some items are unavailable. z Tips • If [SET] is not available, but still desired, touch [SET] ...
...camcorder has 2 guide functions as shown below. See page 71 for details. 1 Touch [GUIDE]. 2 Select the desired item. Recording/Playback Using the guide functions (USAGE GUIDE) You can easily select the desired setting screens by using the guide functions (USAGE GUIDE). Adjust the settings according to cancel Easy Handycam.... Enables you to the setting screens related to display an on the LCD screen. Unavailable settings during Easy Handycam During Easy Handycam operation, some items are unavailable. z Tips • If [SET] is not available, but still desired, touch [SET] ...

Operating Guide
Page 24
... is played back for the start point to start . Reviewing the most recently recorded scenes (Rec review) You can search for about 5 seconds, and the camcorder enters the standby mode at the point where you want the recording to PLAY/EDIT. The sound is set to start the next recording while...
... is played back for the start point to start . Reviewing the most recently recorded scenes (Rec review) You can search for about 5 seconds, and the camcorder enters the standby mode at the point where you want the recording to PLAY/EDIT. The sound is set to start the next recording while...

Operating Guide
Page 25
The last few seconds of the most recently recorded scene are played back. Recording/Playback 25 Then, your camcorder is set to standby. 3 Select [EDITSEARCH] with / , then touch [EXEC]. 4 Select [ON] with / , then touch [EXEC] t . 60min STBY 0:00:00 EDIT GUIDE FN 5 Touch .
The last few seconds of the most recently recorded scene are played back. Recording/Playback 25 Then, your camcorder is set to standby. 3 Select [EDITSEARCH] with / , then touch [EXEC]. 4 Select [ON] with / , then touch [EXEC] t . 60min STBY 0:00:00 EDIT GUIDE FN 5 Touch .

Operating Guide
Page 26
... the input selector on the VCR to the audio input jack of your TV or VCR. 26 When your TV is not necessary. Connect your camcorder to the input jack of a TV or a VCR using the A/V connecting cable (1) or the A/V connecting cable with an S VIDEO cable, pictures can be ...connected. Playing the picture on a TV You can connect your camcorder to the wall outlet using the supplied AC Adaptor for this case, the yellow (standard video) plug connection is monaural (Only one audio input jack...
... the input selector on the VCR to the audio input jack of your TV or VCR. 26 When your TV is not necessary. Connect your camcorder to the input jack of a TV or a VCR using the A/V connecting cable (1) or the A/V connecting cable with an S VIDEO cable, pictures can be ...connected. Playing the picture on a TV You can connect your camcorder to the wall outlet using the supplied AC Adaptor for this case, the yellow (standard video) plug connection is monaural (Only one audio input jack...
Operating Guide
Page 28
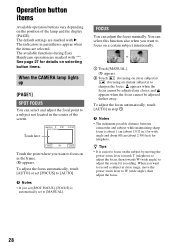
The indicators in parentheses appear when the items are marked with B. The available functions during Easy Handycam operation are selected. When you want to focus on in the frame. 9 appears. appears when the focus cannot be adjusted any closer, and appears when ... zoom for details on the position of the screen. To adjust the focus automatically, touch [AUTO] in step 1. b Notes • The minimum possible distance between camcorder and subject while maintaining sharp focus is automatically set [FOCUS] to W (wide angle), then adjust the focus. 28
The indicators in parentheses appear when the items are marked with B. The available functions during Easy Handycam operation are selected. When you want to focus on in the frame. 9 appears. appears when the focus cannot be adjusted any closer, and appears when ... zoom for details on the position of the screen. To adjust the focus automatically, touch [AUTO] in step 1. b Notes • The minimum possible distance between camcorder and subject while maintaining sharp focus is automatically set [FOCUS] to W (wide angle), then adjust the focus. 28

Operating Guide
Page 29
... [AUTO]. Touch here 60min STBY SPOT METER 0:00:00 AUTO END Touch the point where you set [SPOT METER], [EXPOSURE] is strong contrast between the camcorder and the subject. appears. MENU See page 35. B AUTO Select to maintain the darkening atmosphere of situations such as people or flowers while creating a soft... pictures effectively in various situations with the SCENE SEL. DISP GUIDE (Display Guide)* See page 71. LANDSCAPE* ( ) Select to [MANUAL]. This setting also prevents your camcorder from appearing excessively white when subjects are lit by strong light.
... [AUTO]. Touch here 60min STBY SPOT METER 0:00:00 AUTO END Touch the point where you set [SPOT METER], [EXPOSURE] is strong contrast between the camcorder and the subject. appears. MENU See page 35. B AUTO Select to maintain the darkening atmosphere of situations such as people or flowers while creating a soft... pictures effectively in various situations with the SCENE SEL. DISP GUIDE (Display Guide)* See page 71. LANDSCAPE* ( ) Select to [MANUAL]. This setting also prevents your camcorder from appearing excessively white when subjects are lit by strong light.
Operating Guide
Page 31
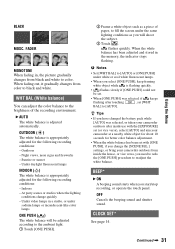
...for the following recording conditions: - At party scenes or studios where the lighting conditions change the [SCENE SEL.] settings, or bring your camcorder outdoors from black and white to black and white. CLOCK SET* See page 14. Under video lamps in a studio, or under sodium... white balance will be set. • When [ONE PUSH] was selected, or taken your camcorder outdoors after touching , set with the [EXPOSURE] set (or vice versa), select [AUTO] and aim your camcorder at a nearby white object for about 10 seconds for the following recording conditions: - When the...
...for the following recording conditions: - At party scenes or studios where the lighting conditions change the [SCENE SEL.] settings, or bring your camcorder outdoors from black and white to black and white. CLOCK SET* See page 14. Under video lamps in a studio, or under sodium... white balance will be set. • When [ONE PUSH] was selected, or taken your camcorder outdoors after touching , set with the [EXPOSURE] set (or vice versa), select [AUTO] and aim your camcorder at a nearby white object for about 10 seconds for the following recording conditions: - When the...
Operating Guide
Page 33
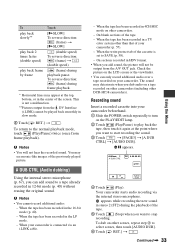
....] t . On sections recorded in HDV format. • When you can only record additional audio over a tape recorded on other DCR-HC38 camcorders). To dub on your camcorder (p. 57). - Recording sound Insert a recorded cassette into your camcorder is not a malfunction. **Pictures output from the DV Interface (i.LINK) cannot be output from frame playback). To play back...
....] t . On sections recorded in HDV format. • When you can only record additional audio over a tape recorded on other DCR-HC38 camcorders). To dub on your camcorder (p. 57). - Recording sound Insert a recorded cassette into your camcorder is not a malfunction. **Pictures output from the DV Interface (i.LINK) cannot be output from frame playback). To play back...
Operating Guide
Page 39
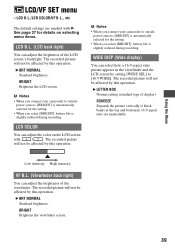
...not be affected by setting [WIDE SEL] to outside power sources, [BRIGHT] is automatically selected for the setting. • When you connect your camcorder to [16:9 WIDE]. Using the Menu LCD/VF SET menu - LCD COLOR You can adjust the color on selecting menu items. LCD B.L. ... by this operation. The recorded picture will not be affected by this operation. See page 27 for the setting. • When you connect your camcorder to outside power sources, [BRIGHT] is automatically selected for details on the LCD screen with B. b Notes • When you select [BRIGHT],...
...not be affected by setting [WIDE SEL] to outside power sources, [BRIGHT] is automatically selected for the setting. • When you connect your camcorder to [16:9 WIDE]. Using the Menu LCD/VF SET menu - LCD COLOR You can adjust the color on selecting menu items. LCD B.L. ... by this operation. The recorded picture will not be affected by this operation. See page 27 for the setting. • When you connect your camcorder to outside power sources, [BRIGHT] is automatically selected for details on the LCD screen with B. b Notes • When you select [BRIGHT],...
Operating Guide
Page 40
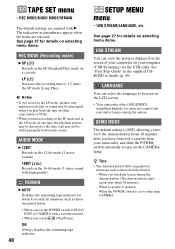
... inserted. • When you cannot find your native tongue among the options. LANGUAGE You can view the pictures displayed on the screen of your camcorder on other than CAMERA. When you mix recordings in the SP mode and in situations such as those described below . - AUDIO MODE B 12BIT... When the POWER switch is inserted. - See page 27 for details on selecting menu items. USB STREAM You can select the language to other camcorders or VCRs. • When you touch the screen during the demonstration. (The demonstration starts again after about 10 minutes after you have removed a...
... inserted. • When you cannot find your native tongue among the options. LANGUAGE You can view the pictures displayed on the screen of your camcorder on other than CAMERA. When you mix recordings in the SP mode and in situations such as those described below . - AUDIO MODE B 12BIT... When the POWER switch is inserted. - See page 27 for details on selecting menu items. USB STREAM You can select the language to other camcorders or VCRs. • When you touch the screen during the demonstration. (The demonstration starts again after about 10 minutes after you have removed a...


