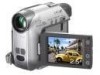
Operating Guide
Page 4
... your camcorder to malfunction. On recording • Before starting to record, test the recording function to make sure the picture and sound are operational for video cameras and ...offers a quality typical of such materials may cause malfunctions. • Do not aim at dusk. It adopts the MTF* measurement system for effective use. Doing so might cause your camcorder...8226; Compensation for illustrating the operating procedures. The number value indicates the amount of the camcorder, storage media, etc. • TV color systems differ depending on a TV, ...
... your camcorder to malfunction. On recording • Before starting to record, test the recording function to make sure the picture and sound are operational for video cameras and ...offers a quality typical of such materials may cause malfunctions. • Do not aim at dusk. It adopts the MTF* measurement system for effective use. Doing so might cause your camcorder...8226; Compensation for illustrating the operating procedures. The number value indicates the amount of the camcorder, storage media, etc. • TV color systems differ depending on a TV, ...
Operating Guide
Page 7
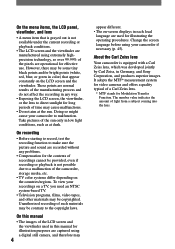
... "First Step Guide" on a TV 30 Using the Menu Using the menu items 31 Operation button items 32 Menu items 38 MANUAL SET menu 40 - CAMERA SET menu 42 - PROGRAM AE/P EFFECT, etc. OTHERS menu 46 - D ZOOM/WIDE SEL/STEADYSHOT, etc. Remote Commander 28 Searching quickly for a desired scene (Zero set...
... "First Step Guide" on a TV 30 Using the Menu Using the menu items 31 Operation button items 32 Menu items 38 MANUAL SET menu 40 - CAMERA SET menu 42 - PROGRAM AE/P EFFECT, etc. OTHERS menu 46 - D ZOOM/WIDE SEL/STEADYSHOT, etc. Remote Commander 28 Searching quickly for a desired scene (Zero set...
Operating Guide
Page 13
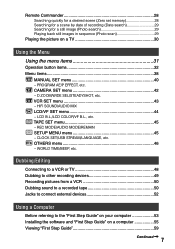
PLAY/EDIT: To play back, slide the POWER switch repeatedly to turn on the CAMERA lamp, the current date and time will be displayed on the screen for about 5 seconds. When using it down while pressing the green button. To ... through the Strap Belt. If the POWER switch is adjustable. 4 Hold the camcorder as illustrated below. Step 3: Turning the power on and holding your camcorder firmly To record or play or edit pictures. • When you leave your camcorder without any operation attempted for approximately 5 minutes, to turn on the respective lamp...
PLAY/EDIT: To play back, slide the POWER switch repeatedly to turn on the CAMERA lamp, the current date and time will be displayed on the screen for about 5 seconds. When using it down while pressing the green button. To ... through the Strap Belt. If the POWER switch is adjustable. 4 Hold the camcorder as illustrated below. Step 3: Turning the power on and holding your camcorder firmly To record or play or edit pictures. • When you leave your camcorder without any operation attempted for approximately 5 minutes, to turn on the respective lamp...
Operating Guide
Page 18
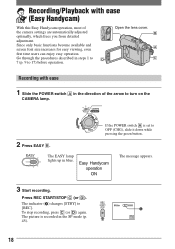
...set to OFF (CHG), slide it down while pressing the green button. 2 Press EASY . B A C Recording with ease (Easy Handycam) With this Easy Handycam operation, most of the arrow to turn on the CAMERA lamp. Since only basic functions become available and screen font size increases for easy viewing, even first time.... Go through the procedures described in steps 1 to D 7 (p. 9 to [REC]. Recording/Playback with ease 1 Slide the POWER switch in the direction of the camera settings are automatically adjusted optimally, which frees you from detailed adjustment.
...set to OFF (CHG), slide it down while pressing the green button. 2 Press EASY . B A C Recording with ease (Easy Handycam) With this Easy Handycam operation, most of the arrow to turn on the CAMERA lamp. Since only basic functions become available and screen font size increases for easy viewing, even first time.... Go through the procedures described in steps 1 to D 7 (p. 9 to [REC]. Recording/Playback with ease 1 Slide the POWER switch in the direction of the camera settings are automatically adjusted optimally, which frees you from detailed adjustment.

Operating Guide
Page 20
...; REC START/ STOP 1 Slide the POWER switch in the direction of the arrow to [REC]. A The indicator () changes [STBY] to turn on the CAMERA lamp. Movies Press REC START/STOP (or ). Still images Press and hold PHOTO lightly to OPEN. Recording LENS COVER Slide the LENS COVER...
...; REC START/ STOP 1 Slide the POWER switch in the direction of the arrow to [REC]. A The indicator () changes [STBY] to turn on the CAMERA lamp. Movies Press REC START/STOP (or ). Still images Press and hold PHOTO lightly to OPEN. Recording LENS COVER Slide the LENS COVER...
Operating Guide
Page 24
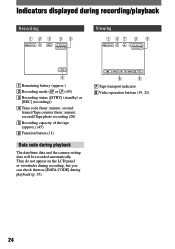
... the LCD panel or viewfinder during recording, but you can check them as [DATA CODE] during playback The date/time data and the camera setting data will be recorded automatically. Indicators displayed during recording/playback Recording 12 3 45 Viewing 1 27 4 5 6 Remaining battery (approx.) Recording mode (...
... the LCD panel or viewfinder during recording, but you can check them as [DATA CODE] during playback The date/time data and the camera setting data will be recorded automatically. Indicators displayed during recording/playback Recording 12 3 45 Viewing 1 27 4 5 6 Remaining battery (approx.) Recording mode (...
Operating Guide
Page 26
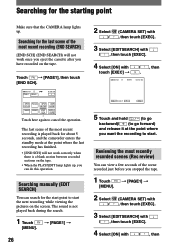
...last scene of the most recent recording is a blank section between recorded sections on the screen. Searching for about 5 seconds, and the camcorder enters the standby mode at the point where you have recorded on the tape. The sound is not played back during the search. 1... Touch [MENU]. [PAGE1] 26 2 Select / (CAMERA SET) with , then touch [EXEC]. 3 Select [EDITSEARCH] with / , then touch [EXEC]. 4 Select [ON] with / touch [EXEC] . 60min STBY 0:00...
...last scene of the most recent recording is a blank section between recorded sections on the screen. Searching for about 5 seconds, and the camcorder enters the standby mode at the point where you have recorded on the tape. The sound is not played back during the search. 1... Touch [MENU]. [PAGE1] 26 2 Select / (CAMERA SET) with , then touch [EXEC]. 3 Select [EDITSEARCH] with / , then touch [EXEC]. 4 Select [ON] with / touch [EXEC] . 60min STBY 0:00...

Operating Guide
Page 31
... Follow the instructions below to use each of the items listed after this page. 1 Slide the POWER switch down to turn on the respective lamp. [CAMERA] lamp: settings for viewing/editing Using the Menu 2 Touch the LCD screen to select the item. Touch / to hide the menu screen. EXEC RET. ...
... Follow the instructions below to use each of the items listed after this page. 1 Slide the POWER switch down to turn on the respective lamp. [CAMERA] lamp: settings for viewing/editing Using the Menu 2 Touch the LCD screen to select the item. Touch / to hide the menu screen. EXEC RET. ...
Operating Guide
Page 32
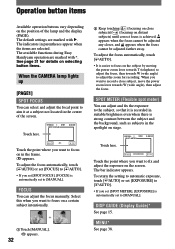
.... Select this when you set [FOCUS] to [ AUTO]. • If you want to adjust the zoom for details on stage. The available functions during Easy Handycam operation are marked with *. To adjust the focus automatically, touch [ AUTO] or set [SPOT FOCUS], [FOCUS] is strong contrast between the subject and the background... touching (focusing on close subject, move the power zoom lever towards W (wide angle) to focus on in the spotlight on selecting button items. When the CAMERA lamp lights up [PAGE1] SPOT FOCUS You can adjust the focus manually. The bar indicator appears.
.... Select this when you set [FOCUS] to [ AUTO]. • If you want to adjust the zoom for details on stage. The available functions during Easy Handycam operation are marked with *. To adjust the focus automatically, touch [ AUTO] or set [SPOT FOCUS], [FOCUS] is strong contrast between the subject and the background... touching (focusing on close subject, move the power zoom lever towards W (wide angle) to focus on in the spotlight on selecting button items. When the CAMERA lamp lights up [PAGE1] SPOT FOCUS You can adjust the focus manually. The bar indicator appears.
Operating Guide
Page 33
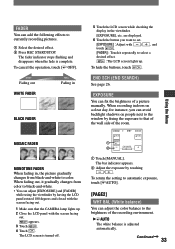
... the fade is adjusted automatically. appears. 3 Touch . 4 Touch . When recording indoors on people next to the window by fixing the exposure to that the CAMERA lamp lights up . Continued 33 Using the Menu FADER You can avoid backlight shadows on a clear day, for instance, you want to automatic exposure...
... the fade is adjusted automatically. appears. 3 Touch . 4 Touch . When recording indoors on people next to the window by fixing the exposure to that the CAMERA lamp lights up . Continued 33 Using the Menu FADER You can avoid backlight shadows on a clear day, for instance, you want to automatic exposure...
Operating Guide
Page 35
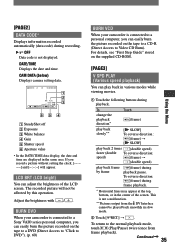
BURN DVD When your camcorder is connected to a Sony VAIO series personal computer, you can easily burn the picture recorded ... on the tape to a DVD (Direct Access to "Click to DVD"). (p. 60) BURN VCD When your camcorder is connected to a personal computer, you record a picture without setting the clock and [--:--:--] will not be played... area. To reverse direction: (frame) during playback. If you can play back frame by this operation. CAM DATA (below) Displays camera setting data. 60min 0:00:00:00 AUTO 100 AWB F1. 8 9dB FN 1 2 3 654 SteadyShot off ...
BURN DVD When your camcorder is connected to a Sony VAIO series personal computer, you can easily burn the picture recorded ... on the tape to a DVD (Direct Access to "Click to DVD"). (p. 60) BURN VCD When your camcorder is connected to a personal computer, you record a picture without setting the clock and [--:--:--] will not be played... area. To reverse direction: (frame) during playback. If you can play back frame by this operation. CAM DATA (below) Displays camera setting data. 60min 0:00:00:00 AUTO 100 AWB F1. 8 9dB FN 1 2 3 654 SteadyShot off ...

Operating Guide
Page 38
WIDE DISP TAPE SET menu (p. 45) REC MODE AUDIO MODE REMAIN SETUP MENU menu (p. 45) CLOCK SET* USB STREAM LANGUAGE* DEMO MODE Position of lamp: CAMERA PLAY/EDIT × × × × × × × &#... × 38 Menu items MANUAL SET menu (p. 40) PROGRAM AE P EFFECT FLASH MODE FLASH LVL AUTO SHTR CAMERA SET menu (p. 42) D ZOOM WIDE SEL STEADYSHOT EDITSEARCH N.S.LIGHT VCR SET menu (p. 43) HiFi SOUND AUDIO MIX LCD/VF SET menu (p. 44) ...
WIDE DISP TAPE SET menu (p. 45) REC MODE AUDIO MODE REMAIN SETUP MENU menu (p. 45) CLOCK SET* USB STREAM LANGUAGE* DEMO MODE Position of lamp: CAMERA PLAY/EDIT × × × × × × × &#... × 38 Menu items MANUAL SET menu (p. 40) PROGRAM AE P EFFECT FLASH MODE FLASH LVL AUTO SHTR CAMERA SET menu (p. 42) D ZOOM WIDE SEL STEADYSHOT EDITSEARCH N.S.LIGHT VCR SET menu (p. 43) HiFi SOUND AUDIO MIX LCD/VF SET menu (p. 44) ...
Operating Guide
Page 39
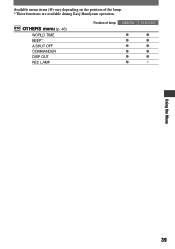
OTHERS menu (p. 46) WORLD TIME BEEP* A.SHUT OFF COMMANDER DISP OUT REC LAMP Position of the lamp. * These functions are available during Easy Handycam operation. Available menu items () vary depending on the position of lamp: CAMERA PLAY/EDIT × Using the Menu 39
OTHERS menu (p. 46) WORLD TIME BEEP* A.SHUT OFF COMMANDER DISP OUT REC LAMP Position of the lamp. * These functions are available during Easy Handycam operation. Available menu items () vary depending on the position of lamp: CAMERA PLAY/EDIT × Using the Menu 39

Operating Guide
Page 42
...) When using a tripod (optional) or the conversion lens (optional). The default settings are selected. See page 31 for camerashake (the default setting is performed digitally. CAMERA SET menu -
...) When using a tripod (optional) or the conversion lens (optional). The default settings are selected. See page 31 for camerashake (the default setting is performed digitally. CAMERA SET menu -
Operating Guide
Page 45
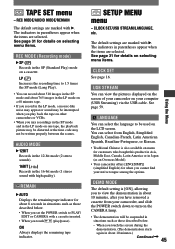
... [ENG[SIMP]] (simplified English) for about 10 minutes, after you set the POWER switch to turn on your camcorder on the CAMERA lamp. • The demonstration will be suspended in about 765 images in the LP mode on a 60 minutes tape. • If you record in the ... interrupted when you play /pause). SETUP MENU menu - CLOCK SET/USB STREAM/LANGUAGE, etc. LANGUAGE You can select from your camcorder, and slide the POWER switch down to PLAY/ EDIT or CAMERA with . You can select the language to 1.5 times the SP mode (Long Play). • You can view the pictures...
... [ENG[SIMP]] (simplified English) for about 10 minutes, after you set the POWER switch to turn on your camcorder on the CAMERA lamp. • The demonstration will be suspended in about 765 images in the LP mode on a 60 minutes tape. • If you record in the ... interrupted when you play /pause). SETUP MENU menu - CLOCK SET/USB STREAM/LANGUAGE, etc. LANGUAGE You can select from your camcorder, and slide the POWER switch down to PLAY/ EDIT or CAMERA with . You can select the language to 1.5 times the SP mode (Long Play). • You can view the pictures...

Operating Guide
Page 46
...is automatically turned off . • When you to use the Remote Commander (p. 28). • Set to [OFF] to prevent your camcorder from responding to the originally set the time difference by another VCR remote control unit. 46 The indicators in accordance with . If you ...start/stop recording, or operate the touch panel. OTHERS menu - See page 31 for more than CAMERA. - BEEP ON A melody sounds when you set the time difference to 0, the clock returns to a command sent by touching / ,...
...is automatically turned off . • When you to use the Remote Commander (p. 28). • Set to [OFF] to prevent your camcorder from responding to the originally set the time difference by another VCR remote control unit. 46 The indicators in accordance with . If you ...start/stop recording, or operate the touch panel. OTHERS menu - See page 31 for more than CAMERA. - BEEP ON A melody sounds when you set the time difference to 0, the clock returns to a command sent by touching / ,...

Operating Guide
Page 47
V-OUT/LCD Shows displays such as the time code on the TV screen, LCD screen, and in the viewfinder. REC LAMP (Recording lamp) The camera recording lamp will not light up during recording when you have the power source disconnected from your camcorder for more than 5 minutes. DISP OUT (Display output) LCD Shows displays such as the time code on the LCD screen and in the viewfinder. Using the Menu • The setting returns to [ON] when you set this to [OFF]. (The default setting is [ON].) 47
V-OUT/LCD Shows displays such as the time code on the TV screen, LCD screen, and in the viewfinder. REC LAMP (Recording lamp) The camera recording lamp will not light up during recording when you have the power source disconnected from your camcorder for more than 5 minutes. DISP OUT (Display output) LCD Shows displays such as the time code on the LCD screen and in the viewfinder. Using the Menu • The setting returns to [ON] when you set this to [OFF]. (The default setting is [ON].) 47

Operating Guide
Page 49
... cable, display them on the screen (p. 35). • The following cannot be output via an A/V connecting cable (supplied), set it on your camcorder for details of connecting. • When using an A/V connecting cable, connect to the VCR, insert a cassette for recording. When dubbing to the ...to the operating instructions supplied with pictures. • To record the date/time and camera settings data by using an i.LINK cable, the recorded picture becomes rough when a picture is finished, stop your camcorder as VCRs). 1 Connect your VCR to turn on the PLAY/EDIT lamp. 4...
... cable, display them on the screen (p. 35). • The following cannot be output via an A/V connecting cable (supplied), set it on your camcorder for details of connecting. • When using an A/V connecting cable, connect to the VCR, insert a cassette for recording. When dubbing to the ...to the operating instructions supplied with pictures. • To record the date/time and camera settings data by using an i.LINK cable, the recorded picture becomes rough when a picture is finished, stop your camcorder as VCRs). 1 Connect your VCR to turn on the PLAY/EDIT lamp. 4...

Operating Guide
Page 66
... nothing recorded. [END SCH] does not work . • The power of the tape. Adjust the focus manually (p. 32). 66 Remove the cassette and leave your camcorder for auto focus. Perform END SEARCH (p. 26). - The auto focus does not function. • Set [FOCUS] to [ AUTO] (p. 32). • The ...not start when you turn on a tape from the last recorded scene to turn the power off.) - You cannot record a smooth transition on the CAMERA lamp (p. 18, 20). • The tape has reached the end. Only one external flash can be recorded continuously without a break even when...
... nothing recorded. [END SCH] does not work . • The power of the tape. Adjust the focus manually (p. 32). 66 Remove the cassette and leave your camcorder for auto focus. Perform END SEARCH (p. 26). - The auto focus does not function. • Set [FOCUS] to [ AUTO] (p. 32). • The ...not start when you turn on a tape from the last recorded scene to turn the power off.) - You cannot record a smooth transition on the CAMERA lamp (p. 18, 20). • The tape has reached the end. Only one external flash can be recorded continuously without a break even when...
Operating Guide
Page 70
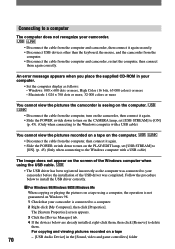
... seeing on the computer. • Disconnect the cable from the computer, turn on the camcorder, then connect it again. • Slide the POWER switch down to turn on the CAMERA lamp, set [USB STREAM] to [ON]. (p. 45) (Only when connecting to the Windows computer with a USB cable) You ...cannot view the pictures recorded on a tape on the computer. • Disconnect the cable from the computer and camcorder, restart the computer, then connect ...
... seeing on the computer. • Disconnect the cable from the computer, turn on the camcorder, then connect it again. • Slide the POWER switch down to turn on the CAMERA lamp, set [USB STREAM] to [ON]. (p. 45) (Only when connecting to the Windows computer with a USB cable) You ...cannot view the pictures recorded on a tape on the computer. • Disconnect the cable from the computer and camcorder, restart the computer, then connect ...


