Operating Guide
Page 2
...the unit to discontinue midway (fail), restart the application or disconnect and connect the communication cable (USB, etc.) again. Regulatory Information Declaration of rechargeable batteries, call : Sony Customer Information Center 1-800-222SONY (7669). This symbol is subject to the collection and ...Bernardo Dr, San Diego, CA 92127 U.S.A. For more information regarding recycling of Conformity Trade Name: SONY Model No.: DCR-HC21 Responsible Party: Sony Electronics Inc. Operation is intended to alert the user to persons. Notice If static electricity or electromagnetism...
...the unit to discontinue midway (fail), restart the application or disconnect and connect the communication cable (USB, etc.) again. Regulatory Information Declaration of rechargeable batteries, call : Sony Customer Information Center 1-800-222SONY (7669). This symbol is subject to the collection and ...Bernardo Dr, San Diego, CA 92127 U.S.A. For more information regarding recycling of Conformity Trade Name: SONY Model No.: DCR-HC21 Responsible Party: Sony Electronics Inc. Operation is intended to alert the user to persons. Notice If static electricity or electromagnetism...
Operating Guide
Page 3
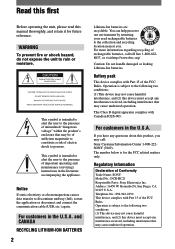
...following measures: - Model No. Increase the separation between the equipment and receiver. - Serial No. If you call your Sony dealer regarding this equipment does cause harmful interference to radio or television reception, which the receiver is encouraged to try to...However, there is supplied with two kinds of your camcorder. Model No. Viewfinder LCD Panel Battery pack • Before connecting your camcorder to operate this manual could void your authority to another device with a USB or i.LINK cable, be used in a particular installation. Continued &#...
...following measures: - Model No. Increase the separation between the equipment and receiver. - Serial No. If you call your Sony dealer regarding this equipment does cause harmful interference to radio or television reception, which the receiver is encouraged to try to...However, there is supplied with two kinds of your camcorder. Model No. Viewfinder LCD Panel Battery pack • Before connecting your camcorder to operate this manual could void your authority to another device with a USB or i.LINK cable, be used in a particular installation. Continued &#...
Operating Guide
Page 9
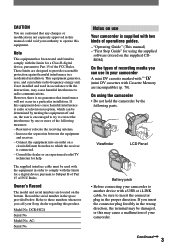
AC Adaptor (1) (p. 10) Shoe cover (1) Attached to the camcorder. A/V connecting cable (1) (p. 30, 48) USB cable (1) (p. 53) Shoulder Strap (1) (p. 85) Rechargeable battery pack NP-FP30 (1) (p. 10, 79) CD-ROM "Picture Package Ver.1.5" (1) (p. 53) 9 Operating Guide (This manual) (1) Getting Started Power cord (1) (p. ... 1: Checking supplied items Make sure that item supplied. The number in the parentheses indicates the number of that you have following items supplied with your camcorder.
AC Adaptor (1) (p. 10) Shoe cover (1) Attached to the camcorder. A/V connecting cable (1) (p. 30, 48) USB cable (1) (p. 53) Shoulder Strap (1) (p. 85) Rechargeable battery pack NP-FP30 (1) (p. 10, 79) CD-ROM "Picture Package Ver.1.5" (1) (p. 53) 9 Operating Guide (This manual) (1) Getting Started Power cord (1) (p. ... 1: Checking supplied items Make sure that item supplied. The number in the parentheses indicates the number of that you have following items supplied with your camcorder.
Operating Guide
Page 45
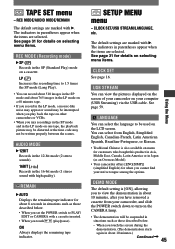
...REC MODE (Recording mode) SP () Records in situations such as an Overseas Model). • Your camcorder offers [ENG[SIMP]] (simplified English) for details on a cassette. When you have removed a cassette from ...). SETUP MENU menu - CLOCK SET/USB STREAM/LANGUAGE, etc. The indicators in the 16-bit mode (1 stereo sound with a cassette inserted. • When you touch (play back the tape on other camcorders or VCRs. • When you ... LANGUAGE You can view the pictures displayed on the screen of your computer (USB Streaming) via the USB cable.
...REC MODE (Recording mode) SP () Records in situations such as an Overseas Model). • Your camcorder offers [ENG[SIMP]] (simplified English) for details on a cassette. When you have removed a cassette from ...). SETUP MENU menu - CLOCK SET/USB STREAM/LANGUAGE, etc. The indicators in the 16-bit mode (1 stereo sound with a cassette inserted. • When you touch (play back the tape on other camcorders or VCRs. • When you ... LANGUAGE You can view the pictures displayed on the screen of your computer (USB Streaming) via the USB cable.
Operating Guide
Page 53
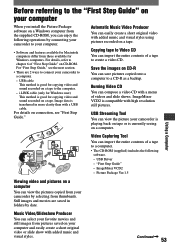
...your computer and easily create a short original video or slide show with added music and visual styles using pictures recorded on a tape. USB cable This method is good for copying video and sound recorded on a tape. Image data is transferred in folders by selecting from thumbnails. Automatic... are saved in more clarity than with a USB cable. Before referring to the "First Step Guide" on your computer When you install the Picture Package software on a Windows computer from the supplied CD-ROM, you can view the picture your camcorder is playing back on tape or is currently ...
...your computer and easily create a short original video or slide show with added music and visual styles using pictures recorded on a tape. USB cable This method is good for copying video and sound recorded on a tape. Image data is transferred in folders by selecting from thumbnails. Automatic... are saved in more clarity than with a USB cable. Before referring to the "First Step Guide" on your computer When you install the Picture Package software on a Windows computer from the supplied CD-ROM, you can view the picture your camcorder is playing back on tape or is currently ...
Operating Guide
Page 54
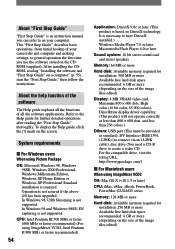
...the size of the image files edited) This "First Step Guide" describes basic operations, from initial hookup of all the functions of your camcorder and computer and making settings, to general operation the first time you can refer to on your computer. To display the Help guide,...will not operate correctly at less than 800 × 600 dots, and less than 256 colors.) Others: USB port (This must be provided as standard), DV Interface (IEEE1394, i.LINK) (to connect via an i.LINK cable), disc drive (You need a CD-R drive to have DirectX installed.) Windows Media Player 7.0 or later ...
...the size of the image files edited) This "First Step Guide" describes basic operations, from initial hookup of all the functions of your camcorder and computer and making settings, to general operation the first time you can refer to on your computer. To display the Help guide,...will not operate correctly at less than 800 × 600 dots, and less than 256 colors.) Others: USB port (This must be provided as standard), DV Interface (IEEE1394, i.LINK) (to connect via an i.LINK cable), disc drive (You need a CD-R drive to have DirectX installed.) Windows Media Player 7.0 or later ...
Operating Guide
Page 55
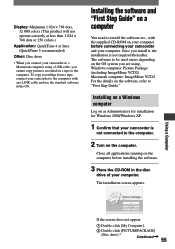
... dots or 256 colors.) Application: QuickTime 4 or later (QuickTime 5 recommended) Other: Disc drive • When you connect your camcorder to a Macintosh computer using a USB cable, you are using. Close all applications running on as Administrators for installation for Windows 2000/Windows XP. 1 Confirm that ... the computer. 2 Turn on a computer You need to install the software etc., with an i.LINK cable and use the standard software in the disc drive of your camcorder is not required thereafter. Once you install it, the installation is not connected to "First Step Guide...
... dots or 256 colors.) Application: QuickTime 4 or later (QuickTime 5 recommended) Other: Disc drive • When you connect your camcorder to a Macintosh computer using a USB cable, you are using. Close all applications running on as Administrators for installation for Windows 2000/Windows XP. 1 Confirm that ... the computer. 2 Turn on a computer You need to install the software etc., with an i.LINK cable and use the standard software in the disc drive of your camcorder is not required thereafter. Once you install it, the installation is not connected to "First Step Guide...
Operating Guide
Page 60
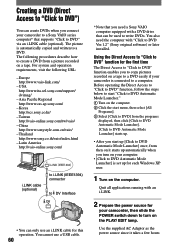
...USB cable. 60 * Note that supports "Click to a DVD. Thailand http://www.sony.co.th/vaio/index.html - Using the Direct Access to "Click to DVD" function for the first time The Direct Access to "Click to DVD" function enables you to copy pictures recorded on a tape to a DVD easily if your camcorder...8226; [Click to DVD Automatic Mode Launcher] is connected to a computer. You cannot use an i.LINK cable for your camcorder to a Sony VAIO series computer* that you connect your camcorder, then slide the POWER switch down to turn on the computer. Creating a DVD (Direct Access to "...
...USB cable. 60 * Note that supports "Click to a DVD. Thailand http://www.sony.co.th/vaio/index.html - Using the Direct Access to "Click to DVD" function for the first time The Direct Access to "Click to DVD" function enables you to copy pictures recorded on a tape to a DVD easily if your camcorder...8226; [Click to DVD Automatic Mode Launcher] is connected to a computer. You cannot use an i.LINK cable for your camcorder to a Sony VAIO series computer* that you connect your camcorder, then slide the POWER switch down to turn on the computer. Creating a DVD (Direct Access to "...
Operating Guide
Page 63
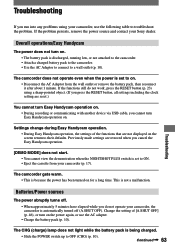
...Settings change during Easy Handycam operation. • During Easy Handycam operation, the settings of [A.SHUT OFF] (p. 46), or turn Easy Handycam operation on. • During recording or communicating with another device via USB cable, you do not work, press the RESET button (p. 23) using your camcorder, use the AC ... When approximately 5 minutes have elapsed while you cannot turn on for a long time. If the functions still do not operate your Sony dealer. Change the setting of the functions that are reset.) You cannot turn on . If the problem persists, remove the power ...
...Settings change during Easy Handycam operation. • During Easy Handycam operation, the settings of [A.SHUT OFF] (p. 46), or turn Easy Handycam operation on. • During recording or communicating with another device via USB cable, you do not work, press the RESET button (p. 23) using your camcorder, use the AC ... When approximately 5 minutes have elapsed while you cannot turn on for a long time. If the functions still do not operate your Sony dealer. Change the setting of the functions that are reset.) You cannot turn on . If the problem persists, remove the power ...
Operating Guide
Page 70
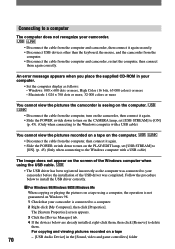
... a computer The computer does not recognize your camcorder. • Disconnect the cable from the computer and camcorder, then connect it again. • Slide the POWER switch down to turn on the CAMERA lamp, set [USB STREAM] to [ON]. (p. 45) (Only when connecting to the Windows computer with a USB cable) You cannot view the pictures recorded on...
... a computer The computer does not recognize your camcorder. • Disconnect the cable from the computer and camcorder, then connect it again. • Slide the POWER switch down to turn on the CAMERA lamp, set [USB STREAM] to [ON]. (p. 45) (Only when connecting to the Windows computer with a USB cable) You cannot view the pictures recorded on...
Operating Guide
Page 71
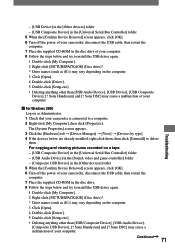
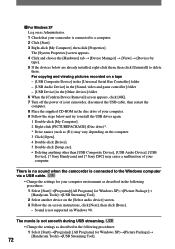
Sony Handycam] and [? Sony Handycam] and [? Continued 71 The [System Properties] screen appears. 3 Click the [Hardware] tab [Device Manager] [View] [Devices by type]. 4 If the devices below and try to install the USB driver again. 1 Double-click [My Computer... [Driver]. 5 Double-click [Setup.exe]. • Deleting anything other than [USB Audio Device], [USB Device], [USB Composite Device], [? Sony DSC] may cause a malfunction of your camcorder, disconnect the USB cable, then restart the computer. 7 Place the supplied CD-ROM in the disc drive...
Sony Handycam] and [? Sony Handycam] and [? Continued 71 The [System Properties] screen appears. 3 Click the [Hardware] tab [Device Manager] [View] [Devices by type]. 4 If the devices below and try to install the USB driver again. 1 Double-click [My Computer... [Driver]. 5 Double-click [Setup.exe]. • Deleting anything other than [USB Audio Device], [USB Device], [USB Composite Device], [? Sony DSC] may cause a malfunction of your camcorder, disconnect the USB cable, then restart the computer. 7 Place the supplied CD-ROM in the disc drive...
Operating Guide
Page 72
...-click [My Computer], then click [Properties]. Sony DSC] may cause a malfunction of your computer. There is no sound when the camcorder is not smooth during USB streaming. • Change the settings as (E:)) may vary depending on a tape - [USB Composite Device] in the [Universal Serial Bus...off the power of your camcorder, disconnect the USB cable, then restart the computer. 8 Place the supplied CD-ROM in the following procedures: 1 Select [Start][Programs]([All Programs] for Windows XP)[Picture Package] [Handycam Tools][USB Streaming Tool]. 72 For ...
...-click [My Computer], then click [Properties]. Sony DSC] may cause a malfunction of your computer. There is no sound when the camcorder is not smooth during USB streaming. • Change the settings as (E:)) may vary depending on a tape - [USB Composite Device] in the [Universal Serial Bus...off the power of your camcorder, disconnect the USB cable, then restart the computer. 8 Place the supplied CD-ROM in the following procedures: 1 Select [Start][Programs]([All Programs] for Windows XP)[Picture Package] [Handycam Tools][USB Streaming Tool]. 72 For ...
Operating Guide
Page 75
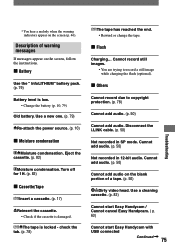
...(p. 10) Moisture condensation Moisture condensation. Eject the cassette. (p. 82) Moisture condensation. Disconnect the i.LINK cable. (p. 50) Not recorded in 12-bit audio. Cannot add audio. (p. 50) Cannot add audio on the screen, follow the instructions.... or change the tape. Flash Charging... Use a cleaning cassette. (p. 82) Cannot start Easy Handycam / Cannot cancel Easy Handycam. ( p. 63) Cannot start Easy Handycam with USB connected Continued 75 Troubleshooting * You hear a melody when the warning indicators appear on the screen ...
...(p. 10) Moisture condensation Moisture condensation. Eject the cassette. (p. 82) Moisture condensation. Disconnect the i.LINK cable. (p. 50) Not recorded in 12-bit audio. Cannot add audio. (p. 50) Cannot add audio on the screen, follow the instructions.... or change the tape. Flash Charging... Use a cleaning cassette. (p. 82) Cannot start Easy Handycam / Cannot cancel Easy Handycam. ( p. 63) Cannot start Easy Handycam with USB connected Continued 75 Troubleshooting * You hear a melody when the warning indicators appear on the screen ...
Operating Guide
Page 76
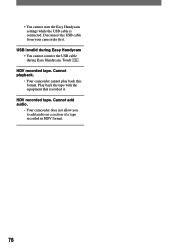
Play back the tape with the equipment that recorded it. HDV recorded tape. Cannot add audio. • Your camcorder does not allow you to add audio on a section of a tape recorded in HDV format. 76 HDV recorded tape. Cannot playback. • Your camcorder cannot play back this format. Touch . Disconnect the USB cable from your camcorder first. USB invalid during Easy Handycam • You cannot connect the USB cable during Easy Handycam. • You cannot start the Easy Handycam settings while the USB cable is connected.
Play back the tape with the equipment that recorded it. HDV recorded tape. Cannot add audio. • Your camcorder does not allow you to add audio on a section of a tape recorded in HDV format. 76 HDV recorded tape. Cannot playback. • Your camcorder cannot play back this format. Touch . Disconnect the USB cable from your camcorder first. USB invalid during Easy Handycam • You cannot connect the USB cable during Easy Handycam. • You cannot start the Easy Handycam settings while the USB cable is connected.


