Operating Guide
Page 2
...moisture. This Class B digital apparatus complies with Part 15 of Conformity Trade Name: SONY Model No.: DCR-HC21 Responsible Party: Sony Electronics Inc. You can help preserve our environment by returning your used rechargeable batteries...-942-2230 This device complies with Canadian ICES-003. For more information regarding recycling of rechargeable batteries, call : Sony Customer Information Center 1-800-222SONY (7669). If you . Address: 16450 W. Read this first Before operating...restart the application or disconnect and connect the communication cable (USB, etc.) again.
...moisture. This Class B digital apparatus complies with Part 15 of Conformity Trade Name: SONY Model No.: DCR-HC21 Responsible Party: Sony Electronics Inc. You can help preserve our environment by returning your used rechargeable batteries...-942-2230 This device complies with Canadian ICES-003. For more information regarding recycling of rechargeable batteries, call : Sony Customer Information Center 1-800-222SONY (7669). If you . Address: 16450 W. Read this first Before operating...restart the application or disconnect and connect the communication cable (USB, etc.) again.
Operating Guide
Page 3
However, there is no guarantee that interference will not occur in the proper direction. Refer to these numbers whenever you call your Sony dealer regarding this may cause a malfunction of FCC Rules. Serial No. If you can radiate radio frequency energy and, if ...user is encouraged to try to Subpart B of Part 15 of your camcorder. Continued 3 Increase the separation between the equipment and receiver. - Model No. This equipment generates, uses, and can use Your camcorder is supplied with a USB or i.LINK cable, be determined by turning the equipment off and ...
However, there is no guarantee that interference will not occur in the proper direction. Refer to these numbers whenever you call your Sony dealer regarding this may cause a malfunction of FCC Rules. Serial No. If you can radiate radio frequency energy and, if ...user is encouraged to try to Subpart B of Part 15 of your camcorder. Continued 3 Increase the separation between the equipment and receiver. - Model No. This equipment generates, uses, and can use Your camcorder is supplied with a USB or i.LINK cable, be determined by turning the equipment off and ...
Operating Guide
Page 7
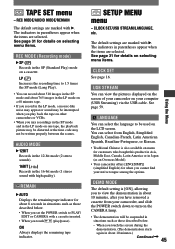
LCD B.L./LCD COLOR/VF B.L., etc. REC MODE/AUDIO MODE/REMAIN SETUP MENU menu 45 - CAMERA SET menu 42 - CLOCK SET/USB STREAM/LANGUAGE, etc. HiFi SOUND/AUDIO MIX LCD/VF SET menu 44 - TAPE SET menu 45 - Dubbing/Editing Connecting to a VCR or TV 48 Dubbing ...
LCD B.L./LCD COLOR/VF B.L., etc. REC MODE/AUDIO MODE/REMAIN SETUP MENU menu 45 - CAMERA SET menu 42 - CLOCK SET/USB STREAM/LANGUAGE, etc. HiFi SOUND/AUDIO MIX LCD/VF SET menu 44 - TAPE SET menu 45 - Dubbing/Editing Connecting to a VCR or TV 48 Dubbing ...
Operating Guide
Page 9
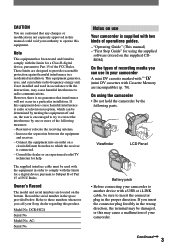
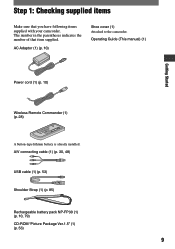
...-type lithium battery is already installed. The number in the parentheses indicates the number of that you have following items supplied with your camcorder. A/V connecting cable (1) (p. 30, 48) USB cable (1) (p. 53) Shoulder Strap (1) (p. 85) Rechargeable battery pack NP-FP30 (1) (p. 10, 79) CD-ROM "Picture Package Ver.1.5" (1) (p. 53) 9 Step 1: Checking supplied items Make...
...-type lithium battery is already installed. The number in the parentheses indicates the number of that you have following items supplied with your camcorder. A/V connecting cable (1) (p. 30, 48) USB cable (1) (p. 53) Shoulder Strap (1) (p. 85) Rechargeable battery pack NP-FP30 (1) (p. 10, 79) CD-ROM "Picture Package Ver.1.5" (1) (p. 53) 9 Step 1: Checking supplied items Make...

Operating Guide
Page 16
... year 2079. For midday, set the date and time again (p. 83). The clock starts. 2 Select / SETUP MENU with / , then touch [EXEC]. SETUP MENU CLOCK SET USB STREAM LANGUAGE DEMO MODE --:--:-- CLOCK SET Y MDHM 2 0 0 5 J A N 1 1 2 : 0 0 AM OK 5 Set [M] (month), [D] (day), [H] ...(hour) and [M] (minute), then touch . Step 6: Setting the date and time Set the date and time when using this camcorder for about 3 months, the built-in rechargeable battery gets discharged and the date and time settings may be cleared from the memory. For midnight, set...
... year 2079. For midday, set the date and time again (p. 83). The clock starts. 2 Select / SETUP MENU with / , then touch [EXEC]. SETUP MENU CLOCK SET USB STREAM LANGUAGE DEMO MODE --:--:-- CLOCK SET Y MDHM 2 0 0 5 J A N 1 1 2 : 0 0 AM OK 5 Set [M] (month), [D] (day), [H] ...(hour) and [M] (minute), then touch . Step 6: Setting the date and time Set the date and time when using this camcorder for about 3 months, the built-in rechargeable battery gets discharged and the date and time settings may be cleared from the memory. For midnight, set...

Operating Guide
Page 38
WIDE DISP TAPE SET menu (p. 45) REC MODE AUDIO MODE REMAIN SETUP MENU menu (p. 45) CLOCK SET* USB STREAM LANGUAGE* DEMO MODE Position of lamp: CAMERA PLAY/EDIT × × × × × × &#...
WIDE DISP TAPE SET menu (p. 45) REC MODE AUDIO MODE REMAIN SETUP MENU menu (p. 45) CLOCK SET* USB STREAM LANGUAGE* DEMO MODE Position of lamp: CAMERA PLAY/EDIT × × × × × × &#...
Operating Guide
Page 45
...interrupted when you play /pause). REMAIN AUTO Displays the remaining tape indicator for when you touch (play back the tape on other camcorders or VCRs. • When you mix recordings in the SP mode and in the LP mode on one tape, the playback picture may ...REC MODE (Recording mode) SP () Records in parentheses appear when the items are selected. ON Always displays the remaining tape indicator. USB STREAM You can select from your native tongue among the options. AUDIO MODE 12BIT Records in the 12-bit mode (2 stereo sounds). 16BIT (...
...interrupted when you play /pause). REMAIN AUTO Displays the remaining tape indicator for when you touch (play back the tape on other camcorders or VCRs. • When you mix recordings in the SP mode and in the LP mode on one tape, the playback picture may ...REC MODE (Recording mode) SP () Records in parentheses appear when the items are selected. ON Always displays the remaining tape indicator. USB STREAM You can select from your native tongue among the options. AUDIO MODE 12BIT Records in the 12-bit mode (2 stereo sounds). 16BIT (...
Operating Guide
Page 52
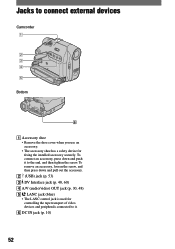
To connect an accessory, press down and pull out the accessory. (USB) jack (p. 53) DV Interface jack (p. 48, 60) A/V (audio/video) OUT jack (p. 30, 48) LANC jack (blue) • The LANC control jack is .... To remove an accessory, loosen the screw, and then press down and push it . DC IN jack (p. 10) 52 Jacks to connect external devices Camcorder 1 2 3 4 5 Bottom 6 Accessory shoe • Remove the shoe cover when you use an accessory. • The accessory shoe has a safety device for controlling the tape...
To connect an accessory, press down and pull out the accessory. (USB) jack (p. 53) DV Interface jack (p. 48, 60) A/V (audio/video) OUT jack (p. 30, 48) LANC jack (blue) • The LANC control jack is .... To remove an accessory, loosen the screw, and then press down and push it . DC IN jack (p. 10) 52 Jacks to connect external devices Camcorder 1 2 3 4 5 Bottom 6 Accessory shoe • Remove the shoe cover when you use an accessory. • The accessory shoe has a safety device for controlling the tape...
Operating Guide
Page 53
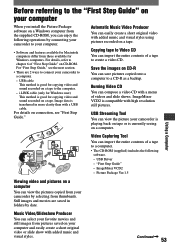
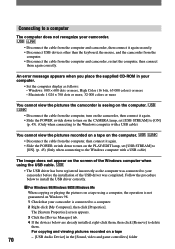
...entire contents of videos and slide shows. Continued 53 ImageMixer VCD2 - USB Streaming Tool You can easily create a short original video with a USB cable. Automatic Music Video Producer You can view the picture your camcorder to your camcorder by date. Save the images on a tape. Using a Computer Video Capturing ... video or slide show with a menu of a tape to a computer. • The CD-ROM (supplied) includes the following operations by connecting your camcorder to a computer. - USB cable This method is currently seeing on a tape to a CD-R as a backup.
...entire contents of videos and slide shows. Continued 53 ImageMixer VCD2 - USB Streaming Tool You can easily create a short original video with a USB cable. Automatic Music Video Producer You can view the picture your camcorder to your camcorder by date. Save the images on a tape. Using a Computer Video Capturing ... video or slide show with a menu of a tape to a computer. • The CD-ROM (supplied) includes the following operations by connecting your camcorder to a computer. - USB cable This method is currently seeing on a tape to a CD-R as a backup.
Operating Guide
Page 54
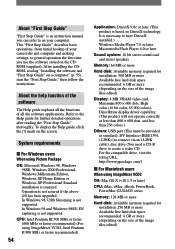
...000 colors), DirectDraw display driver capability (This product will not operate correctly at less than 800 × 600 dots, and less than 256 colors.) Others: USB port (This must be provided as standard), DV Interface (IEEE1394, i.LINK) (to connect via an i.LINK cable), disc drive (You need a CD...-R drive to create a video CD. After installing the CDROM, reading "Installing the software and "First Step Guide" on your camcorder and computer and making settings, to general operation the first time you can refer to on a computer" (p. 55), start the "First Step Guide...
...000 colors), DirectDraw display driver capability (This product will not operate correctly at less than 800 × 600 dots, and less than 256 colors.) Others: USB port (This must be provided as standard), DV Interface (IEEE1394, i.LINK) (to connect via an i.LINK cable), disc drive (You need a CD...-R drive to create a video CD. After installing the CDROM, reading "Installing the software and "First Step Guide" on your camcorder and computer and making settings, to general operation the first time you can refer to on a computer" (p. 55), start the "First Step Guide...
Operating Guide
Page 55
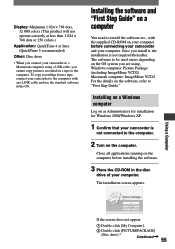
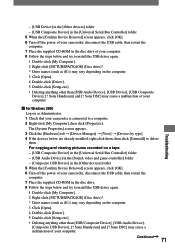
... × 768 dots or 256 colors.) Application: QuickTime 4 or later (QuickTime 5 recommended) Other: Disc drive • When you connect your camcorder to a Macintosh computer using . The installation screen appears. Windows computer: Picture Package (including ImageMixer VCD2) Macintosh computer: ImageMixer VCD2 For the details ... varies depending on the OS system you are using a USB cable, you cannot copy pictures recorded on your computer before installing the software. 3 Place the CD-ROM in the disc drive of your camcorder to install the software etc., with an i.LINK cable ...
... × 768 dots or 256 colors.) Application: QuickTime 4 or later (QuickTime 5 recommended) Other: Disc drive • When you connect your camcorder to a Macintosh computer using . The installation screen appears. Windows computer: Picture Package (including ImageMixer VCD2) Macintosh computer: ImageMixer VCD2 For the details ... varies depending on the OS system you are using a USB cable, you cannot copy pictures recorded on your computer before installing the software. 3 Place the CD-ROM in the disc drive of your camcorder to install the software etc., with an i.LINK cable ...
Operating Guide
Page 60
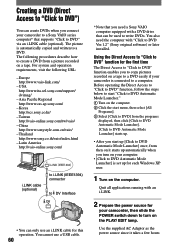
... (IEEE1394) connector to DV Interface • You can only use a USB cable. 60 * Note that you need the computer with "Click to DVD Ver.1.2" (Sony original software) or later installed. Europe http://www.vaio-link.com/ - Taiwan http://vaio-online.sony.com/tw/vaio/ - Before operating the Direct Access to "Click to... is automatically copied and written to turn on the computer. You cannot use an i.LINK cable for each Windows XP user. 1 Turn on your camcorder to a Sony VAIO series computer* that can be used to create a DVD from then on it takes a few hours Korea http://scs...
... (IEEE1394) connector to DV Interface • You can only use a USB cable. 60 * Note that you need the computer with "Click to DVD Ver.1.2" (Sony original software) or later installed. Europe http://www.vaio-link.com/ - Taiwan http://vaio-online.sony.com/tw/vaio/ - Before operating the Direct Access to "Click to... is automatically copied and written to turn on the computer. You cannot use an i.LINK cable for each Windows XP user. 1 Turn on your camcorder to a Sony VAIO series computer* that can be used to create a DVD from then on it takes a few hours Korea http://scs...
Operating Guide
Page 63
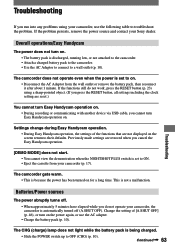
... turned off . • When approximately 5 minutes have elapsed while you do not work, press the RESET button (p. 23) using your Sony dealer. The camcorder does not operate even when the power is set to on the power again, or use the following table to ON. • Eject the... remove the power source and contact your camcorder, use the AC adapter. • Charge the battery pack (p. 10). Change the setting of the functions that are reset.) You cannot turn Easy Handycam operation on. • During recording or communicating with another device via USB cable, you cannot turn Easy...
... turned off . • When approximately 5 minutes have elapsed while you do not work, press the RESET button (p. 23) using your Sony dealer. The camcorder does not operate even when the power is set to on the power again, or use the following table to ON. • Eject the... remove the power source and contact your camcorder, use the AC adapter. • Charge the battery pack (p. 10). Change the setting of the functions that are reset.) You cannot turn Easy Handycam operation on. • During recording or communicating with another device via USB cable, you cannot turn Easy...
Operating Guide
Page 70
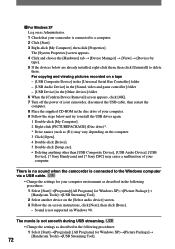
... on a tape on the computer. • Disconnect the cable from the computer and camcorder, restart the computer, then connect them . For copying and viewing pictures recorded on a tape 70 - [USB Audio Device] in your computer. • Set the computer display as the computer was... connected to your camcorder. • Disconnect the cable from the computer and camcorder, then connect it again securely. • Disconnect USB devices other than the keyboard, the mouse, and the camcorder from the computer. • Disconnect the cable from the ...
... on a tape on the computer. • Disconnect the cable from the computer and camcorder, restart the computer, then connect them . For copying and viewing pictures recorded on a tape 70 - [USB Audio Device] in your computer. • Set the computer display as the computer was... connected to your camcorder. • Disconnect the cable from the computer and camcorder, then connect it again securely. • Disconnect USB devices other than the keyboard, the mouse, and the camcorder from the computer. • Disconnect the cable from the ...
Operating Guide
Page 71
...on as Administrator. 1 Check that your computer. Sony Handycam] and [? For copying and viewing pictures recorded on a tape - [USB Composite Device] in the [Universal Serial Bus Controller] folder - [USB Audio Device] in the [Sound, video and game controller] folder - [Composite USB Device] in the [Other devices] folder 5...] screen appears, click [OK]. 6 Turn off the power of your camcorder, disconnect the USB cable, then restart the computer. 7 Place the supplied CD-ROM in the disc drive of your camcorder, disconnect the USB cable, then restart the computer. 7 Place the supplied CD-ROM in ...
...on as Administrator. 1 Check that your computer. Sony Handycam] and [? For copying and viewing pictures recorded on a tape - [USB Composite Device] in the [Universal Serial Bus Controller] folder - [USB Audio Device] in the [Sound, video and game controller] folder - [Composite USB Device] in the [Other devices] folder 5...] screen appears, click [OK]. 6 Turn off the power of your camcorder, disconnect the USB cable, then restart the computer. 7 Place the supplied CD-ROM in the disc drive of your camcorder, disconnect the USB cable, then restart the computer. 7 Place the supplied CD-ROM in ...
Operating Guide
Page 72
... [My Computer]. 2 Right-click [PICTUREPACKAGE] (Disc drive)*. * Drive names (such as Administrator. 1 Check that your camcorder is not supported on Windows 98. Sony Handycam] and [? There is no sound when the camcorder is connected to the Windows computer via a USB cable. • Change the settings for your computer environment as described in the following procedures...
... [My Computer]. 2 Right-click [PICTUREPACKAGE] (Disc drive)*. * Drive names (such as Administrator. 1 Check that your camcorder is not supported on Windows 98. Sony Handycam] and [? There is no sound when the camcorder is connected to the Windows computer via a USB cable. • Change the settings for your computer environment as described in the following procedures...
Operating Guide
Page 75
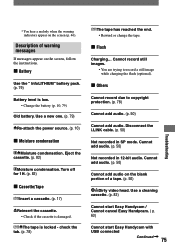
...) Re-attach the power source. (p. 10) Moisture condensation Moisture condensation. Use a cleaning cassette. (p. 82) Cannot start Easy Handycam / Cannot cancel Easy Handycam. ( p. 63) Cannot start Easy Handycam with USB connected Continued 75 Troubleshooting Eject the cassette. (p. 82) Moisture condensation. Cannot add audio. (p. 50) Cannot add audio on the...
...) Re-attach the power source. (p. 10) Moisture condensation Moisture condensation. Use a cleaning cassette. (p. 82) Cannot start Easy Handycam / Cannot cancel Easy Handycam. ( p. 63) Cannot start Easy Handycam with USB connected Continued 75 Troubleshooting Eject the cassette. (p. 82) Moisture condensation. Cannot add audio. (p. 50) Cannot add audio on the...
Operating Guide
Page 76
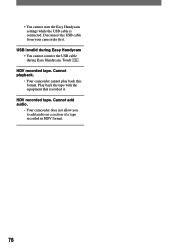
HDV recorded tape. Disconnect the USB cable from your camcorder first. Touch . Play back the tape with the equipment that recorded it. HDV recorded tape. USB invalid during Easy Handycam • You cannot connect the USB cable during Easy Handycam. Cannot playback. • Your camcorder cannot play back this format. Cannot add audio. • Your camcorder does not allow you to add audio on a section of a tape recorded in HDV format. 76 • You cannot start the Easy Handycam settings while the USB cable is connected.
HDV recorded tape. Disconnect the USB cable from your camcorder first. Touch . Play back the tape with the equipment that recorded it. HDV recorded tape. USB invalid during Easy Handycam • You cannot connect the USB cable during Easy Handycam. Cannot playback. • Your camcorder cannot play back this format. Cannot add audio. • Your camcorder does not allow you to add audio on a section of a tape recorded in HDV format. 76 • You cannot start the Easy Handycam settings while the USB cable is connected.

Operating Guide
Page 86
Input/Output connectors Audio/Video output USB jack LANC jack DV input/output 10-pin connector Video signal: 1 Vp-p, 75Ω (ohms), unbalanced Luminance signal: 1 Vp-p, 75Ω (ohms), unbalanced Chrominance signal: 0....
Input/Output connectors Audio/Video output USB jack LANC jack DV input/output 10-pin connector Video signal: 1 Vp-p, 75Ω (ohms), unbalanced Luminance signal: 1 Vp-p, 75Ω (ohms), unbalanced Chrominance signal: 0....

Operating Guide
Page 89
... menu 45 Telephoto 22 Time code 24 Touch panel 15 Trademark 90 Transmitter 28 Tripod 23 TV 30, 48 TV color systems 77 U USB jack 52 USB STREAM 45 USB Streaming 45 Using abroad 77 V VCR SET menu 43 VF B.L. (Viewfinder brightness)........ 44 Video head 82 Video operation buttons ....... 21 View...
... menu 45 Telephoto 22 Time code 24 Touch panel 15 Trademark 90 Transmitter 28 Tripod 23 TV 30, 48 TV color systems 77 U USB jack 52 USB STREAM 45 USB Streaming 45 Using abroad 77 V VCR SET menu 43 VF B.L. (Viewfinder brightness)........ 44 Video head 82 Video operation buttons ....... 21 View...


