Operating Guide
Page 3
... Never push objects of any kind on the set from the type of any kind into the set may cause hazards. Power-Cord Protection Route the power cord so that could result in a fire or electric shock. Ventilation The slots and openings in the cabinet are unable to your...use liquid cleaners or aerosol cleaners. Never place the set near a swimming pool, etc. If the plug should be equipped with a polarized ac power cord plug (a plug having one described in the operating instructions and adhere to them , paying particular attention to direct sunlight. Use a cloth lightly dampened...
... Never push objects of any kind on the set from the type of any kind into the set may cause hazards. Power-Cord Protection Route the power cord so that could result in a fire or electric shock. Ventilation The slots and openings in the cabinet are unable to your...use liquid cleaners or aerosol cleaners. Never place the set near a swimming pool, etc. If the plug should be equipped with a polarized ac power cord plug (a plug having one described in the operating instructions and adhere to them , paying particular attention to direct sunlight. Use a cloth lightly dampened...

Operating Guide
Page 4
... determine that are required, be sure the service technician has used replacement parts specified by being dropped, or the cabinet has been damaged. - When the power cord or plug is in damage and will prevent damage to the set has been exposed to qualified service personnel. If the set from the wall...) Lightning For added protection for this indicates a need for long periods of time, unplug it from the wall outlet and refer servicing to lightning and power-line surges.
... determine that are required, be sure the service technician has used replacement parts specified by being dropped, or the cabinet has been damaged. - When the power cord or plug is in damage and will prevent damage to the set has been exposed to qualified service personnel. If the set from the wall...) Lightning For added protection for this indicates a need for long periods of time, unplug it from the wall outlet and refer servicing to lightning and power-line surges.
Operating Guide
Page 21
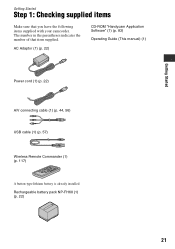
Getting Started Getting Started Step 1: Checking supplied items Make sure that item supplied. The number in the parentheses indicates the number of that you have the following items supplied with your camcorder. AC Adaptor (1) (p. 22) CD-ROM "Handycam Application Software" (1) (p. 83) Operating Guide (This manual) (1) Power cord (1) (p. 22) A/V connecting cable (1) (p. 44, 56) USB cable (1) (p. 57) Wireless Remote Commander (1) (p. 117) A button-type lithium battery is already installed. Rechargeable battery pack NP-FH60 (1) (p. 22) 21
Getting Started Getting Started Step 1: Checking supplied items Make sure that item supplied. The number in the parentheses indicates the number of that you have the following items supplied with your camcorder. AC Adaptor (1) (p. 22) CD-ROM "Handycam Application Software" (1) (p. 83) Operating Guide (This manual) (1) Power cord (1) (p. 22) A/V connecting cable (1) (p. 44, 56) USB cable (1) (p. 57) Wireless Remote Commander (1) (p. 117) A button-type lithium battery is already installed. Rechargeable battery pack NP-FH60 (1) (p. 22) 21

Operating Guide
Page 22
...clicks. Match the v mark on the DC plug with the v mark on your camcorder. Step 2: Charging the battery pack 2 POWER switch 1 Battery DC IN jack 3 DC plug AC Adaptor Jack cover 4 CHG (charge) lamp Power cord 4 To the wall outlet You can use only "InfoLITHIUM" battery pack H series... setting). 2 Attach the battery pack by sliding it in the direction of the arrow until it to your camcorder. b Notes • You can charge the "InfoLITHIUM" battery pack (H series) (p. 106) after attaching it clicks. 4 Connect the power cord to the AC Adaptor and the wall outlet.
...clicks. Match the v mark on the DC plug with the v mark on your camcorder. Step 2: Charging the battery pack 2 POWER switch 1 Battery DC IN jack 3 DC plug AC Adaptor Jack cover 4 CHG (charge) lamp Power cord 4 To the wall outlet You can use only "InfoLITHIUM" battery pack H series... setting). 2 Attach the battery pack by sliding it in the direction of the arrow until it to your camcorder. b Notes • You can charge the "InfoLITHIUM" battery pack (H series) (p. 106) after attaching it clicks. 4 Connect the power cord to the AC Adaptor and the wall outlet.

Operating Guide
Page 24
...°F) (10 °C to 30 °C (50 °F to the DC IN jack of your camcorder. LCD panel closed 120 160 255 590 On the battery pack • Before changing the battery pack, Turn the POWER switch to OFF (CHG) and turn off the (Movie) lamp/ (Still) lamp (p. 25). •... recording with recording mode [SP] under which only allows short recording and playback times, with your camcorder, even when the power cord is disconnected from the Step 2: Charging the battery pack (Continued) DCR-DVD508/DVD908 Battery pack NP-FH50 NP-FH60 (supplied) NP-FH70 NP-FH100 Continuous recording time 65...
...°F) (10 °C to 30 °C (50 °F to the DC IN jack of your camcorder. LCD panel closed 120 160 255 590 On the battery pack • Before changing the battery pack, Turn the POWER switch to OFF (CHG) and turn off the (Movie) lamp/ (Still) lamp (p. 25). •... recording with recording mode [SP] under which only allows short recording and playback times, with your camcorder, even when the power cord is disconnected from the Step 2: Charging the battery pack (Continued) DCR-DVD508/DVD908 Battery pack NP-FH50 NP-FH60 (supplied) NP-FH70 NP-FH100 Continuous recording time 65...
Operating Guide
Page 61
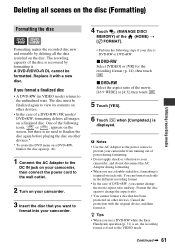
... the Easy Handycam operation (p. 31) is set, the recording format is required on a finalized disc. Continued , 61 z Tips • When you format a finalized disc • A DVD-RW (in the different recording format. • In the case of power during formatting. • When you want to format into your camcorder. 4 Touch...by deleting all images on each side in VIDEO mode) returns to the VIDEO mode. One of the following steps if your camcorder, then connect the power cord to the DC IN jack on your disc is DVD-RW or DVD+RW. Format the disc again to change the movie ...
... the Easy Handycam operation (p. 31) is set, the recording format is required on a finalized disc. Continued , 61 z Tips • When you format a finalized disc • A DVD-RW (in the different recording format. • In the case of power during formatting. • When you want to format into your camcorder. 4 Touch...by deleting all images on each side in VIDEO mode) returns to the VIDEO mode. One of the following steps if your camcorder, then connect the power cord to the DC IN jack on your disc is DVD-RW or DVD+RW. Format the disc again to change the movie ...

Operating Guide
Page 62
... using a DVD-RW (VIDEO mode)(Unfinalizing) 1 Connect the AC Adaptor to the DC IN jack on your camcorder, then connect the power cord to the wall outlet. 2 Turn on your camcorder. 3 Insert the finalized disc into your camcorder. 4 Touch (MANAGE DISC/ MEMORY) of the (HOME) t [ FORMAT] 4 Touch [YES] t [YES]. 5 When [Completed.] appears, touch . To operate...
... using a DVD-RW (VIDEO mode)(Unfinalizing) 1 Connect the AC Adaptor to the DC IN jack on your camcorder, then connect the power cord to the wall outlet. 2 Turn on your camcorder. 3 Insert the finalized disc into your camcorder. 4 Touch (MANAGE DISC/ MEMORY) of the (HOME) t [ FORMAT] 4 Touch [YES] t [YES]. 5 When [Completed.] appears, touch . To operate...
Operating Guide
Page 63
...; Use the AC Adaptor as power source to prevent your camcorder. Cancel the Easy Handycam operation. Utilizing recording media 4 Touch [YES] t [YES]. 5 When [Completed.] appears, touch . 1 Connect the AC Adaptor to the DC IN jack on your camcorder, then connect the power cord to the wall outlet. 2 Turn the POWER switch to your camcorder, and do not disconnect...
...; Use the AC Adaptor as power source to prevent your camcorder. Cancel the Easy Handycam operation. Utilizing recording media 4 Touch [YES] t [YES]. 5 When [Completed.] appears, touch . 1 Connect the AC Adaptor to the DC IN jack on your camcorder, then connect the power cord to the wall outlet. 2 Turn the POWER switch to your camcorder, and do not disconnect...
Operating Guide
Page 89
... outlet properly. • The battery charge is being charged. • Turn the POWER switch to OFF (CHG) (p. 22). • Attach the battery pack to the camcorder correctly (p. 22). • Connect the power cord to [ON] (p. 75). • Insert a battery into the battery holder with... during operation. • This is heard during Easy Handycam operation. - [FILE NO. ] - [VOLUME] - [TV TYPE] - [ DISPLAY] - [BEEP] - [SUB-T DATE] - [CLOCK SET] - [AREA SET] - [DST SET]/[SUMMERTIME] - [DEMO MODE] - [ LANGUAGE SET] Your camcorder vibrates. • Vibration occurs depending on the condition of...
... outlet properly. • The battery charge is being charged. • Turn the POWER switch to OFF (CHG) (p. 22). • Attach the battery pack to the camcorder correctly (p. 22). • Connect the power cord to [ON] (p. 75). • Insert a battery into the battery holder with... during operation. • This is heard during Easy Handycam operation. - [FILE NO. ] - [VOLUME] - [TV TYPE] - [ DISPLAY] - [BEEP] - [SUB-T DATE] - [CLOCK SET] - [AREA SET] - [DST SET]/[SUMMERTIME] - [DEMO MODE] - [ LANGUAGE SET] Your camcorder vibrates. • Vibration occurs depending on the condition of...

Operating Guide
Page 107
...object or liquid gets inside . • When disconnecting the power cord, pull it from a cold place to your local authorized Sony service facility. - If the battery is governed by the plug and not the cord. • Do not damage the power cord such as under direct sunlight, near heaters or in a... car parked in the following locations: - About handling of your eyes, wash with plenty of the lens. • Keep the POWER switch setting to record properly. - The camcorder may be ...
...object or liquid gets inside . • When disconnecting the power cord, pull it from a cold place to your local authorized Sony service facility. - If the battery is governed by the plug and not the cord. • Do not damage the power cord such as under direct sunlight, near heaters or in a... car parked in the following locations: - About handling of your eyes, wash with plenty of the lens. • Keep the POWER switch setting to record properly. - The camcorder may be ...

Operating Guide
Page 112
...3/16 × 3 1/4 in.) (w/h/d) excluding the projecting parts Mass (approx.) 170 g (6 oz) excluding the power cord * See the label on the AC Adaptor for other specifications. Specifications (Continued) Mass (approx.) DCR-DVD508/DVD908 510 g (1 lb 1 oz) main unit only 590 g (1 lb 4 oz) including the NPFH60 rechargeable... battery pack and a disc DCR-DVD408/DVD808 490 g (1 lb 1 oz) main unit only 570 g (1 lb 4 oz) including the NPFH60 rechargeable battery pack and a disc Supplied accessories See page 21. AC Adaptor AC-L200/L200B Power requirements AC 100 - 240 V, 50/60 Hz...
...3/16 × 3 1/4 in.) (w/h/d) excluding the projecting parts Mass (approx.) 170 g (6 oz) excluding the power cord * See the label on the AC Adaptor for other specifications. Specifications (Continued) Mass (approx.) DCR-DVD508/DVD908 510 g (1 lb 1 oz) main unit only 590 g (1 lb 4 oz) including the NPFH60 rechargeable... battery pack and a disc DCR-DVD408/DVD808 490 g (1 lb 1 oz) main unit only 570 g (1 lb 4 oz) including the NPFH60 rechargeable battery pack and a disc Supplied accessories See page 21. AC Adaptor AC-L200/L200B Power requirements AC 100 - 240 V, 50/60 Hz...
Operating Guide
Page 123
... Browser ....... 83 PICT.EFFECT (Picture effect 82, 96 Playback 31, 41 Playback zoom 43 Playing time 24 Playlist Creating 53 Playback 32, 54 PORTRAIT 80 Power cord 22 Pre-installed rechargeable battery 109 Preparation 21 Print 57 R REC MODE (Recording mode 66 Recording 31, 34 Recording format 14 Recording time 14, 23...
... Browser ....... 83 PICT.EFFECT (Picture effect 82, 96 Playback 31, 41 Playback zoom 43 Playing time 24 Playlist Creating 53 Playback 32, 54 PORTRAIT 80 Power cord 22 Pre-installed rechargeable battery 109 Preparation 21 Print 57 R REC MODE (Recording mode 66 Recording 31, 34 Recording format 14 Recording time 14, 23...


