
Camera Operations Guide
Page 2
... shock hazard, do not expose the unit to discontinue midway (fail), restart the application or disconnect and connect the communication cable (USB, etc.) again. For more information regarding this product. Regulatory Information Declaration of the FCC Rules. Bernardo Dr, San Diego, CA .... The number below . Telephone No.: 858-942-2230 This device complies with Part 15 of Conformity Trade Name: SONY Model No.: DCR-TRV280 Responsible Party: Sony Electronics Inc. b Notice If static electricity or electromagnetism causes data transfer to rain or moisture. Operation is for future...
... shock hazard, do not expose the unit to discontinue midway (fail), restart the application or disconnect and connect the communication cable (USB, etc.) again. For more information regarding this product. Regulatory Information Declaration of the FCC Rules. Bernardo Dr, San Diego, CA .... The number below . Telephone No.: 858-942-2230 This device complies with Part 15 of Conformity Trade Name: SONY Model No.: DCR-TRV280 Responsible Party: Sony Electronics Inc. b Notice If static electricity or electromagnetism causes data transfer to rain or moisture. Operation is for future...
Camera Operations Guide
Page 3
...device such as a VCR or a computer with an USB or i.LINK cable, be determined by one or more of your camcorder. Consult the dealer or an experienced radio/TV technician ...the pixels are for effective use standard 8 mm and Hi8 , Digital8 video cassettes on the country/ region. To view your camcorder. • The on the LCD panel, viewfinder, and lens...appear constantly on connecting other device Before connecting your camcorder if necessary (p. 19). ,continued 3 CCD-TRV138: TRV138 CCD-TRV338: TRV338 DCR-TRV280: TRV280 Instructions with the limits for a digital device ...
...device such as a VCR or a computer with an USB or i.LINK cable, be determined by one or more of your camcorder. Consult the dealer or an experienced radio/TV technician ...the pixels are for effective use standard 8 mm and Hi8 , Digital8 video cassettes on the country/ region. To view your camcorder. • The on the LCD panel, viewfinder, and lens...appear constantly on connecting other device Before connecting your camcorder if necessary (p. 19). ,continued 3 CCD-TRV138: TRV138 CCD-TRV338: TRV338 DCR-TRV280: TRV280 Instructions with the limits for a digital device ...
Camera Operations Guide
Page 7
... i.LINK 97 Maintenance and precautions 98 Specification 101 Quick Reference Identifying parts and controls ...........104 Index 109 For TRV280: Two operating instructions are supplied with your camcorder: • Camera Operations Guide (This manual) • "First Step Guide" for using the supplied applications...Using the (LCD SET) menu - CLOCK SET/USB STREAM/ LANGUAGE, etc 55 Using the (OTHERS) menu - FRAME REC/INT.REC, etc. ......52 Using the (SETUP MENU) - Easy Dubbing ( TRV138/338 62 Recording pictures from a VCR ( TRV280 66 Dubbing selected scenes from a tape - PROGRAM...
... i.LINK 97 Maintenance and precautions 98 Specification 101 Quick Reference Identifying parts and controls ...........104 Index 109 For TRV280: Two operating instructions are supplied with your camcorder: • Camera Operations Guide (This manual) • "First Step Guide" for using the supplied applications...Using the (LCD SET) menu - CLOCK SET/USB STREAM/ LANGUAGE, etc 55 Using the (OTHERS) menu - FRAME REC/INT.REC, etc. ......52 Using the (SETUP MENU) - Easy Dubbing ( TRV138/338 62 Recording pictures from a VCR ( TRV280 66 Dubbing selected scenes from a tape - PROGRAM...
Camera Operations Guide
Page 11
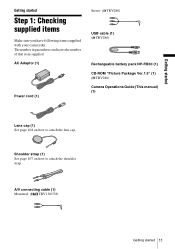
... started Getting started 11 AC Adaptor (1) Power cord (1) Stereo: ( TRV280) USB cable (1) ( TRV280) Rechargeable battery pack NP-FM30 (1) CD-ROM "Picture Package Ver.1.5" (1) ( TRV280) Camera Operations Guide (This manual) (1) Lens cap (1) See page ...104 on how to attach the lens cap. Shoulder strap (1) See page 107 on how to attach the shoulder strap. A/V connecting cable (1) Monaural: ( TRV138/338) Getting started Step 1: Checking supplied items Make sure you have following items supplied with your camcorder...
... started Getting started 11 AC Adaptor (1) Power cord (1) Stereo: ( TRV280) USB cable (1) ( TRV280) Rechargeable battery pack NP-FM30 (1) CD-ROM "Picture Package Ver.1.5" (1) ( TRV280) Camera Operations Guide (This manual) (1) Lens cap (1) See page ...104 on how to attach the lens cap. Shoulder strap (1) See page 107 on how to attach the shoulder strap. A/V connecting cable (1) Monaural: ( TRV138/338) Getting started Step 1: Checking supplied items Make sure you have following items supplied with your camcorder...
Camera Operations Guide
Page 17
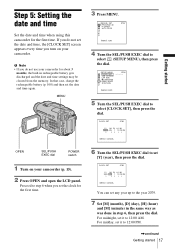
... STBY Y MD HM 2005 JAN 1 12 : 0 0 AM [MENU] : CANCEL You can set the date and time again. Getting started 17 SETUP MENU CLOCK SET USB STREAM LTR SIZE LANGUAGE DEMO MODE RETURN STBY --:--:-- [MENU] : END 5 Turn the SEL/PUSH EXEC dial to select (SETUP MENU), then press the dial. If.... MENU 3 Press MENU. CLOCK SET STBY Y MD HM 2005 JAN 1 12 : 0 0 AM [MENU] : CANCEL OPEN SEL/PUSH EXEC dial POWER switch 1 Turn on your camcorder. For midday, set [Y] (year), then press the dial. MANUAL SET PROGRAM AE P EFFECT AUTO SHTR STBY [MENU] : END 4 Turn the SEL/PUSH EXEC dial to...
... STBY Y MD HM 2005 JAN 1 12 : 0 0 AM [MENU] : CANCEL You can set the date and time again. Getting started 17 SETUP MENU CLOCK SET USB STREAM LTR SIZE LANGUAGE DEMO MODE RETURN STBY --:--:-- [MENU] : END 5 Turn the SEL/PUSH EXEC dial to select (SETUP MENU), then press the dial. If.... MENU 3 Press MENU. CLOCK SET STBY Y MD HM 2005 JAN 1 12 : 0 0 AM [MENU] : CANCEL OPEN SEL/PUSH EXEC dial POWER switch 1 Turn on your camcorder. For midday, set [Y] (year), then press the dial. MANUAL SET PROGRAM AE P EFFECT AUTO SHTR STBY [MENU] : END 4 Turn the SEL/PUSH EXEC dial to...
Camera Operations Guide
Page 19
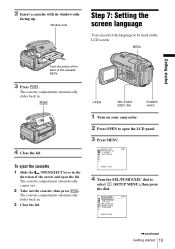
The cassette compartment automatically slides back in . 3 Close the lid. SETUP MENU CLOCK SET USB STREAM LTR SIZE LANGUAGE DEMO MODE RETURN STBY --:--:-- [MENU] : END ,continued Getting started Push the center of the back of the arrow and open the ...LCD panel. 3 Press MENU. MANUAL SET PROGRAM AE P EFFECT AUTO SHTR STBY [MENU] : END 4 Turn the SEL/PUSH EXEC dial to be used on your camcorder. 2 Press OPEN to open the lid. MENU Getting started 19 To eject the cassette 1 Slide the OPEN/EJECT lever in the direction of the cassette...
The cassette compartment automatically slides back in . 3 Close the lid. SETUP MENU CLOCK SET USB STREAM LTR SIZE LANGUAGE DEMO MODE RETURN STBY --:--:-- [MENU] : END ,continued Getting started Push the center of the back of the arrow and open the ...LCD panel. 3 Press MENU. MANUAL SET PROGRAM AE P EFFECT AUTO SHTR STBY [MENU] : END 4 Turn the SEL/PUSH EXEC dial to be used on your camcorder. 2 Press OPEN to open the lid. MENU Getting started 19 To eject the cassette 1 Slide the OPEN/EJECT lever in the direction of the cassette...
Camera Operations Guide
Page 20
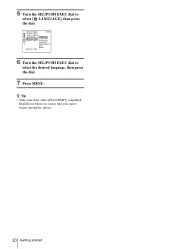
SETUP MENU CLOCK SET STBY USB STREAM LTR SIZE ENGLISH LANGUAGE ENG[SIMP] DEMO MODE FRANÇAIS ESPAÑOL PORTUGUÊS [MENU] : END 6 Turn the SEL/PUSH EXEC dial to select [ LANGUAGE], then press the dial. 5 Turn the SEL/PUSH EXEC dial to select the desired language, then press the dial. 7 Press MENU. z Tip • Your camcorder offers [ENG [SIMP]] (simplified English) for when you cannot find your native tongue among the options. 20 Getting started
SETUP MENU CLOCK SET STBY USB STREAM LTR SIZE ENGLISH LANGUAGE ENG[SIMP] DEMO MODE FRANÇAIS ESPAÑOL PORTUGUÊS [MENU] : END 6 Turn the SEL/PUSH EXEC dial to select [ LANGUAGE], then press the dial. 5 Turn the SEL/PUSH EXEC dial to select the desired language, then press the dial. 7 Press MENU. z Tip • Your camcorder offers [ENG [SIMP]] (simplified English) for when you cannot find your native tongue among the options. 20 Getting started
Camera Operations Guide
Page 27
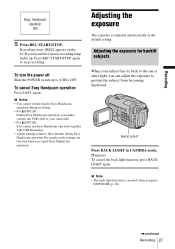
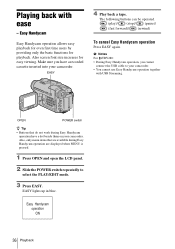
... • The back light function is adjusted automatically in CAMERA mode. . To cancel Easy Handycam operation Press EASY again. Adjusting the exposure for backlit subjects When your camcorder. • For TRV280: You cannot use Easy Handycam operation together with USB Streaming. • All the settings return to the sun or other light, you press EXPOSURE...
... • The back light function is adjusted automatically in CAMERA mode. . To cancel Easy Handycam operation Press EASY again. Adjusting the exposure for backlit subjects When your camcorder. • For TRV280: You cannot use Easy Handycam operation together with USB Streaming. • All the settings return to the sun or other light, you press EXPOSURE...
Camera Operations Guide
Page 36
... ON 36 Playback Playing back with USB Streaming. b Notes For TRV280: • During Easy Handycam operation, you have a dot beside them on your camcorder. Also, only menu items that do not work during Easy Handycam operation are displayed when MENU is pressed. 1 Press OPEN and open the ... switch repeatedly to your camcorder. EASY lights up in blue. Also screen font size increases for playback. Make sure you cannot connect the USB cable to select the PLAY/EDIT mode. 3 Press EASY. EASY 4 Play back a tape. Easy Handycam Easy Handycam operation allows easy playback for...
... ON 36 Playback Playing back with USB Streaming. b Notes For TRV280: • During Easy Handycam operation, you have a dot beside them on your camcorder. Also, only menu items that do not work during Easy Handycam operation are displayed when MENU is pressed. 1 Press OPEN and open the ... switch repeatedly to your camcorder. EASY lights up in blue. Also screen font size increases for playback. Make sure you cannot connect the USB cable to select the PLAY/EDIT mode. 3 Press EASY. EASY 4 Play back a tape. Easy Handycam Easy Handycam operation allows easy playback for...
Camera Operations Guide
Page 55
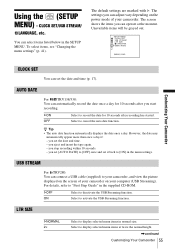
... and insert the tape again. - GOFF ON Select to activate the USB Streaming function. Select to deactivate the USB Streaming function. The default settings are marked with G. USB STREAM For TRV280: You can operate at twice the normal height. ,continued Customizing Your Camcorder 55 LTR SIZE GNORMAL 2× Select to display selected menu items at...
... and insert the tape again. - GOFF ON Select to activate the USB Streaming function. Select to deactivate the USB Streaming function. The default settings are marked with G. USB STREAM For TRV280: You can operate at twice the normal height. ,continued Customizing Your Camcorder 55 LTR SIZE GNORMAL 2× Select to display selected menu items at...
Camera Operations Guide
Page 72
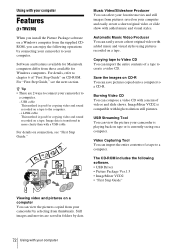
...Video Capturing Tool You can import the entire contents of a tape to a computer. For details on connection, see the next section. USB Streaming Tool You can view the picture your camcorder is playing back on tape or is good for copying video and sound recorded on a tape to the computer. - Software and... or slide show with added music and visual styles. i.LINK cable This method is good for Windows computers. Using with your computer Features ( TRV280) When you install the Picture Package software on a Windows computer from the supplied CDROM, you can enjoy the following software. •...
...Video Capturing Tool You can import the entire contents of a tape to a computer. For details on connection, see the next section. USB Streaming Tool You can view the picture your camcorder is playing back on tape or is good for copying video and sound recorded on a tape to the computer. - Software and... or slide show with added music and visual styles. i.LINK cable This method is good for Windows computers. Using with your computer Features ( TRV280) When you install the Picture Package software on a Windows computer from the supplied CDROM, you can enjoy the following software. •...
Camera Operations Guide
Page 73
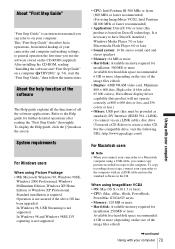
...XP Home Edition or Windows XP Professional Standard installation is required. Refer to the computer with your camcorder to create a video CD. System requirements For Windows users When using a USB cable, you cannot copy pictures recorded on a tape to have DirectX installed.) Windows Media Player...Help guide explains all the software applications. Operation is not supported. To display the Help guide, click the [?] mark on a computer ( TRV280)" (p. 74), start the "First Step Guide," then follow the instructions. In Windows 98 and Windows 98SE, DV capturing is not supported. ...
...XP Home Edition or Windows XP Professional Standard installation is required. Refer to the computer with your camcorder to create a video CD. System requirements For Windows users When using a USB cable, you cannot copy pictures recorded on a tape to have DirectX installed.) Windows Media Player...Help guide explains all the software applications. Operation is not supported. To display the Help guide, click the [?] mark on a computer ( TRV280)" (p. 74), start the "First Step Guide," then follow the instructions. In Windows 98 and Windows 98SE, DV capturing is not supported. ...
Camera Operations Guide
Page 79
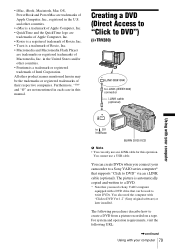
Creating a DVD (Direct Access to "Click to DVD") ( TRV280) to i.LINK (IEEE1394) connector i.LINK cable (optional) Using with "Click to DVD" via an i.LINK cable (optional). Furthermore, "™" and "®" are not mentioned in ... a registered trademark of Roxio, Inc. • Toast is automatically copied and written to a DVD. * Note that you connect your camcorder to a Sony VAIO series computer* that can only use a USB cable. You also need a Sony VAIO computer equipped with your computer to DV Interface BURN DVD/VCD b Note • You can be the trademarks...
Creating a DVD (Direct Access to "Click to DVD") ( TRV280) to i.LINK (IEEE1394) connector i.LINK cable (optional) Using with "Click to DVD" via an i.LINK cable (optional). Furthermore, "™" and "®" are not mentioned in ... a registered trademark of Roxio, Inc. • Toast is automatically copied and written to a DVD. * Note that you connect your camcorder to a Sony VAIO series computer* that can only use a USB cable. You also need a Sony VAIO computer equipped with your computer to DV Interface BURN DVD/VCD b Note • You can be the trademarks...
Camera Operations Guide
Page 87
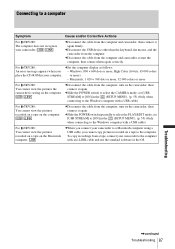
... cannot view the pictures recorded on a tape on the computer. cWhen you connect your camcorder to the computer with a USB cable) For TRV280: You cannot view the pictures recorded on a tape on the camcorder, then connect it again. For TRV280: cSet the computer display as follows: An error message appears when you cannot copy pictures...
... cannot view the pictures recorded on a tape on the computer. cWhen you connect your camcorder to the computer with a USB cable) For TRV280: You cannot view the pictures recorded on a tape on the camcorder, then connect it again. For TRV280: cSet the computer display as follows: An error message appears when you cannot copy pictures...
Camera Operations Guide
Page 88
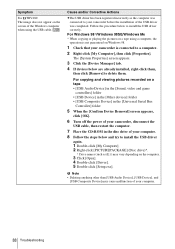
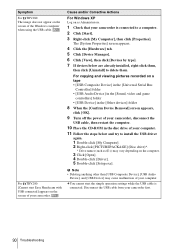
...depending on Windows 98. 1 Check that your computer. 88 Troubleshooting Cause and/or Corrective Actions cThe USB driver has been registered incorrectly as (E:)) may cause malfunction of your camcorder is not guaranteed on the computer. 3 Click [Open]. 4 Double-click [Driver]. 5 Double-...click [My Computer], then click [Properties]. Symptom For TRV280: The image does not appear on a tape • [USB Audio Device] in the [Sound, video and game controllers] folder • [USB Device] in the [Other devices] folder • [USB Composite Device] in the [Universal Serial Bus Controller]...
...depending on Windows 98. 1 Check that your computer. 88 Troubleshooting Cause and/or Corrective Actions cThe USB driver has been registered incorrectly as (E:)) may cause malfunction of your camcorder is not guaranteed on the computer. 3 Click [Open]. 4 Double-click [Driver]. 5 Double-...click [My Computer], then click [Properties]. Symptom For TRV280: The image does not appear on a tape • [USB Audio Device] in the [Sound, video and game controllers] folder • [USB Device] in the [Other devices] folder • [USB Composite Device] in the [Universal Serial Bus Controller]...
Camera Operations Guide
Page 89
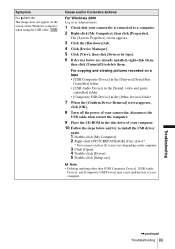
...Controller] folder • [USB Audio Device] in the [Sound, video and game controller] folder • [Composite USB Device] in the [Other devices] folder 7 When the [Confirm Device Removal] screen appears, click [OK]. 8 Turn off the power of your camcorder, disconnect the USB cable, then restart the ...computer. 9 Place the CD-ROM in the disc drive of your camcorder is connected to a computer. 2 Right-click [My Computer], then click [Properties]. Symptom For TRV280: The image does not appear on the ...
...Controller] folder • [USB Audio Device] in the [Sound, video and game controller] folder • [Composite USB Device] in the [Other devices] folder 7 When the [Confirm Device Removal] screen appears, click [OK]. 8 Turn off the power of your camcorder, disconnect the USB cable, then restart the ...computer. 9 Place the CD-ROM in the disc drive of your camcorder is connected to a computer. 2 Right-click [My Computer], then click [Properties]. Symptom For TRV280: The image does not appear on the ...
Camera Operations Guide
Page 90
...ROM in the disc drive of your computer. 11 Follow the steps below are already installed, right-click them . cYou cannot start Easy Handycam with USB connected] appears on the computer. 3 Click [Open]. 4 Double-click [Driver]. 5 Double-click [Setup.exe]. The [System Properties...1 Check that your camcorder. b Note • Deleting anything other than [USB Composite Device], [USB Audio Device], and [USB Device] may vary depending on the screen of the Windows computer when using the USB cable. For TRV280: [Cannot start the simple operation settings while the USB cable is connected to...
...ROM in the disc drive of your computer. 11 Follow the steps below are already installed, right-click them . cYou cannot start Easy Handycam with USB connected] appears on the computer. 3 Click [Open]. 4 Double-click [Driver]. 5 Double-click [Setup.exe]. The [System Properties...1 Check that your camcorder. b Note • Deleting anything other than [USB Composite Device], [USB Audio Device], and [USB Device] may vary depending on the screen of the Windows computer when using the USB cable. For TRV280: [Cannot start the simple operation settings while the USB cable is connected to...

Camera Operations Guide
Page 91
...] for Windows XP), [Picture Package], [Handycam Tools], and [USB Streaming Tool], then start up [USB Streaming Tool]. 2 Adjust the slider in the following procedures: 1 Select [Start], [Programs] ([All Programs] for your camcorder to another device on the [Select audio device] screen. 3 Follow the on the CD-R in PDF. For TRV280: Picture Package does not function...
...] for Windows XP), [Picture Package], [Handycam Tools], and [USB Streaming Tool], then start up [USB Streaming Tool]. 2 Adjust the slider in the following procedures: 1 Select [Start], [Programs] ([All Programs] for your camcorder to another device on the [Select audio device] screen. 3 Follow the on the CD-R in PDF. For TRV280: Picture Package does not function...
Camera Operations Guide
Page 93
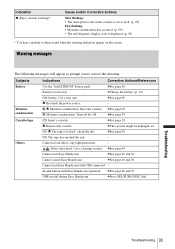
...Z Moisture condensation. Z Reinsert the cassette. cThe cassette might be damaged, etc. cSee page 95. Cannot start Easy Handycam cSee page 26 and 36. USB invalid during Easy Handycam cPress SEL/PUSH EXEC dial. cSee page 96. cSee page 99. Q Z The tape is low. Cannot record due... prompt you to copyright protection. - Dirty video head. Cannot cancel Easy Handycam cSee page 26 and 36. Invalid button with USB connected - Use a cleaning cassette. Cannot start Easy Handycam with Easy Handycam operation cSee page 26 and 36. Indication Z (Eject cassette warning)* Cause...
...Z Moisture condensation. Z Reinsert the cassette. cThe cassette might be damaged, etc. cSee page 95. Cannot start Easy Handycam cSee page 26 and 36. USB invalid during Easy Handycam cPress SEL/PUSH EXEC dial. cSee page 96. cSee page 99. Q Z The tape is low. Cannot record due... prompt you to copyright protection. - Dirty video head. Cannot cancel Easy Handycam cSee page 26 and 36. Invalid button with USB connected - Use a cleaning cassette. Cannot start Easy Handycam with Easy Handycam operation cSee page 26 and 36. Indication Z (Eject cassette warning)* Cause...
Camera Operations Guide
Page 101
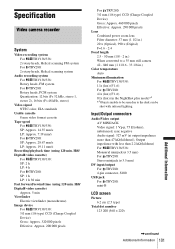
... more than 2.2 kΩ (kilohms) For TRV138/338: Monaural minijack (ø 3.5 mm) For TRV280: Stereo minijack (ø 3.5 mm) DV input/output For TRV280: 4-pin connector, S100 USB jack For TRV280: mini-B LCD screen Picture 6.2 cm (2.5 type) Total dot number 123 200 (560 ×... 220) ,continued Additional Information 101 Additional Information Hi8/ Digital8 video cassette) Approx. 5 min Viewfinder Electric viewfinder ...
... more than 2.2 kΩ (kilohms) For TRV138/338: Monaural minijack (ø 3.5 mm) For TRV280: Stereo minijack (ø 3.5 mm) DV input/output For TRV280: 4-pin connector, S100 USB jack For TRV280: mini-B LCD screen Picture 6.2 cm (2.5 type) Total dot number 123 200 (560 ×... 220) ,continued Additional Information 101 Additional Information Hi8/ Digital8 video cassette) Approx. 5 min Viewfinder Electric viewfinder ...


