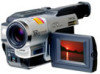
Operating Instructions
Page 6
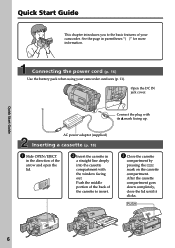
... when using your camcorder. Push the middle portion of the back of your camcorder outdoors (p. 11). AC power adaptor (supplied) Inserting a cassette (p. 18) 1 Slide OPEN/EJECT in the direction of the arrow and open the lid. 2 Insert the cassette in parentheses "( )" for more information. Quick Start Guide This chapter introduces you...
... when using your camcorder. Push the middle portion of the back of your camcorder outdoors (p. 11). AC power adaptor (supplied) Inserting a cassette (p. 18) 1 Slide OPEN/EJECT in the direction of the arrow and open the lid. 2 Insert the cassette in parentheses "( )" for more information. Quick Start Guide This chapter introduces you...
Operating Instructions
Page 18
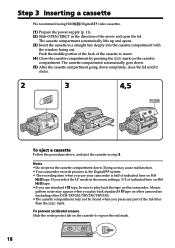
... We recommend using Hi8 /Digital8 video cassettes. (1) Prepare the power supply (p. 11). (2) Slide OPEN/EJECT in the menu settings, 3/4 of indicated time on Hi8 tape. •If you press any part of the lid other DCR-TRV230/TRV330/TRV530). •The cassette compartment may cause malfunction. •Your camcorder records pictures in the Digital8 system...
... We recommend using Hi8 /Digital8 video cassettes. (1) Prepare the power supply (p. 11). (2) Slide OPEN/EJECT in the menu settings, 3/4 of indicated time on Hi8 tape. •If you press any part of the lid other DCR-TRV230/TRV330/TRV530). •The cassette compartment may cause malfunction. •Your camcorder records pictures in the Digital8 system...
Operating Instructions
Page 20
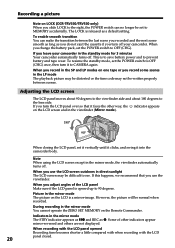
...then turn it faces the other indicators appear mirror-reversed and others are not displayed. Recording a picture Note on LOCK (DCR-TRV330/TRV530 only) When you slide LOCK to the right, the POWER switch can...may not be written properly between the last scene you recorded and the next scene smooth as long as you do not eject the cassette if you turn the LCD panel over so... recorded. Adjusting the LCD screen The LCD panel moves about 90 degrees to the viewfinder side and about 180 degrees to CAMERA again. This is opened Recording time becomes shorter a little compared with when recording ...
...then turn it faces the other indicators appear mirror-reversed and others are not displayed. Recording a picture Note on LOCK (DCR-TRV330/TRV530 only) When you slide LOCK to the right, the POWER switch can...may not be written properly between the last scene you recorded and the next scene smooth as long as you do not eject the cassette if you turn the LCD panel over so... recorded. Adjusting the LCD screen The LCD panel moves about 90 degrees to the viewfinder side and about 180 degrees to CAMERA again. This is opened Recording time becomes shorter a little compared with when recording ...
Operating Instructions
Page 21
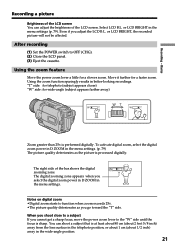
...21 When you shoot close to the "W" side until the focus is processed digitally. You can adjust the brightness of the bar shows the digital zooming zone. or LCD BRIGHT in better-looking recordings. Using the zoom function sparingly results in the menu settings (p. 79). Move... a little for a slower zoom. Recording - or LCD BRIGHT, the recorded picture will not be affected. The right side of the LCD screen. Notes on digital zoom •Digital zoom starts to OFF (CHG). (2) Close the LCD panel. (3) Eject the cassette. Basics Recording a picture Brightness of the LCD screen...
...21 When you shoot close to the "W" side until the focus is processed digitally. You can adjust the brightness of the bar shows the digital zooming zone. or LCD BRIGHT in better-looking recordings. Using the zoom function sparingly results in the menu settings (p. 79). Move... a little for a slower zoom. Recording - or LCD BRIGHT, the recorded picture will not be affected. The right side of the LCD screen. Notes on digital zoom •Digital zoom starts to OFF (CHG). (2) Close the LCD panel. (3) Eject the cassette. Basics Recording a picture Brightness of the LCD screen...
Operating Instructions
Page 26
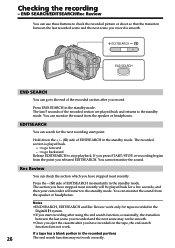
...to the standby mode. You can monitor the sound from the speaker or headphones. If you press START/STOP, re-recording begins from the point you have recorded on the tape, the end search function does not work correctly. The last 5 seconds of EDITSEARCH momentarily in the standby...be played back for a few seconds, and then your camcorder will be smooth. •Once you eject the cassette after you start point. Hold down the +/- (7) side of the recorded section after you have stopped most recently. Rec Review You can go backward Release EDITSEARCH to check ...
...to the standby mode. You can monitor the sound from the speaker or headphones. If you press START/STOP, re-recording begins from the point you have recorded on the tape, the end search function does not work correctly. The last 5 seconds of EDITSEARCH momentarily in the standby...be played back for a few seconds, and then your camcorder will be smooth. •Once you eject the cassette after you start point. Hold down the +/- (7) side of the recorded section after you have stopped most recently. Rec Review You can go backward Release EDITSEARCH to check ...

Operating Instructions
Page 69
... then press the dial. When finished, the indicator changes to COMPLETE. (5) Rewind the tape in CONTROL, you want to record over) into the VCR, then set to recording pause. (3) Turn the SEL/PUSH EXEC dial to select ADJ TEST, then press the dial. (4) Turn the SEL/PUSH... slow playback. The calculated stop position for notes. Before operation, eject the cassette from your camcorder and the VCR. Editing Dubbing only desired scenes - IN and OUT are recorded on an image for adjusting the synchronicity. Digital program editing Step 3: Adjusting the synchronicity of the VCR You can...
... then press the dial. When finished, the indicator changes to COMPLETE. (5) Rewind the tape in CONTROL, you want to record over) into the VCR, then set to recording pause. (3) Turn the SEL/PUSH EXEC dial to select ADJ TEST, then press the dial. (4) Turn the SEL/PUSH... slow playback. The calculated stop position for notes. Before operation, eject the cassette from your camcorder and the VCR. Editing Dubbing only desired scenes - IN and OUT are recorded on an image for adjusting the synchronicity. Digital program editing Step 3: Adjusting the synchronicity of the VCR You can...
Operating Instructions
Page 72
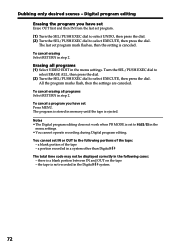
...ejected. The last set program mark flashes, then the setting is a blank portion between IN and OUT on the tape - All the program marks flash, then the settings are canceled. Dubbing only desired scenes - To cancel a program you have set to the following cases: - a portion recorded...IN from the last set IN or OUT to menu settings. • You cannot operate recording during Digital program editing. / in the Digital8 system. 72 To cancel erasing all programs (1) Select VIDEO EDIT in step 2. To cancel erasing Select RETURN in the menu settings. a blank portion ...
...ejected. The last set program mark flashes, then the setting is a blank portion between IN and OUT on the tape - All the program marks flash, then the settings are canceled. Dubbing only desired scenes - To cancel a program you have set to the following cases: - a portion recorded...IN from the last set IN or OUT to menu settings. • You cannot operate recording during Digital program editing. / in the Digital8 system. 72 To cancel erasing all programs (1) Select VIDEO EDIT in step 2. To cancel erasing Select RETURN in the menu settings. a blank portion ...
Operating Instructions
Page 90
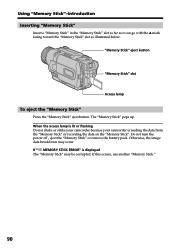
...camcorder is displayed The "Memory Stick" may occur. If this occurs, use another "Memory Stick." 90 Do not turn the power off , eject the "Memory Stick" or remove the battery pack. Otherwise, the image data breakdown may be corrupted. If " MEMORY STICK ERROR" is ...reading the data from the "Memory Stick" or recording the data on the "Memory Stick". "Memory Stick" eject button "Memory Stick" slot Access lamp To eject the "Memory Stick" Press the "Memory Stick" eject button. Using "Memory Stick"-introduction Inserting "Memory Stick" Insert a "Memory Stick"...
...camcorder is displayed The "Memory Stick" may occur. If this occurs, use another "Memory Stick." 90 Do not turn the power off , eject the "Memory Stick" or remove the battery pack. Otherwise, the image data breakdown may be corrupted. If " MEMORY STICK ERROR" is ...reading the data from the "Memory Stick" or recording the data on the "Memory Stick". "Memory Stick" eject button "Memory Stick" slot Access lamp To eject the "Memory Stick" Press the "Memory Stick" eject button. Using "Memory Stick"-introduction Inserting "Memory Stick" Insert a "Memory Stick"...
Operating Instructions
Page 103
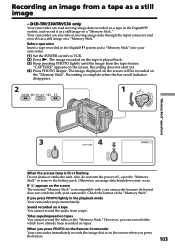
...back. (3) Keep pressing PHOTO lightly until the image from a tape. When you can read moving image data through the input connector and record it as a still image - "CAPTURE" appears on the screen when you press PHOTO lightly in the Digital8 system and a "Memory Stick..." into your camcorder. DCR-TRV330/TRV530 only Your camcorder can record titles which have already been recorded on the "Memory Stick." The image displayed on the screen will be recorded on a "Memory Stick." Also do not turn the power off , eject the "Memory Stick" or remove the ...
...back. (3) Keep pressing PHOTO lightly until the image from a tape. When you can read moving image data through the input connector and record it as a still image - "CAPTURE" appears on the screen when you press PHOTO lightly in the Digital8 system and a "Memory Stick..." into your camcorder. DCR-TRV330/TRV530 only Your camcorder can record titles which have already been recorded on the "Memory Stick." The image displayed on the screen will be recorded on a "Memory Stick." Also do not turn the power off , eject the "Memory Stick" or remove the ...
Operating Instructions
Page 104
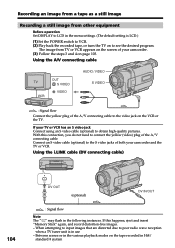
... on the VCR or the TV. If this connection, you do not need to the video jack on to the S video jacks of both your camcorder. (3) Follow the steps 3 and 4 on the tape recorded in use - When attempting to input images that are distorted due to obtain high-quality ... Signal flow Note The " " may flash in the various playback modes on page 103. With this happens, eject and insert "Memory Stick" again, and record distortion-free images. - Connect an S video cable (optional) to see the desired program. The image from other equipment Before operation Set DISPLAY to LCD in ...
... on the VCR or the TV. If this connection, you do not need to the video jack on to the S video jacks of both your camcorder. (3) Follow the steps 3 and 4 on the tape recorded in use - When attempting to input images that are distorted due to obtain high-quality ... Signal flow Note The " " may flash in the various playback modes on page 103. With this happens, eject and insert "Memory Stick" again, and record distortion-free images. - Connect an S video cable (optional) to see the desired program. The image from other equipment Before operation Set DISPLAY to LCD in ...

Operating Instructions
Page 106
Insert another "Memory Stick" and repeat the procedure from the last image recorded on the previous "Memory Stick". 106 If the write-protect tab on the "Memory Stick" is full "MEMORY FULL" appears on the screen when you ... to stop copying Press MENU to LOCK "NOT READY" appears on the screen, and the copying stops. As well do not turn the power off, eject the "Memory Stick" or remove the battery pack. When the memory of copying Your camcorder resumes copying from step 2. When the access lamp is lit...
Insert another "Memory Stick" and repeat the procedure from the last image recorded on the previous "Memory Stick". 106 If the write-protect tab on the "Memory Stick" is full "MEMORY FULL" appears on the screen when you ... to stop copying Press MENU to LOCK "NOT READY" appears on the screen, and the copying stops. As well do not turn the power off, eject the "Memory Stick" or remove the battery pack. When the memory of copying Your camcorder resumes copying from step 2. When the access lamp is lit...

Operating Instructions
Page 112
...folders inside the "Memory Stick" are displayed. (6) Select and double-click the desired image file from the system appears, then unplug the USB cable or eject the "Memory Stick." For Macintosh users (1) Quit application programs opened. "Dcim" folder t "100msdcf" folder t Image file For the detailed folder and...lit. (2) Drag and drop the "Memory Stick" icon to the Trash or select Eject under the Special menu. (3) Eject the "Memory Stick." 112 For Windows 2000 users (1) Move the cursor to the "Unplug or Eject Hardware" icon on the TaskTray and click to cancel the applicable drive. (2) A ...
...folders inside the "Memory Stick" are displayed. (6) Select and double-click the desired image file from the system appears, then unplug the USB cable or eject the "Memory Stick." For Macintosh users (1) Quit application programs opened. "Dcim" folder t "100msdcf" folder t Image file For the detailed folder and...lit. (2) Drag and drop the "Memory Stick" icon to the Trash or select Eject under the Special menu. (3) Eject the "Memory Stick." 112 For Windows 2000 users (1) Move the cursor to the "Unplug or Eject Hardware" icon on the TaskTray and click to cancel the applicable drive. (2) A ...

Operating Instructions
Page 127
... so that the battery pack has enough power to a wall outlet. (p. 16) The end search function does not work. • The tape was ejected after recording. • You have used the battery pack in the remaining battery time. c Connect it firmly. (p. 11, 16) • The battery is ...an extremely hot or cold environment for a long time. • The battery pack is dead. c Remove the cassette and leave your camcorder for cassette ejection work correctly. • The tape has a blank portion in the remaining battery time. The % and Z indicators flash and no functions except for at...
... so that the battery pack has enough power to a wall outlet. (p. 16) The end search function does not work. • The tape was ejected after recording. • You have used the battery pack in the remaining battery time. c Connect it firmly. (p. 11, 16) • The battery is ...an extremely hot or cold environment for a long time. • The battery pack is dead. c Remove the cassette and leave your camcorder for cassette ejection work correctly. • The tape has a blank portion in the remaining battery time. The % and Z indicators flash and no functions except for at...

Operating Instructions
Page 131
...TRV530 only) Slow flashing: •The still image is nearly dead. C:21:00 Self-diagnosis display (p. 130). Warning indicator as to "Memory Stick"* (DCR-TRV330/TRV530 only) Slow flashing: • No "Memory Stick" is out (red) (p. 18). Fast flashing: •The battery is unreadable. Fast ... file is corrupted. •The file is dead. % Moisture condensation has occurred* Fast flashing: •Eject the cassette, turn off your camcorder (p. 88). Warning indicator as to eject the cassette* Slow flashing: •The write-protect tab on the cassette is inserted. The E indicator ...
...TRV530 only) Slow flashing: •The still image is nearly dead. C:21:00 Self-diagnosis display (p. 130). Warning indicator as to "Memory Stick"* (DCR-TRV330/TRV530 only) Slow flashing: • No "Memory Stick" is out (red) (p. 18). Fast flashing: •The battery is unreadable. Fast ... file is corrupted. •The file is dead. % Moisture condensation has occurred* Fast flashing: •Eject the cassette, turn off your camcorder (p. 88). Warning indicator as to eject the cassette* Slow flashing: •The write-protect tab on the cassette is inserted. The E indicator ...

Operating Instructions
Page 139
... plastic bag has reached the surrounding temperature (after a squall or a shower. - If there is turned on the surface of the functions except cassette ejection will not appear. Eject the cassette, turn off your camcorder, and leave it . You use your camcorder in a high temperature and humidity place. You bring your camcorder from...
... plastic bag has reached the surrounding temperature (after a squall or a shower. - If there is turned on the surface of the functions except cassette ejection will not appear. Eject the cassette, turn off your camcorder, and leave it . You use your camcorder in a high temperature and humidity place. You bring your camcorder from...
Operating Instructions
Page 149
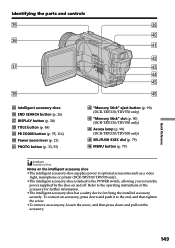
... r; Power zoom lever (p. 21) ra PHOTO button (p. 33, 93) rs "Memory Stick" eject button (p. 90) (DCR-TRV330/TRV530 only) rd "Memory Stick" slot (p. 90) (DCR-TRV330/TRV530 only) rf Access lamp (p. 90) (DCR-TRV330/TRV530 only) rg SEL/PUSH EXEC dial (p. 79) rh MENU button (p. 79) Notes... on the intelligent accessory shoe •The intelligent accessory shoe supplies power to optional accessories such as a video light, microphone or printer (DCR-TRV330/TRV530 only). •The intelligent accessory shoe is linked to the POWER switch, allowing you to turn the power supplied...
... r; Power zoom lever (p. 21) ra PHOTO button (p. 33, 93) rs "Memory Stick" eject button (p. 90) (DCR-TRV330/TRV530 only) rd "Memory Stick" slot (p. 90) (DCR-TRV330/TRV530 only) rf Access lamp (p. 90) (DCR-TRV330/TRV530 only) rg SEL/PUSH EXEC dial (p. 79) rh MENU button (p. 79) Notes... on the intelligent accessory shoe •The intelligent accessory shoe supplies power to optional accessories such as a video light, microphone or printer (DCR-TRV330/TRV530 only). •The intelligent accessory shoe is linked to the POWER switch, allowing you to turn the power supplied...
Operating Instructions
Page 150
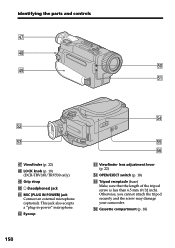
... jack also accepts a "plug-in-power" microphone. th Cassette compartment (p. 18) 150 ts Eyecup tf tg th td Viewfinder lens adjustment lever (p. 22) tf OPEN/EJECT switch (p. 18) tg Tripod receptacle (base) Make sure that the length of the tripod screw is less than 6.5 mm (9/32 inch). Identifying the parts and...
... jack also accepts a "plug-in-power" microphone. th Cassette compartment (p. 18) 150 ts Eyecup tf tg th td Viewfinder lens adjustment lever (p. 22) tf OPEN/EJECT switch (p. 18) tg Tripod receptacle (base) Make sure that the length of the tripod screw is less than 6.5 mm (9/32 inch). Identifying the parts and...


