

Operating Instructions
Page 27
Playing back a tape You cannot play back the tapes recorded in the Digital8 system. You can control playback using the Remote Commander supplied with the LCD screen facing out [a]. Basics - If you close the LCD panel, you can turn the LCD panel over and move it ... adjust the volume, press either of the LCD panel by lifting the LCD panel up by 23 degrees [b]. [a] [b] 23° 27 When monitoring on your camcorder. (1) Install the power source and insert the recorded tape. (2) Set the POWER switch to VCR while pressing the small green button. (3) Open the LCD panel...
Playing back a tape You cannot play back the tapes recorded in the Digital8 system. You can control playback using the Remote Commander supplied with the LCD screen facing out [a]. Basics - If you close the LCD panel, you can turn the LCD panel over and move it ... adjust the volume, press either of the LCD panel by lifting the LCD panel up by 23 degrees [b]. [a] [b] 23° 27 When monitoring on your camcorder. (1) Install the power source and insert the recorded tape. (2) Set the POWER switch to VCR while pressing the small green button. (3) Open the LCD panel...
Operating Instructions
Page 30
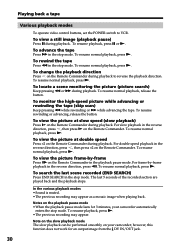
... section are played back and the playback stops. however, this function does not work for 3 minutes, your camcorder; To change the playback direction Press on the Remote Commander in the stop mode. To resume rewinding or advancing, release the button. For frame-by -frame Press... C on the Remote Commander during playback. Playing back a tape Various playback modes To operate video control buttons, set the POWER switch to reverse the playback direction. To resume normal playback, press N....
... section are played back and the playback stops. however, this function does not work for 3 minutes, your camcorder; To change the playback direction Press on the Remote Commander in the stop mode. To resume rewinding or advancing, release the button. For frame-by -frame Press... C on the Remote Commander during playback. Playing back a tape Various playback modes To operate video control buttons, set the POWER switch to reverse the playback direction. To resume normal playback, press N....
Operating Instructions
Page 66
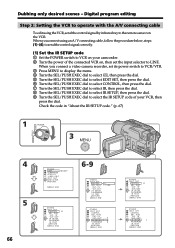
... selector to select the IR SETUP code of your VCR, then press the dial. When you connect using the VCR, send the control signal by infrared ray to the remote sensor on , then set its power switch to VCR/VTR. 3 Press MENU to display the menu. 4 Turn the SEL/PUSH EXEC ... with the A/V connecting cable To edit using an A/V connecting cable, follow the procedure below, steps (1)~(4), to send the control signal correctly. (1) Set the IR SETUP code 1 Set the POWER switch to VCR on your camcorder. 2 Turn the power of the connected VCR on the VCR. I N " " CUT-OUT " I R SETUP P AUS EMODE I R ADJ ...
... selector to select the IR SETUP code of your VCR, then press the dial. When you connect using the VCR, send the control signal by infrared ray to the remote sensor on , then set its power switch to VCR/VTR. 3 Press MENU to display the menu. 4 Turn the SEL/PUSH EXEC ... with the A/V connecting cable To edit using an A/V connecting cable, follow the procedure below, steps (1)~(4), to send the control signal correctly. (1) Set the IR SETUP code 1 Set the POWER switch to VCR on your camcorder. 2 Turn the power of the connected VCR on the VCR. I N " " CUT-OUT " I R SETUP P AUS EMODE I R ADJ ...

Operating Instructions
Page 68
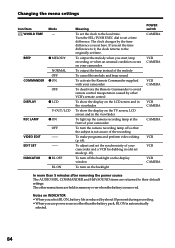
..." CUT-OUT " I R SETUP P AUS EMODE P AUS E I R TEST REC RETURN PB [ MENU ] : END 2 OTHERS ED I T SET CONTROL ADJ TEST " CUT- Select PAUSE if the button to cancel recording pause is z. - Select PB if the button to cancel recording pause is X. - Set ...the devices. Select REC if the button to cancel recording pause is N. (3) Setting your camcorder and the VCR to cancel recording pause on your camcorder and face it towards the remote sensor of your VCR. Infrared rays emitter Remote sensor A/V connecting cable (optional) 68 To cancel recording pause: - Dubbing only desired ...
..." CUT-OUT " I R SETUP P AUS EMODE P AUS E I R TEST REC RETURN PB [ MENU ] : END 2 OTHERS ED I T SET CONTROL ADJ TEST " CUT- Select PAUSE if the button to cancel recording pause is z. - Select PB if the button to cancel recording pause is X. - Set ...the devices. Select REC if the button to cancel recording pause is N. (3) Setting your camcorder and the VCR to cancel recording pause on your camcorder and face it towards the remote sensor of your VCR. Infrared rays emitter Remote sensor A/V connecting cable (optional) 68 To cancel recording pause: - Dubbing only desired ...
Operating Instructions
Page 84
...off so that the subject is not aware of your camcorder and a VCR for dubbing in memory even when the battery is automatically selected. 84 To output the melody when you set time. Turn the SEL/PUSH EXEC dial to avoid remote control misoperation caused by about 10 percent during recording. •...set here. BEEP z MELODY COMMANDER NORMAL OFF z ON OFF DISPLAY REC LAMP VIDEO EDIT EDIT SET z LCD V-OUT/LCD z ON OFF -- -- The other VCR's remote control To show the display on the LCD screen and in the viewfinder To show the display on the backlight POWER switch CAMERA VCR CAMERA VCR...
...off so that the subject is not aware of your camcorder and a VCR for dubbing in memory even when the battery is automatically selected. 84 To output the melody when you set time. Turn the SEL/PUSH EXEC dial to avoid remote control misoperation caused by about 10 percent during recording. •...set here. BEEP z MELODY COMMANDER NORMAL OFF z ON OFF DISPLAY REC LAMP VIDEO EDIT EDIT SET z LCD V-OUT/LCD z ON OFF -- -- The other VCR's remote control To show the display on the LCD screen and in the viewfinder To show the display on the backlight POWER switch CAMERA VCR CAMERA VCR...
Operating Instructions
Page 104
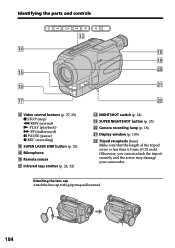
qg qh wa qj ws qd Video control buttons (p. 27, 30) x STOP (stop) m REW (rewind) N PLAY (playback) M FF (fastforward) X PAUSE (pause) z REC (recording) qf SUPER LASER LINK button (p. 32) qg Microphone qh Remote sensor qj Infrared rays emitter (p. 24, 32) qk NIGHTSHOT switch (p. 24) ql SUPER NIGHTSHOT button (p. 25) w; Camera recording ... the tripod screw is less than 6.5 mm (9/32 inch). Otherwise, you cannot attach the tripod securely and the screw may damage your camcorder. Attaching the lens cap Attach the lens cap to the grip strap as illustrated. 104 Identifying the parts and...
qg qh wa qj ws qd Video control buttons (p. 27, 30) x STOP (stop) m REW (rewind) N PLAY (playback) M FF (fastforward) X PAUSE (pause) z REC (recording) qf SUPER LASER LINK button (p. 32) qg Microphone qh Remote sensor qj Infrared rays emitter (p. 24, 32) qk NIGHTSHOT switch (p. 24) ql SUPER NIGHTSHOT button (p. 25) w; Camera recording ... the tripod screw is less than 6.5 mm (9/32 inch). Otherwise, you cannot attach the tripod securely and the screw may damage your camcorder. Attaching the lens cap Attach the lens cap to the grip strap as illustrated. 104 Identifying the parts and...

Operating Instructions
Page 108
...) 4 ./> buttons (p. 59, 61) 5 Tape transport buttons (p. 30) 6 Transmitter Point toward the remote sensor to control the camcorder after turning on the Remote Commander •Point the remote sensor away from other Sony VCRs to the + - Otherwise, the Remote Commander may not function properly. •Your camcorder works in the Commander mode VTR 2, we recommend changing the Commander mode...
...) 4 ./> buttons (p. 59, 61) 5 Tape transport buttons (p. 30) 6 Transmitter Point toward the remote sensor to control the camcorder after turning on the Remote Commander •Point the remote sensor away from other Sony VCRs to the + - Otherwise, the Remote Commander may not function properly. •Your camcorder works in the Commander mode VTR 2, we recommend changing the Commander mode...


