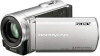

Handycam® Handbook
Page 4
... an object. Do not use your camcorder in this manual, the internal memory of your camcorder and memory card are called "recording media." Design and specifications of your camcorder. Confirm the model name of your camcorder Confirm the model name on your camcorder and accessories are lit or flashing When using a digital still camera, and...
... an object. Do not use your camcorder in this manual, the internal memory of your camcorder and memory card are called "recording media." Design and specifications of your camcorder. Confirm the model name of your camcorder Confirm the model name on your camcorder and accessories are lit or flashing When using a digital still camera, and...
Handycam® Handbook
Page 9
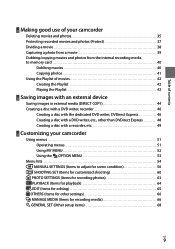
... contents Making good use of your camcorder Deleting movies and photos 35 Protecting recorded movies and photos (Protect 37 Dividing a movie 38 Capturing a photo from a movie 39 Dubbing/copying movies and photos from the internal recording media to memory card 40 Dubbing movies 40 Copying ...other than DVDirect Express 48 Creating a disc with a recorder, etc 49 Customizing your camcorder Using menus 51 Operating menus 51 Using MY MENU 52 Using the OPTION MENU 53 Menu lists 54 MANUAL SETTINGS (Items to adjust for scene condition 56 SHOOTING SET (Items for customized shooting 60...
... contents Making good use of your camcorder Deleting movies and photos 35 Protecting recorded movies and photos (Protect 37 Dividing a movie 38 Capturing a photo from a movie 39 Dubbing/copying movies and photos from the internal recording media to memory card 40 Dubbing movies 40 Copying ...other than DVDirect Express 48 Creating a disc with a recorder, etc 49 Customizing your camcorder Using menus 51 Operating menus 51 Using MY MENU 52 Using the OPTION MENU 53 Menu lists 54 MANUAL SETTINGS (Items to adjust for scene condition 56 SHOOTING SET (Items for customized shooting 60...

Handycam® Handbook
Page 17
..." media) * Marked with this manual, "Memory Stick PRO Duo" media and "Memory Stick PRO-HG Duo" media are referred to as "Memory Stick PRO Duo" media. Memory cards of up to 32 GB are guaranteed to record movies and/or photos on the camcorder you use "Memory Stick PRO Duo" media of memory card that you use...
..." media) * Marked with this manual, "Memory Stick PRO Duo" media and "Memory Stick PRO-HG Duo" media are referred to as "Memory Stick PRO Duo" media. Memory cards of up to 32 GB are guaranteed to record movies and/or photos on the camcorder you use "Memory Stick PRO Duo" media of memory card that you use...

Handycam® Handbook
Page 33
... another device via the S VIDEO jack, by using the A/V connecting cable or an A/V connecting cable with the TV. Connect your camcorder to . Refer also to the instruction manuals supplied with the devices to be connected. A/V connecting cable (supplied) Connecting to another device via the A/V Remote Connector using an A/V connecting...
... another device via the S VIDEO jack, by using the A/V connecting cable or an A/V connecting cable with the TV. Connect your camcorder to . Refer also to the instruction manuals supplied with the devices to be connected. A/V connecting cable (supplied) Connecting to another device via the A/V Remote Connector using an A/V connecting...

Handycam® Handbook
Page 34
...To check information (counter, etc.) on the screen of your TV or VCR. Notes When you connect your camcorder to a TV compatible with your camcorder to the LINE IN input on the VCR to LINE (VIDEO 1, VIDEO 2, etc.). OUT/PANEL] ...; . US 34 When your TV is not a malfunction. When you set [TV TYPE] to [4:3], the image quality may not be displayed full screen. Refer also to the instruction manuals...
...To check information (counter, etc.) on the screen of your TV or VCR. Notes When you connect your camcorder to a TV compatible with your camcorder to the LINE IN input on the VCR to LINE (VIDEO 1, VIDEO 2, etc.). OUT/PANEL] ...; . US 34 When your TV is not a malfunction. When you set [TV TYPE] to [4:3], the image quality may not be displayed full screen. Refer also to the instruction manuals...

Handycam® Handbook
Page 44
... the external media. Refer to the Sony support page for your country/region for details on external media that can be used. 1 Connect the AC Adaptor and the power cord (mains lead) to the DC IN jack of your camcorder and the wall outlet (wall socket). 4 Connect...external media can be ensured, even for devices applicable to the operating conditions. Connect your camcorder to the wall outlet (wall socket) using the supplied AC adaptor (p. 12). Refer to the instruction manual supplied with an external device Saving images in the internal recording media of your...
... the external media. Refer to the Sony support page for your country/region for details on external media that can be used. 1 Connect the AC Adaptor and the power cord (mains lead) to the DC IN jack of your camcorder and the wall outlet (wall socket). 4 Connect...external media can be ensured, even for devices applicable to the operating conditions. Connect your camcorder to the wall outlet (wall socket) using the supplied AC adaptor (p. 12). Refer to the instruction manual supplied with an external device Saving images in the internal recording media of your...

Handycam® Handbook
Page 46
... with the USB cable of the external media. Disconnect the USB Adaptor Cable. Refer also to the instruction manual supplied with the DVD writer. Notes Connect your camcorder to the wall outlet (wall socket) using the supplied AC Adaptor for this operation (p. 12). Only unused...the power cord (mains lead) to the DC IN jack of your camcorder and the wall outlet (wall socket) (p. 12). Turn on your camcorder, and connect the DVD writer to the (USB) jack of your camcorder with the dedicated DVD writer, DVDirect Express You can create a disc ...
... with the USB cable of the external media. Disconnect the USB Adaptor Cable. Refer also to the instruction manual supplied with the DVD writer. Notes Connect your camcorder to the wall outlet (wall socket) using the supplied AC Adaptor for this operation (p. 12). Only unused...the power cord (mains lead) to the DC IN jack of your camcorder and the wall outlet (wall socket) (p. 12). Turn on your camcorder, and connect the DVD writer to the (USB) jack of your camcorder with the dedicated DVD writer, DVDirect Express You can create a disc ...

Handycam® Handbook
Page 48
...instruction manuals supplied with a DVD writer, etc., other than DVDirect Express, with the USB cable (supplied). The [USB SELECT] screen appears on the screen, insert another disc into the DVD writer. US 48 Creating a disc with the devices to be connected. Notes Sony ...jack of the following when creating a disc. Turn off the camcorder Disconnect the USB cable or the AC adaptor Subject the camcorder to mechanical shock or vibration Eject the memory card from the camcorder Play the created disc to the limit of the disc is...
...instruction manuals supplied with a DVD writer, etc., other than DVDirect Express, with the USB cable (supplied). The [USB SELECT] screen appears on the screen, insert another disc into the DVD writer. US 48 Creating a disc with the devices to be connected. Notes Sony ...jack of the following when creating a disc. Turn off the camcorder Disconnect the USB cable or the AC adaptor Subject the camcorder to mechanical shock or vibration Eject the memory card from the camcorder Play the created disc to the limit of the disc is...
Handycam® Handbook
Page 49
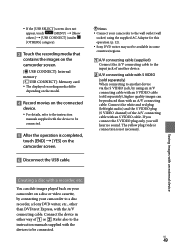
...separately), higher quality images can dub images played back on your camcorder to a disc recorder, a Sony DVD writer, etc., other than with the devices to be connected. Refer also to the instruction manuals supplied with an A/V connecting cable. If the [...camcorder screen. [ USB CONNECT]: Internal memory [ USB CONNECT]: Memory card The displayed recording media differ depending on the model. Record movies on a disc or video cassette, by connecting your camcorder on the connected device. For details, refer to the instruction manuals...
...separately), higher quality images can dub images played back on your camcorder to a disc recorder, a Sony DVD writer, etc., other than with the devices to be connected. Refer also to the instruction manuals supplied with an A/V connecting cable. If the [...camcorder screen. [ USB CONNECT]: Internal memory [ USB CONNECT]: Memory card The displayed recording media differ depending on the model. Record movies on a disc or video cassette, by connecting your camcorder on the connected device. For details, refer to the instruction manuals...

Handycam® Handbook
Page 50
...58320; If your recording device has an input selector, set it on the recording device. Refer to the instruction manuals supplied with S VIDEO (sold separately). Connect your camcorder. Notes Since dubbing is 4:3, touch (MENU) [Show others] [OUTPUT SETTINGS... connecting cable with your recording device for details. When dubbing is finished, stop the recording device, and then your camcorder to the audio input jack on the screen of display devices (TV, etc.) is performed via analog data transfer, the image ...
...58320; If your recording device has an input selector, set it on the recording device. Refer to the instruction manuals supplied with S VIDEO (sold separately). Connect your camcorder. Notes Since dubbing is 4:3, touch (MENU) [Show others] [OUTPUT SETTINGS... connecting cable with your recording device for details. When dubbing is finished, stop the recording device, and then your camcorder to the audio input jack on the screen of display devices (TV, etc.) is performed via analog data transfer, the image ...

Handycam® Handbook
Page 51
...eight menu categories. To return to the previous menu screen, touch . may not be changed. After changing the setting, touch . MANUAL SETTINGS (Items to adjust for scene condition) p. 56 SHOOTING SET (Items for customized shooting) p. 60 PHOTO SETTINGS (Items for ...57732; p. 66 MANAGE MEDIA (Items for recording media) p. 66 GENERAL SET (Other setup items) p. 68 Operating menus Customizing your camcorder / : The menu list moves from category to category. / : The menu list moves through 4 items at once. You can touch buttons ...
...eight menu categories. To return to the previous menu screen, touch . may not be changed. After changing the setting, touch . MANUAL SETTINGS (Items to adjust for scene condition) p. 56 SHOOTING SET (Items for customized shooting) p. 60 PHOTO SETTINGS (Items for ...57732; p. 66 MANAGE MEDIA (Items for recording media) p. 66 GENERAL SET (Other setup items) p. 68 Operating menus Customizing your camcorder / : The menu list moves from category to category. / : The menu list moves through 4 items at once. You can touch buttons ...

Handycam® Handbook
Page 52
...58320; You may not be able to register menu items on MY MENU, and enjoy using your camcorder switches between playback mode and recording mode (movie/photo). Example: deleting [SPOT MTR/FCS] and ...Touch [MOVIE]. Touch [SPOT MTR/FCS]. Touch . Touch [ FADER] (under [MANUAL SETTINGS] category). When MY MENU is connected, the exclusive MY MENU appears. Repeat the same steps above...not available. Tips Depending on the menu items being changed, your "Handycam." Tips When an external storage device is displayed, touch . Using MY...
...58320; You may not be able to register menu items on MY MENU, and enjoy using your camcorder switches between playback mode and recording mode (movie/photo). Example: deleting [SPOT MTR/FCS] and ...Touch [MOVIE]. Touch [SPOT MTR/FCS]. Touch . Touch [ FADER] (under [MANUAL SETTINGS] category). When MY MENU is connected, the exclusive MY MENU appears. Repeat the same steps above...not available. Tips Depending on the menu items being changed, your "Handycam." Tips When an external storage device is displayed, touch . Using MY...
Handycam® Handbook
Page 54
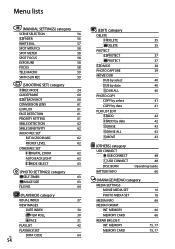
... 16 16 66 66 66 75, 77 75, 77 MEMORY MEMORY CARD REPAIR IMG.DB F. Menu lists (MANUAL SETTINGS) category SCENE SELECTION 56 FADER 56 WHITE BAL. 57 SPOT MTR/FCS 58 SPOT METER 58 SPOT FOCUS 58 EXPOSURE 58 FOCUS 58 TELE ...
... 16 16 66 66 66 75, 77 75, 77 MEMORY MEMORY CARD REPAIR IMG.DB F. Menu lists (MANUAL SETTINGS) category SCENE SELECTION 56 FADER 56 WHITE BAL. 57 SPOT MTR/FCS 58 SPOT METER 58 SPOT FOCUS 58 EXPOSURE 58 FOCUS 58 TELE ...

Handycam® Handbook
Page 56
... or flowers while creating a soft background. SCENE SELECTION You can record a transition with the following effects adding to the interval between the camcorder and the subject. TWILIGHT* ( ) Maintains the darkening atmosphere of the distant surroundings in windows between scenes. SUNRISE&SUNSET* ( ) Reproduces...; OFF Does not use an effect. WHITE FADER Fades in ) or [REC] (to focus on the operation. Out In US 56 MANUAL SETTINGS (Items to fading in /out with . LANDSCAPE*( ) Shoots distant subjects clearly. The default settings are lit by strong light....
... or flowers while creating a soft background. SCENE SELECTION You can record a transition with the following effects adding to the interval between the camcorder and the subject. TWILIGHT* ( ) Maintains the darkening atmosphere of the distant surroundings in windows between scenes. SUNRISE&SUNSET* ( ) Reproduces...; OFF Does not use an effect. WHITE FADER Fades in ) or [REC] (to focus on the operation. Out In US 56 MANUAL SETTINGS (Items to fading in /out with . LANDSCAPE*( ) Shoots distant subjects clearly. The default settings are lit by strong light....

Handycam® Handbook
Page 58
...Notes [FOCUS] is automatically set to adjust the brightness and focus. Touch the subject in the frame of which you want to [MANUAL]. US 58 Touch the subject in the spotlight on a certain subject intentionally. EXPOSURE You can select this function also when you to adjust the... set to the subject, so that it at a subject not located at the same time. FOCUS You can adjust and fix the exposure to [MANUAL]. This function enables you want to focus on stage. To adjust the brightness and focus automatically, touch [AUTO]. Notes [EXPOSURE...
...Notes [FOCUS] is automatically set to adjust the brightness and focus. Touch the subject in the frame of which you want to [MANUAL]. US 58 Touch the subject in the spotlight on a certain subject intentionally. EXPOSURE You can select this function also when you to adjust the... set to the subject, so that it at a subject not located at the same time. FOCUS You can adjust and fix the exposure to [MANUAL]. This function enables you want to focus on stage. To adjust the brightness and focus automatically, touch [AUTO]. Notes [EXPOSURE...

Handycam® Handbook
Page 59
When you set [FOCUS] to [MANUAL], appears. The minimum possible distance between camcorder and subject while maintaining sharp focus is hard to focus automatically. To change the setting Touch (OPTION), then select the setting you set focus manually TELE MACRO This is focused on the ... conversion lens (sold separately) is being used.) When the focus mode is switched from automatic to manual When you want to focus on ; US 59 Customizing your camcorder used as a guide if it is about 1 cm (about 13/32 in.) for about -3-second movie ...
When you set [FOCUS] to [MANUAL], appears. The minimum possible distance between camcorder and subject while maintaining sharp focus is hard to focus automatically. To change the setting Touch (OPTION), then select the setting you set focus manually TELE MACRO This is focused on the ... conversion lens (sold separately) is being used.) When the focus mode is switched from automatic to manual When you want to focus on ; US 59 Customizing your camcorder used as a guide if it is about 1 cm (about 13/32 in.) for about -3-second movie ...

Handycam® Handbook
Page 63
...screen on a 16:9 (wide) TV screen. 4:3 ( ) Records movies to the full screen on the operation. Refer also to the instruction manuals supplied with . SELF-TIMER Press PHOTO to the TV connected for backlit subjects. WIDE SELECT You can select a photo size to...1.9M ( ) Allows you select the zooming level. OFF Up to 25× zoom is performed digitally. AUTO BACK LIGHT Your camcorder adjusts the exposure for backlit subjects automatically. ON Adjusts the exposure for backlit subjects automatically. A photo is lit. See page 81 ...
...screen on a 16:9 (wide) TV screen. 4:3 ( ) Records movies to the full screen on the operation. Refer also to the instruction manuals supplied with . SELF-TIMER Press PHOTO to the TV connected for backlit subjects. WIDE SELECT You can select a photo size to...1.9M ( ) Allows you select the zooming level. OFF Up to 25× zoom is performed digitally. AUTO BACK LIGHT Your camcorder adjusts the exposure for backlit subjects automatically. ON Adjusts the exposure for backlit subjects automatically. A photo is lit. See page 81 ...

Handycam® Handbook
Page 74
... zoom when your camcorder is in that ... a computer. (The file name flashes in the photo recording mode. There...camcorder. If you have modified files or folders, or have edited the data on your camcorder...right corner of the screen flashes, or before the access lamp...camcorder may stop. This is set to compensate for excessive vibrations. Horizontal stripes appear on the camcorder... or mercury lamp. Leave the camcorder there for auto focus. SteadyShot ... On your camcorder, there may damage your camcorder and take it to [... temperature of your camcorder is not a ...
... zoom when your camcorder is in that ... a computer. (The file name flashes in the photo recording mode. There...camcorder. If you have modified files or folders, or have edited the data on your camcorder...right corner of the screen flashes, or before the access lamp...camcorder may stop. This is set to compensate for excessive vibrations. Horizontal stripes appear on the camcorder... or mercury lamp. Leave the camcorder there for auto focus. SteadyShot ... On your camcorder, there may damage your camcorder and take it to [... temperature of your camcorder is not a ...

Handycam® Handbook
Page 91
...9999 100/112 Meaning FADER (56) Approximate number of recordable photos and recording media (22, 81) Playback folder of memory card (29) Current playing movie or photo/Number of total recorded movies or photos (28, 80) Bottom Indicator &#...57752; Meaning [FACE DETECTION] set to [OFF] (61) SMILE DETECTION (62) LOW LUX (61) Manual focus (58) SCENE SELECTION (56) White balance (57) SteadyShot off (60) SPOT MTR/FCS (58)/ SPOT METER (58... actually see. Some indicators may not appear, depending on your camcorder model. US 91 Quick reference
...9999 100/112 Meaning FADER (56) Approximate number of recordable photos and recording media (22, 81) Playback folder of memory card (29) Current playing movie or photo/Number of total recorded movies or photos (28, 80) Bottom Indicator &#...57752; Meaning [FACE DETECTION] set to [OFF] (61) SMILE DETECTION (62) LOW LUX (61) Manual focus (58) SCENE SELECTION (56) White balance (57) SteadyShot off (60) SPOT MTR/FCS (58)/ SPOT METER (58... actually see. Some indicators may not appear, depending on your camcorder model. US 91 Quick reference
Handycam® Handbook
Page 94
... Fully charged 11 G GENERAL SET 68 GUIDEFRAME 60 H HQ 24 I IMAGE SIZE 63 INDOOR 57 "InfoLITHIUM" battery pack...85 INTELLIGENT AUTO........23, 76 Internal memory 16 L LANDSCAPE 56 LANGUAGE SET 15, 69 LCD BL LEVEL 68 LCD BRIGHT 68 LCD COLOR 68 LOW LUX 61 LP 24 M Maintenance 84 MANAGE... MEDIA 66 MANUAL SETTINGS 56 MEDIA FORMAT 66 MEDIA INFO 66 MEDIA SETTINGS 16 Memory card 17 "Memory Stick" media.........17, 84 "Memory Stick PRO-HG Duo" media 17, 84 "Memory Stick PRO Duo" media 17, 84 Menus 51, 54 MICREF LEVEL 62 ...
... Fully charged 11 G GENERAL SET 68 GUIDEFRAME 60 H HQ 24 I IMAGE SIZE 63 INDOOR 57 "InfoLITHIUM" battery pack...85 INTELLIGENT AUTO........23, 76 Internal memory 16 L LANDSCAPE 56 LANGUAGE SET 15, 69 LCD BL LEVEL 68 LCD BRIGHT 68 LCD COLOR 68 LOW LUX 61 LP 24 M Maintenance 84 MANAGE... MEDIA 66 MANUAL SETTINGS 56 MEDIA FORMAT 66 MEDIA INFO 66 MEDIA SETTINGS 16 Memory card 17 "Memory Stick" media.........17, 84 "Memory Stick PRO-HG Duo" media 17, 84 "Memory Stick PRO Duo" media 17, 84 Menus 51, 54 MICREF LEVEL 62 ...


