

Operating Guide
Page 7
... the hard disk from being broken or recorded images from being lost , save your camcorder if necessary (p.13). To view your camcorder • The hard disk of the computer. * Refer to "Handycam Handbook"...screen language before using a VCR, or a DVD/HDD recorder*. • It is not dustproofed, dripproofed or waterproofed. Unauthorized recording of your computer*. Also, you can save your image data using your image data periodically, after recording. Note on use • The camcorder is recommended that you save all your camcorder may damage the hard disk drive...
... the hard disk from being broken or recorded images from being lost , save your camcorder if necessary (p.13). To view your camcorder • The hard disk of the computer. * Refer to "Handycam Handbook"...screen language before using a VCR, or a DVD/HDD recorder*. • It is not dustproofed, dripproofed or waterproofed. Unauthorized recording of your computer*. Also, you can save your image data using your image data periodically, after recording. Note on use • The camcorder is recommended that you save all your camcorder may damage the hard disk drive...

Operating Guide
Page 13
... not appear during playback. POWER switch When using the camcorder for the first time, the [CLOCK SET] screen appears on the hard disc, and can be displayed during recording, but they are automatically recorded on the LCD screen. 1 While pressing the green button, turn on the LCD screen. To reset the date and time Touch (HOME...
... not appear during playback. POWER switch When using the camcorder for the first time, the [CLOCK SET] screen appears on the hard disc, and can be displayed during recording, but they are automatically recorded on the LCD screen. 1 While pressing the green button, turn on the LCD screen. To reset the date and time Touch (HOME...
Operating Guide
Page 17
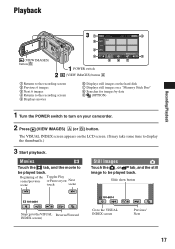
... 4 Returns to the recording screen 5 Displays movies 6 Displays still images on the hard disk 7 Displays still images on a "Memory Stick Duo" 8 Searches for images by date 9 (OPTION) 1 Turn the POWER switch to turn on the LCD screen. (It may take some time to display the thumbnails.) 3 Start playback. The VISUAL INDEX screen appears on your camcorder. 2 Press (VIEW IMAGES) A (or...
... 4 Returns to the recording screen 5 Displays movies 6 Displays still images on the hard disk 7 Displays still images on a "Memory Stick Duo" 8 Searches for images by date 9 (OPTION) 1 Turn the POWER switch to turn on the LCD screen. (It may take some time to display the thumbnails.) 3 Start playback. The VISUAL INDEX screen appears on your camcorder. 2 Press (VIEW IMAGES) A (or...

Operating Guide
Page 20
... operate the POWER switch on . qf (flash) button*2 You can switch the screen display when you press while the power is set to 5 times the original size (Playback zoom). • When you touch the screen during playback zoom, the point you touched will be turned on or off as ... 20 appears.) qk Tripod receptacle (Bottom surface) Attach the tripod (optional: the length of the displayed frame. q; qh NIGHTSHOT switch*2 To record in mirror mode, open the LCD screen 90 degrees to the camcorder (1), then rotate it 180 degrees to OFF (CHG), you can check the remaining battery. When you...
... operate the POWER switch on . qf (flash) button*2 You can switch the screen display when you press while the power is set to 5 times the original size (Playback zoom). • When you touch the screen during playback zoom, the point you touched will be turned on or off as ... 20 appears.) qk Tripod receptacle (Bottom surface) Attach the tripod (optional: the length of the displayed frame. q; qh NIGHTSHOT switch*2 To record in mirror mode, open the LCD screen 90 degrees to the camcorder (1), then rotate it 180 degrees to OFF (CHG), you can check the remaining battery. When you...

Operating Guide
Page 27
...source. Even if a screen prompting you agree, then click [Next]. 8 Set the camcorder onto the Handycam Station, then turn the POWER switch to turn on the connection confirmation screen. The sound is ...drive that your camcorder is set up for your selected country/region. 7 Read [License Agreement], select [I accept the terms of your computer after completing the installation. 27 However, imported images and images on computers fulfilling the above system requirements. • Picture Motion Browser does not support 5.1ch surround sound reproduction. Recording/Playback Hard disk...
...source. Even if a screen prompting you agree, then click [Next]. 8 Set the camcorder onto the Handycam Station, then turn the POWER switch to turn on the connection confirmation screen. The sound is ...drive that your camcorder is set up for your selected country/region. 7 Read [License Agreement], select [I accept the terms of your computer after completing the installation. 27 However, imported images and images on computers fulfilling the above system requirements. • Picture Motion Browser does not support 5.1ch surround sound reproduction. Recording/Playback Hard disk...
Operating Guide
Page 29
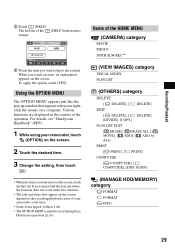
...screen, touch another tab. Items of the operation. If you cannot find the item anywhere, the function does not work under the situation. • The tabs and items that appears when you touch an item, its explanation appears on a computer. Various functions are displayed... PRINT] COMPUTER [ COMPUTER], [ COMPUTER], [DISC BURN] (MANAGE HDD/MEMORY) category FORMAT FORMAT INFO 29 For details, see "Handycam Handbook" (PDF). 1 While using your camcorder, touch (OPTION) on the screen. 2 Touch the desired item. 3 Change the setting, then touch . • When the item you want is not on ...
...screen, touch another tab. Items of the operation. If you cannot find the item anywhere, the function does not work under the situation. • The tabs and items that appears when you touch an item, its explanation appears on a computer. Various functions are displayed... PRINT] COMPUTER [ COMPUTER], [ COMPUTER], [DISC BURN] (MANAGE HDD/MEMORY) category FORMAT FORMAT INFO 29 For details, see "Handycam Handbook" (PDF). 1 While using your camcorder, touch (OPTION) on the screen. 2 Touch the desired item. 3 Change the setting, then touch . • When the item you want is not on ...

Operating Guide
Page 31
...not compensate you press the RESET button, all settings, including the clock setting, are limited. However, your Sony dealer will be deleted. The camcorder does not operate even when the power is automatically turned off (A.SHUT OFF). Delete unnecessary images (p.24).... hard disk of the camcorder, depending on the problem. Leave the camcorder there for your camcorder to be required to the wall outlet (p.11). • Set the camcorder onto the Handycam Station securely (p.11). Cancel Easy Handycam operation. This is displayed. The power abruptly turns off your camcorder ...
...not compensate you press the RESET button, all settings, including the clock setting, are limited. However, your Sony dealer will be deleted. The camcorder does not operate even when the power is automatically turned off (A.SHUT OFF). Delete unnecessary images (p.24).... hard disk of the camcorder, depending on the problem. Leave the camcorder there for your camcorder to be required to the wall outlet (p.11). • Set the camcorder onto the Handycam Station securely (p.11). Cancel Easy Handycam operation. This is displayed. The power abruptly turns off your camcorder ...

Operating Guide
Page 32
...fix by yourself. Some symptoms you cannot activate simultaneously. C:04:00 C:(or E:) ss:ss (Self-diagnosis display) C:04:ss • The battery pack is not a malfunction. Contact your camcorder again. Use an "InfoLITHIUM" battery pack (p.11). • Connect the DC plug of the AC Adaptor ..., see "Handycam Handbook" (PDF). Reconnect it and operate your Sony dealer or local authorized Sony service facility. C:13:ss / C:32:ss • Remove the power source. Inform them of the lens cover may appear on the screen even if the lens cover is closed (DCR-SR42/ SR62/SR82). •...
...fix by yourself. Some symptoms you cannot activate simultaneously. C:04:00 C:(or E:) ss:ss (Self-diagnosis display) C:04:ss • The battery pack is not a malfunction. Contact your camcorder again. Use an "InfoLITHIUM" battery pack (p.11). • Connect the DC plug of the AC Adaptor ..., see "Handycam Handbook" (PDF). Reconnect it and operate your Sony dealer or local authorized Sony service facility. C:13:ss / C:32:ss • Remove the power source. Inform them of the lens cover may appear on the screen even if the lens cover is closed (DCR-SR42/ SR62/SR82). •...


