Handycam® Handbook
Page 1
4-170-094-11(1) DCR-SR68/SR88/SX43/ SX44/SX63 Digital Video Camera Recorder "Handycam" Handbook Table of contents 8 Getting started 11 Recording/Playback 20 Making good use of your 36 camcorder Saving images with an 45 external device Customizing your 53 camcorder Additional information 71 Quick reference 92 2010 Sony Corporation
4-170-094-11(1) DCR-SR68/SR88/SX43/ SX44/SX63 Digital Video Camera Recorder "Handycam" Handbook Table of contents 8 Getting started 11 Recording/Playback 20 Making good use of your 36 camcorder Saving images with an 45 external device Customizing your 53 camcorder Additional information 71 Quick reference 92 2010 Sony Corporation

Handycam® Handbook
Page 11
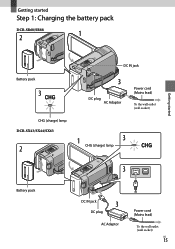
Getting started Step 1: Charging the battery pack DCR-SR68/SR88 Battery pack CHG (charge) lamp DCR-SX43/SX44/SX63 DC IN jack DC plug AC Adaptor Power cord (Mains lead) To the wall outlet (wall socket) CHG (charge) lamp Getting started Battery pack DC IN jack DC plug AC Adaptor Power cord (Mains lead) To the wall outlet (wall socket) US 11
Getting started Step 1: Charging the battery pack DCR-SR68/SR88 Battery pack CHG (charge) lamp DCR-SX43/SX44/SX63 DC IN jack DC plug AC Adaptor Power cord (Mains lead) To the wall outlet (wall socket) CHG (charge) lamp Getting started Battery pack DC IN jack DC plug AC Adaptor Power cord (Mains lead) To the wall outlet (wall socket) US 11
Handycam® Handbook
Page 13
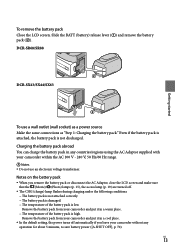
... When you leave your camcorder without any countries/regions using the AC Adaptor supplied with your camcorder and put it in any operation for about 5 minutes, to save battery power ([A.SHUT OFF], p. 70). US 13 DCR-SR68/SR88 DCR-SX43/SX44/SX63 To use an electronic voltage transformer.... Remove the battery pack from your camcorder within the AC 100 V - 240 V, 50 Hz/60 Hz range. Notes Do ...
... When you leave your camcorder without any countries/regions using the AC Adaptor supplied with your camcorder and put it in any operation for about 5 minutes, to save battery power ([A.SHUT OFF], p. 70). US 13 DCR-SR68/SR88 DCR-SX43/SX44/SX63 To use an electronic voltage transformer.... Remove the battery pack from your camcorder within the AC 100 V - 240 V, 50 Hz/60 Hz range. Notes Do ...

Handycam® Handbook
Page 19
... displayed, initialize the memory card by touching (MENU) [Show others] [MEDIA FORMAT] (under [MANAGE MEDIA] category) [MEMORY CARD] (DCR-SR68/SR88/SX44/ SX63) [YES] [YES] . DCR-SR68/SR88 Access lamp DCR-SX43/SX44/SX63 Note direction of notched corner. In that case, touch [YES]. If you record only photos on the memory card, touch [NO]. ...
... displayed, initialize the memory card by touching (MENU) [Show others] [MEDIA FORMAT] (under [MANAGE MEDIA] category) [MEMORY CARD] (DCR-SR68/SR88/SX44/ SX63) [YES] [YES] . DCR-SR68/SR88 Access lamp DCR-SX43/SX44/SX63 Note direction of notched corner. In that case, touch [YES]. If you record only photos on the memory card, touch [NO]. ...

Handycam® Handbook
Page 20
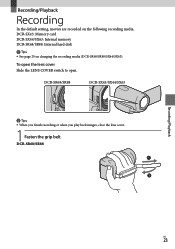
Recording/Playback Recording In the default setting, movies are recorded on changing the recording media (DCR-SR68/SR88/SX44/SX63). DCR-SR68/SR88 DCR-SX43/SX44/SX63 Tips When you finish recording or when you play back images, close the lens cover. 1 Fasten the grip belt. To open the lens cover Slide the LENS COVER switch to open. DCR-SR68/SR88 US 20 DCR-SX43: Memory card DCR-SX44/SX63: Internal memory DCR-SR68/SR88: Internal hard disk Tips See page 17 on the following recording media.
Recording/Playback Recording In the default setting, movies are recorded on changing the recording media (DCR-SR68/SR88/SX44/SX63). DCR-SR68/SR88 DCR-SX43/SX44/SX63 Tips When you finish recording or when you play back images, close the lens cover. 1 Fasten the grip belt. To open the lens cover Slide the LENS COVER switch to open. DCR-SR68/SR88 US 20 DCR-SX43: Memory card DCR-SX44/SX63: Internal memory DCR-SR68/SR88: Internal hard disk Tips See page 17 on the following recording media.
Handycam® Handbook
Page 21
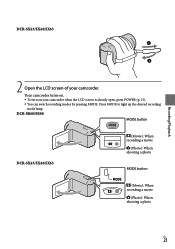
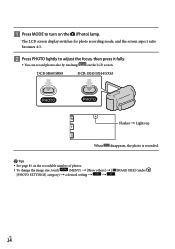
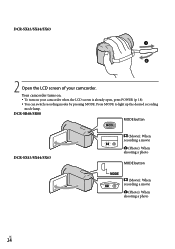
DCR-SR68/SR88 MODE button DCR-SX43/SX44/SX63 (Movie): When recording a movie (Photo): When shooting a photo MODE button (Movie): When recording a movie (Photo): When shooting a photo US 21 Press MODE to light up the desired recording mode lamp. DCR-SX43/SX44/SX63 Recording/Playback 2 Open the LCD screen of your camcorder when the LCD screen is already open, press POWER (p. 15). You can switch recording modes by pressing MODE. Your camcorder turns on. To turn on your camcorder.
DCR-SR68/SR88 MODE button DCR-SX43/SX44/SX63 (Movie): When recording a movie (Photo): When shooting a photo MODE button (Movie): When recording a movie (Photo): When shooting a photo US 21 Press MODE to light up the desired recording mode lamp. DCR-SX43/SX44/SX63 Recording/Playback 2 Open the LCD screen of your camcorder when the LCD screen is already open, press POWER (p. 15). You can switch recording modes by pressing MODE. Your camcorder turns on. To turn on your camcorder.

Handycam® Handbook
Page 22
...(movie/photo)/playback modes. Recording movies Press START/STOP to start recording. You can start recording after turning on your camcorder during this time. DCR-SR68/SR88 DCR-SX43/SX44/SX63 START/STOP button [STBY] [REC] To stop recording also by touching in the bottom left of LCD ...LCD. Rec & zoom buttons on LCD about 3sec after Notes If you close the LCD screen while recording movies, the camcorder stops recording. The maximum continuous recordable time of movies is about 13 hours. When a movie file exceeds 2 GB,...
...(movie/photo)/playback modes. Recording movies Press START/STOP to start recording. You can start recording after turning on your camcorder during this time. DCR-SR68/SR88 DCR-SX43/SX44/SX63 START/STOP button [STBY] [REC] To stop recording also by touching in the bottom left of LCD ...LCD. Rec & zoom buttons on LCD about 3sec after Notes If you close the LCD screen while recording movies, the camcorder stops recording. The maximum continuous recordable time of movies is about 13 hours. When a movie file exceeds 2 GB,...
Handycam® Handbook
Page 24
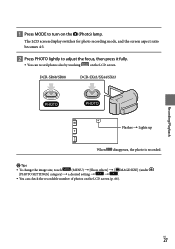
The LCD screen display switches for photo recording mode, and the screen aspect ratio becomes 4:3. Press PHOTO lightly to turn on the (Photo) lamp. DCR-SR68/SR88 DCR-SX43/SX44/SX63 Flashes Lights up When disappears, the photo is recorded. Tips See page 81 on the recordable number of photos. To change ...
The LCD screen display switches for photo recording mode, and the screen aspect ratio becomes 4:3. Press PHOTO lightly to turn on the (Photo) lamp. DCR-SR68/SR88 DCR-SX43/SX44/SX63 Flashes Lights up When disappears, the photo is recorded. Tips See page 81 on the recordable number of photos. To change ...
Handycam® Handbook
Page 33
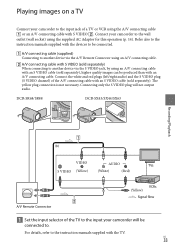
... separately), higher quality images can be produced than with S VIDEO . DCR-SR68/SR88 DCR-SX43/SX44/SX63 Recording/Playback IN VIDEO AUDIO TVs S VIDEO (Yellow) (White) (Red) VCRs (Yellow) Signal flow A/V Remote Connector Set the input selector of the TV to the input your camcorder to the wall outlet (wall socket) using the supplied AC Adaptor...
... separately), higher quality images can be produced than with S VIDEO . DCR-SR68/SR88 DCR-SX43/SX44/SX63 Recording/Playback IN VIDEO AUDIO TVs S VIDEO (Yellow) (White) (Red) VCRs (Yellow) Signal flow A/V Remote Connector Set the input selector of the TV to the input your camcorder to the wall outlet (wall socket) using the supplied AC Adaptor...
Handycam® Handbook
Page 51
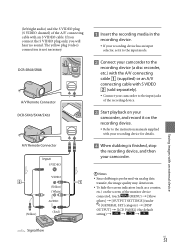
DCR-SR68/SR88 A/V Remote Connector DCR-SX43/SX44/SX63 A/V Remote Connector Input S VIDEO (Yellow) VIDEO (Yellow) (White) AUDIO (Red) Insert the recording media in the recording device. If your recording device has an input selector, set it to the input mode. Connect your camcorder to ...instruction manuals supplied with your recording device for details. When dubbing is finished, stop the recording device, and then your camcorder. Notes Since dubbing is not necessary. (left/right audio) and the S VIDEO plug (S VIDEO channel) ...
DCR-SR68/SR88 A/V Remote Connector DCR-SX43/SX44/SX63 A/V Remote Connector Input S VIDEO (Yellow) VIDEO (Yellow) (White) AUDIO (Red) Insert the recording media in the recording device. If your recording device has an input selector, set it to the input mode. Connect your camcorder to ...instruction manuals supplied with your recording device for details. When dubbing is finished, stop the recording device, and then your camcorder. Notes Since dubbing is not necessary. (left/right audio) and the S VIDEO plug (S VIDEO channel) ...
Handycam® Handbook
Page 80
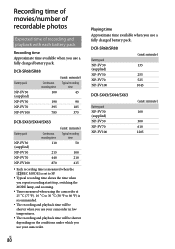
...NP-FV100 (unit: minute) 135 255 525 1045 DCR-SX43/SX44/SX63 Battery pack NP-FV30 (supplied) NP-FV50 NP-FV70 NP-FV100 (unit: minute) 160 300 610 1205 US 80 Playing time Approximate time available when you use your camcorder. DCR-SR68/SR88 Battery pack NP-FV30 (supplied) NP-FV50 NP...-FV70 NP-FV100 Continuous recording time 100 (unit: minute) Typical recording time 45 190 90 395 185 785 375 DCR-SX43/SX44/SX63 Battery pack NP-FV30 (supplied) NP-FV50 NP...
...NP-FV100 (unit: minute) 135 255 525 1045 DCR-SX43/SX44/SX63 Battery pack NP-FV30 (supplied) NP-FV50 NP-FV70 NP-FV100 (unit: minute) 160 300 610 1205 US 80 Playing time Approximate time available when you use your camcorder. DCR-SR68/SR88 Battery pack NP-FV30 (supplied) NP-FV50 NP...-FV70 NP-FV100 Continuous recording time 100 (unit: minute) Typical recording time 45 190 90 395 185 785 375 DCR-SX43/SX44/SX63 Battery pack NP-FV30 (supplied) NP-FV50 NP...

Handycam® Handbook
Page 93
DCR-SR68/SR88 Speaker (VIEW IMAGES) button (27) (DISC BURN) button (see Operating Guide) POWER button (15) RESET button Press RESET using a pointed ... to light up the LIGHT. (USB) jack (49) US 93 Quick reference DCR-SR68/SR88 Built-in microphone Lens (Carl Zeiss lens) LENS COVER switch LED VIDEO LIGHT (26) A/V Remote Connector (33) DCR-SX43/SX44/SX63 Speaker Lens (Carl Zeiss lens) LENS COVER switch LED VIDEO...
DCR-SR68/SR88 Speaker (VIEW IMAGES) button (27) (DISC BURN) button (see Operating Guide) POWER button (15) RESET button Press RESET using a pointed ... to light up the LIGHT. (USB) jack (49) US 93 Quick reference DCR-SR68/SR88 Built-in microphone Lens (Carl Zeiss lens) LENS COVER switch LED VIDEO LIGHT (26) A/V Remote Connector (33) DCR-SX43/SX44/SX63 Speaker Lens (Carl Zeiss lens) LENS COVER switch LED VIDEO...

Handycam® Handbook
Page 94
... Hook for a shoulder belt BATT (battery) release lever (13) Tripod receptacle Attach a tripod (sold separately) to the tripod receptacle using a pointed object. DCR-SX43/SX44/SX63 DCR-SR68/SR88 (VIEW IMAGES) button (27) (DISC BURN) button (see Operating Guide) POWER button (15) RESET button Press RESET using a tripod screw (... of the screw must be less than 5.5 mm (7/32 in.)). Access lamp (memory card) (18) While the lamp is lit or flashing, the camcorder is reading or writing data. Memory card slot (18) US 94
... Hook for a shoulder belt BATT (battery) release lever (13) Tripod receptacle Attach a tripod (sold separately) to the tripod receptacle using a pointed object. DCR-SX43/SX44/SX63 DCR-SR68/SR88 (VIEW IMAGES) button (27) (DISC BURN) button (see Operating Guide) POWER button (15) RESET button Press RESET using a tripod screw (... of the screw must be less than 5.5 mm (7/32 in.)). Access lamp (memory card) (18) While the lamp is lit or flashing, the camcorder is reading or writing data. Memory card slot (18) US 94

Operating Guide
Page 1
http://www.sony.net/ Printed in China US/ES 4-170-098-11(1) DCR-SR68/SR88/SX43/SX44/SX63 Digital Video Camera Recorder Operating Guide US Guía de operaciones ES 2010 Sony Corporation Additional information on this product and answers to frequently asked questions can be found at our Customer Support Website.
http://www.sony.net/ Printed in China US/ES 4-170-098-11(1) DCR-SR68/SR88/SX43/SX44/SX63 Digital Video Camera Recorder Operating Guide US Guía de operaciones ES 2010 Sony Corporation Additional information on this product and answers to frequently asked questions can be found at our Customer Support Website.
Operating Guide
Page 15
Getting started Step 1: Charging the battery pack DCR-SR68/SR88 Battery pack CHG (charge) lamp DCR-SX43/SX44/SX63 DC IN jack DC plug AC Adaptor Power cord (Mains lead) To the wall outlet (wall socket) CHG (charge) lamp Getting started Battery pack DC IN jack DC plug AC Adaptor Power cord (Mains lead) To the wall outlet (wall socket) US 15
Getting started Step 1: Charging the battery pack DCR-SR68/SR88 Battery pack CHG (charge) lamp DCR-SX43/SX44/SX63 DC IN jack DC plug AC Adaptor Power cord (Mains lead) To the wall outlet (wall socket) CHG (charge) lamp Getting started Battery pack DC IN jack DC plug AC Adaptor Power cord (Mains lead) To the wall outlet (wall socket) US 15

Operating Guide
Page 22
... displayed, initialize the memory card by touching (MENU) [Show others ] [MOVIE DUB]/[PHOTO COPY] (under [MANAGE MEDIA] category) [MEMORY CARD] (DCR-SR68/SR88/SX44/ SX63) [YES] [YES] . It may appear if you insert a new memory card. To eject the memory card Open the cover and lightly push... copying movies and photos from the internal recording media to create a new Image Database File. If you record only photos on the screen. DCR-SR68/SR88 Access lamp DCR-SX43/SX44/SX63 A cc e s s lamp Note direction of notched corner.
... displayed, initialize the memory card by touching (MENU) [Show others ] [MOVIE DUB]/[PHOTO COPY] (under [MANAGE MEDIA] category) [MEMORY CARD] (DCR-SR68/SR88/SX44/ SX63) [YES] [YES] . It may appear if you insert a new memory card. To eject the memory card Open the cover and lightly push... copying movies and photos from the internal recording media to create a new Image Database File. If you record only photos on the screen. DCR-SR68/SR88 Access lamp DCR-SX43/SX44/SX63 A cc e s s lamp Note direction of notched corner.
Operating Guide
Page 23
DCR-SR68/SR88 DCR-SX43/SX44/SX63 Tips When you finish recording or when you play back images, close the lens cover. 1 Fasten the grip belt. DCR-SR68/SR88 Recording/Playback US 23 DCR-SX43: Memory card DCR-SX44/SX63: Internal memory DCR-SR68/SR88: Internal hard disk Tips See page 20 on the following recording media. To open the lens cover Slide the LENS COVER switch to open. Recording/Playback Recording In the default setting, movies are recorded on changing the recording media (DCR-SR68/SR88/SX44/SX63).
DCR-SR68/SR88 DCR-SX43/SX44/SX63 Tips When you finish recording or when you play back images, close the lens cover. 1 Fasten the grip belt. DCR-SR68/SR88 Recording/Playback US 23 DCR-SX43: Memory card DCR-SX44/SX63: Internal memory DCR-SR68/SR88: Internal hard disk Tips See page 20 on the following recording media. To open the lens cover Slide the LENS COVER switch to open. Recording/Playback Recording In the default setting, movies are recorded on changing the recording media (DCR-SR68/SR88/SX44/SX63).
Operating Guide
Page 24
Your camcorder turns on. To turn on your camcorder. DCR-SR68/SR88 MODE button DCR-SX43/SX44/SX63 (Movie): When recording a movie (Photo): When shooting a photo MODE button (Movie): When recording a movie (Photo): When shooting a photo US 24 Press MODE to light up the desired recording mode lamp. DCR-SX43/SX44/SX63 2 Open the LCD screen of your camcorder when the LCD screen is already open, press POWER (p. 18). You can switch recording modes by pressing MODE.
Your camcorder turns on. To turn on your camcorder. DCR-SR68/SR88 MODE button DCR-SX43/SX44/SX63 (Movie): When recording a movie (Photo): When shooting a photo MODE button (Movie): When recording a movie (Photo): When shooting a photo US 24 Press MODE to light up the desired recording mode lamp. DCR-SX43/SX44/SX63 2 Open the LCD screen of your camcorder when the LCD screen is already open, press POWER (p. 18). You can switch recording modes by pressing MODE.

Operating Guide
Page 25
You cannot operate your camcorder or switching the recording (movie/photo)/playback modes. DCR-SR68/SR88 DCR-SX43/SX44/SX63 START/STOP button [STBY] [REC] To stop recording also by touching in the bottom left of the LCD screen. Rec & ...zoom buttons on LCD about 3 seconds, then disappear after Notes If you turn on the camcorder. US 25 Recording/Playback ...
You cannot operate your camcorder or switching the recording (movie/photo)/playback modes. DCR-SR68/SR88 DCR-SX43/SX44/SX63 START/STOP button [STBY] [REC] To stop recording also by touching in the bottom left of the LCD screen. Rec & ...zoom buttons on LCD about 3 seconds, then disappear after Notes If you turn on the camcorder. US 25 Recording/Playback ...
Operating Guide
Page 27
... switches for photo recording mode, and the screen aspect ratio becomes 4:3. Press PHOTO lightly to turn on the (Photo) lamp. Recording/Playback US 27 DCR-SR68/SR88 DCR-SX43/SX44/SX63 Flashes Lights up When disappears, the photo is recorded. Tips To change the image size, touch (MENU) [Show others] [ IMAGE...
... switches for photo recording mode, and the screen aspect ratio becomes 4:3. Press PHOTO lightly to turn on the (Photo) lamp. Recording/Playback US 27 DCR-SR68/SR88 DCR-SX43/SX44/SX63 Flashes Lights up When disappears, the photo is recorded. Tips To change the image size, touch (MENU) [Show others] [ IMAGE...


